
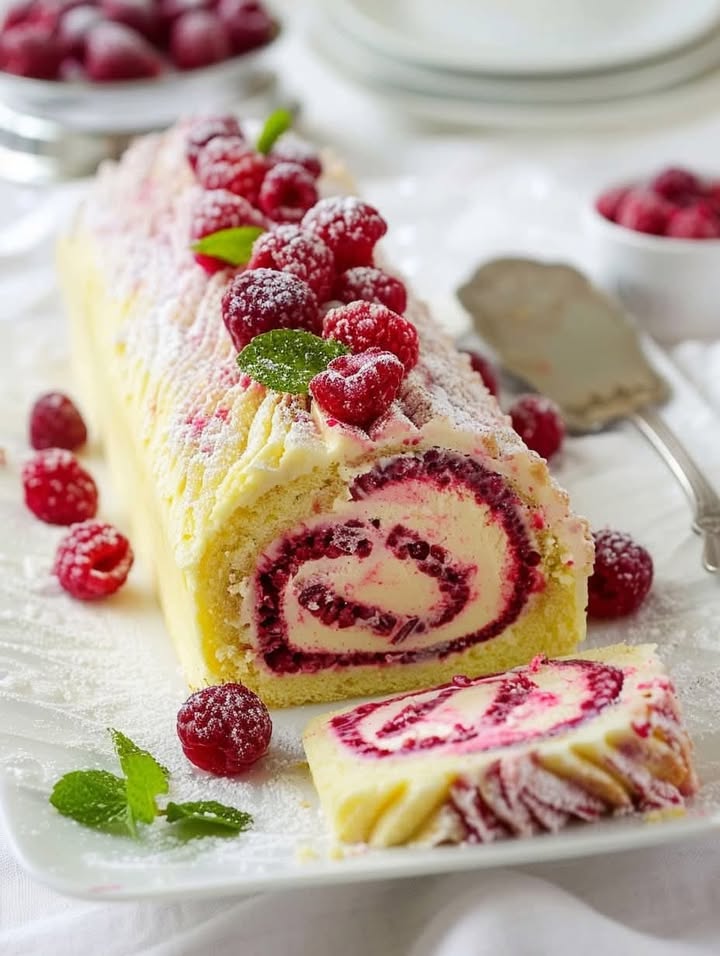
The Raspberry Chocolate Roll: My Favorite Fancy-But-Easy Dessert
Have you ever wanted to impress a crowd but felt short on time and energy? I have been there more times than I can count! That’s why this Raspberry Chocolate Cake Roll is my secret weapon. It looks like it came from a high-end bakery, with its elegant swirl and beautiful dusting of powdered sugar. But the truth is, it’s a wonderfully simple treat to make at home. The rich chocolate sponge cake hugs a light, creamy filling bursting with fresh raspberries and melty chocolate chips. One bite, and you’ll be hooked.
A Little Slice of Cake History
The idea of a rolled cake, or “roulade,” has been charming bakers for centuries. While many cultures have their own version, the chocolate roll has a special place in American dessert history. Think of the classic Yule Log at Christmas! Our modern take, this Raspberry Chocolate Roll, swaps the heavy buttercream for a fluffy whipped cream filling. It’s lighter, fresher, and lets the tart raspberries truly shine against the deep chocolate. It’s a beautiful blend of tradition and a bright, modern twist that my family adores.
Why You’ll Adore This Chocolate Raspberry Swirl
Honestly, this recipe is a winner for so many reasons. First, it’s surprisingly simple—no fancy layers to stack. Second, it’s incredibly versatile; serve it at a birthday party or a casual weekend treat. Third, the flavor combination is pure magic. The bittersweet cocoa cake, the sweet cream, the pop of tart berry, and the pockets of chocolate create a perfect balance. It’s a dessert that feels special without requiring you to be a pastry chef. It’s the kind of recipe that makes people ask, “When are you making that again?”
Perfect Occasions for Your Cake Roll
This Raspberry Chocolate Roll is your go-to dessert for so many moments. It’s a stunning centerpiece for holiday dinners like Thanksgiving or Christmas. It’s light enough for a spring brunch or a baby shower tea party. I love bringing it to potlucks because it slices so beautifully and feeds a crowd. Honestly, any Tuesday night becomes a celebration with a slice of this cake and a cup of coffee. It’s that good.
What You’ll Need: Ingredients List
Gathering your ingredients is the first happy step. You likely have most of these in your pantry already!
For the Chocolate Cake:
- 3/4 cup all-purpose flour
- 1/4 cup unsweetened cocoa powder
- 1 teaspoon baking powder
- 1/4 teaspoon salt
- 4 large eggs
- 3/4 cup granulated sugar
- 1 teaspoon vanilla extract
- Powdered sugar for dusting
For the Whipped Cream Filling:
- 1 cup heavy cream
- 1/4 cup powdered sugar
- 1 teaspoon vanilla extract
- 1 cup fresh raspberries
- 1/2 cup chocolate chips
Easy Swaps: Substitution Ideas
No raspberries? No problem! This recipe is wonderfully adaptable.
- Berries: Swap raspberries for sliced strawberries, blackberries, or a mix of your favorite summer berries.
- Chocolate Chips: Use white chocolate chips, dark chocolate chunks, or even chopped nuts for a different crunch.
- Cocoa Powder: For a deeper flavor, try using Dutch-process cocoa powder.
- Dairy-Free: Use a chilled coconut cream for the whipped cream and dairy-free chocolate chips.
How to Make Your Raspberry Chocolate Roll: A Step-by-Step Guide
Follow these simple steps, and you’ll have a gorgeous dessert in no time. The key is not to rush and to have fun with it!
Step 1: Get Your Pan Ready
First, preheat your oven to 350°F (175°C). Line your 10×15-inch jelly roll pan with parchment paper. I leave a bit of an overhang on the long sides—it makes lifting the cake out so much easier later. A quick spritz of cooking spray under the parchment helps it stay put. Having everything ready before you start mixing is my best advice.
Step 2: Mix the Dry Ingredients
In a medium bowl, grab your whisk and sift together the flour, cocoa powder, baking powder, and salt. Sifting is important here! It gets rid of any lumps in the cocoa and makes the cake lighter. The dark cocoa powder mixed with the white flour looks like a painter’s palette. Set this beautiful dry mixture aside for a moment.
Step 3: Beat Eggs and Sugar to Perfection
This is the magic step. In a large bowl, beat the eggs and granulated sugar together with an electric mixer. You want to beat them for a good 4-5 minutes, until the mixture is thick, pale yellow, and forms a ribbon when you lift the beaters. It should look almost like a very liquid marshmallow fluff. This volume is what gives the cake its airy, flexible texture. Stir in the vanilla extract at the end.
Pro tip: Use room temperature eggs for maximum volume. They whip up much better than cold ones!
Step 4: Gently Fold In the Flour
Now, take your sifted dry ingredients and sprinkle them over the fluffy egg mixture in three parts. Use a big spatula and fold gently. You want to combine everything without knocking out all those precious air bubbles you just whipped in. The batter will be glossy and smooth, like a thick chocolate sauce. Spread it evenly into your prepared pan with the spatula.
Step 5: Bake Until Springy
Slide the pan into your preheated oven. Bake for 12 to 15 minutes. You’ll know it’s done when the top looks set and springs back lightly when you touch it. Your kitchen will smell amazing! Be careful not to overbake, as a dry cake is harder to roll. This is a quick bake, so set a timer.
Step 6: Prepare for the Roll
While the cake bakes, lay a clean, lint-free kitchen towel flat on your counter. Generously dust it with powdered sugar. This sugar layer will prevent the warm cake from sticking to the towel. It’s like creating a little cloud for your cake to land on.
Step 7: The Big Flip and Roll
As soon as the cake comes out of the oven, carefully run a knife around the edges. Invert it directly onto your sugared towel. The cake will release from the pan. Now, slowly and carefully peel off the parchment paper. Starting from one of the short ends, use the towel to gently but firmly roll the cake up. Roll the cake and the towel together into a spiral. Let this rolled-up bundle cool completely on a rack. This step “trains” the cake to hold its rolled shape.
Step 8: Make the Dreamy Filling
While the cake cools, make your filling. In a chilled bowl, beat the heavy cream, powdered sugar, and vanilla extract until stiff peaks form. This means when you lift the beaters, the cream stands up straight. Be careful not to overbeat, or you’ll get butter! The cream should be thick, smooth, and hold its shape perfectly.
Step 9: Unroll, Fill, and Re-Roll
Once the cake is cool, carefully unroll it. It will lay flat. Spread the whipped cream evenly over the entire surface, leaving a small border at the edges. Now, scatter the fresh raspberries and chocolate chips all over the cream. Gently roll the cake back up, this time without the towel inside. Don’t worry if it cracks a little—that’s part of its homemade charm! The filling will peek out beautifully.
Step 10: Chill and Serve
Wrap your beautiful Raspberry Chocolate Roll in plastic wrap. Refrigerate it for at least one hour. This resting time allows the cake to set firmly, making it much easier to slice cleanly. When you’re ready to serve, unwrap it, place it on a serving platter, and give it a final, snowy dusting of powdered sugar just before slicing.
Chef’s Secret Tip
My secret for a crack-free roll? Roll the cake up while it’s still warm. The heat makes the sponge more flexible. Letting it cool in that rolled shape with the towel is the key to a perfect spiral when you add the filling later.
Your Baking Timeline
Here’s a quick breakdown of the time you’ll need:
- Prep Time: 20 minutes
- Baking Time: 12-15 minutes
- Cooling Time: About 1 hour
- Chilling Time: At least 1 hour
- Total Time: Approximately 2 hours (mostly hands-off)
- Servings: 8-10 elegant slices
A Sweet Little Fact
Did you know the raspberry’s bright flavor comes from a perfect balance of natural sugars and acids? This is why they pair so brilliantly with rich chocolate. The berry cuts through the sweetness and adds a fresh, fruity note that makes you go back for just one more slice.
Kitchen Tools You’ll Need
You don’t need any special equipment for this recipe:
- 10×15-inch Jelly Roll Pan
- Parchment Paper
- Stand Mixer or Hand Mixer
- Mixing Bowls
- Sifter or Fine Mesh Strainer
- Clean Kitchen Towel
- Spatula
- Wire Cooling Rack
How to Store Your Leftover Cake Roll
If you have any leftovers (a big if in my house!), store the cake roll tightly wrapped in plastic wrap in the refrigerator. The whipped cream filling means it must stay chilled. It will stay fresh and delicious for up to 2-3 days.
For longer storage, you can freeze individual slices. Wrap each slice tightly in plastic wrap and then place them in a freezer bag or airtight container. They can be frozen for up to a month. Thaw slices in the refrigerator overnight before serving.
I do not recommend storing this cake at room temperature due to the dairy-based filling. Always keep it cold to maintain the best texture and food safety.
My Best Tips for Success
- Measure your flour correctly. Spoon it into the cup and level it off. Don’t scoop directly from the bag.
- Make sure your eggs are at room temperature for the best volume when beating.
- Don’t skip dusting the towel with powdered sugar. It’s your insurance against sticking.
- Roll the cake with the towel while it’s still warm. This is the most important step for a flexible cake.
- Use fresh, firm raspberries. If they’re too soft, they might bleed too much juice into the cream.
Make It Look Like a Million Bucks
Presentation is half the fun!
- Dust with powdered sugar and cocoa powder in a pretty pattern using a stencil.
- Arrange a few extra fresh raspberries and mint leaves on the plate next to each slice.
- Drizzle individual slices with a little melted chocolate or raspberry sauce.
- Serve on a beautiful cake stand or a simple wooden board for a rustic look.
Try These Other Delicious Variations!
Love this concept? Here are some other fantastic spin-off recipes you can try for different occasions:
- Lemon Berry Roll: Swap the cocoa powder for flour, add lemon zest to the batter, and fill with lemon cream and mixed berries.
- Pumpkin Spice Roll: A fall favorite! Use pumpkin puree and warm spices in the cake, and fill with cream cheese frosting.
- Mocha Roll: Add a tablespoon of instant espresso powder to the cocoa mixture and fill with mocha-flavored whipped cream.
- Peppermint Chocolate Roll: Perfect for the holidays. Add crushed peppermint candies to the chocolate filling and garnish with candy canes.
- Tropical Coconut Roll: Use a vanilla cake, fill with coconut cream, and top with toasted coconut and diced mango.
- Chocolate Orange Roll: Add orange zest to the chocolate batter and a touch of orange liqueur to the whipped cream for a sophisticated twist.
More Decadent Desserts to Explore
If you love combining chocolate and creamy elements, you might also adore our ultimate Cookie Dough Brownies, a true crowd-pleaser. For a frozen treat, our Chocolate Chip Cookie Dough Ice Cream Cake is pure summer joy. And if you’re a fan of classic comfort, our Banana Pudding Cake is like a hug in dessert form. Feeling ambitious? Try the layered wonder of our Cookie Dough Ice Cream Cake Rolls.
Common Mistakes to Avoid
Avoiding these few pitfalls will guarantee you a perfect roll every single time.
Mistake 1: Overbaking the Cake
This is the number one reason cakes crack badly when rolled. An overbaked sponge loses its moisture and flexibility, becoming brittle. It’s meant to be soft and springy. Set your timer for the minimum time and start checking. The cake is done when the top feels firm but springs back immediately when you lightly press it. Remember, it will continue to cook a tiny bit from residual heat out of the oven.
Mistake 2: Letting the Cake Cool Before the First Roll
Waiting to roll the cake until it’s cool is a sure path to cracks. You must roll it with the towel while it is still warm and pliable. The heat allows the structure to bend and set in that rolled shape. Rolling it warm “trains” its memory, so when you unroll it later for filling, it happily goes back into a spiral.
Mistake 3: Using a Warm Filling
Your whipped cream filling must be cold and your cake must be completely cooled before you assemble. If either is warm, the whipped cream will start to melt and weep into the cake. This makes a soggy roll that is hard to slice. It also causes the cream to lose its shape. Always chill your bowl and beaters before whipping the cream, and be patient while the cake cools down.
Mistake 4: Overfilling the Roll
It’s tempting to pile on that delicious filling, but less is more here. A thick, overflowing layer of cream and berries puts too much pressure on the cake as you roll. This can cause the cake to split or the filling to squish out the ends. Spread a thin, even layer, leaving about a half-inch border on all sides. The result is a neat, tight spiral in every slice.
Mistake 5: Skipping the Chilling Step Before Slicing
You’ve rolled it, and you’re eager to taste it—I get it! But slicing right away is messy. The filling hasn’t had time to set, and the cake is still soft from being handled. Wrapping it tightly and refrigerating for that crucial hour firms everything up. This gives you those clean, beautiful slices where you can see every lovely layer.
Balancing Your Sweet Treats
Desserts like this Raspberry Chocolate Roll are a wonderful part of a joyful life. For guidance on balancing all food groups for a healthy lifestyle, you can find great tips on creating a balanced plate from trusted sources. Enjoying treats mindfully alongside nutritious meals is my personal philosophy.
For more baking inspiration and cake ideas just like this one, be sure to browse our entire collection of favorite cake and cupcake recipes. We’re always adding new family-tested delights!
Your Raspberry Chocolate Roll Questions, Answered
Can I make this cake roll a day ahead?
Absolutely! In fact, making it a day ahead is a fantastic idea. The flavors have more time to meld together, and the cake firms up beautifully for slicing. Just be sure to wrap it tightly in plastic wrap after it’s assembled and chilled. Store it in the refrigerator. Before serving, let it sit at room temperature for about 15-20 minutes to take the chill off, then dust with fresh powdered sugar. The texture and taste might even be better on the second day.
My cake cracked when I rolled it. What did I do wrong?
Don’t worry, a small crack is common and doesn’t ruin the dessert! It usually means one of two things. First, the cake might have been slightly overbaked and dried out. Next time, bake for a minute or two less. Second, you may have waited too long to roll it after it came out of the oven. Remember to roll it with the towel immediately while it’s still warm and flexible. Even with a crack, once you roll it with the filling, it will still taste amazing. A dusting of powdered sugar covers a multitude of sins!
Can I use frozen raspberries instead of fresh?
You can, but with a very important step: they must be completely thawed and thoroughly drained. Frozen berries release a lot of water as they thaw. If you add them to the filling while they’re still wet, that extra liquid will make your whipped cream runny and can soggy the cake. Thaw them in a strainer over a bowl, and pat them very dry with paper towels before using.
Why do I need to roll the cake with a towel?
The towel serves two crucial purposes. First, the powdered sugar you dust on it prevents the warm, sticky cake surface from adhering to itself. This allows you to unroll it later without tearing. Second, rolling it while warm in the towel shapes the cake’s “muscle memory.” It cools and sets in that spiral shape. When you later unroll it to add filling, it naturally wants to go back to that roll, giving you a perfect, tight spiral with the filling neatly tucked inside.
Can I use a different size pan?
The 10×15-inch jelly roll pan is specifically designed for this type of cake to get the right thickness. If you use a larger pan, your cake will be too thin and likely burn or become too brittle to roll. If you use a smaller pan, the batter will be too thick, resulting in a undercooked center or a cake too stiff to roll properly. I highly recommend using the correct size pan for the best results. It’s a worthwhile investment for perfect roll cakes.
How do I know when the whipped cream has “stiff peaks”?
Stiff peaks mean that when you lift the beaters out of the whipped cream, the cream forms distinct, firm peaks that stand straight up and hold their shape. They should not droop over at the tips. Be careful not to go beyond this point to “overbeaten,” where the cream looks grainy and starts to separate into butter and buttermilk. Using a chilled bowl and beaters helps you achieve stiff peaks faster and more reliably.
What can I do with the egg yolks if I only use whites?
This recipe uses whole eggs, so no yolks are left over! But if you were making a different roll cake that used only whites, you could save the yolks for a rich custard, homemade ice cream, or use them to make a delicious lemon curd. They can be stored in an airtight container in the fridge for a couple of days.
Can I make this recipe gluten-free?
Yes, you can! Use a good-quality 1-to-1 gluten-free all-purpose flour blend that contains xanthan gum. Be sure to sift it well with the cocoa powder, as gluten-free flour can be clumpier. The baking process and times should remain the same. I’ve had great success with this swap for friends with gluten sensitivities.
My cake stuck to the parchment paper. How do I prevent that?
To prevent sticking, make sure your parchment paper is properly greased or that you’ve used a non-stick spray on the pan underneath it. Also, don’t let the cake cool in the pan before flipping it. Flip it onto the sugared towel as soon as it comes out of the oven, while it’s still steaming hot. The heat helps it release. If a small piece sticks, don’t panic; just patch it with a little filling later.
Can I add other fruits or fillings?
Please do! This recipe is a wonderful canvas. Try sliced strawberries, chopped peaches, or even a layer of lemon curd under the whipped cream. You could fold mini chocolate chips or chopped toasted nuts into the whipped cream itself. Swap the vanilla in the cream for a bit of almond or mint extract. Make it your own–that’s the joy of home baking!
Ready to Bake Some Memories
And there you have it—my go-to recipe for a stunning Raspberry Chocolate Roll that’s far easier than it looks. This dessert has saved my bacon for more last-minute guests and special occasions than I can remember. The rich chocolate, the fluffy cream, and the bright pop of raspberry is a combination that never fails to delight. So grab your bowl and whisk, and give it a try. I promise, the look on your friends’ and family’s faces when you slice into that beautiful swirl will be worth every minute. Happy baking!
Equipment
- Grand bol
- Fouet
- Spatule
- Plaque à pâtisserie
- Papier sulfurisé
Ingredients
- 4 œufs
- 150 g sucre
- 30 g cacao en poudre
- 65 g farine tout usage
- 5 g poudre à lever
- 1 g sel
- 240 ml crème épaisse
- 120 ml sauce caramel
- 90 g pépites de chocolat
- q.s. sucre glace pour saupoudrer
- q.s. cacao en poudre pour saupoudrer
- q.s. sauce caramel pour le décor
Instructions
- Préchauffez votre four à 175°C. Graissez une plaque à pâtisserie de 15x10 pouces et tapissez-la de papier sulfurisé.
- Dans un grand bol, battez les œufs et le sucre jusqu'à ce que le mélange soit épais et pâle. Tamisez le cacao en poudre, la farine, la poudre à lever et le sel. Incorporez délicatement jusqu'à obtenir une pâte lisse.
- Versez la pâte dans le moule préparé et étalez-la uniformément. Faites cuire au four pendant 12-15 minutes ou jusqu'à ce que le gâteau rebondisse au toucher.
- Une fois le gâteau cuit, retournez-le sur un torchon saupoudré de sucre glace. Retirez soigneusement le papier sulfurisé et roulez-le avec le torchon à l'intérieur. Laissez-le refroidir complètement.
- Déroulez le gâteau et étalez la garniture uniformément. Ajoutez des framboises et des pépites de chocolat, puis enroulez à nouveau le gâteau sans le torchon.
- Saupoudrez le rouleau de sucre glace. Réfrigérez pendant au moins 1 heure avant de servir.
Notes
Nutrition

Hi, I’m Olivia Parker, the founder of BakingSecret.com and a lifelong lover of all things sweet and homemade. I grew up in a small town in Oregon, where the smell of fresh cookies in my family’s kitchen sparked my passion for baking. Over the years, I turned that passion into a mission: to help home bakers feel confident, inspired, and creative.
After studying food science and working in several artisan bakeries across the U.S., I decided to create a space where everyone from beginners to seasoned bakers can find reliable recipes, expert tips, and a warm, welcoming community. BakingSecret.com is my way of sharing the magic of baking with the world. When I’m not testing new recipes, you’ll find me exploring farmers’ markets, collecting vintage cookbooks, or perfecting my sourdough technique.