
Last weekend, my niece begged me to make “those pretty red balls on a stick” for her birthday party. She’d seen red velvet cake pops at a fancy bakery and couldn’t stop talking about them. I’ll be honest—I was nervous at first. Those little treats looked so perfect and professional. But after making my first batch, I realized they’re actually easier than they look. Now I make them all the time, and my niece thinks I’m the coolest aunt ever.
The best part? You don’t need fancy skills or expensive tools to create these stunning treats. Red velvet cake pops are fun to make, delicious to eat, and always impress at parties. They’re like tiny bites of happiness covered in chocolate.
I’ve spent countless hours testing recipes and techniques in my kitchen. I’ve made mistakes, learned from them, and figured out what works best. Today I’m sharing everything I know about making red velvet cake pops that look beautiful and taste amazing. Whether you want the classic version or a healthier option, I’ve got you covered.
The Classic Red Velvet Cake Pops Recipe
Let’s talk about the foundation of great red velvet cake pops. The secret starts with a moist, flavorful cake that holds together perfectly when mixed with frosting. I’ve tested this recipe dozens of times, and it works every single time.
For the cake base, you’ll need these ingredients:
- 2 cups all-purpose flour
- 1 and 1/2 cups granulated sugar
- 1 teaspoon baking soda
- 1 teaspoon cocoa powder
- 1 teaspoon salt
- 2 large eggs
- 1 cup buttermilk
- 1 cup vegetable oil
- 2 tablespoons red food coloring
- 1 teaspoon white vinegar
- 1 teaspoon vanilla extract
Preheat your oven to 350°F and grease a 9×13 inch baking pan. Mix all the dry ingredients in one bowl. In another bowl, whisk together the eggs, buttermilk, oil, food coloring, vinegar, and vanilla. Combine the wet and dry ingredients until just mixed. Don’t overmix—that’s a common mistake that makes the cake tough.
Pour the batter into your pan and bake for 25-30 minutes. A toothpick inserted in the center should come out clean. Let the cake cool completely. This is important because warm cake won’t hold its shape when you form the balls.
Once your cake is cool, crumble it into fine crumbs using your hands or a food processor. You want the texture to be even with no large chunks. Add 3/4 cup of cream cheese frosting to the crumbs. Start with less frosting and add more if needed. The mixture should stick together when squeezed but not feel wet or mushy.
Here’s where many people mess up. If you add too much frosting, your cake pops will fall off the sticks. If you add too little, they’ll be dry and crumbly. The right amount makes all the difference.
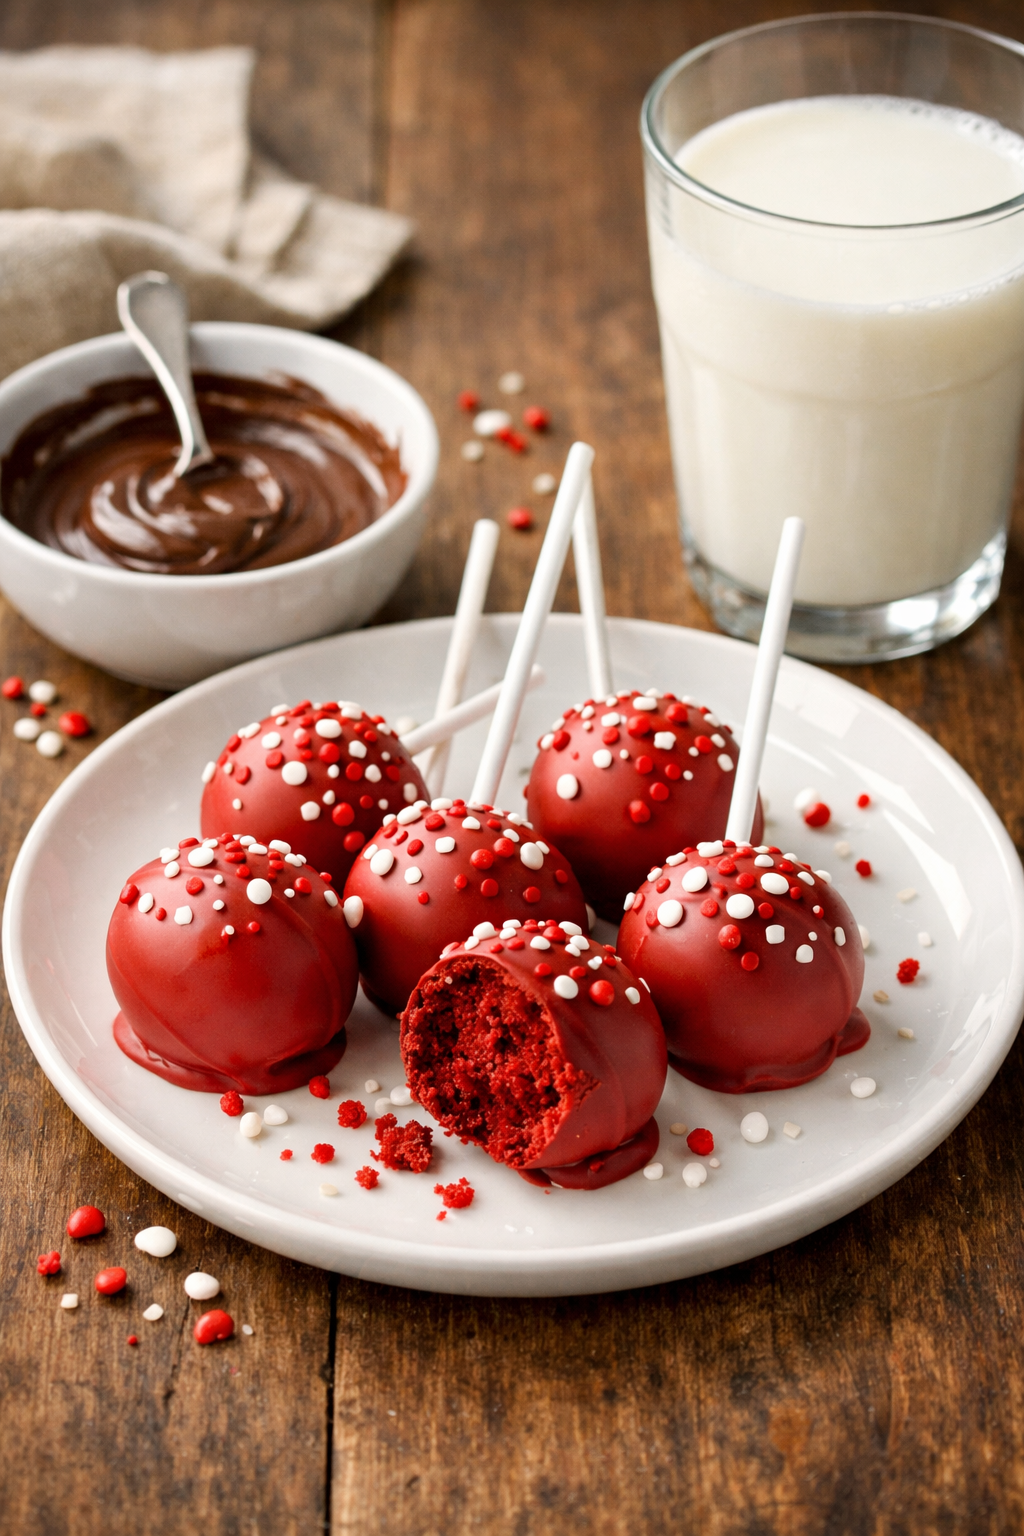
Roll the mixture into balls about 1 and 1/2 inches in diameter. I use a small cookie scoop to keep them the same size. Place them on a baking sheet lined with parchment paper. Pop them in the freezer for 15-20 minutes. This firms them up and makes dipping easier.
Now comes the fun part—coating your red velvet cake pops with white chocolate. Melt 16 ounces of white chocolate coating in a microwave-safe bowl. Heat it in 30-second intervals, stirring between each one. The chocolate should be smooth and fluid, not thick or lumpy.
Dip the tip of a lollipop stick into the melted chocolate, then insert it halfway into a cake ball. This helps the pop stay on the stick. Let it set for a minute, then dip the entire ball into the chocolate. Hold it over the bowl and let the excess drip off. Tap your wrist gently to remove extra coating.
Stand the finished pops upright in a styrofoam block or cake pop stand. You can sprinkle them with decorations while the chocolate is still wet. Red sugar, white sprinkles, or crushed cookies all look beautiful.
The texture should be smooth on the outside and moist on the inside. Each bite should melt in your mouth with that signature red velvet flavor—slightly chocolatey with a hint of tang from the buttermilk.
If you’re using a cake pop maker instead of baking a full cake, the process gets even easier. Pour the batter into the cake pop maker following the manufacturer’s instructions. Most machines cook the pops in just a few minutes. You’ll still mix them with frosting and coat them the same way.
Healthy Red Velvet Cake Pops
I created this healthier version after my sister asked if I could make red velvet cake pops with fewer calories. She wanted to enjoy them without the guilt. After some experimenting, I found ways to lighten them up while keeping that rich, velvety taste.
For healthy red velvet cake pops, swap out some ingredients. Use whole wheat pastry flour instead of all-purpose flour. It adds fiber and nutrients without making the cake heavy. Replace half the oil with unsweetened applesauce. This cuts calories and keeps the cake moist.
Greek yogurt works great instead of full-fat buttermilk. It adds protein and creates the same tangy flavor. You can also use natural food coloring made from beets instead of artificial dyes. The color won’t be as vibrant, but it’s a cleaner option.
For the coating, try dark chocolate instead of white chocolate. Dark chocolate has antioxidants and less sugar. Or use a thin layer of cream cheese frosting rolled in unsweetened coconut flakes.
The healthy version has about 120 calories per pop compared to 180 for the classic recipe. That’s a significant difference if you’re watching your intake. The texture stays smooth and satisfying. You won’t feel like you’re missing out on anything.
One trick I learned is adding a tablespoon of ground flaxseed to the batter. It boosts the fiber content and adds omega-3 fatty acids. No one can taste it, but your body will thank you.
Some people worry that healthier baked goods taste bland or dry. Not these. The secret is balancing the substitutions so you don’t lose moisture or flavor. I’ve served these at parties without telling anyone they’re healthier, and people can’t tell the difference.

Special Dietary Needs and Variations
Now that you’ve got the basics down, let’s talk about making red velvet cake pops that work for everyone. I learned this the hard way when I showed up to a friend’s potluck with my gorgeous cake pops, only to find out three guests couldn’t eat them—one was gluten-free, another had a dairy issue, and the third just really hated cream cheese. Talk about feeling unprepared!
Since that slightly embarrassing moment, I’ve made it my mission to master variations that accommodate different dietary needs. The good news? You can still get that amazing red velvet taste without the traditional ingredients. Let me walk you through what I’ve discovered.
Gluten-Free Red Velvet Cake Pops
My neighbor has celiac disease, and she was convinced she’d never enjoy red velvet cake pops. When I brought over a batch of gluten-free ones, she literally teared up. No joke. That’s when I realized how important these adaptations are to people who feel left out of dessert time.
The main challenge with gluten-free baking is getting the right texture. Regular flour gives cake structure, and removing it can make things crumbly or gummy. But here’s the thing—cake pops are already mixed with frosting, which helps bind everything together. This actually makes them easier to adapt than regular cakes.
For gluten-free red velvet cake pops, I use a quality all-purpose gluten-free flour blend. Look for one that contains xanthan gum already mixed in. Bob’s Red Mill and King Arthur both make excellent versions. If your blend doesn’t have xanthan gum, add half a teaspoon per cup of flour. This ingredient mimics gluten’s binding properties.
I also add an extra egg to gluten-free batters. The additional protein helps hold everything together and creates a more stable structure. Another trick I picked up is letting the batter rest for ten minutes before baking. Gluten-free flours need time to absorb liquid properly. This simple step prevents that gritty texture some gluten-free treats have.
The rest of the process stays pretty much the same. Bake at 350°F just like the regular version. You might need an extra two or three minutes in the oven since gluten-free batters sometimes take longer to set. Use the toothpick test to check doneness. Once cooled, crumble and mix with frosting as usual.
One thing I noticed is that gluten-free cake tends to be slightly denser. This actually works in your favor for cake pops. The denser texture holds up better during the dipping process. I’ve had fewer pops fall off their sticks when using gluten-free cake.
The coating process is naturally gluten-free as long as you’re using pure chocolate or candy melts. Just double-check the label to make sure there’s no cross-contamination warning if you’re serving someone with serious sensitivities.
Taste-wise, most people can’t tell these are gluten-free. I’ve done blind taste tests with my family, and nobody could identify which batch was which. The red velvet flavor comes through beautifully—that slight cocoa taste with the tangy buttermilk notes. If you’re looking for other creative cake ideas, you might enjoy experimenting with a mushroom cake design for your next themed party.
Red Velvet Cake Pops Without Cream Cheese
Funny enough, my dad hates cream cheese. Always has. Says the texture weirds him out. So when I started making red velvet cake pops, I had to figure out an alternative that would still give that signature tangy flavor he loves about red velvet.
The traditional cream cheese frosting serves two purposes in cake pops. It binds the crumbs together, and it adds moisture and flavor. You need something that can do both jobs without the cream cheese. I’ve tried several options, and I’ll share what actually works.
Buttercream frosting is my go-to replacement. Make a simple American buttercream with butter, powdered sugar, vanilla, and a splash of milk. To get that tangy kick that cream cheese normally provides, add a teaspoon of lemon juice or white vinegar to the frosting. This brightens the flavor and mimics that slight tang. The lemon bars with cake mix recipe uses a similar technique to add brightness without cream cheese.
Another option I’ve tested is using mascarpone cheese instead. It’s milder than cream cheese but still creamy and slightly tangy. Mix it with powdered sugar and vanilla just like you would cream cheese frosting. The texture is actually smoother, which some people prefer.
For a dairy-free version, coconut cream works surprisingly well. Use the thick cream from the top of a chilled can of full-fat coconut milk. Whip it with powdered sugar and vanilla extract. It doesn’t have the tanginess, so I add a squeeze of lime juice. The coconut flavor is subtle and actually complements the red velvet nicely.
Here’s something important—when you’re not using cream cheese, you might need to adjust the amount of frosting you add to the cake crumbs. Buttercream is typically sweeter and less dense than cream cheese frosting, so start with about two-thirds cup instead of three-quarters. Add more gradually until you get the right consistency.
The cake balls should hold together firmly without feeling greasy. If they’re too soft, they’ll slide off the sticks when you dip them. This is one of those common mistakes people make when adapting recipes. Too much frosting ruins the structural integrity, regardless of what type you’re using.
Red Velvet Cake Balls from Popular Sources
By the way, I’m not the only one obsessed with perfecting red velvet cake pops. Some amazing bakers have shared their versions, and I’ve learned something from each one. Let me tell you about a few standout recipes and what makes them special.
The Pioneer Woman’s red velvet cake balls are legendary. Ree Drummond keeps things simple and foolproof. Her recipe uses a boxed cake mix, which honestly makes life easier. She’s not pretending to be fancy—she’s being practical. The genius part is how she adds extra cocoa powder to the mix to deepen the chocolate flavor. This creates a richer taste that stands up well to the sweet white chocolate coating.
What I love about her approach is the cream cheese frosting ratio. She uses a full eight-ounce package of cream cheese mixed with butter and powdered sugar. The result is super creamy cake balls that practically melt in your mouth. They’re on the richer side, similar to how a cake happy birthday chocolate celebration dessert should taste—indulgent and special.
The Allrecipes version of red velvet cake balls takes a slightly different path. It uses homemade cake, which gives you more control over the ingredients. Multiple reviewers mention that the recipe produces a more subtle chocolate flavor and lets the buttermilk tang shine through. Some bakers add extra food coloring to make them super vibrant, while others keep the color more natural.
One cool variation I found on Allrecipes involved someone who added a tablespoon of espresso powder to the batter. Coffee intensifies chocolate flavors without making things taste like coffee. It’s a professional baker’s secret that works beautifully in red velvet.
Then there’s the version that appeared on Oprah’s show years ago. Those red velvet cake pops went viral because they looked absolutely stunning—perfectly round, glossy white chocolate coating, delicate red drizzle on top. The recipe emphasizes chilling the cake balls at every step. Form them, chill. Dip the sticks, chill. Coat with chocolate, chill again. It’s more time-consuming, but the results are showstopping.
The calorie count varies between these recipes. The Pioneer Woman’s version comes in around 200 calories per pop because of that generous cream cheese frosting. The Allrecipes version with less frosting sits closer to 150 calories. If you’re watching your intake, knowing these differences helps you choose wisely. For another lighter dessert option, check out this lemon cream cheese dump cake recipe that offers easier preparation with portion control.
Here’s my honest take—each recipe has merit depending on what you need. Want quick and reliable? Go with a boxed mix version. Need to control every ingredient for dietary reasons? Make the cake from scratch. Want Instagram-worthy pops for a special event? Follow the Oprah method with all that chilling.
I’ve adapted parts from each source to create my personal favorite version. I use homemade cake for better flavor control, the Pioneer Woman’s frosting ratio for creaminess, and the Oprah chilling method for perfect presentation. Mixing and matching techniques from different sources lets you customize red velvet cake pops to your exact preferences.
Don’t be afraid to experiment. Maybe you want to add a pinch of cinnamon like some Southern bakers do. Or perhaps you’ll try rolling your pops in crushed Oreos instead of sprinkles. The beauty of having multiple trusted sources is that you can learn different approaches and find what works best for your taste and skill level.
Celebrity-Inspired and Special Occasion Red Velvet Cake Pops
Last spring, I catered a bridal shower where the bride requested “those fancy red velvet cake pops like on TV.” She’d seen them featured on a talk show and wanted that exact glamorous vibe. That request sent me down a rabbit hole of celebrity-inspired desserts, and I discovered there’s actually a whole world of elevated cake pop techniques that go beyond the basics.
Here’s the thing about celebrity recipes—they’re often designed to look absolutely perfect because they’re going to be photographed or filmed. But I’ve learned you can totally recreate that high-end appearance at home without a professional kitchen or expensive equipment. Let me show you how.
Red Velvet Cake Pops Oprah-Style
Remember when Oprah featured red velvet cake pops on her show and the entire country went crazy trying to recreate them? I sure do. My mom called me that very afternoon asking if I could make them for her book club. The pressure was real.
What made those Oprah-style red velvet cake pops so special was their absolute perfection. Every single pop looked identical—perfectly round, flawlessly smooth coating, not a crack or bubble in sight. The secret isn’t magic or professional training. It’s patience and technique.
The Oprah method focuses heavily on temperature control. After forming your cake balls, freeze them solid for at least two hours. Not just firm—completely frozen. This prevents the interior from warming up when you dip them in melted chocolate, which is what causes cracking. When warm cake meets warm chocolate, expansion happens. Frozen cake stays stable.
For the coating, use high-quality white chocolate bark or candy melts. Cheap chocolate doesn’t flow as smoothly and tends to clump. Melt it slowly in a deep, narrow container. I use a tall drinking glass because it allows you to fully submerge the cake ball without using tons of chocolate. The depth is key for achieving that seamless coating.
Here’s a trick I learned from watching pastry chefs—tap the stick on the edge of the glass exactly three times after dipping. Not two, not five. Three taps lets the excess drip off while keeping enough coating for a smooth finish. Then give the pop a gentle twist as you pull it away. This prevents that little tail of chocolate from forming at the bottom.
The signature look includes a delicate red drizzle on top. Put a small amount of melted red candy melts in a piping bag or plastic baggie with a tiny corner snipped off. Hold it high above the pops and move your hand in quick back-and-forth motions. The drizzle should be thin and elegant, not thick globs. Practice on parchment paper first until you get the motion right.
Oprah’s version also featured edible gold dust for extra glamour. You can find this at craft stores or online. Use a small, clean paintbrush to dust it lightly over the dried chocolate. Just a hint of shimmer makes them look expensive and special.
Calorie-wise, these come in around 190 per pop because of the generous chocolate coating and decorative elements. If you’re serving them at a celebration, though, that’s perfectly reasonable. Sometimes dessert is about joy, not just nutrition.
The first time I successfully made Oprah-style pops, I literally did a happy dance in my kitchen. They looked professional. My mom’s book club friends couldn’t believe I made them myself. That feeling of pride when you create something beautiful and delicious? Totally worth the extra effort.
Red Velvet Cake Pops for Special Events
I’ve made red velvet cake pops for probably fifty different events at this point. Baby showers, graduation parties, Valentine’s Day, Christmas—you name it. Each occasion calls for slightly different styling, and that’s where creativity gets fun.
For weddings, I love making them look elegant and sophisticated. Use white chocolate coating with pearl dust for a subtle shimmer. You can match the wedding colors by tinting white chocolate with food coloring. Add the bride and groom’s initials using edible markers, or attach small fondant flowers. Display them on a tiered stand for a gorgeous dessert table centerpiece.
One bride asked me to make cake pops that matched her bouquet—deep burgundy roses with gold accents. I coated the pops in burgundy-tinted chocolate, then added gold leaf flakes while the coating was still wet. They looked like tiny works of art. Several guests asked where she ordered them from, not believing they were homemade.
Birthday parties give you permission to go wild with fun decorations. For kids’ parties, I roll the pops in colorful sprinkles or crushed candy. You can also insert the sticks into mini cupcake liners before the chocolate sets, creating little tutus around each pop. Kids absolutely love these.
Adult birthday celebrations call for something more refined. Try drizzling dark chocolate over white-coated pops, or vice versa. Add a dusting of edible glitter. Create an ombre effect by gradually changing the coating color across multiple pops—light pink fading to deep red looks stunning.
Valentine’s Day is obviously peak season for red velvet anything. I shape the cake balls into hearts instead of rounds. It takes a bit more time and careful molding, but the effect is adorable. Coat them in pink or red chocolate, then add white chocolate drizzle to create a marbled effect. Package them in clear cellophane bags tied with ribbon for sweet gifts.
Christmas offers endless decorating possibilities. White chocolate coating with red and green sprinkles keeps things festive. Or go elegant with dark chocolate coating and crushed candy canes. I’ve even made them look like tiny ornaments by adding edible paint details. Incorporating healthy fats like those found in quality dark chocolate makes these treats slightly more nutritious while maintaining that indulgent feel during the holiday season.
For presentation, think beyond just standing them upright. I’ve arranged them in decorative boxes lined with tissue paper, creating beautiful gift sets. For parties, stick them into a foam cone covered with ribbon to create a cake pop “tree.” Or arrange them flat in a pattern on a serving platter with fresh flowers tucked around them.
Here’s something I discovered by accident—cake pops make fantastic place card holders. Write guests’ names on small tags and attach them to the sticks. Each person gets a personalized dessert at their seat. It’s functional and delicious.
The key to special occasion pops is planning ahead. Don’t wait until the day before to start. Make the cake balls two days early and freeze them. Dip and decorate the day before. This spreads out the work and reduces stress. Trust me, I learned this lesson the hard way when I tried to make sixty pops in one afternoon for my cousin’s wedding. Never again.
Finding Red Velvet Cake Pops Near You
Okay, I’ll be real with you. Sometimes you don’t have time to make cake pops from scratch, or maybe you just don’t feel like baking. That’s completely fine. Supporting local bakeries is wonderful, and many of them make incredible red velvet cake pops.
Finding quality cake pops near you takes a bit of detective work. Start with Google searches for “red velvet cake pops near me” or “custom cake pops” plus your city name. Look at the photos carefully. You want pops that look smooth and professional, not lumpy or cracked. Read the reviews specifically mentioning taste and freshness.
Local bakeries often have more creative options than chain stores. Small businesses can customize orders with specific colors, decorations, or even flavor variations. Call ahead and ask questions. How far in advance do they need orders? Do they use fresh ingredients or frozen cake? What type of chocolate do they use for coating?
Specialty cake pop shops have popped up in many cities—pun intended. These places focus exclusively on cake pops and usually offer amazing variety. I’ve found shops that make red velvet with cream cheese centers, or versions dipped in ruby chocolate for a naturally pink coating. The creativity is impressive.
Here’s what to look for when buying cake pops: they should feel slightly firm when you touch them, not mushy. The chocolate coating should be glossy and smooth. If you see cracks or the coating looks dull and chalky, that’s a red flag. Fresh cake pops taste moist and flavorful, not dry or overly sweet.
Farmers markets are another great source. I’ve discovered talented home bakers who sell at weekend markets. Their products are usually made that morning, so freshness is guaranteed. Plus, you can often request custom orders for upcoming events.
Grocery store bakeries have gotten better about offering cake pops, though quality varies widely. Some use pre-made frozen pops that just get thawed and decorated. Others make them fresh in-store. Ask the bakery staff about their process. The ones made fresh will always taste better.
Pricing varies depending on location and complexity. Basic red velvet cake pops typically run between two and four dollars each. Custom decorated ones for weddings or special events can cost five to seven dollars per pop. That might seem expensive, but remember you’re paying for labor, skill, and quality ingredients.
If you need a large quantity for an event, always order at least a week ahead. Popular bakeries book up fast, especially around holidays. I once waited until three days before a party to order sixty pops and ended up having to visit four different bakeries to get enough. Learn from my mistake.
One thing I love about buying locally is discovering new techniques and flavor combinations. Last month I found a bakery that adds a tiny piece of cheesecake in the center of their red velvet pops. Genius. Sometimes seeing what professionals do inspires my own baking experiments.
Whether you’re making elaborate homemade versions or picking up a dozen from your favorite local spot, red velvet cake pops bring joy to any gathering. If you’re looking to expand your baking repertoire beyond cake pops, exploring other cakes and cupcakes recipes can give you even more ideas for celebrations and everyday treats.
The best part about all these options—homemade classic, healthy versions, dietary adaptations, celebrity-inspired, or bakery-bought—is that you get to choose what works for your life right now. Some weekends I spend hours crafting perfect pops from scratch. Other times I grab a box from the local baker and spend my time with family instead. Both choices are completely valid.
Making red velvet cake pops has taught me that impressive doesn’t have to mean complicated. With the right techniques and a bit of patience, anyone can create treats that look professional and taste amazing. Start with the basic recipe, then branch out into variations that excite you. Each batch teaches you something new, and before you know it, you’ll be the person everyone asks to bring dessert to parties.
Frequently Asked Questions
What is the secret to cake pops?
The real secret to successful cake pops is getting the cake-to-frosting ratio exactly right. Too much frosting makes them fall off the sticks, while too little makes them dry and crumbly. Start with less frosting than you think you need—about three-quarters cup for a full cake—and add more gradually. The mixture should hold together when squeezed but not feel wet. Another crucial secret is chilling the formed balls before dipping, which keeps them stable during the coating process.
What is the secret ingredient in red velvet cake?
The secret ingredient that gives red velvet its distinctive flavor is actually the combination of buttermilk and vinegar. These acidic ingredients react with the baking soda to create a tender crumb and add that signature tangy taste. The cocoa powder is used in small amounts—just enough to add depth without making it taste like chocolate cake. Some bakers also swear by adding a touch of espresso powder to enhance the subtle chocolate notes without making the flavor obvious.
The most common mistake is adding too much cocoa powder, which turns red velvet into chocolate cookies. Red velvet should have just a hint of cocoa—usually one tablespoon per batch. Another frequent error is using cheap food coloring that fades during baking, resulting in brown cookies instead of red. Overmixing the dough develops too much gluten, making cookies tough instead of tender. Finally, many bakers skip the buttermilk thinking they can substitute regular milk, but buttermilk’s acidity is essential for that classic tangy flavor.
What not to do when making cake pops?
Never dip warm cake balls into chocolate—they’ll crack and fall apart. Always chill them thoroughly first, ideally in the freezer for fifteen to twenty minutes. Don’t skip dipping the stick in chocolate before inserting it into the ball; this glue-like step is what keeps pops from sliding off. Avoid using chocolate that’s too hot, as it will be too thin and won’t coat properly. Don’t rush the drying process by putting them in the fridge immediately—let them set at room temperature first to prevent condensation and cracking.
How long do red velvet cake pops stay fresh?
Properly stored red velvet cake pops stay fresh for about five to seven days at room temperature in an airtight container. If you refrigerate them, they’ll last up to two weeks, though the chocolate coating might develop condensation when you bring them back to room temperature. For longer storage, freeze uncoated cake balls for up to three months. I wrap them individually in plastic wrap, then place them in freezer bags. Thaw in the fridge overnight before coating and decorating.
Can I use box mix for red velvet cake pops?
Absolutely, and there’s zero shame in it. Box mixes actually work great for cake pops because they’re formulated to be moist and consistent. I use them all the time when I’m short on time or making large batches. To elevate a box mix, try adding an extra egg, replacing water with buttermilk, and using melted butter instead of oil. Add a tablespoon of cocoa powder and a teaspoon of vanilla extract to boost the flavor. Nobody will know you started with a box unless you tell them.
Why do my cake pops keep falling off the sticks?
This frustrating problem usually comes from one of three issues. First, you might be adding too much frosting to the cake crumbs, making the mixture too heavy and soft. Second, you may not be chilling the cake balls long enough before dipping—they need to be very firm. Third, you might be skipping the crucial step of dipping the stick tip in chocolate before inserting it. That little bit of melted chocolate acts as glue. Also, make sure you’re not inserting the stick more than halfway into the ball.
How many cake pops does one cake make?
A standard 9×13 inch cake typically yields between forty and fifty cake pops, depending on how large you make them. I aim for balls about one and a half inches in diameter, which gives me around forty-five pops. If you’re using a cake pop maker instead of baking a full cake, those machines usually make twelve to eighteen pops per batch. For parties, I generally estimate two to three pops per person, though people often eat more because they’re so irresistible.
What’s the best chocolate for coating cake pops?
Candy melts or almond bark work better than regular chocolate chips for coating cake pops. They’re formulated to melt smoothly and harden with a nice snap and shine. Regular chocolate chips contain stabilizers that prevent them from melting smoothly—you’ll end up with thick, clumpy coating. If you prefer real chocolate, use high-quality chocolate bars or wafers designed for dipping. You can add a teaspoon of coconut oil or vegetable shortening to thin it slightly for easier coating. White chocolate bark gives that classic look for red velvet pops.
Can I make cake pops ahead of time for a party?
Yes, and I actually recommend it for stress-free party prep. Make and freeze the cake balls up to three months ahead. Coat and decorate them up to two days before your event, storing them in an airtight container at room temperature. They’ll stay fresh and beautiful. If you’re adding delicate decorations like fresh flowers or edible glitter, wait until the day of the party. I always make my pops at least one day ahead so I’m not rushing around last minute. It makes hosting so much more enjoyable when dessert is already done.
Equipment
- Mixing Bowls
- Whisk
- Baking Pan (9x13 inches)
- Baking Sheet
- Parchment Paper
Ingredients
- 2 cups All-purpose flour
- 1.5 cups Granulated sugar
- 1 teaspoon Baking soda
- 1 teaspoon Cocoa powder
- 1 teaspoon Salt
- 2 large Eggs
- 1 cup Buttermilk
- 1 cup Vegetable oil
- 2 tablespoons Red food coloring
- 1 teaspoon White vinegar
- 1 teaspoon Vanilla extract
- 3/4 cup Cream cheese frosting
- 16 ounces White chocolate coating
Instructions
- Preheat your oven to 350°F and grease a 9x13 inch baking pan.
- Mix all the dry ingredients in one bowl.
- In another bowl, whisk together the eggs, buttermilk, oil, food coloring, vinegar, and vanilla.
- Combine the wet and dry ingredients until just mixed, avoiding overmixing.
- Pour the batter into the prepared pan and bake for 25-30 minutes, or until a toothpick comes out clean.
- Let the cake cool completely.
- Crumble the cooled cake into fine crumbs.
- Mix the cake crumbs with 3/4 cup of cream cheese frosting until the mixture holds together when squeezed.
- Roll the mixture into balls about 1 and 1/2 inches in diameter and place them on a lined baking sheet.
- Freeze the balls for 15-20 minutes to firm them up.
- Melt 16 ounces of white chocolate coating in a microwave-safe bowl, heating in 30-second intervals.
- Dip the tip of a lollipop stick into the melted chocolate and insert it into a cake ball halfway.
- Let the chocolate on the stick set for a minute, then dip the entire ball into the melted chocolate.
- Let the excess chocolate drip off and tap gently to remove extra coating.
- Stand the finished pops upright in a styrofoam block or cake pop stand and decorate while the chocolate is still wet.