
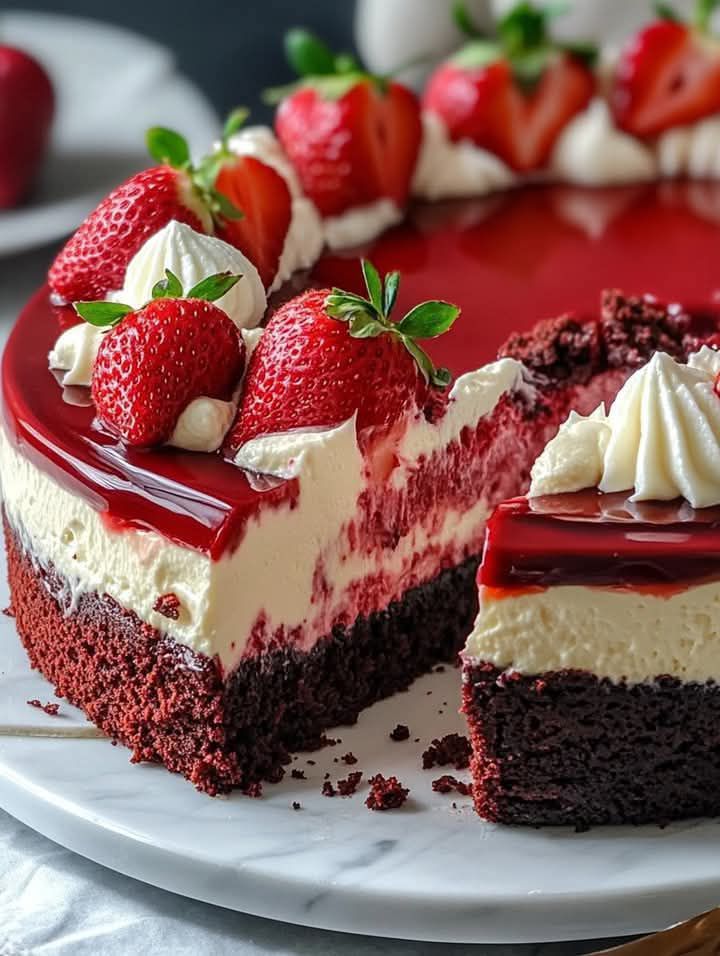
Why This Red Velvet Cheesecake Delight is a Showstopper
Picture this: A slice of cake so velvety and rich, it feels like dessert royalty. Now imagine pairing that with the sweet tang of strawberries and creamy cheesecake filling. Sounds dreamy, right? That’s exactly what happened when I first made this Red Velvet Cheesecake Delight. It was for my best friend’s birthday, and let me tell you, the moment I placed it on the table, all eyes were glued to it. The deep red layers paired with the blush pink topping turned out to be a feast for both the eyes and the taste buds. If you’re looking for a dessert that’s equal parts stunning and delicious, this recipe is your golden ticket.
The Story Behind Red Velvet Cake
Red velvet cake has always been a bit of a mystery to me. Growing up, I thought its vibrant color came from some magical ingredient only bakers knew about. Turns out, it’s just cocoa powder and food coloring! The origins of red velvet cake date back to the early 20th century in the southern United States. Back then, natural cocoa powder reacted with buttermilk and vinegar to give the cake a reddish-brown hue. Modern recipes amp up the drama with food coloring, making it as much a visual treat as it is a culinary one. Pairing it with strawberry cheesecake filling? Well, that’s my little twist to keep things fresh and exciting.
Why You’ll Fall Head Over Heels for This Recipe
This Red Velvet Cheesecake Delight isn’t just another dessert; it’s an experience. The cake itself is soft, moist, and slightly chocolatey, while the cheesecake layer brings a creamy, fruity balance. What makes this recipe truly special is how simple it is to pull off. No fancy techniques or hours of prep—just straightforward steps that anyone can follow. Plus, the combination of flavors is versatile enough to suit any palate. Whether you’re a seasoned baker or a newbie, this dish will make you feel like a kitchen rockstar.
Perfect Occasions for This Dessert
If you’re hosting a dinner party, celebrating a birthday, or even just craving something indulgent, this Red Velvet Cheesecake Delight fits the bill perfectly. It’s ideal for holidays like Valentine’s Day (hello, red and pink theme!) or Christmas, where its festive colors shine. I’ve also served it at casual get-togethers, and it never fails to impress. Trust me, no matter the occasion, this dessert will have everyone asking for seconds—and maybe even the recipe!
Ingredients You’ll Need
Let’s break down what you’ll need to create this masterpiece:
For the Red Velvet Cake Base:
- 1 cup all-purpose flour
- 1 cup granulated sugar
- 1 teaspoon baking powder
- 1 teaspoon baking soda
- ½ teaspoon salt
- 1 tablespoon cocoa powder
- 1 cup vegetable oil
- 1 cup buttermilk, room temperature
- 2 large eggs, room temperature
- 2 tablespoons red food coloring
- 1 teaspoon vanilla extract
- 1 teaspoon white vinegar
For the Strawberry Cheesecake Filling:
- 16 oz cream cheese, softened
- 1 cup powdered sugar
- 1 teaspoon vanilla extract
- 1 cup fresh strawberries, pureed (about 8-10 strawberries)
- 1 cup heavy whipping cream
For Topping:
- Fresh strawberries, halved
- Whipped cream (optional)
Substitution Options
Not everyone has every ingredient on hand, and that’s okay! Here are some easy swaps:
- Buttermilk: Mix 1 cup of milk with 1 tablespoon of lemon juice or vinegar. Let it sit for 5 minutes.
- Heavy Whipping Cream: Use coconut cream for a dairy-free option.
- Fresh Strawberries: Frozen strawberries work too—just thaw and drain them before pureeing.
- Red Food Coloring: Try beetroot powder for a natural alternative.
Preparation Steps
Step 1: Preheat Your Oven
Start by preheating your oven to 350°F (175°C). Grease and line a 9-inch springform pan. This step ensures your cake doesn’t stick and comes out perfectly smooth. Pro tip: Use parchment paper at the bottom for extra insurance against sticking.
Step 2: Make the Red Velvet Cake
In a large bowl, sift together the flour, sugar, baking powder, baking soda, salt, and cocoa powder. Sifting not only removes lumps but also aerates the dry ingredients, giving your cake a lighter texture. In another bowl, whisk the wet ingredients until smooth. Combine the two mixtures gently—overmixing can lead to a dense cake. Pour the batter into your prepared pan and smooth the top with a spatula. Bake for 25-30 minutes, or until a toothpick comes out clean. Let it cool completely before moving on.
Step 3: Prepare the Strawberry Cheesecake Filling
Beat the softened cream cheese until it’s silky smooth. Gradually add the powdered sugar and vanilla extract, mixing until fully combined. Stir in the pureed strawberries, ensuring everything blends evenly. Whip the heavy cream in a separate bowl until stiff peaks form, then fold it gently into the strawberry mixture. Folding keeps the filling light and airy. Chef’s tip: Chill your mixing bowl and beaters before whipping the cream—it helps achieve those perfect peaks faster.
Step 4: Assemble the Cheesecake
Once the red velvet cake has cooled, carefully remove it from the springform pan and place it on your serving dish. Spread the strawberry cheesecake filling evenly over the cake. Smooth it out with a spatula for a polished look. Pop the whole thing in the fridge and let it chill for at least 4 hours. Patience is key here—the longer it chills, the better it sets.
Step 5: Serve and Enjoy
Before serving, garnish with fresh strawberry halves and a dollop of whipped cream if you’re feeling fancy. Slice into generous portions and watch everyone dig in with delight. There’s nothing quite like seeing people enjoy something you’ve made with love.
Timing Breakdown
- Prep Time: 20 minutes
- Cooking Time: 30 minutes
- Resting/Chilling Time: 4 hours
- Total Time: Approximately 5 hours
Chef’s Secret
Here’s a little trick I learned: To intensify the strawberry flavor, simmer the puree with a tablespoon of sugar for 5 minutes before letting it cool. This reduces the liquid and concentrates the sweetness, making your cheesecake filling absolutely irresistible.
Extra Info
Did you know that red velvet cake became wildly popular during World War II? Rationing meant butter and sugar were scarce, so bakers got creative with cocoa and food coloring. Talk about turning limitations into legends!
Necessary Equipment
- 9-inch springform pan
- Mixing bowls
- Electric mixer or whisk
- Spatula
- Parchment paper
- Toothpick or cake tester
Storage Tips
Leftovers? Lucky you! Store your Red Velvet Cheesecake Delight in the refrigerator, covered tightly with plastic wrap or in an airtight container. It stays fresh for up to 3 days. For longer storage, freeze slices individually wrapped in plastic and placed in a freezer-safe bag. They’ll last up to a month. Thaw frozen slices overnight in the fridge before serving.
When reheating isn’t necessary, simply let the dessert come to room temperature for about 15 minutes before enjoying. Cold desserts can sometimes dull flavors, so this step makes a big difference.
Finally, avoid stacking heavy items on top of your cake while storing. The delicate layers deserve gentle handling to maintain their structure and presentation.
Tips and Advice
- Always use room-temperature eggs and buttermilk for smoother batters.
- Don’t skip sifting the dry ingredients—it really does make a difference.
- For a more intense red color, add an extra teaspoon of food coloring.
- Chill your cheesecake filling before assembling for easier spreading.
Presentation Ideas
- Garnish with edible flowers for a touch of elegance.
- Dust powdered sugar lightly over the top for a rustic look.
- Serve slices on decorative plates with a drizzle of strawberry sauce.
- Add a sprig of mint for a pop of green against the red and pink hues.
Healthier Alternatives
If you’re looking to lighten up this Red Velvet Cheesecake Delight, here are six variations:
- Gluten-Free Option: Swap all-purpose flour with almond flour or a gluten-free blend.
- Low-Sugar Version: Replace granulated sugar with monk fruit sweetener.
- Vegan Twist: Use plant-based cream cheese and substitute eggs with flax eggs.
- Dairy-Free Delight: Opt for coconut oil instead of vegetable oil and coconut cream instead of heavy cream.
- Protein-Packed: Add a scoop of vanilla protein powder to the cheesecake filling.
- No-Bake Variation: Skip the baking altogether by using a store-bought red velvet cake base.
Common Mistakes to Avoid
Mistake 1: Overmixing the Batter
Overmixing leads to a dense cake rather than a light and fluffy one. Once the dry and wet ingredients are combined, stop stirring. Pro tip: Use a spatula for the final mix to prevent overworking the batter.
Mistake 2: Skipping the Chilling Step
Rushing the chilling process results in a runny cheesecake filling. Give it the full 4 hours—or overnight if possible—for the best texture.
Mistake 3: Using Cold Ingredients
Cold eggs and buttermilk won’t incorporate smoothly, leaving lumps in your batter. Take them out of the fridge at least 30 minutes before starting.
Mistake 4: Overbaking the Cake
An overbaked red velvet cake turns dry and crumbly. Stick to the recommended baking time and check with a toothpick. If it comes out clean, it’s done.
Mistake 5: Not Greasing the Pan Properly
A poorly greased pan means your cake might tear when you try to remove it. Double-check that every inch of the pan is coated, especially the edges.
FAQs
Can I make this recipe ahead of time?
Absolutely! This dessert actually benefits from being made a day in advance. The flavors meld beautifully overnight, making it even tastier.
How do I prevent cracks in the cheesecake filling?
Cracks often happen due to sudden temperature changes. Cool the cheesecake gradually in the fridge and avoid opening the door frequently while it sets.
What if I don’t have a springform pan?
You can use a regular cake pan, but lining it with parchment paper will help you lift the cake out easily once it’s baked.
Can I use frozen strawberries?
Yes, just thaw and drain them thoroughly to remove excess water. Too much liquid can thin out the filling.
Is this recipe kid-friendly?
Definitely! Kids love the bright colors and sweet flavors. Just omit the optional whipped cream if you’re keeping it simple.
How do I know when the cake is fully baked?
Insert a toothpick into the center. If it comes out clean or with a few crumbs, it’s ready. Avoid underbaking, as the cake needs to support the filling.
Can I double the recipe?
Yes, doubling works fine. Just ensure you adjust the baking time slightly if using larger pans.
What’s the best way to slice this dessert?
Use a sharp knife dipped in hot water. Wipe it clean between cuts for neat, clean slices.
Can I freeze the entire cake?
Freezing the assembled cake isn’t ideal, as the texture may change. Instead, freeze individual slices for better results.
Why did my cheesecake filling turn grainy?
Graininess usually happens if the cream cheese wasn’t softened enough. Let it sit at room temperature for at least 30 minutes before mixing.
Final Thoughts
There you have it—a Red Velvet Cheesecake Delight that’s sure to steal the spotlight at any gathering. With its bold colors, creamy textures, and irresistible flavors, this dessert proves that baking doesn’t have to be complicated to be impressive. Whether you’re treating yourself or wowing a crowd, this recipe is a winner. So grab your apron, gather your ingredients, and let’s get baking. Your taste buds will thank you!
Equipment
- Mixing Bowl
- Electric Mixer or Whisk
- Spatula
- 9-inch Springform Pan
- Parchment Paper
Notes
Nutrition

Hi, I’m Olivia Parker, the founder of BakingSecret.com and a lifelong lover of all things sweet and homemade. I grew up in a small town in Oregon, where the smell of fresh cookies in my family’s kitchen sparked my passion for baking. Over the years, I turned that passion into a mission: to help home bakers feel confident, inspired, and creative.
After studying food science and working in several artisan bakeries across the U.S., I decided to create a space where everyone from beginners to seasoned bakers can find reliable recipes, expert tips, and a warm, welcoming community. BakingSecret.com is my way of sharing the magic of baking with the world. When I’m not testing new recipes, you’ll find me exploring farmers’ markets, collecting vintage cookbooks, or perfecting my sourdough technique.