
Discover the Magic of Sourdough Bread: A Timeless Classic
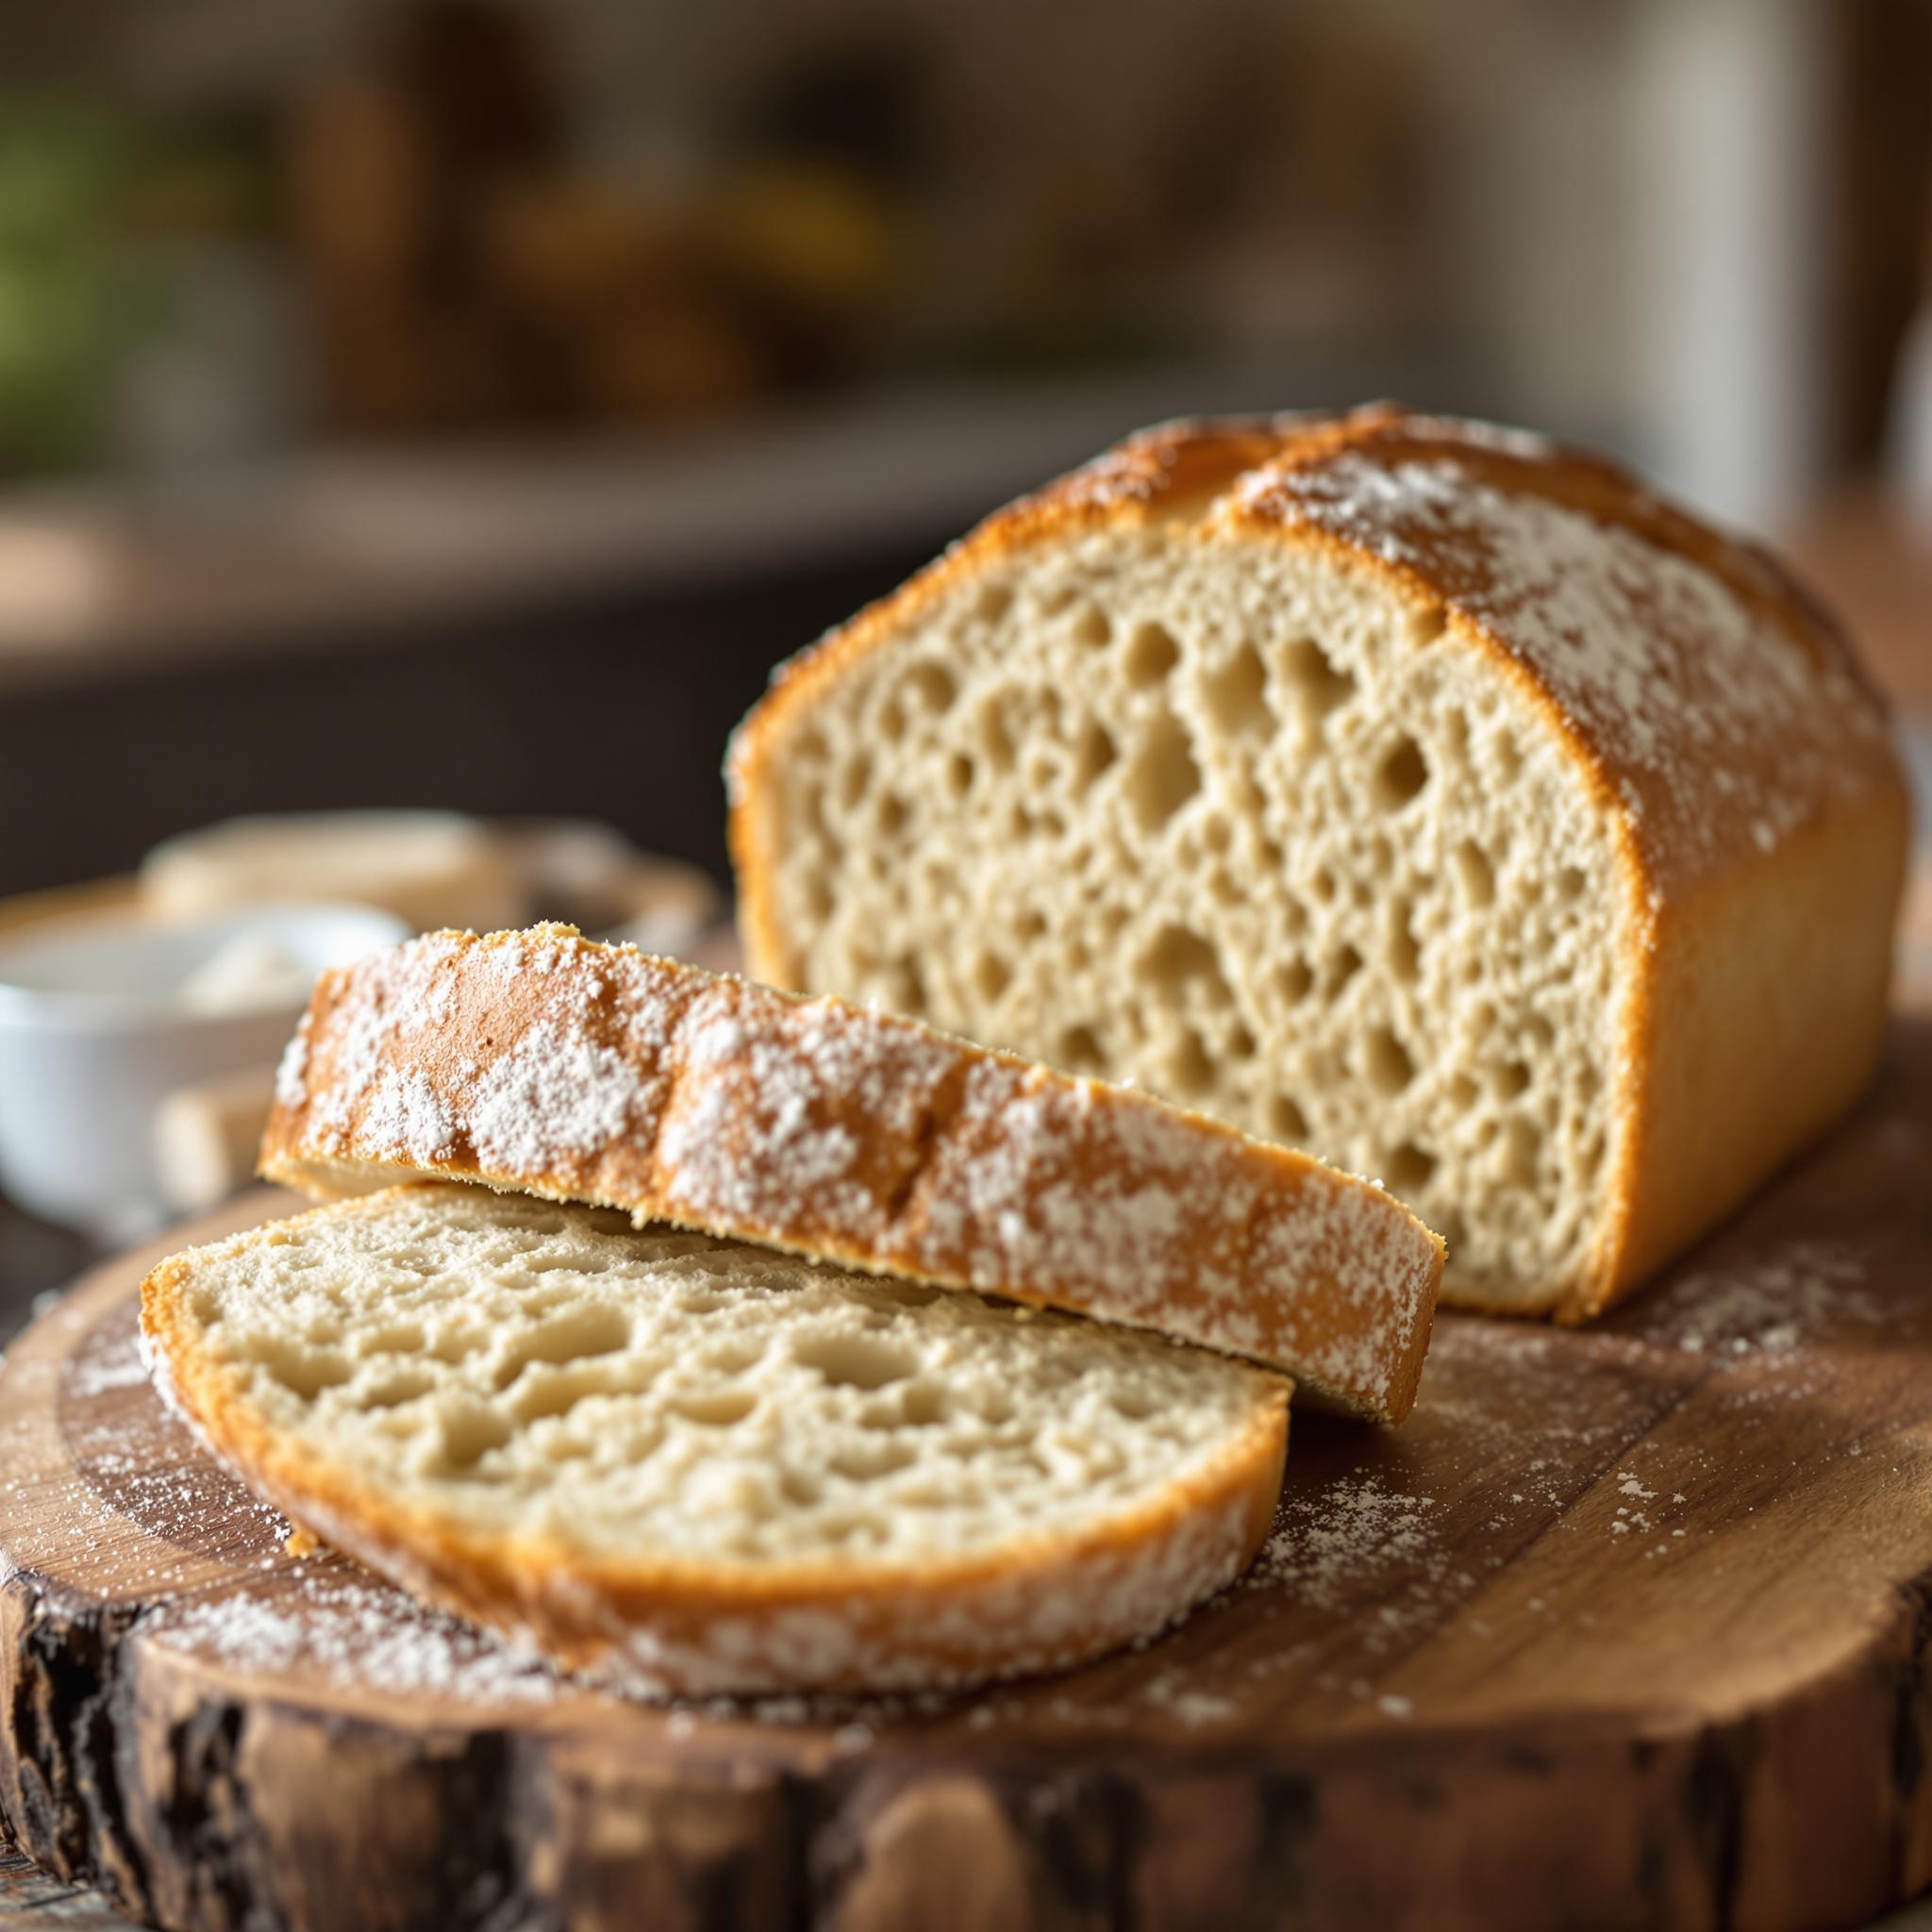
There’s something truly magical about baking your own Sourdough Bread. The aroma that fills your kitchen, the satisfying crackle of the crust as it cools, and the soft, airy crumb inside—it’s a sensory experience like no other. I remember the first time I made sourdough bread; it was a chilly Sunday afternoon, and my starter had been bubbling away for days. When I pulled that golden loaf out of the oven, I knew I had created something special. Whether you’re a seasoned baker or just starting out, this recipe is perfect for anyone who loves wholesome, homemade goodness.
The Rich History Behind Sourdough Bread
Sourdough bread has been around for thousands of years, dating back to ancient Egypt when bakers discovered that wild yeast in the air could make dough rise. Over time, this method spread across Europe, becoming a staple in countries like France and Italy. What makes sourdough unique is its reliance on a natural fermentation process using a “starter” instead of commercial yeast. This not only gives it its signature tangy flavor but also enhances its digestibility. Today, sourdough remains a beloved classic, with modern twists like whole-grain versions or adding seeds and nuts for extra texture.
Why You’ll Fall in Love with This Sourdough Bread Recipe
This sourdough bread recipe is all about simplicity and flavor. It doesn’t require any fancy equipment or hard-to-find ingredients, yet the results are restaurant-worthy. The slow fermentation process develops complex flavors that store-bought bread simply can’t match. Plus, there’s nothing quite as rewarding as slicing into a loaf you’ve nurtured from start to finish. Whether you’re craving a slice slathered with butter or paired with your favorite soup, this bread will quickly become a household favorite.
Perfect Occasions to Bake Sourdough Bread
This homemade sourdough bread is perfect for so many occasions! Impress guests at brunch by serving warm slices alongside jams and cheeses. Pack it for picnics or road trips—it stays fresh longer than regular bread thanks to its sturdy crust. During cozy family dinners, pair it with hearty stews or soups for a comforting meal. And let’s not forget lazy weekends when you can sip coffee while enjoying a thick slice toasted to perfection.
Ingredients for Your Sourdough Bread Masterpiece
- 500g bread flour (or all-purpose flour)
- 350g water, lukewarm
- 100g active sourdough starter
- 10g salt
Substitution Options for Flexibility
- Replace bread flour with whole wheat flour for a nuttier taste.
- Use filtered water if your tap water has strong chlorine odors.
- Add-ins like sunflower seeds, oats, or dried herbs can elevate the flavor profile.
Step-by-Step Preparation Guide
Step 1: Feed Your Starter
Before diving into the dough, ensure your sourdough starter is lively and bubbly. Feed it equal parts flour and water about 6-8 hours before you plan to mix your dough. A healthy starter should double in size within 4-6 hours. Pro tip: Keep your starter in a warm spot—around 75°F (24°C)—to encourage activity. Watching those tiny bubbles form is almost therapeutic!
Step 2: Mix the Dough
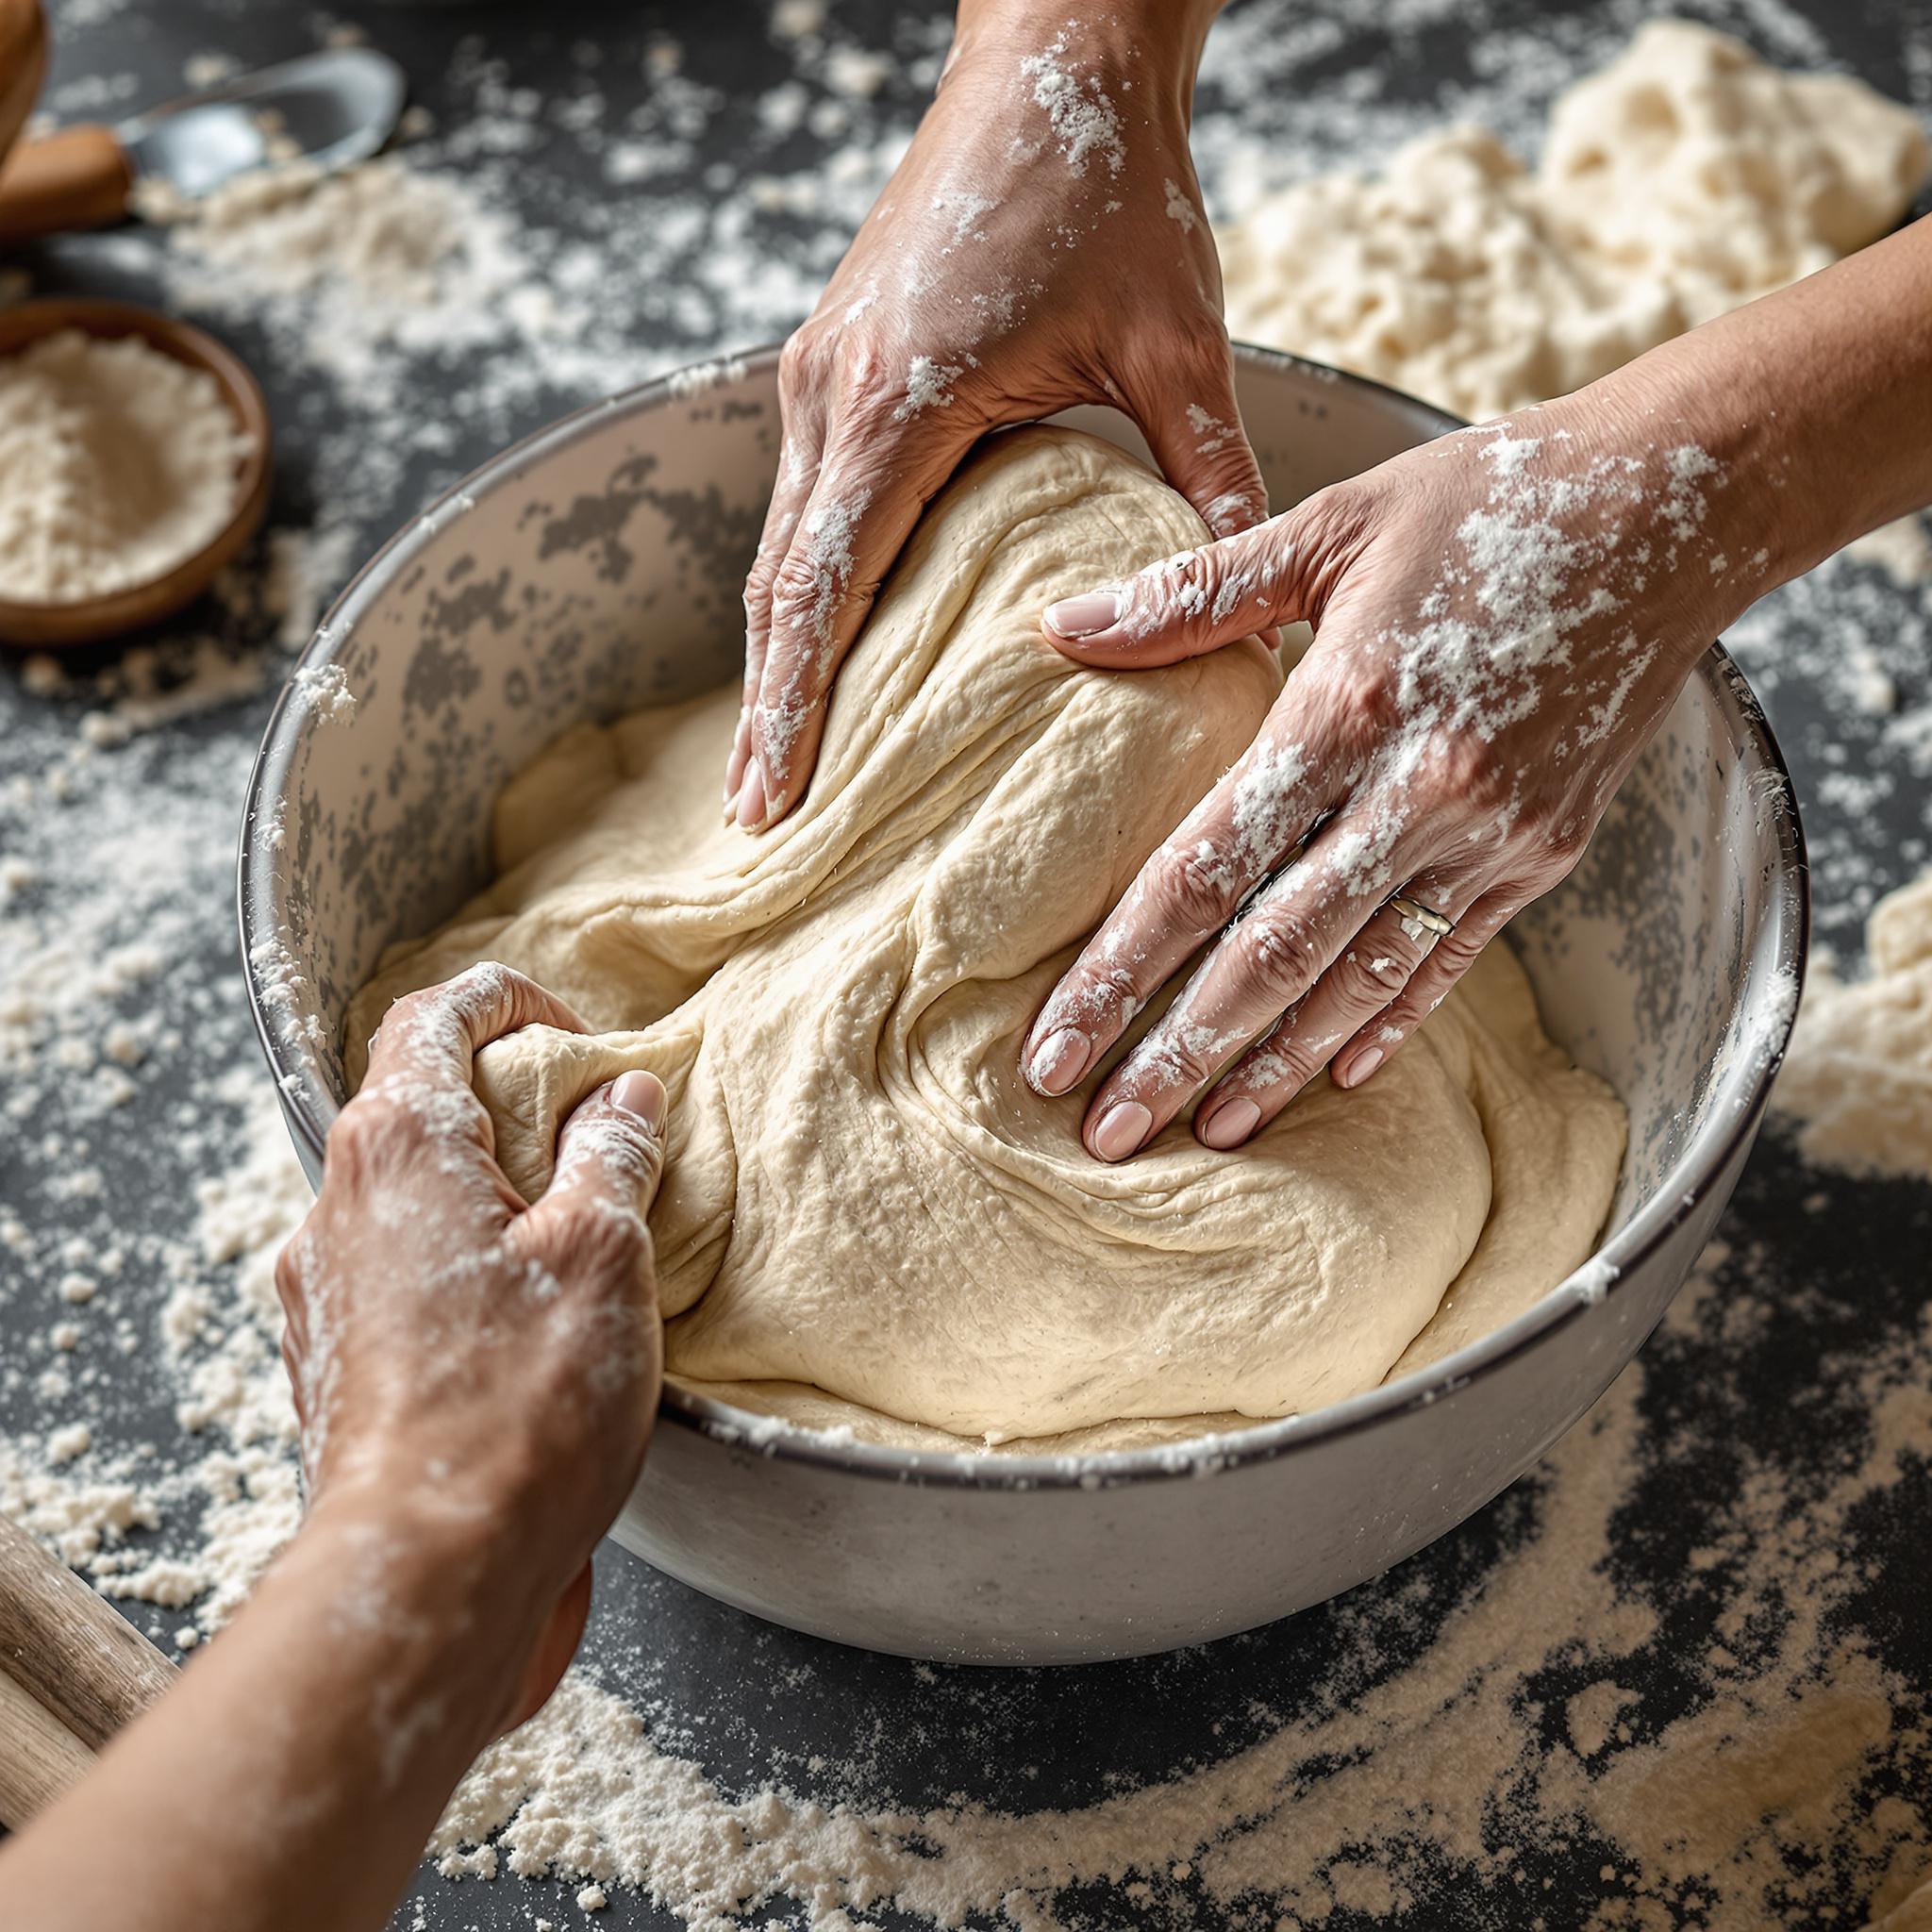
In a large mixing bowl, combine the flour, water, and starter. Use your hands or a wooden spoon to bring everything together until no dry bits remain. Let the mixture rest for 30 minutes—this step, called autolyse, allows the flour to fully hydrate and gluten to develop naturally. As you watch the dough relax, notice how smooth and elastic it becomes.
Step 3: Add Salt and Knead
Sprinkle the salt over the dough and knead gently to incorporate. If you’re hand-kneading, aim for about 10 minutes; otherwise, use a stand mixer with a dough hook for 5-7 minutes. The dough should feel soft and slightly tacky but not sticky. Pro tip: Resist the urge to add more flour unless absolutely necessary—it might make the bread too dense.
Step 4: Bulk Fermentation
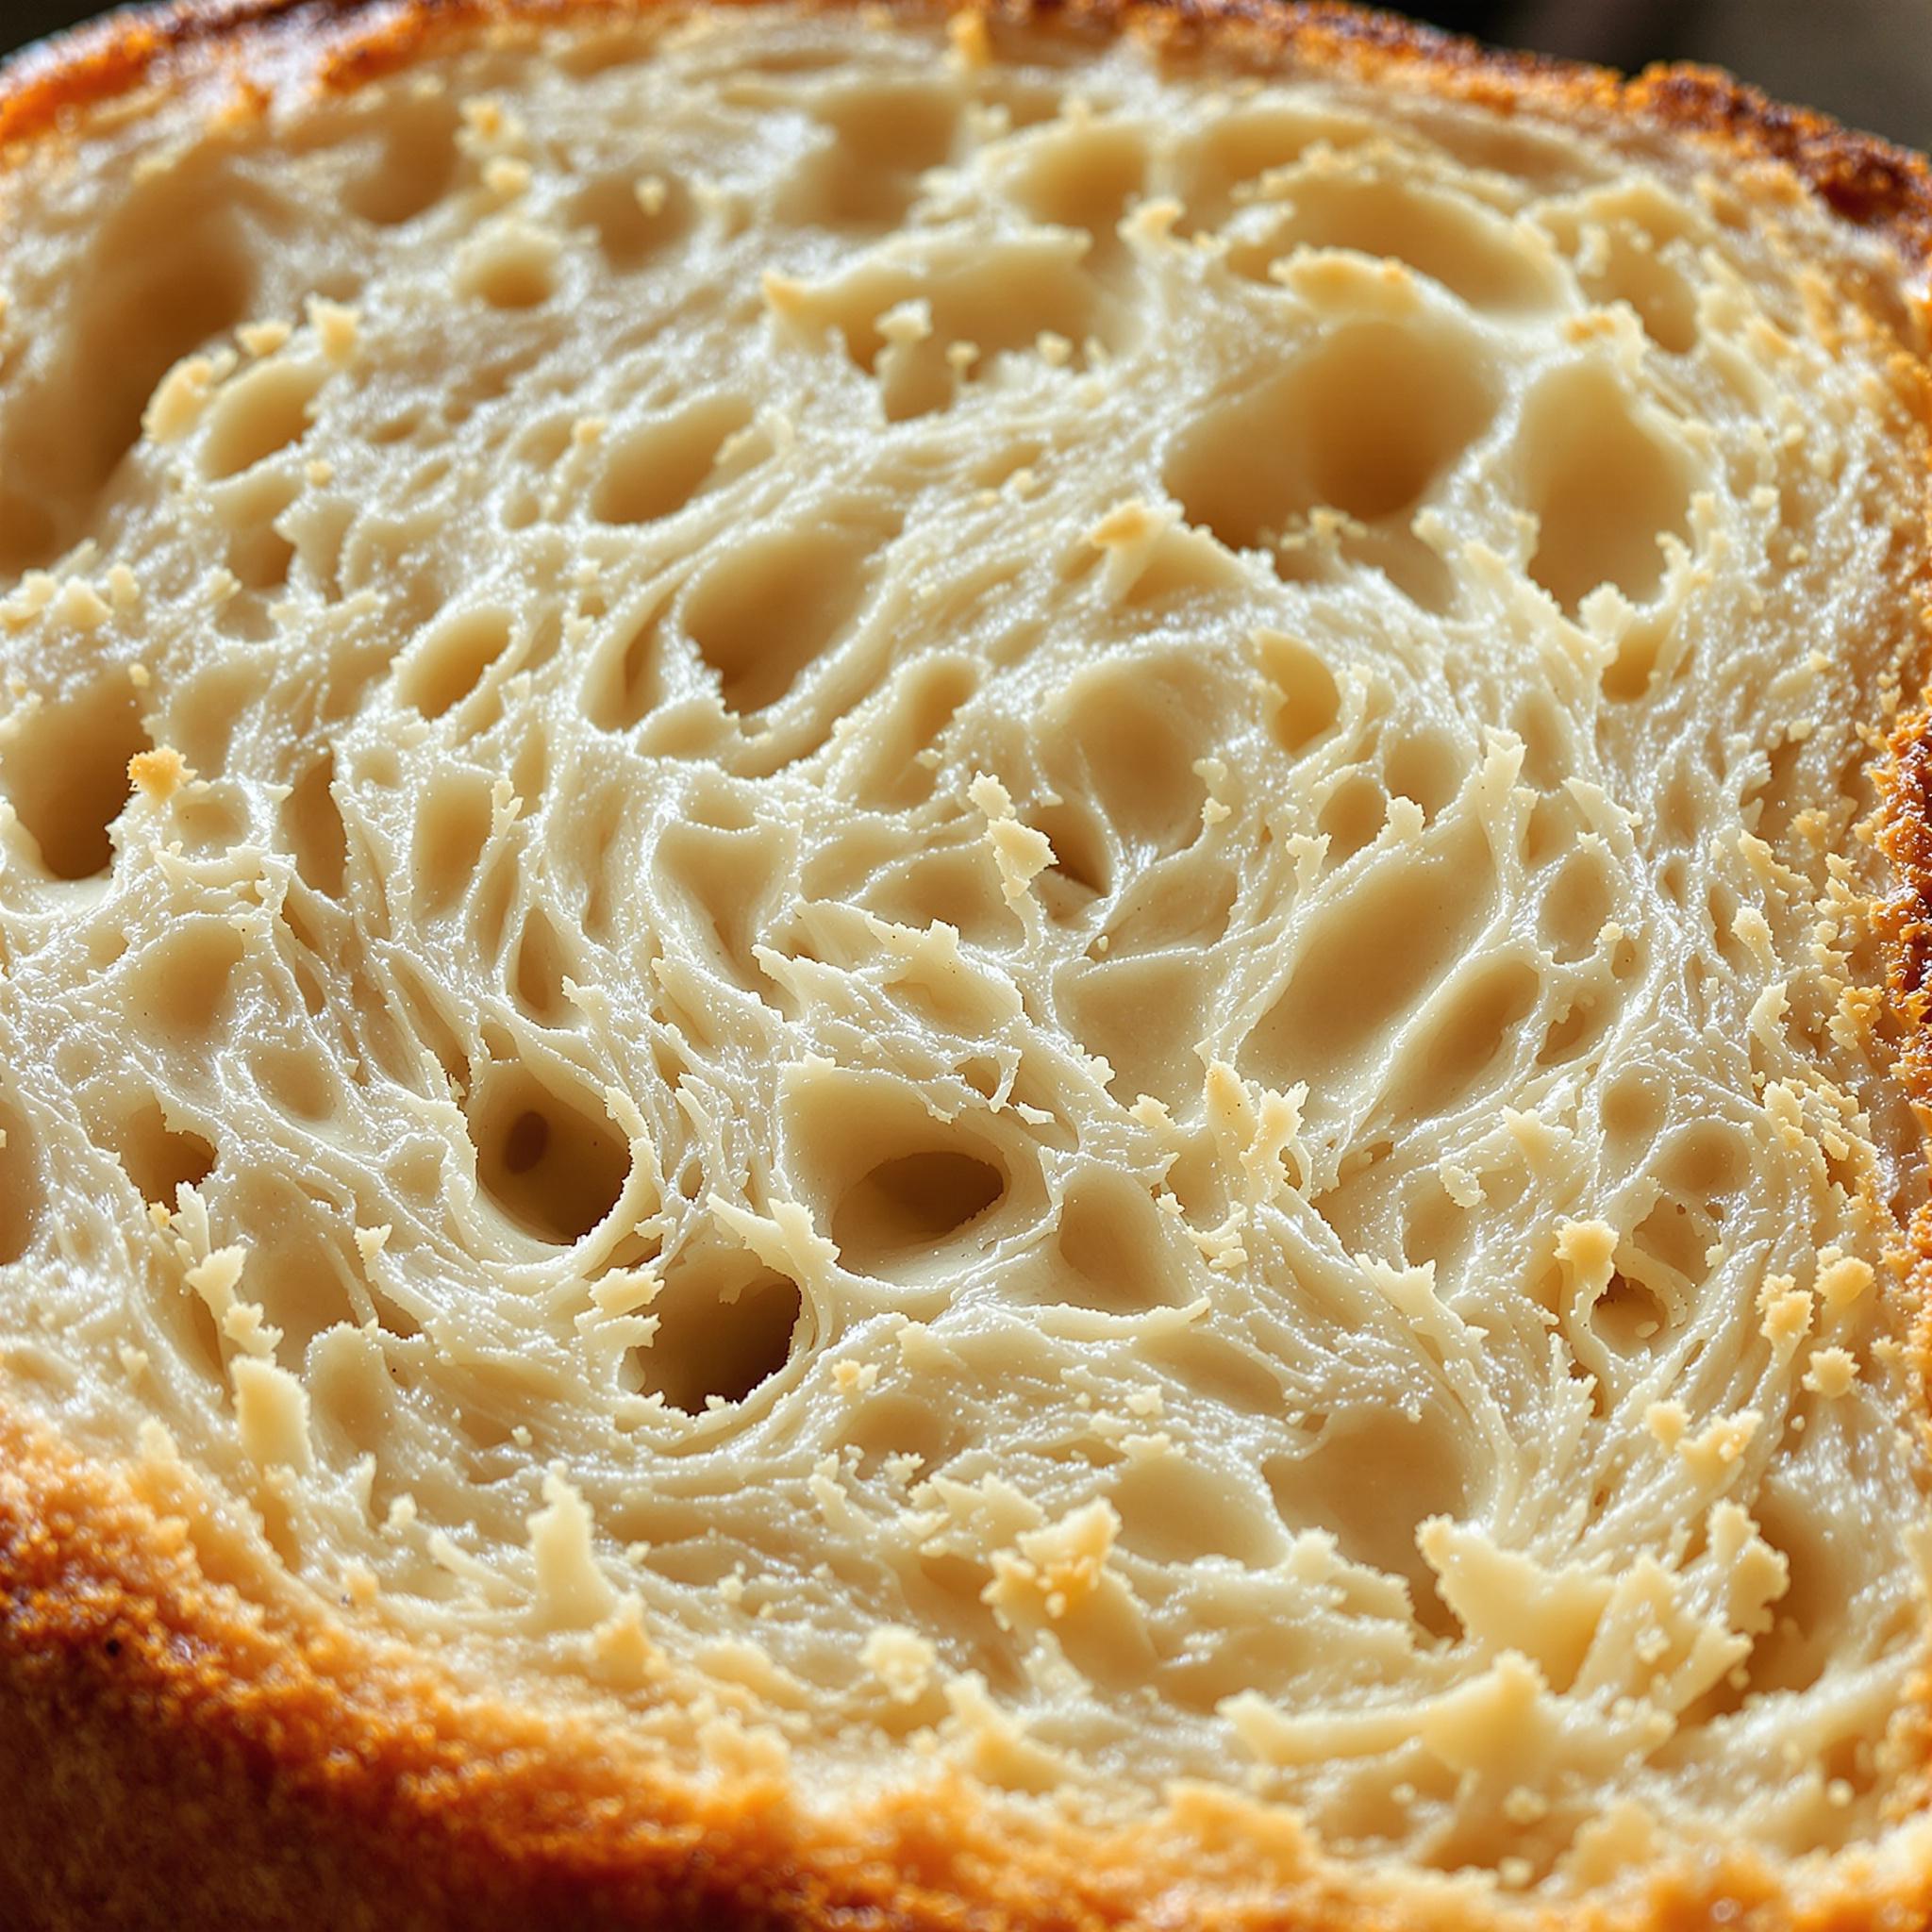
Cover the dough and let it ferment at room temperature for 4-6 hours, depending on how warm your kitchen is. During this time, perform stretch-and-fold techniques every 30 minutes to build strength. Each fold helps trap air pockets, which later create those beautiful holes in your finished loaf. By the end, the dough will look puffy and airy.
Step 5: Shape and Proof
Turn the dough onto a lightly floured surface and shape it into a round or oval boule. Place it seam-side up in a proofing basket dusted with flour. Cover and refrigerate overnight (8-12 hours). This cold proof slows fermentation, deepening the flavor and making the dough easier to score before baking.
Step 6: Bake to Golden Perfection
Preheat your oven to 475°F (245°C) with a Dutch oven inside. Once hot, carefully transfer the dough to the preheated pot, score the top with a sharp blade, and cover. Bake for 20 minutes, then uncover and bake for another 20-25 minutes until the crust is deep golden brown. The smell? Pure heaven. Cool completely before slicing to avoid squishing the delicate crumb.
Chef’s Tip: Enhance Flavor with a Steam Bath
To achieve that iconic crispy crust, place a small oven-safe dish filled with water on the lower rack while baking. The steam mimics professional bakery ovens, creating a perfectly blistered exterior. Trust me, it makes all the difference!
Time Breakdown for Sourdough Bread
- Prep Time: 30 minutes
- Fermentation Time: 4-6 hours
- Proofing Time: 8-12 hours
- Baking Time: 40-45 minutes
- Total Time: Approximately 14-16 hours
Nutritional Information
- Calories per slice (approx.): 150
- Protein: 5g
- Fat: 1g
- Carbohydrates: 30g
- Fiber: 2g
An Interesting Curiosity About Sourdough Bread
Did you know that San Francisco is famous for its unique sourdough flavor? The local bacteria strain, Lactobacillus sanfranciscensis, contributes to its distinct tanginess. No wonder sourdough lovers rave about Bay Area loaves!
Necessary Tools for Success
- Dutch oven or heavy-duty pot with lid
- Proofing basket or bowl lined with a tea towel
- Bench scraper for handling dough
- Lame or razor blade for scoring
Storage Instructions for Sourdough Bread
To keep your sourdough loaf fresh, store it in a paper bag at room temperature for up to 3 days. Avoid plastic bags, as they trap moisture and soften the crust. For longer storage, wrap the bread tightly in foil and freeze for up to 3 months. When ready to enjoy, thaw at room temperature and reheat in the oven for a few minutes to restore crispiness.
If you live in a humid climate, consider storing the bread cut-side down on a cutting board. This prevents the exposed crumb from drying out while keeping the crust intact. Lastly, never refrigerate your bread—it accelerates staling.
Tips and Tricks for Perfect Sourdough Bread
- Weigh your ingredients for precision—baking is a science!
- Keep notes on each bake to track improvements.
- Experiment with hydration levels to adjust the crumb structure.
Serving Suggestions for Sourdough Bread
- Top slices with avocado, poached eggs, and chili flakes for breakfast.
- Pair with creamy soups like tomato basil or roasted butternut squash.
Healthier Alternatives for Sourdough Bread
Looking to tweak this recipe? Here are six variations:
- Whole Grain Sourdough: Substitute half the white flour with whole wheat for added fiber and nutrients.
- Seeded Sourdough: Mix in pumpkin seeds, flaxseeds, or chia seeds for crunch and omega-3s.
- Herb-Infused Sourdough: Add rosemary, thyme, or garlic powder for savory flair.
- Einkorn Sourdough: Use ancient grain einkorn flour for a nutrient-dense option.
- Rye Sourdough: Incorporate rye flour for a denser, earthier loaf.
- Low-Carb Sourdough: Replace some flour with almond or coconut flour for fewer carbs.
Common Mistakes to Avoid
Mistake 1: Using an Inactive Starter
One of the most common pitfalls is using a starter that hasn’t been properly fed or activated. An inactive starter won’t produce enough gas to leaven the dough, resulting in flat, dense bread. To avoid this, always check that your starter doubles in size within 4-6 hours after feeding. Pro tip: Mark the jar with a rubber band to monitor growth easily.
Mistake 2: Overflouring the Dough
Adding too much flour during mixing or shaping can lead to tough, dry bread. Remember, sourdough dough is meant to be slightly sticky. Instead of overflouring, wet your hands or use a bench scraper to handle the dough without sticking. Patience pays off here!
Mistake 3: Skipping the Cold Proof
While it may seem tempting to skip the overnight proof, this step is crucial for developing depth of flavor. Without it, your bread might lack complexity and have a less pronounced tang. Plan ahead and embrace the wait—it’s worth it!
Frequently Asked Questions About Sourdough Bread
How do I know my sourdough starter is ready?
Your starter is ready when it doubles in size, smells pleasantly tangy, and floats in water. This usually takes 4-6 hours after feeding.
Can I bake sourdough without a Dutch oven?
Yes! Use a baking stone or steel and create steam by placing a pan of water in the oven. Results may vary slightly, but the bread will still turn out delicious.
What causes large holes in sourdough bread?
Large holes come from proper fermentation and gentle handling. Overmixing or degassing the dough too aggressively can collapse air pockets.
Why does my bread taste bland?
A bland flavor often stems from insufficient fermentation or underproofing. Extend bulk fermentation or proofing times to enhance taste.
Is sourdough healthier than regular bread?
Yes! The fermentation process breaks down phytic acid, improving digestibility and nutrient absorption compared to commercial yeast bread.
Can I use tap water for my starter?
Most tap water works fine, but if yours is heavily chlorinated, opt for filtered water to protect the beneficial bacteria in your starter.
How long does sourdough last?
At room temperature, sourdough stays fresh for 2-3 days. Freeze leftovers for up to 3 months for extended shelf life.
Why did my bread collapse after scoring?
Collapsing occurs when the dough is overproofed or scored too deeply. Aim for shallow cuts and ensure proper tension when shaping.
Do I need a scale to make sourdough?
While not mandatory, a scale ensures accuracy and consistency. Baking by weight eliminates guesswork and improves results.
What’s the best way to revive old starter?
Feed your starter twice daily with equal parts flour and water until it regains vigor. Discard excess starter to maintain balance.
Conclusion
Baking sourdough bread is a journey filled with learning, patience, and joy. From nurturing your starter to pulling a golden loaf from the oven, every step connects you to centuries of tradition. Whether you’re whipping up a classic version or experimenting with new twists, this recipe promises endless possibilities. So roll up your sleeves, gather your ingredients, and embark on your own sourdough adventure—you won’t regret it!
Equipment
- Large mixing bowl
- Wooden spoon or hands
- Dutch oven
- Proofing basket
- Lame or razor blade
Ingredients
- 500 g bread flour (or all-purpose flour)
- 350 g water lukewarm
- 100 g active sourdough starter
- 10 g salt
Instructions
- Ensure your sourdough starter is lively and bubbly before mixing your dough.
- Combine flour, water, and starter, mix until no dry parts remain, then let rest for 30 minutes.
- Add salt and knead until the dough is smooth and elastic.
- Let the dough ferment for 4-6 hours, performing stretches and folds every 30 minutes.
- Shape the dough, place in a proofing basket, and refrigerate overnight.
- Preheat oven to 475°F and bake in a Dutch oven until golden brown.