
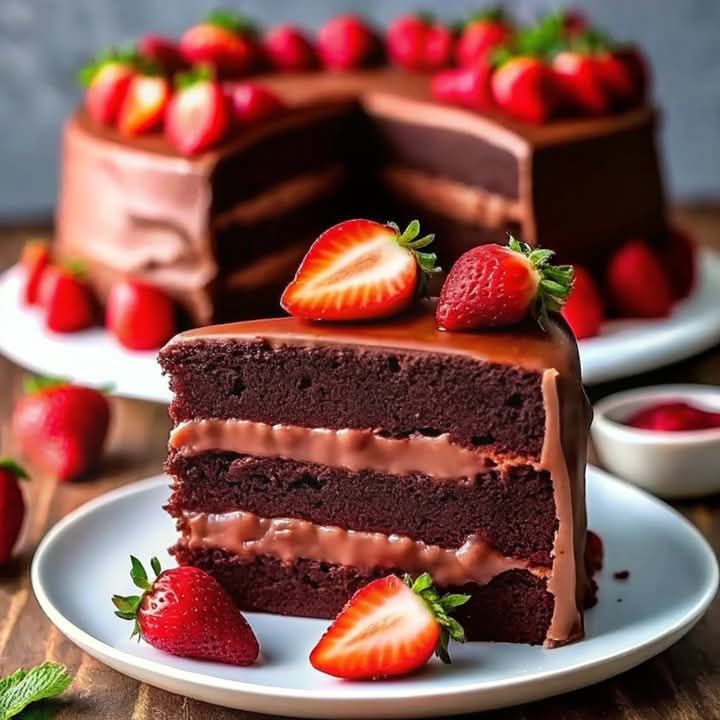
Chocolate Cake with Fresh Strawberry Filling: A Berry Blissful Treat!
You know that moment when you take a bite of something so good, time just stops? For me, it’s always with a slice of truly great cake. My quest for the perfect celebratory dessert led me to create this Chocolate Cake with Fresh Strawberry Filling. The rich, dark cocoa layers paired with a bright, tangy homemade strawberry jam create a flavor dance that’s simply magical. I tested it for my daughter’s birthday, and let’s just say the silence at the table was the best compliment I could have hoped for!
The Story Behind This Strawberry Chocolate Delight
The combo of chocolate and strawberries isn’t new—it’s a timeless romance. Think of those classic chocolate-dipped berries you see every Valentine’s Day. This cake is my home-baker’s tribute to that perfect pair. While classic Black Forest cakes use cherries, I wanted the sunny, fresh flavor of real strawberries shining through. This version skips the jarred fillings and the sometimes-overwhelming sweetness, opting instead for a simple, vibrant fruit filling you cook up yourself. It feels both classic and wonderfully new.
Why You’ll Absolutely Adore This Recipe
This isn’t just another chocolate cake. First, the boiled water in the batter guarantees a super moist crumb that stays soft for days. Second, that fresh strawberry filling cuts through the richness with its perfect sweet-tart punch. Third, it’s a stunner! The layers, the frosting, the garnish—it looks like it came from a fancy bakery but is made with love (and regular bowls) in your own kitchen. It’s the kind of dessert that makes any day feel special.
Perfect Occasions for Your Berry Chocolate Masterpiece
This cake is a versatile superstar! It’s ideal for birthdays, Mother’s Day brunches, or anniversary dinners. I love making it in the spring and summer when strawberries are at their peak. It’s also a wonderful “just because” treat to share with neighbors or to bring to a potluck where you want to be the undisputed dessert hero. Honestly, a quiet Tuesday night with a cup of coffee and a slice of this cake is a pretty fantastic occasion, too.
Gather Your Ingredients for This Berry Chocolate Delight
Here’s everything you’ll need to create this dreamy dessert. Let’s get your mise en place ready!
For the Cake Layers:
- 2 large eggs
- 1 ¾ cups all-purpose flour
- ¾ cup unsweetened cocoa powder
- 1 ½ cups sugar
- 1 ½ tsp baking powder
- 1 ½ tsp baking soda
- 1 tsp salt
- 1 cup whole milk
- ½ cup vegetable oil
- 2 tsp vanilla extract
- 1 cup boiling water
For the Strawberry Filling:
- 2 cups fresh strawberries, hulled & sliced
- ½ cup sugar
- 1 tbsp lemon juice
- ¼ cup cornstarch
- 1 cup water
For the Chocolate Frosting:
- 1 cup unsalted butter, softened
- 4 cups powdered sugar
- ¾ cup unsweetened cocoa powder
- ½ cup heavy cream
- 2 tsp vanilla extract
Smart Substitutions for Your Pantry
Out of something? No worries! Here are some easy swaps:
- All-purpose flour: A 1:1 gluten-free flour blend works well.
- Whole milk: Any milk you have—2%, almond, or oat milk—will do the job.
- Fresh strawberries: In a pinch, use frozen thawed strawberries. Just drain any excess liquid.
- Heavy cream: For the frosting, full-fat canned coconut cream can be a dairy-free alternative.
- Cornstarch: An equal amount of tapioca starch or arrowroot powder can thicken the filling.
Step-by-Step: How to Create Your Strawberry Chocolate Delight
Step 1: Bake the Chocolate Cake Layers
Preheat your oven to 350°F (175°C) and grease two 9-inch cake pans. In a large bowl, whisk together the sugar, eggs, and vanilla until they become a pale, smooth mixture. Pour in the milk and oil, and whisk again until it’s all beautifully combined. In a separate bowl, sift together the flour, cocoa powder, baking powder, baking soda, and salt. This ensures no cocoa lumps! Gradually add these dry ingredients to your wet mixture, stirring just until the batter is smooth and thick. Now, carefully stir in the boiling water. The batter will become very thin—this is exactly right! It’s the secret to an incredibly moist cake. Divide the thin batter evenly between your prepared pans. Bake for 30-35 minutes. You’ll know it’s done when a toothpick poked in the center comes out clean. Let the cakes cool in the pans for 10 minutes, then turn them out onto a wire rack to cool completely. Pro tip: For perfectly flat layers, you can trim the domed tops with a serrated knife once they’re cool.
Step 2: Prepare the Fresh Strawberry Filling
In a medium saucepan, combine your sliced strawberries, sugar, and lemon juice. In a small bowl, make a slurry by mixing the cornstarch with the 1 cup of water until it’s completely smooth with no lumps. Pour this slurry into the saucepan with the berries. Cook over medium heat, stirring frequently. Watch as the mixture slowly transforms from a cloudy pink liquid into a gorgeous, glossy, thick jam. The strawberries will soften and break down a bit, creating a chunky, spreadable filling. This process takes about 5-10 minutes. Once thickened, remove it from the heat and let it cool completely. It will continue to thicken as it sits.
Step 3: Assemble Your Masterpiece
This is where the magic happens! Place your first completely cooled cake layer on a plate or cake stand. If you trimmed the top, place the cut side up—it helps soak in flavor. Spoon all of that glorious, cooled strawberry filling onto the center of the cake layer. Use an offset spatula or the back of a spoon to spread it evenly, leaving a small border around the edge to prevent squishing out. Gently place the second cake layer on top, pressing down slightly to secure it. Take a moment to admire your beautiful layered creation.
Step 4: Whip Up the Creamy Chocolate Frosting
In a large bowl, beat the softened butter with an electric mixer for 2-3 minutes until it’s light and creamy. Gradually add the powdered sugar and cocoa powder, mixing on low speed at first to avoid a sugar cloud! Once incorporated, increase the speed. Pour in the heavy cream and vanilla extract. Now, beat for a full 2-3 more minutes on medium-high speed. Watch as the frosting becomes light, fluffy, and spreadable. It should hold its shape beautifully. Chef’s tip: If your frosting seems too thick, add a splash more cream. Too thin? Add a bit more powdered sugar.
Step 5: Frost and Finish the Cake
First, apply a thin “crumb coat” all over the cake. This is a thin layer of frosting that traps any loose crumbs. Don’t worry about it looking perfect. Once the cake is thinly covered, pop it in the refrigerator for 15 minutes to let this coat set. This is the secret to a clean, professional-looking finish! After chilling, use the remaining frosting to cover the cake completely. Use your spatula to create smooth sides or fun swirls—it’s your canvas! For a final touch of elegance, decorate the top with a ring of fresh strawberries. Your Strawberry Chocolate Delight is ready to shine!
Timing is Everything
Prep Time: 30 minutes (active work)
Cook Time: 35 minutes (for the cakes and filling)
Cooling Time: 1 hour (crucial for easy assembly!)
Total Time: About 2 hours, 5 minutes from start to finish.
Chef’s Secret for the Ultimate Flavor
Want an extra flavor boost? Brush the top of each cake layer with a simple syrup (equal parts sugar and water, heated until dissolved) flavored with a little kirsch or Chambord liqueur before adding the filling. It adds a subtle, sophisticated depth and keeps the cake incredibly moist!
A Sweet Little Fact
Did you know the combination of chocolate and strawberry is a classic for a scientific reason? The compounds in both foods share similar flavor profiles, which makes them taste even better together than they do apart. It’s a true culinary harmony!
Your Baking Toolkit
- Two 9-inch round cake pans
- Mixing bowls (large and medium)
- Electric hand mixer or stand mixer
- Wire cooling racks
- Saucepan
- Whisk and spatulas (offset is great for frosting)
- Measuring cups and spoons
How to Store Your Dreamy Cake
Short-term storage: Because of the fresh fruit filling, this cake is best stored in the refrigerator. Cover it with a cake dome or loosely with plastic wrap. It will stay fresh and delicious for up to 3-4 days. Let slices sit at room temperature for 15 minutes before serving to soften the frosting.
Can you freeze it? Absolutely! Freeze the frosted cake (without the fresh strawberry garnish) for up to 2 months. Wrap it tightly in a few layers of plastic wrap, then foil. Thaw overnight in the refrigerator.
For the components: You can bake the cake layers up to a day ahead, wrap them well, and store at room temperature. The strawberry filling can be made 2-3 days in advance and kept in a sealed container in the fridge.
Tips & Tricks for Baking Success
- Use room temperature eggs and milk for a smoother, better-incorporated batter.
- Don’t skip the crumb coat! It’s the number one trick for a polished final look.
- If your strawberries aren’t super sweet, you can add an extra tablespoon of sugar to the filling.
- Sift your cocoa and powdered sugar for the frosting to avoid any lumps.
Presentation Ideas to Impress Your Guests
- Dust the top with edible gold dust or shimmer for a festive look.
- Create a “naked cake” effect by doing a very light frosting coat, letting the layers and filling peek through.
- Pipe swirls of extra frosting on top and place a small, perfect strawberry on each one.
- Serve each slice with a drizzle of extra strawberry sauce or a dollop of whipped cream.
Healthier & Tasty Variations to Try
Love the idea but want to mix it up? Here are six delicious spins on this classic:
- Gluten-Free Delight: Simply swap the all-purpose flour for your favorite 1:1 gluten-free baking blend.
- Vegan Wonder: Use flax eggs, plant-based milk, vegan butter, and coconut cream. The boiling water trick still works for moisture!
- Raspberry Rendezvous: Substitute fresh raspberries for the strawberries. The seeds add a nice texture and the flavor is tart and bright.
- Orange Chocolate Dream: Add the zest of one orange to the cake batter and use an orange curd filling instead of strawberry.
- Mocha Infusion: Dissolve 1-2 tablespoons of instant espresso powder into the boiling water before adding it to the cake batter for a coffee-chocolate twist.
- Mini Cake Treats: Bake the batter in cupcake tins. Core the center of the cooled cupcakes and fill with the strawberry jam before frosting for adorable hand-held delights.
Love Decadent Desserts? Try These Next!
If your sweet tooth is calling for more, you have to explore our other indulgent recipes. For the ultimate chocolate experience, you cannot beat our show-stopping Hot Fudge Sundae Brownie Cheesecake. If you’re a fan of layered treats, the famous Ultimate Slutty Brownies with their cookie dough and Oreo layers are a must-make. For a stunning rolled dessert, the Peanut Butter Cup Cake Roll is pure, creamy joy. And when citrus season hits, our sunny Lemon Condensed Milk Drizzle Cake is irresistibly tender and tangy.
Common Mistakes to Avoid With This Cake
Mistake 1: Adding a Warm Filling
It’s tempting to assemble the cake as soon as the strawberry filling is done cooking. But if the filling is still warm, it will melt the frosting and make the cake layers soggy. The heat turns the filling runny again, causing a messy slide. Always let the filling cool completely to room temperature, or even chill it in the fridge for a bit. A cool, thick filling is much easier to control and will keep your cake layers beautifully textured.
Mistake 2: Overmixing the Cake Batter
Once you add the flour to the wet ingredients, you need to be gentle. Overmixing after the flour is incorporated develops the gluten in the flour. This can make your cake tough, dense, and chewy instead of soft and tender. Mix just until you no longer see streaks of dry flour. It’s okay if the batter looks a little lumpy—it will smooth out. Remember, a light hand makes a light cake!
Mistake 3: Skipping the Crumb Coat
You’ve made beautiful, dark chocolate cake layers. When you start frosting, those dark crumbs will get mixed into your pristine chocolate frosting, creating a gray, speckled mess on your final coat. The thin, initial crumb coat seals in all those loose crumbs. Chilling it for 15 minutes sets this layer. Then, when you apply your final, beautiful layer of frosting, it glides on smoothly over a clean, sealed surface with no crumbs in sight.
Mistake 4: Using Cold Butter for Frosting
Butter that’s straight from the fridge is too hard to whip up properly. You’ll end up with a lumpy, difficult-to-spread frosting that might even look curdled. Your butter should be softened to room temperature—it should yield slightly when you press it with your finger but not be oily or melted. Soft butter whips up full of air, creating that light, fluffy, cloud-like frosting texture we all love. Plan ahead and take your butter out about an hour before you start.
Balancing Indulgence with Wellness
Desserts like this chocolate strawberry cake are a wonderful part of life’s celebrations. Enjoying them mindfully as part of a balanced approach is key. For great foundational advice on balancing treats with nutritious foods, the CDC offers excellent resources on building healthy eating habits for the whole family.
If this Strawberry Chocolate Delight has you excited to bake more, you’ll find a whole world of inspiration in our collection of favorite cake and cupcake recipes.
Frequently Asked Questions (FAQ)
Can I use frozen strawberries for the filling?
Yes, you can absolutely use frozen strawberries! There’s no need to thaw them first. Just add the frozen berries directly to the saucepan with the other filling ingredients. You may need to add an extra minute or two to the cooking time since you’re starting from frozen. Keep in mind that frozen berries often release more liquid as they cook, so your filling might be a bit softer. If it seems too runny after cooking, you can mix an extra teaspoon of cornstarch with a tablespoon of cold water and stir it in, cooking for another minute until thickened.
How can I make sure my cake layers are perfectly flat?
Even baking is the best way to get flat layers. Make sure your oven is properly preheated and your racks are centered. Using light-colored metal pans (not dark non-stick) helps prevent the edges from cooking too fast. You can also use bake-even strips—fabric strips you soak in water and wrap around the outside of the pan. They insulate the edges so the cake rises evenly. If a dome still forms, simply let the cakes cool, then use a long serrated knife to carefully slice off the rounded top to create a flat surface. Save the scraps for a trifle!
Can I make this cake a day ahead?
Making it a day ahead is actually a fantastic idea! The flavors have time to meld and the cake becomes even more moist. You can bake the layers and make the filling the day before. Wrap the cooled cake layers tightly in plastic wrap and store at room temperature. Keep the filling in a sealed container in the fridge. On the day you want to serve, let the filling come to room temperature, then assemble and frost the whole cake. The frosted cake can sit in the fridge for several hours before your event.
My frosting is too runny/thick. How can I fix it?
Frosting consistency is easy to adjust. If it’s too runny, it likely needs more powdered sugar to thicken it up. Add about a quarter cup at a time and beat well until it reaches a spreadable consistency. If it’s too thick and difficult to spread, it needs more liquid. Add more heavy cream, but do it slowly—just one tablespoon at a time. Beat well after each addition until it becomes smooth and fluffy. Temperature also affects it; if your kitchen is very warm, chilling the bowl for 10 minutes can help firm it up.
What’s the best way to slice a layer cake cleanly?
For picture-perfect slices, use a long, thin, sharp knife. Dip the knife in very hot water and wipe it dry with a clean towel before each cut. The heat helps the knife glide smoothly through the frosting and cake without tearing or dragging. Make a gentle sawing motion rather than pressing straight down. Wipe the blade clean between slices to keep each one looking pristine. This little trick makes serving your beautiful cake so much easier and more elegant.
Can I turn this recipe into cupcakes?
This recipe adapts wonderfully to cupcakes! Line your muffin tins with paper liners. Fill each liner about 2/3 full with the cake batter. Bake at the same temperature (350°F) for about 18-22 minutes, or until a toothpick comes out clean. Let them cool completely. To fill them, use a small paring knife or a cupcake corer to remove a bit of the center from the top of each cupcake. Spoon or pipe the cooled strawberry filling into the hole. Frost as usual with the chocolate frosting for delicious, filled strawberry chocolate cupcakes!
Is there a way to make the filling less sweet?
If you prefer a tarter, more fruit-forward filling, you can easily reduce the sugar. Start with 1/4 cup of sugar instead of 1/2 cup. Taste your strawberries—if they are very sweet, you might not need much sugar at all. The lemon juice will also enhance the tartness. Remember, the sugar doesn’t just add sweetness; it also helps preserve the color and texture of the fruit. Cooking it a bit longer can help concentrate the natural fruit flavors if you’re using less sugar.
My cake sank in the middle. What happened?
A sunken cake is usually a sign of underbaking or too much leavening. Oven temperatures can vary, so your cake might need a few more minutes than the recipe states. Always test with a toothpick—it should come out with a few moist crumbs, but not wet batter. Also, make sure your baking powder and baking soda are fresh (not older than 6 months). Old leaveners lose their power, while too much can cause the cake to rise too quickly and then collapse. Measure your flour correctly by spooning it into the cup and leveling it off; packing it down adds too much flour and can cause sinking too.
Can I use a different type of fruit?
The beauty of this recipe is its versatility! The fresh fruit filling method works with many berries. Try it with blueberries, blackberries, or a mix of raspberries and strawberries. For stone fruits like peaches or cherries, chop them small and you may need to adjust the cornstarch slightly as they have different pectin and water content. The cooking process is the same: cook until thickened. Each fruit will give your Chocolate Delight a completely new and delicious personality.
Why do we add boiling water to the cake batter?
Adding boiling water does two amazing things. First, it “blooms” the cocoa powder. This means the hot water opens up the cocoa particles, releasing a deeper, richer chocolate flavor than you’d get with cold liquid. Second, it thins the batter significantly. A thin batter rises more evenly and bakes into a cake with an exceptionally moist, tender, and almost velvety crumb. Don’t be alarmed when your batter looks more like chocolate soup—it’s supposed to! This is a classic technique for super-moist chocolate cakes.
Ready, Set, Bake!
So, are you ready to create some magic in your kitchen? This Chocolate Cake with Fresh Strawberry Filling is more than just a dessert; it’s a project filled with love, a stunning centerpiece, and a guarantee of happy faces. The process is fun, the result is breathtaking, and the taste is pure joy. Remember, baking is an adventure. Don’t stress over perfection. Embrace any little “imperfections” as signs of your homemade touch. Now, preheat that oven, grab those strawberries, and get ready to make a memory—one delicious, decadent slice at a time. Happy baking!
Equipment
- Deux moules à gâteau ronds de 9 pouces
- Grand bol
- Fouet
- Racks de refroidissement
- Casserole moyenne
Ingredients
- 2 grands œufs
- 1.75 tasses farine tout usage
- 0.75 tasse cacao en poudre non sucré
- 1.5 tasses sucre
- 1.5 cuil. à café poudre à lever
- 1.0 cuil. à café sel
- 1 tasse lait entier
- 0.5 tasse huile végétale
- 2 cuil. à café extrait de vanille
- 1 tasse eau bouillante
- 2 tasses fraises fraîches, hachées
- 0.5 tasse sucre
- 1 cuil. à soupe jus de citron
- 0.25 tasse fécule de maïs
- 1 tasse eau
- 1 tasse beurre doux, ramolli
- 4 tasses sucre en poudre
- 0.75 tasse cacao en poudre non sucré
- 0.5 tasse crème épaisse
- 2 cuil. à café extrait de vanille
Instructions
- Préchauffez votre four à 175°C et graissez deux moules à gâteau de 9 pouces.
- Dans un grand bol, fouettez ensemble le sucre, les œufs et l'extrait de vanille jusqu'à atteindre une consistance lisse.
- Ajoutez le lait et l'huile, et fouettez jusqu'à ce que tout soit bien mélangé.
- Tamisez ensemble la farine, le cacao, la poudre à lever, le bicarbonate de soude, et le sel dans un autre bol.
- Incorporez progressivement les ingrédients secs dans le mélange humide, en remuant jusqu'à obtenir une consistance lisse.
- Ajoutez soigneusement l'eau bouillante jusqu'à ce que la pâte soit liquide.
- Répartissez uniformément la pâte dans les moules préparés et enfournez pour 30-35 minutes, ou jusqu'à ce qu'un cure-dent en ressorte propre.
- Laissez refroidir les gâteaux dans les moules pendant 10 minutes, puis démoulez sur une grille pour refroidir complètement.
- Dans une casserole moyenne, combinez les fraises tranchées, le sucre et le jus de citron.
- Mélangez la fécule de maïs avec de l'eau pour faire une pâte, puis ajoutez-la à la casserole.
- Faites cuire à feu moyen jusqu'à ce que le mélange épaississe, environ 5-10 minutes, puis laissez refroidir complètement.
- Placez une couche de gâteau refroidie sur un plat et étalez la garniture de fraises refroidie sur le dessus.
- Ajoutez la deuxième couche de gâteau par-dessus la garniture de fraises.
- Battez le beurre ramolli jusqu'à ce qu'il soit crémeux, puis incorporez progressivement le sucre en poudre et le cacao.
- Versez la crème épaisse et l'extrait de vanille, puis mélangez jusqu'à obtention d'une consistance mousseuse et étalable.
- Appliquez une fine couche de glaçage sur le gâteau et réfrigérez pendant 15 minutes.
- Glaçez complètement le gâteau et décorez le dessus avec des fraises fraîches.
Notes
Nutrition

Hi, I’m Olivia Parker, the founder of BakingSecret.com and a lifelong lover of all things sweet and homemade. I grew up in a small town in Oregon, where the smell of fresh cookies in my family’s kitchen sparked my passion for baking. Over the years, I turned that passion into a mission: to help home bakers feel confident, inspired, and creative.
After studying food science and working in several artisan bakeries across the U.S., I decided to create a space where everyone from beginners to seasoned bakers can find reliable recipes, expert tips, and a warm, welcoming community. BakingSecret.com is my way of sharing the magic of baking with the world. When I’m not testing new recipes, you’ll find me exploring farmers’ markets, collecting vintage cookbooks, or perfecting my sourdough technique.