
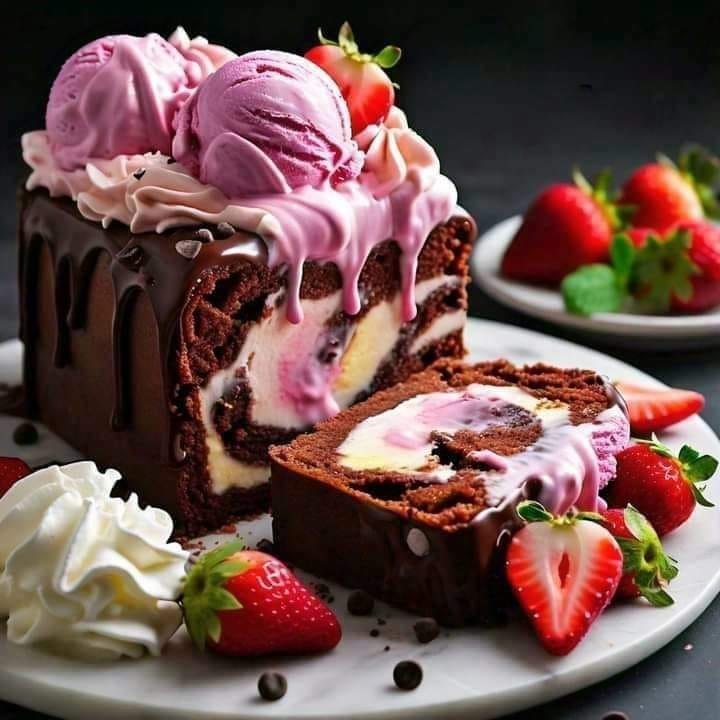
Decadent Strawberry Chocolate Fantasy Ice Cream Loaf Cake
Have you ever had one of those kitchen daydreams? You know, where you’re imagining the perfect dessert and it just gets more and more delicious in your mind? I was doing just that on a sunny afternoon, craving something cold, creamy, and utterly indulgent. I wanted the tangy sweetness of summer strawberries to meet the deep, rich comfort of chocolate. The result? This Strawberry Chocolate Fantasy Ice Cream Loaf Cake. It’s not just a dessert; it’s a whole experience in a slice. Let me tell you, the first time I served this to my book club, there was a moment of pure, blissful silence. Then came the happy sighs. That’s how you know it’s a winner.
A Sweet Slice of Imagination
While an ice cream cake might feel like a modern treat, the idea of pairing fruit and chocolate is timeless. Think of classic desserts like a chocolate cherry Swiss roll, where the bright fruit cuts through the rich cocoa. I took that same beloved principle and ran with it, creating a frozen masterpiece. The traditional loaf cake gets a juicy makeover with strawberry puree, then it’s layered with homemade ice cream speckled with real berries and chocolate chips. It’s my twist on the ice cream sandwiches I loved as a kid, but all grown up and elegant enough for any party.
Why You’ll Fall in Love With This Strawberry Chocolate Delight
This recipe is your new secret weapon for three big reasons. First, the texture is pure magic. You get the tender crumb of the cake, the smooth, creamy bite of the ice cream, and the final crack of a chocolate ganache shell. Second, it’s a make-ahead dream. You assemble it once, stash it in the freezer, and pull out a show-stopper whenever you need it. No last-minute fuss! Finally, it’s incredibly customizable. Don’t have strawberries? Use raspberries! Want more crunch? Add nuts. It’s a forgiving recipe that lets you play.
When to Serve Your Frozen Fantasy
This Strawberry Chocolate Delight isn’t just for summer. It’s perfect for birthday celebrations when you want something different from a frosted cake. It’s a star at potlucks (it travels frozen!). It turns a simple family movie night into a special occasion. I even made a mini version for a fancy ladies’ luncheon, and it was the talk of the table. Any moment that calls for a smile and a spoon is the right moment for this cake.
Gathering Your Ingredients for Success
Using good-quality, simple ingredients makes all the difference here. Here’s what you’ll need:
For the Strawberry Cake:
- 1 1/2 cups all-purpose flour
- 1 cup granulated sugar
- 2 teaspoons baking powder
- 1 teaspoon salt
- 1/2 cup unsalted butter, softened
- 2 large eggs
- 2 teaspoons vanilla extract
- 1 cup strawberry puree (from fresh or frozen berries)
For the Fantasy Ice Cream Layer:
- 2 cups heavy cream
- 1 cup whole milk
- 1/2 cup granulated sugar
- 1/4 cup strawberry jam
- 1/4 cup finely chopped strawberries
- 1/2 cup semisweet chocolate chips
For the Chocolate Ganache Drizzle:
- 1 cup semisweet chocolate chips
- 1 tablespoon unsalted butter
Easy Swaps and Substitutions
No need to run to the store! This recipe is flexible.
- Flour: A 1-to-1 gluten-free flour blend works perfectly.
- Berries: Swap the strawberry puree and jam for raspberry, blueberry, or even mango.
- Chocolate: Use dark chocolate for a less sweet kick, or white chocolate for a pretty contrast.
- Ice Cream Base: For a quicker version, use 1.5 quarts of high-quality store-bought strawberry ice cream, softened slightly and mixed with the extra chopped berries and chocolate chips.
Creating Your Strawberry Chocolate Delight: Step-by-Step
Step 1: Bake the Perfect Pink Cake
Start by preheating your oven to 350°F (175°C). Grease a 9×5-inch loaf pan well. In a large bowl, whisk together the flour, sugar, baking powder, and salt. Add the softened butter, eggs, vanilla, and that gorgeous, ruby-red strawberry puree. Mix just until the batter is smooth and uniformly pink. Pour it into your prepared pan. The smell of strawberries will start to fill your kitchen already! Bake for 45-50 minutes, until a toothpick inserted in the center comes out clean. Let the cake cool completely in the pan on a wire rack. Pro tip: For extra-clean slices, wrap the cooled cake and freeze it for an hour before assembling. It’s much easier to cut!
Step 2: Whip Up the No-Churn Ice Cream
While the cake cools, make your ice cream. This is the fun, no-ice-cream-maker-needed method! In a large bowl, combine the heavy cream, milk, sugar, and strawberry jam. Use a hand mixer or whisk vigorously until the mixture is thick, creamy, and holds soft peaks. This takes a few minutes but is so worth it. Gently fold in the chopped strawberries and chocolate chips. The vibrant red berry pieces and dark chocolate bits create a beautiful confetti effect. Chef’s tip: Be careful not to overmix once you add the berries, or the cream can become grainy. A few gentle turns with a spatula is all it needs.
Step 3: The Grand Assembly
Now for the architectural part! Carefully remove the cooled cake from the loaf pan. Using a serrated knife, slice it horizontally into two even layers. This is your canvas. Place the bottom layer back into the loaf pan (line it with plastic wrap first for easy removal). Now, scoop all of that luscious strawberry ice cream batter on top. Spread it into an even layer, pressing down gently. Top with the second cake layer. Cover the entire pan tightly with plastic wrap and freeze for at least 6 hours, but overnight is best for a firm, sliceable texture.
Step 4: The Chocolate Ganache Finale
Right before serving, make the ganache. Place the chocolate chips and butter in a heatproof bowl. Heat 1/2 cup of heavy cream (not listed in ingredients, but needed here) just until it simmers, then pour it over the chocolate. Let it sit for one minute, then whisk slowly until you have a smooth, glossy river of chocolate. Let it cool for 5 minutes to thicken slightly. Lift your frozen cake loaf out of the pan using the plastic wrap. Place it on a serving plate and drizzle the warm ganache generously over the top. It will set into a beautiful, crackly shell almost instantly. Slice and serve immediately!
Timing is Everything
This recipe is about planning, not labor. Here’s the breakdown:
- Prep Time: 30 minutes (for both cake and ice cream mix)
- Bake Time: 50 minutes
- Cooling/Freezing Time: 6 hours (minimum) or overnight
- Total Time (Hands-off): About 7.5 hours
My Secret Weapon: Freeze Before You Slice
My absolute best trick for a perfect presentation is to freeze the assembled loaf for an hour before you add the ganache. Then, pour the ganache over and return it to the freezer for 15 minutes. This creates a super clean, thick chocolate layer that won’t melt when you slice. You get that gorgeous contrast in every piece.
A Fun Fact About Strawberries
Did you know strawberries are the only fruit that wear their seeds on the outside? Those little yellow specks are the actual seeds! Using a ripe, red puree not only gives amazing flavor but also a natural pink color that makes this dessert simply beautiful.
What You’ll Need in Your Kitchen
- 9×5-inch loaf pan
- Mixing bowls (large and medium)
- Hand mixer or stand mixer
- Wire cooling rack
- Serrated knife (for slicing cake layers)
- Spatula
- Plastic wrap
Keeping Your Strawberry Chocolate Fantasy Fresh
Storage is straightforward for this frozen treat. After the ganache has set, wrap the entire loaf (or any leftover slices) tightly in plastic wrap. Then, place it in an airtight container or a freezer bag. This double layer of protection prevents ice crystals from forming on the cake and keeps the ice cream creamy.
Your ice cream loaf cake will stay delicious in the freezer for up to 2 months. That means you can make it well ahead of a big event! If you need to store it in the fridge briefly (maybe for 30 minutes before serving to soften slightly), it will keep for up to 3 days, though the ice cream will become very soft.
Always use a sharp knife dipped in hot water to get the cleanest slices. Wipe the knife between cuts for a perfect presentation every time you serve it.
Tips for the Best Results Every Time
- Use the ripest strawberries you can find for the puree. More flavor, more color!
- For the ice cream, make sure your heavy cream and milk are very cold before whipping. It whips up faster and holds more air.
- High-quality chocolate chips truly make a difference in both the ice cream and the ganache. They melt smoother and taste richer.
- If your ice cream mixture seems too soft after folding, pop the bowl in the freezer for 20 minutes before assembling. It will be easier to handle.
Making It Look as Good as It Tastes
- Serve each slice on a chilled plate with a dollop of fresh whipped cream.
- Garnish with a fresh strawberry fan and a mint leaf.
- For a drizzle party, offer warm chocolate sauce and a raspberry coulis on the side.
- Crushed freeze-dried strawberries sprinkled on top add a fantastic crunch and a burst of concentrated berry flavor.
Healthier Twists on the Fantasy
Love the idea but want to lighten it up? Try one of these simple swaps:
- Gluten-Free Fantasy: Use your favorite gluten-free all-purpose flour blend for the cake. Everything else remains the same!
- Lower-Fat Option: Substitute the heavy cream and whole milk in the ice cream with a combination of low-fat evaporated milk and light whipped topping. The cake itself is already quite light.
- Vegan Dream: Use a vegan butter and egg substitute for the cake. For the ice cream, use full-fat coconut cream and a plant-based milk. Stick with dark chocolate chips to keep it dairy-free.
- Sugar-Conscious Sweetness: Reduce the sugar in the cake by 1/4 cup and use a sugar-free strawberry jam. A sugar substitute that measures like sugar can also work in the ice cream base.
- Nutty Crunch: Add 1/2 cup of finely chopped toasted almonds or pecans to the cake batter for added texture and healthy fats.
- Tropical Twist: Swap strawberry for pureed mango and use white chocolate chips. It’s a completely different, but equally amazing, flavor journey.
Common Mistakes to Avoid
Mistake 1: Using Warm Ingredients for the Ice Cream
This is the biggest pitfall! If your heavy cream, milk, or bowl are even slightly warm, the ice cream mixture will never whip up properly. It will stay soupy and won’t freeze with a creamy texture. Always ensure your dairy is straight from the fridge, and chill your mixing bowl for 10 minutes before you start. If your kitchen is hot, place the bowl over another bowl of ice while you whip.
Mistake 2: Overmixing the Cake Batter
We want a tender, light cake, not a tough, dense one. Overmixing after adding the flour develops the gluten, leading to a chewy texture. Mix the dry and wet ingredients together just until you no longer see streaks of flour. A few small lumps are perfectly fine. They’ll bake out, I promise!
Mistake 3: Assembling with a Warm Cake
Patience is key here. If you layer the ice cream onto a cake that’s even slightly warm, the ice cream will melt instantly. You’ll get a soggy, messy layer that refreezes into an icy block. Let the cake cool completely in the pan, then wrap and freeze it for at least an hour. A cold cake is a sturdy cake for building your fantasy.
Mistake 4: Skipping the Ganache Cool-Down
Pouring piping hot ganache over your frozen cake is a recipe for a melted mess. The heat will cause the ice cream to melt and pool around the base. After you make the ganache, let it sit at room temperature for 5-7 minutes. It should be warm and pourable, but not hot. This way, it creates a perfect shell without damaging your beautiful layers underneath.
Your Strawberry Chocolate Delight Questions, Answered
Can I use frozen strawberries for the puree?
Absolutely! Frozen strawberries are a fantastic option, often picked at peak ripeness. Just thaw them completely and drain any excess liquid before pureeing. You might need to reduce the liquid slightly if the puree seems too runny. The flavor will still be wonderful. In fact, using frozen berries can make this dessert a year-round treat.
Do I need an ice cream maker for this recipe?
Nope, not at all! This is a “no-churn” ice cream method. The heavy cream is whipped with the other ingredients to incorporate air, which gives it a light, creamy texture as it freezes. It’s much simpler than using a machine and yields incredibly rich results. Just be sure to whip the cream mixture until it’s nice and thick before folding in your add-ins.
How do I get a clean slice without the ice cream smushing?
The secret is a hot, sharp knife. Run your knife under very hot water for a few seconds, wipe it dry with a towel, and make a smooth, confident cut. Wipe the knife clean and reheat it for each slice. This melts through the frozen layers just enough to give you a clean cut without applying pressure that would smash the cake and ice cream together.
Can I make this dairy-free or vegan?
Yes, you can! For a vegan version, use plant-based butter and an egg replacer like flax eggs in the cake. For the ice cream layer, use full-fat coconut cream (chilled) in place of the heavy cream and a rich plant-based milk like oat or cashew milk. Be sure to use dairy-free chocolate chips. The texture and flavor will be delightfully different but still decadent.
My ganache is too thick/too thin. How do I fix it?
Ganache can be finicky. If it’s too thick and won’t drizzle, gently reheat it for 5-second intervals in the microwave, stirring between each, until it loosens. If it’s too thin and runny, let it cool longer at room temperature. You can also add a few more chocolate chips to thicken it. The ideal consistency is like warm honey—it should coat the back of a spoon and fall in a ribbon.
How far in advance can I make this?
This is the ultimate make-ahead dessert! You can fully assemble and freeze the cake (without the ganache) for up to 2 months. Add the ganache drizzle either the day before serving or even a few hours before. Store-bought ganache can sometimes form a white “bloom” if frozen for weeks, but it’s still perfectly safe and tasty to eat.
Can I use a different pan, like a round cake pan?
You can, but the assembly will be different. A round pan would work if you want to create a layered round ice cream cake. You’d need to cut rounds out of the baked sheet cake. The loaf pan is simpler because you just slice one cake in half. If you’re looking for more layered cake ideas, a round pan opens up new possibilities!
What can I do with leftover strawberry puree?
Don’t waste a drop! Leftover strawberry puree is a kitchen treasure. Stir it into yogurt or oatmeal, swirl it into cheesecake batter, mix it into a vinaigrette for salads, or use it as a topping for pancakes or my mini lemon cheesecakes. You can also freeze it in an ice cube tray for future smoothies or sauces.
Is this dessert very high in calories?
This is a rich, indulgent treat, so a serving has about 540 calories. It’s packed with flavor, so a little goes a long way! You can make lighter versions as suggested in the healthier twists section. Remember, enjoying treats like this is part of a balanced diet. For more on the nutritional benefits of whole foods like strawberries, which provide essential vitamins and minerals, it’s always good to check trusted resources.
Can I add alcohol to the recipe?
For an adult version, a little liqueur can be amazing! Add 1-2 tablespoons of strawberry liqueur, Chambord, or even a chocolate liqueur to the ice cream mixture after whipping. Be careful not to add too much, as alcohol inhibits freezing and can make the ice cream too soft. It’s a fun way to dress up the dessert for a special dinner party.
And if you love the combo of fruit and chocolate but want something quicker, you must try this stunning no-bake Chocolate Orange Pie. It has that same magical balance of flavors. For another easy, crowd-pleasing treat that’s famously addictive, the sweet-and-salty Christmas Crack toffee is always a hit.
The Final Slice
This Strawberry Chocolate Fantasy Ice Cream Loaf Cake is more than just a list of ingredients and steps. It’s a chance to create a little bit of magic in your own kitchen. It’s the joy of seeing eyes light up when you bring it to the table. It’s the perfect blend of nostalgic flavor and elegant presentation. Whether for a birthday, a summer BBQ, or just because it’s Tuesday, this dessert delivers happiness in every frosty, chocolate-drizzled bite. So go ahead, preheat that oven, and get ready to make some delicious memories. Your freezer (and your friends) will thank you!
Equipment
- Grand bol
- Fouet
- Spatule
- Plaque à pâtisserie
- Papier sulfurisé
Ingredients
- 1,5 tasse farine tout usage
- 1 tasse sucre granulé
- 2 cuillère à café poudre à lever
- 1 cuillère à café sel
- 1/2 tasse beurre non salé, ramolli
- 2 œufs
- 2 cuillère à café extrait de vanille
- 1 tasse purée de fraises fait maison ou surgelé
- 2 tasses crème épaisse
- 1 tasse lait entier
- 1/2 tasse sucre granulé
- 1/4 tasse confiture de fraises
- 1/4 tasse fraises finement hachées
- 1/2 tasse pépites de chocolat mi-sucré
- 1 cuillère à soupe beurre non salé
- 1/2 tasse crème épaisse pour la ganache
Instructions
- Préchauffez votre four à 175°C et graissez un moule à pain de 9x5 pouces.
- Dans un grand bol, fouettez ensemble la farine, le sucre, la poudre à lever et le sel.
- Ajoutez le beurre ramolli, les œufs, l'extrait de vanille et la purée de fraises et mélangez jusqu'à obtenir un mélange lisse.
- Versez la pâte dans le moule préparé et faites cuire pendant 45-50 minutes jusqu'à ce qu'un cure-dent en ressorte propre.
- Laissez le gâteau refroidir complètement dans le moule sur une grille.
- Pendant que le gâteau refroidit, préparez la crème glacée en combinant la crème épaisse, le lait, le sucre et la confiture de fraises dans un grand bol.
- Fouettez le mélange jusqu'à ce qu'il soit épais et crémeux, puis incorporez délicatement les fraises hachées et les pépites de chocolat.
- Retirez le gâteau refroidi et coupez-le horizontalement en deux couches.
- Placez la couche inférieure à nouveau dans le moule tapissé de film plastique.
- Étalez uniformément le mélange de crème glacée aux fraises par-dessus.
- Placez la deuxième couche de gâteau sur le dessus et couvrez le moule hermétiquement avec du film plastique.
- Congelez pendant au moins 6 heures ou toute la nuit.
- Avant de servir, préparez la ganache en chauffant 1/2 tasse de crème épaisse jusqu'à ébullition et versez-la sur les pépites de chocolat et le beurre dans un bol.
- Laissez reposer une minute, puis fouettez jusqu'à obtenir un mélange lisse et laissez refroidir légèrement.
- Retirez le gâteau du moule à l'aide du film plastique et drizzle la ganache dessus.
- Tranchez et servez immédiatement.