
The Ultimate Milk Cream and Strawberry Jelly Roll Cake Recipe
You know that feeling when you see a dessert that just looks like pure happiness? That’s what this cake is for me. It’s more than a recipe; it’s a little edible hug. Picture soft, fluffy sponge rolled around a cloud of creamy filling and sweet, ruby-red strawberry jelly. It’s the kind of dessert that makes guests’ eyes light up and kids ask for seconds. It reminds me of sunny afternoons and simple, sweet moments shared with loved ones.
The Story Behind the Strawberry Cream Roll
This lovely Strawberry Cream Roll has roots in classic European baking. Jelly roll cakes, or ‘roulades,’ have been enjoyed for generations, often as a lighter alternative to rich, dense cakes. What makes my version special is the pairing of two fillings. Instead of just cream or just jelly, we get both! The smooth milk cream balances the bright, tangy fruitiness of the strawberry jelly. It’s a modern twist on a traditional teatime treat that always feels celebratory.
Why You’ll Fall in Love With This Strawberry Cream Roll
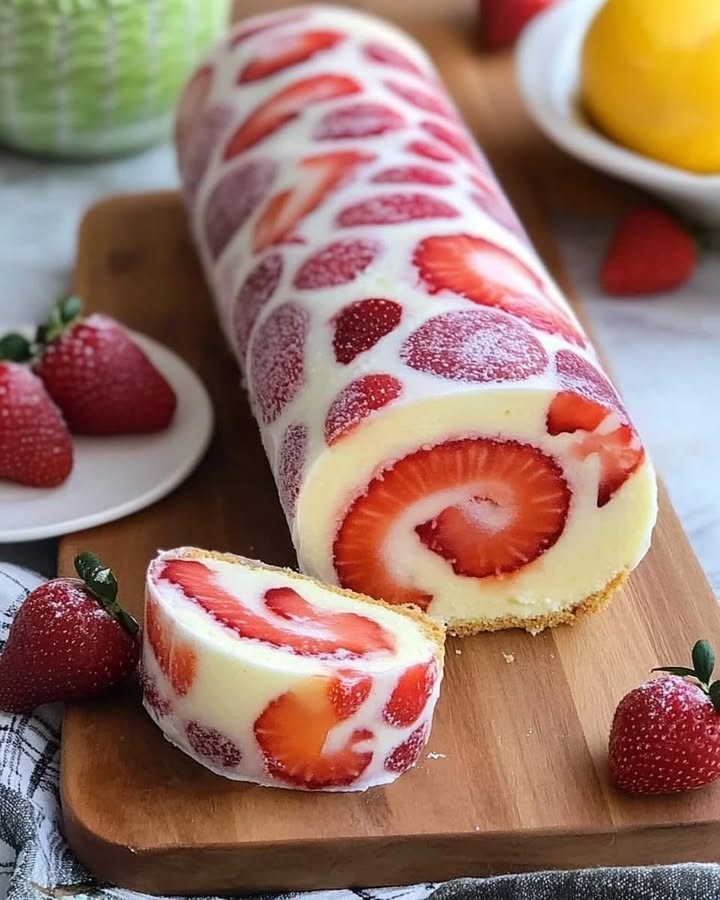
This cake is a true crowd-pleaser for so many reasons. First, it’s stunningly beautiful. The swirl of white cream and red jelly inside a golden cake is just gorgeous. Taste-wise, it hits the perfect balance: not too heavy, not too sweet. It’s incredibly satisfying. Secondly, while it looks impressive, it’s surprisingly straightforward to make. You won’t need any fancy skills. It’s a fantastic recipe for building your baking confidence and creating something truly special.
Perfect Occasions for This Delightful Cake
This cake shines at so many gatherings! It’s a star at summer picnics and barbecues. It’s a lovely centerpiece for a baby shower or a birthday party. I often make it for a weekend family lunch—it feels like a treat without being over the top. It’s also perfect for a Mother’s Day brunch or as a sweet ending to a holiday meal. Honestly, any time you want to bring a smile to the table, this jelly roll cake is a perfect choice.
Ingredients for Your Strawberry Jelly Roll Cake
You’ll need simple pantry staples to create this masterpiece. Here’s your shopping list:
- For the Cake: 4 large eggs, 100g (1/2 cup) granulated sugar, 1 teaspoon vanilla extract, 100g (3/4 cup) all-purpose flour, 1 teaspoon baking powder, 1/4 teaspoon salt, powdered sugar for dusting.
- For the Milk Cream Filling: 200ml heavy cream, 50g (1/4 cup) powdered sugar, 1 teaspoon vanilla extract.
- For the Strawberry Jelly: 200g fresh strawberries, 1/4 cup granulated sugar (adjust to taste), 1 tablespoon lemon juice, 1 packet (about 7g) unflavored gelatin, 1/2 cup water for dissolving gelatin.
Smart Substitution Options
Don’t worry if you’re missing an ingredient! You can easily adapt this recipe.
- Flour: You can use cake flour for an even lighter sponge.
- Heavy Cream: For a lighter option, use half mascarpone and half whipped cream. It’s still creamy but less rich.
- Strawberries: Swap with other berries like raspberries or blueberries. You can also use high-quality strawberry jam in a pinch.
- Gelatin: Agar-agar can be a vegetarian substitute. Follow the package instructions for the equivalent amount.
- Pan: If you don’t have a jelly roll pan, a large rimmed baking sheet (10×15 inches) works perfectly.
Crafting Your Perfect Strawberry Cream Roll: Step-by-Step
Step 1: Bake the Foundation – The Light Sponge Cake
Start by preheating your oven to 375°F (190°C). Line your jelly roll pan with parchment and give it a light grease. This will be your cake’s home. In a big bowl, whisk the eggs and granulated sugar together. Go for about 5-7 minutes. You want the mixture to become thick, pale, and lovely. It should look like a sunny, foamy cloud. Add the vanilla and give it a final mix. Sift your flour, baking powder, and salt together in another bowl. This keeps your cake light. Gently fold the dry mix into the egg foam. Be careful not to deflate all those lovely bubbles! Pour this airy batter into your pan and spread it evenly. Bake for 12-15 minutes. The cake will be golden and spring back when you touch it.
Pro tip: Whisking the eggs and sugar properly is key for a light, rollable cake that won’t crack.
Step 2: The Roll & Cool – A Critical Move!
When the cake is baked, act quickly! Get a clean kitchen towel and dust it generously with powdered sugar. Take your hot cake pan and invert it onto the towel. Now, carefully peel off the parchment paper. The powdered sugar on the towel prevents sticking. Starting from one short end, gently roll the warm cake up with the towel inside it. Let this rolled bundle cool completely on the counter. This pre-roll step trains the cake to keep its shape later. It prevents cracking when you add the filling.
Step 3: Make the Dreamy Milk Cream Filling
This filling is simple bliss. In a mixing bowl, combine your heavy cream, powdered sugar, and vanilla extract. Beat it until soft peaks form. The cream will become thick, creamy, and hold its shape. It should smell sweet and comforting. Don’t overbeat it into stiff, grainy peaks—we want it smooth and spreadable. Set this aside for now.
Chef’s tip: Chill your bowl and beaters beforehand for quicker, better whipping.
Step 4: Create the Vibrant Strawberry Jelly Layer
Time for the fruity heart of the cake! Hull and slice your fresh strawberries. In a saucepan, combine them with granulated sugar and lemon juice. The lemon brightens the flavor. Heat this over medium heat until the strawberries soften and release their gorgeous ruby juices. The mixture should be warm but not boiling. Meanwhile, dissolve your gelatin packet in half a cup of cold water. Stir this dissolved gelatin into the warm strawberry mixture until it’s fully mixed in. Let it cool slightly. You want it still liquid enough to drizzle, but not completely set.
Step 5: The Grand Assembly of Your Jelly Roll Cake
Now for the fun part! Carefully unroll your cooled cake from the towel. It should be flat and flexible. Spread the milk cream filling evenly all over the surface. Leave a tiny border at the edges so it doesn’t spill out. Next, drizzle or spoon your prepared strawberry jelly over the cream layer. Spread it gently to create a beautiful, even red layer. Now, roll the cake back up tightly, starting from the same short end. Go slowly and keep the filling inside. Place your finished roll seam-side down on a serving platter. Wrap it in plastic wrap and let it chill in the fridge for at least an hour. This sets everything perfectly.
Step 6: Serve Your Beautiful Creation
After its chill time, your Strawberry Jelly Roll Cake is ready to shine. Unwrap it and dust the top with a final sprinkle of powdered sugar. Use a sharp knife to slice into beautiful rounds. Each slice will reveal that stunning swirl of cream and jelly inside a tender cake. Serve it chilled and enjoy the smiles it brings!
Timing Breakdown
Here’s a handy guide to managing your time:
- Prep Time (cake & fillings): ~30 minutes
- Baking Time: 12-15 minutes
- Cooling/Rolling Time: ~30 minutes
- Chilling Time (to set): At least 1 hour
- Total Time (including chilling): Approximately 2 hours 15 minutes
The Chef’s Secret for a Perfect Roll
The absolute key to a crack-free, beautiful roll is rolling the warm cake with the towel. This “training” step shapes the cake’s memory. When you unroll it later to add filling, it will naturally curl back into a perfect spiral without breaking. Never skip this step!
A Sweet Fact About Strawberries
Did you know strawberries are packed with vitamin C? They actually have more per serving than oranges! They’re not just delicious; they add a little nutritional boost to your dessert. Of course, in a cake we focus on flavor, but it’s a nice bonus. The quality of your ingredients matters, and using fresh, ripe berries makes all the difference in your jelly layer.
Necessary Equipment
You don’t need a lot of fancy tools:
- 10×15 inch Jelly Roll Pan (or rimmed baking sheet)
- Parchment Paper
- Large Mixing Bowls
- Electric Mixer or Whisk
- Saucepan
- Clean Kitchen Towel
- Spatula
- Plastic Wrap
How to Store Your Strawberry Cream Roll
This cake is best enjoyed fresh, but it stores well. After serving, wrap any leftover cake tightly in plastic wrap or place it in an airtight container. Keep it in the refrigerator. The cream and jelly filling need to stay cool.
It will keep its texture and flavor beautifully for up to 3 days. The cake may soften slightly over time but will still be delicious. Do not freeze this cake. Freezing can cause the cream to separate and the texture of the sponge to become soggy upon thawing.
For the best presentation, slice and serve it chilled directly from the fridge. If you need to make it ahead, you can assemble the whole roll, wrap it well, and chill it overnight before serving.
Tips and Advice for Success
- Room Temperature Eggs: Using room-temperature eggs helps them whip up higher and lighter, giving you a better sponge.
- Don’t Overmix: When folding flour into the eggs, mix just until combined. Overmixing deflates the batter and leads to a dense cake.
- Cool Jelly Properly: Let the strawberry jelly cool enough so it won’t melt the cream, but don’t let it set solid before spreading.
- Chill Before Serving: That hour of chilling is non-negotiable. It sets the filling and makes slicing clean and easy.
Presentation Tips to Impress
- Serve each slice on a white plate for a dramatic contrast.
- Add a fresh strawberry and a mint leaf beside each slice.
- You can drizzle a little extra melted white chocolate over the top before dusting with sugar.
- For a party, slice the whole roll and arrange the slices on a large platter in a spiral pattern.
6 Fun Variations: Healthier & Creative Alternatives
Love this recipe? Try these twists!
- Berry Medley Roll: Swap strawberries for a mix of raspberries, blueberries, and blackberries. The jelly will be a deep, jewel-toned purple.
- Lemon Curd & Cream Roll: Replace the strawberry jelly with homemade or store-bought lemon curd. It’s tangy, bright, and utterly refreshing.
- Chocolate Sponge Version: Add 25g of cocoa powder to the dry ingredients for a chocolate sponge. Fill it with the same milk cream and raspberry jelly.
- Sugar-Free Option: Use a sugar substitute approved for baking in the cake and fillings. Use naturally sweet berries and rely on their flavor.
- Eggless Sponge Cake: Use an eggless sponge cake recipe base (often using yogurt or vinegar as leavening) and proceed with the same fillings.
- Yogurt Cream Filling: For a lighter cream, mix half whipped cream with half strained Greek yogurt. It adds a lovely tang.
Exploring Other Roll Cake Classics
If you love the format of a roll cake, you’ll adore other classic variations. For a tropical twist, try a Southern Pineapple Orange Swirl Cheesecake. It’s a creamy, no-bake delight. Chocolate lovers must try the rich combination in a Cherry Chocolate Roll Cake. For a burst of citrus, the No-Bake Orange Creamsicle Cheesecake is pure summer joy. And if you’re a malt fan, a Maltesers Chocolate Loaf Cake offers a different but equally comforting shape.
Common Mistakes to Avoid
Mistake 1: A Cracked or Broken Cake Roll
This happens most often when you skip the initial “training” roll. Rolling the warm cake with the towel is essential. It teaches the flexible cake its final shape. If you try to roll a cooled, flat cake with filling for the first time, it’s much more likely to crack. Also, overbaking the cake makes it dry and brittle, which leads to breaks. Bake just until it springs back, and don’t forget the towel step!
Mistake 2: Runny or Unset Strawberry Jelly
A watery jelly can seep out and make the roll soggy. This mistake occurs if the gelatin isn’t properly dissolved or if the jelly mixture isn’t cooled enough before assembly. Always dissolve the gelatin fully in cold water first before adding it to the warm strawberries. Then, let the mixture cool until it’s thickened slightly but still pourable. If it’s too hot, it will melt the cream. If it’s completely set, you can’t spread it.
Mistake 3: Overwhipping the Cream Filling
Whipping the cream past soft peaks into stiff, grainy peaks makes it difficult to spread smoothly. It can also cause the cream to “break” and look curdled when you roll the cake. Stop beating when the cream holds its shape softly. It should be smooth and luxurious. A practical tip: use chilled cream and tools, and watch it closely as it thickens.
Mistake 4: Adding Filling Before the Cake is Cool
If you unroll the cake and add filling while it’s still warm, disaster awaits. The warm cake will melt the cream, making it runny and unstable. The jelly might also become too loose. Always let the cake cool completely rolled up in the towel. Patience here ensures a neat, firm roll that holds together beautifully when sliced.
Mistake 5: Not Using Enough Powdered Sugar on the Towel
That dusting of powdered sugar on the towel isn’t just for looks. It’s a crucial non-stick layer. If you use too little, the hot cake can stick to the towel fibers. When you unroll it later, you might tear the delicate sponge surface. Be generous with the sugar dusting! It creates a protective, sweet barrier that makes the process smooth.
A Note on Ingredients and Nutrition
Using fresh, high-quality ingredients always makes a better cake. Ripe strawberries, real vanilla, and good eggs matter. Remember, cooking and baking are part of a holistic approach to enjoying food. For more great information on nutrition and food, resources like the CDC’s nutrition page offer helpful guidelines on balanced eating, including topics like overall water intake and diet quality.
Frequently Asked Questions
Can I make this Strawberry Cream Roll cake ahead of time?
Absolutely! This cake is actually great for making ahead. You can fully assemble the roll, wrap it tightly in plastic wrap, and store it in the refrigerator for up to 24 hours before serving. The chilling time helps it set perfectly. In fact, I often make it the night before a gathering. Just be sure to keep it refrigerated. Do not freeze it, as the textures of the cream and sponge can suffer.
What if I don’t have a jelly roll pan?
No problem! Any rimmed baking sheet that is approximately 10×15 inches will work just fine. The rim is important to contain the batter. If your sheet is slightly larger, your cake will be a bit thinner and may bake faster. If it’s slightly smaller, your cake will be thicker and may need a minute or two more baking time. Just adjust accordingly and watch for that “spring back” touch test in the center.
Can I use frozen strawberries instead of fresh?
Yes, you can use frozen strawberries. They often work very well for the jelly because they’re already soft. Make sure to thaw them completely and drain any excess liquid before you cook them with the sugar. You might need to reduce the added sugar slightly if the frozen berries are pre-sweetened. The flavor will still be excellent.
Why do I need to roll the cake in a towel while it’s hot?
This step is a baker’s secret for a flexible cake. Rolling the warm, pliable cake with the towel inside “trains” it to hold a rolled shape. When it cools in that rolled position, it remembers it. Later, when you unroll it to add filling, it will naturally and easily roll back up without cracking or breaking. Skipping this step is the main reason cakes crack during final assembly.
How do I know when the whipped cream is at “soft peaks”?
“Soft peaks” is the stage where the whipped cream is thick and holds a gentle shape. When you lift the beaters out of the cream, the peak that forms will curl over softly at the top. It shouldn’t be stiff or stand straight up. It should look smooth and creamy, not grainy. If you continue beating past this point, it becomes “stiff peaks,” which are harder to spread and can turn buttery.
Can I use a different fruit for the jelly?
Of course! This recipe is wonderfully adaptable. Raspberries, blueberries, blackberries, or a mix all work beautifully. You can even use peaches or mangoes. Adjust the sugar based on the natural sweetness of your chosen fruit. The lemon juice is still recommended to brighten the flavor. The process is exactly the same.
What’s the purpose of the lemon juice in the strawberry jelly?
The lemon juice adds a necessary touch of acidity. It brightens the flavor of the strawberries, making them taste more vibrant and less flat. It also helps balance the sweetness of the added sugar. From a technical standpoint, the acid can also help with the setting process of the jelly, though gelatin sets in a wide pH range.
My cream filling seems too thin. What did I do wrong?
If your cream is too thin, a few things might have happened. Your heavy cream might not have been cold enough before whipping. Cream whips best when it’s very cold. Your bowls and beaters should also be chilled. Also, you might have under-whipped it. Ensure you whip until it truly thickens and forms those soft peaks. Lastly, check that you used the correct type of cream—you need heavy cream or whipping cream, not half-and-half or milk.
Can children help make this Strawberry Jelly Roll Cake?
Yes, this can be a fun family baking project! Children can help with tasks like washing the strawberries, dusting the towel with powdered sugar, and gently spreading the fillings (with supervision). The rolling step might be best done by an adult, as it requires a bit of care. It’s a wonderful way to teach them about baking processes and create a sweet memory together.
Where can I find more cake inspiration like this?
If you’ve fallen in love with making this kind of delightful dessert, you’ll find a treasure trove of ideas in our main collection of cake and cupcake recipes. From simple loaves to elaborate layered cakes, there’s always a new baking project to bring joy to your kitchen.
Your New Favorite Dessert Is Ready
I hope this Strawberry Cream Roll becomes a beloved recipe in your home, just like it is in mine. It’s a testament to how simple ingredients can create something truly spectacular. The light sponge, the creamy filling, and the burst of strawberry jelly come together in a dance of textures and flavors. It’s not just a cake; it’s a celebration of homemade goodness. So gather your ingredients, roll up that cake with confidence, and get ready to share a slice of pure happiness.
Equipment
- Plaque à pâtisserie
- Fouet
- Grand bol
- Spatule
- Papier sulfurisé
Ingredients
- 4 œufs
- 100 g sucre
- 1 cuil. à café extrait de vanille
- 100 g farine tout usage
- 1 cuil. à café poudre à lever
- 1/4 cuil. à café sel
- 200 ml crème épaisse
- 50 g sucre glace pour saupoudrer
- 200 g fraises fraîches
- 1/4 tasse sucre à ajuster au goût
- 1 cuil. à soupe jus de citron
- 1 cuil. à soupe gelatine non aromatisée
- 1/2 tasse eau pour dissoudre la gélatine
Instructions
- Préchauffez votre four à 190°C. Tapissez une plaque à pâtisserie de 15x10 pouces de papier sulfurisé, en graissant légèrement.
- Battez les œufs et le sucre ensemble pendant environ 5 à 7 minutes jusqu'à ce que le mélange soit épais et clair. Ajoutez l'extrait de vanille et mélangez bien.
- Tamisez la farine, la poudre à lever et le sel dans un autre bol et incorporez délicatement au mélange d'œufs.
- Versez la pâte dans le moule et faites cuire au four pendant 12-15 minutes jusqu'à ce qu'elle soit dorée et rebondissante.
- Farinez un torchon propre avec du sucre glace et retournez le gâteau chaud dessus, en retirant délicatement le papier sulfurisé.
- Roulez le gâteau chaud avec le torchon et laissez-le refroidir complètement.
- Dans un bol, fouettez la crème épaisse, le sucre glace et l'extrait de vanille jusqu'à ce que des pics souples se forment ; mettez de côté.
- Équeutez et tranchez les fraises, puis combinez-les dans une casserole avec le sucre et le jus de citron, en chauffant jusqu'à ce qu'elles ramollissent.
- Dissolvez la gélatine dans de l'eau froide, incorporez-la au mélange de fraises tiède et laissez refroidir légèrement.
- Déroulez le gâteau refroidi, étalez la crème au lait uniformément, puis arrosez ou déposez la gelée de fraises sur le dessus.
- Roulez à nouveau le gâteau, côté couture vers le bas, et laissez refroidir au réfrigérateur pendant au moins une heure.
- Une fois réfrigéré, saupoudrez de sucre glace, tranchez et servez.
Notes
Nutrition

Hi, I’m Olivia Parker, the founder of BakingSecret.com and a lifelong lover of all things sweet and homemade. I grew up in a small town in Oregon, where the smell of fresh cookies in my family’s kitchen sparked my passion for baking. Over the years, I turned that passion into a mission: to help home bakers feel confident, inspired, and creative.
After studying food science and working in several artisan bakeries across the U.S., I decided to create a space where everyone from beginners to seasoned bakers can find reliable recipes, expert tips, and a warm, welcoming community. BakingSecret.com is my way of sharing the magic of baking with the world. When I’m not testing new recipes, you’ll find me exploring farmers’ markets, collecting vintage cookbooks, or perfecting my sourdough technique.