
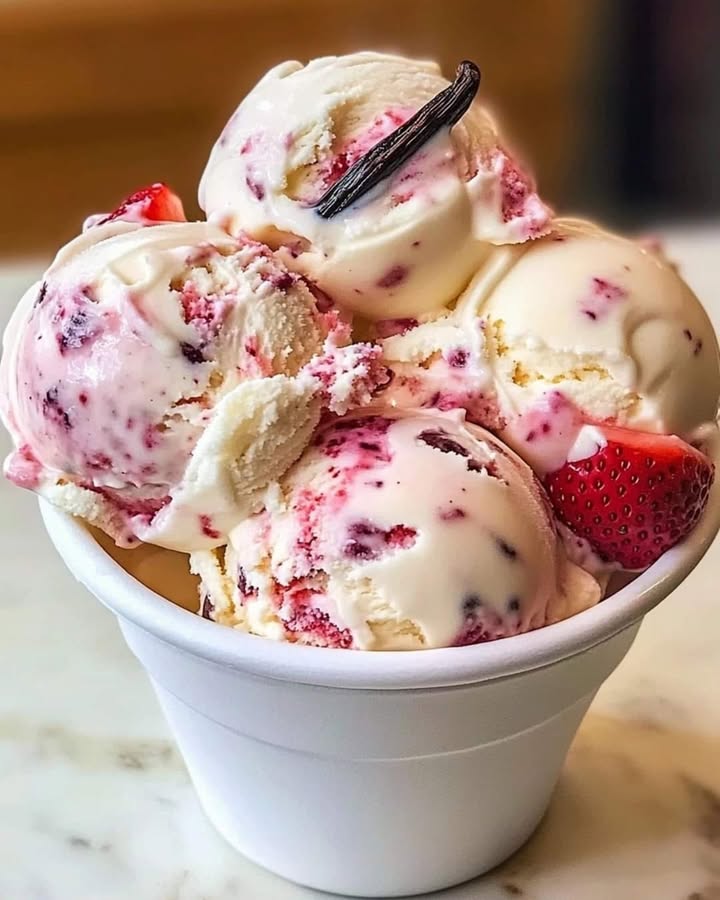
A Bowl of Sunshine: My Strawberry Vanilla Delight
I swear, the moment I spoon the first deep pink swirl of this strawberry vanilla bean ice cream, summer just blooms in my mouth. It’s not just ice cream. It’s a memory frozen in time. Picture this. The sun is warm on your back, you’sve just picked the last of the season’s strawberries, and the sweet scent of vanilla wafts from your kitchen. That’s what this recipe captures. It’s my absolute homemade strawberry vanilla delight, a creamy masterpiece that turns simple ingredients into pure joy. No fancy machine needed! Let’s make some happiness together.
The Story Behind This Sweet Strawberry Vanilla Bean Treat
Ice cream’s history is a wonderful, messy tale of innovation, but my version has a personal twist. The classic combination of strawberry and vanilla is timeless—think of those old-fashioned soda fountain treats. I wanted to elevate that with real vanilla bean, not extract, and fresh berries, not syrup. Why? Because my grandma always said the tiny seeds in a vanilla pod were “little specks of magic.” I tested this recipe during a family reunion. My goal was a creamy base that held up against the juicy strawberry swirl, not a runny mess. After a few trials (one too icy, one too sweet), this perfect balance emerged. It’s my modern homage to a classic, steeped in family love.
Why You’ll Absolutely Adore This Recipe
You’ll love this strawberry vanilla delight for so many reasons!
- The Flavor is Unbeatable: Real vanilla bean adds a perfumed depth you can’t get from extract, and fresh strawberries give a bright, tangy punch.
- It’s Surprisingly Simple: The steps are straightforward—cook a little, chill a lot, churn, and enjoy. It’s a fantastic project for budding cooks.
- The Texture is Dreamy: The custard base, thanks to the egg yolks and cream, creates a luxuriously smooth, rich ice cream that melts perfectly.
- It’s a Customizable Masterpiece: Feel like doubling the strawberry? Go for it! Want to add chocolate chips? Yes! This recipe is your canvas.
Perfect Occasions for Your Homemade Strawberry Vanilla Bean Ice Cream
This isn’t just a dessert; it’s an event starter! Serve it at a backyard barbecue and watch guests gather around the ice cream maker. It’s the perfect celebratory finish to a summer birthday dinner, perhaps paired with a slice of stunning White Chocolate Strawberry Cheesecake. Pack it for a picnic in little containers—it’s a sweet surprise. Or, simply make it on a lazy Sunday. It turns an ordinary afternoon into a special family moment.
The Ingredients for Your Strawberry Vanilla Delight
Simple, quality ingredients make all the difference. Here’s what you need:
- 1 cup whole milk
- 2 cups fresh strawberries, hulled and sliced
- 1 cup granulated sugar
- 6 large egg yolks
- 2 cups heavy cream
- 1 vanilla bean, split and seeds scraped
– A local CDC resource on healthy food choices highlights the value of fresh fruits, so choosing ripe, local berries is a wonderful step.
Handy Substitution Options
Don’t worry if you’re missing something! Here are some easy swaps:
- For Fresh Strawberries: Use high-quality frozen strawberries if fresh aren’t in season. Thaw and drain them well before cooking.
- For Vanilla Bean: If you can’t find a bean, use 1 tablespoon of pure vanilla extract. Add it to the cooled custard, not the hot mixture.
- For Heavy Cream: In a pinch, you can use all milk, but the ice cream will be less rich and creamy.
- For Sugar: You can use honey or maple syrup, but expect a slight flavor shift and a softer texture.
Crafting Your Perfect Strawberry Vanilla Bean Ice Cream: Step by Step
Step 1: Cook the Strawberries
Combine your sliced strawberries, sugar, and those precious scraped vanilla bean seeds in a saucepan. The heat wakes up the berries. Their juicy red color deepens, and the sugar melts into a glossy syrup. It smells like a sweet jam factory in your kitchen. Cook over medium heat, stirring gently, until the berries soften and the mixture looks syrupy. You want them broken down but not completely mush. This creates the perfect swirl. Remove from heat and let this beautiful mixture cool completely. Pro tip: Letting it cool ensures it won’t melt your chilled custard when you mix it later.
Step 2: Heat the Cream
In a separate saucepan, gently warm the heavy cream and whole milk. Medium heat is your friend here. Watch for little bubbles around the edges and a soft simmer. Don’t let it boil violently! Boiling can scorch the dairy. Once it simmers, take it off the heat immediately. This warm bath is what will cook your egg yolks into a stable custard.
Step 3: Prepare the Egg Yolks
Whisk those six egg yolks in a bowl until they’re smooth and lemon-colored. Now, here’s the crucial part. Slowly, slowly pour the hot cream mixture into the yolks while whisking constantly. This tempers the yolks. It prevents them from scrambling into little eggy lumps. It should feel like a warm, velvety liquid when combined.
Step 4: Thicken the Custard
Pour the egg and cream mixture back into the saucepan. Cook it over low heat. Stir it constantly with a wooden spoon or spatula. This is the magic moment. The mixture will slowly thicken. After 5-10 minutes, it will coat the back of your spoon. Run your finger across the spoon. If the line holds, it’s ready. You’ve made custard! Pro tip: Don’t rush this or turn the heat up. Low and slow makes creamy, not curdled.
Step s5: Cool the Custard
Strain the custard into a clean bowl through a fine-mesh sieve. This catches any tiny cooked egg bits, guaranteeing silky smoothness. Let it cool on the counter to room temperature. Then, cover it and refrigerate until it’s fully chilled, at least 4 hours or overnight. Patience here makes churning far better.
Step 6: Churn the Ice Cream
Pour your chilled, now-thick custard into your ice cream maker. Churn according to your machine’s directions. It’s a fun watch! The liquid slowly transforms into soft, frozen cream. It will softly mound up and look like premium soft-serve.
Step 7: Add Strawberry Mixture
In the final minutes of churning, gently pour or spoon in your cooled strawberry mixture. Let the machine fold it in for just a minute. You want gorgeous pink streaks, not a homogenous pink mix. This gives that beautiful “swirl” effect.
Step 8: Freeze to Firm Up
Transfer the softly churned ice cream into an airtight container. A loaf pan lined with parchment works great too. Freeze it for at least 2-4 hours to firm up properly. Then, scoop away! Your strawberry vanilla delight is ready.
Timeline for Your Ice Cream Masterpiece
Good ice cream takes a little time, but it’s worth it!
- Prep Time: 20 minutes (hulling berries, scraping vanilla, whisking yolks)
- Cooking Time: 15-20 minutes (berries + custard)
- Chilling Time: 4 hours minimum (crucial for the custard)
- Churning Time: 20-30 minutes (depends on your machine)
- Freezing Time: 2-4 hours (to set firm)
- Total Time: About 7 hours (most of it is passive chilling/freezing)
My Chef’s Secret for Ultimate Creaminess
My secret? After you churn the ice cream and before you freeze it, give it a “layer-up.” Spread half the ice cream in your container, add a layer of the strawberry mixture, then top with the remaining ice cream. Gently fold with a spatula just once or twice. This creates pockets of intense berry flavor nestled in the vanilla cream. It’s a surprise every scoop!
A Sweet Little Extra: The Vanilla Bean
That vanilla bean is special. Historically, vanilla comes from an orchid vine. The pods are cured for months to develop their flavor. Scraping the tiny seeds releases that deep, floral aroma. It’s a luxury, but for this strawberry vanilla bean ice cream, it’s the star. You can rinse and dry the used pod and stick it in your sugar jar to make vanilla sugar!
Necessary Equipment
- Medium saucepan (2 is helpful)
- Wooden spoon or spatula
- Whisk
- Fine-mesh sieve
- Bowls for cooling
- Ice cream maker (I use a simple electric one)
- Airtight freezer container
Storage: Keeping Your Strawberry Vanilla Delight Perfect
Homemade ice cream can crystallize if stored poorly. For the best texture, store it in an airtight container. Press a piece of parchment paper directly onto the surface before sealing the lid. This minimizes air exposure, which is the enemy of creamy ice cream.
Your strawberry vanilla bean ice cream will keep beautifully in the freezer for up to one week. After that, it might start to get a bit harder and icier, though the flavor will still be great. For longer storage, you can try it, but fresh is always best with homemade treats.
If you find your ice cream is too hard after freezing, let it sit on the counter for 5-10 minutes before scooping. This softens it perfectly. And for an extra-special no-bake dessert pairing, check out our collection of fabulous no-bake treats perfect for hot days when you don’t want to turn on the oven.
Tips and Advice for Scoop-Worthy Success
- Chill Everything: A cold custard churns faster and sets better. Don’t skip the long chill.
- Berry Quality is Key: Use the ripest, reddest strawberries you can find. They have the best flavor and sweetness.
- Pre-chill Your Machine: If your ice cream maker bowl needs freezing, ensure it’s fully frozen solid 24 hours before.
- Scoop Warmly: Dip your ice cream scoop in warm water for easier, cleaner scoops from the frozen container.
Presentation Ideas to Wow Your Guests
- Scoop into vintage sundae glasses with a drizzle of hot fudge and a fresh strawberry on top.
- Make adorable ice cream sandwiches between homemade shortbread cookies.
- Serve in waffle cones with a sprinkle of freeze-dried strawberry powder for color.
- Create a “berry patch” dessert: lay scoops on a plate, scatter more fresh berries, and add mint leaves.
- Pair a scoop with a slice of Peanut Butter Chees-ecake for a decadent dessert duo.
Healthier & Fun Variations of Your Ice Cream
Want to tweak this strawberry vanilla delight? Here are six fantastic spins!
- Strawberry Basil: Add 2 tablespoons of finely chopped fresh basil to the strawberry cooking step. It’s a refreshing, gourmet twist.
- Lactose-Free Version: Substitute the milk and heavy cream with full-fat coconut milk. The flavor will be slightly tropical but still delicious.
- Sugar-Free Option: Use a monk fruit or stevia-based sweetener designed for baking. Follow conversion charts, as sweetness levels vary.
- Yogurt-Based: Replace half the heavy cream with full-fat Greek yogurt for a tangy, protein-rich version. It’s less creamy but very tasty.
- Strawberry Cheesecake Ice Cream: Fold in ½ cup of graham cracker crumbs and small cream cheese cubes after churning for a fun deconstructed cheesecake vibe.
- Double Vanilla: For vanilla lovers, add a teaspoon of vanilla extract to the custard along with the bean. It doubles the vanilla perfume.
Common Mistakes to Avoid
Mistake 1: Not Cooling the Strawberry Mixture Completely
People often rush and add warm or hot strawberry syrup straight into the churning custard. This causes the cold custard to partially melt. The result is a watery, less creamy final texture and can prevent the ice cream from setting properly. Always let your cooked strawberry mixture cool to room temperature, or even refrigerate it, before adding it in the last churn step.
Mistake 2: Cooking the Custard on Too High Heat
The desire to speed things up leads to cranking the heat when thickening the custard. High heat will scramble the egg yolks, giving you little curdled bits in your base. It also cooks the custard too fast, preventing it from becoming thick and silky. Keep the heat low, stir constantly, and patience.
Patience. The custard thickening is a slow, gentle process.
Mistake 3: Skipping the Chilling Step for the Custard
It’s tempting to pour warm custard right into the ice cream maker. This is a disaster. Warm custard will not freeze properly in the machine. It can even damage some models. The mixture needs to be thoroughly cold (below 40°F) so it freezes quickly and aerates correctly, creating that light, creamy body. Chill for at least 4 hours. No shortcuts.
Mistake 4: Over-churning the Ice Cream
Once the ice cream has thickened in the machine and looks like soft-serve, it’s done. Continuing to churn makes it hard and icy, as it incorporates too much air and breaks the emulsion. Follow your machine’s recommended time, usually 20-25 minutes. When it holds its shape on the paddle, stop churning.
Mistake 5: Using Underripe or Watery Strawberries
The flavor of your strawberry vanilla delight hinges on the berry. Using pale, underripe, or waterlogged berries (often from frozen if not drained) gives a bland, weak flavor and can add extra liquid to the mix. Seek out deep red, fragrant, ripe strawberries. If using frozen, thaw completely and drain off any excess syrup before cooking.
Frequently Asked Questions
Can I make this strawberry vanilla bean ice cream without an ice cream maker?
Yes, you can! It’s a bit more hands-on but works. After making and chilling your custard, pour it into a shallow, freezer-safe container (like a loaf pan). Freeze for 45 minutes, then take it out and whisk vigorously with a fork or hand mixer to break up ice crystals. Repeat this whisking process every 30-45 minutes for about 2-3 hours until frozen. The texture will be a bit denser than churned ice cream, but still delicious. Adding the strawberry swirl during the last mixing is key.
Why do I need to use egg yolks? Can I skip them?
The egg yolks are crucial for a classic custard-style ice cream. They add richness, a velvety texture, and help stabilize the mixture, preventing large ice crystals. If you skip them, you’ll have a Philadelphia-style ice cream, which is lighter but can be icier and less creamy. For a truly rich strawberry vanilla delight, the yolks are worth it. If you must avoid them, increase the cream slightly and expect a different final product.
My ice cream turned out too hard after freezing. What went wrong?
Homemade ice cream often freezes harder than commercial versions because we don’t add stabilizers. If it’s rock-hard, likely: 1) The custard wasn’t churned long enough to incorporate air, 2) The sugar content was a bit low (sugar helps keep it soft), or 3) It was frozen too quickly at a very cold temperature. Letting it temper on the counter for 5-10 minutes before scooping always helps. For future batches, ensure your sugar测量 is accurate and churn until truly soft-serve状.
How can I make this recipe dairy-free or vegan?
You can create a vegan strawberry vanilla delight! Substitute the milk and heavy cream with an equal amount of full-fat, canned coconut milk. Use agar agar or a cornstarch slurry (混合) instead of egg yolks for thickening. Replace the sugar with coconut sugar or maple syrup. The flavor will be coconut-forward with a hint of vanilla and strawberry, and the texture will be good but not identical to dairy cream. Churn as usual.
What’s the difference between using a vanilla bean and vanilla extract?
A vanilla bean provides tiny seeds that give visual speckles and a deep, complex floral aroma that infuses整个 mixture. Vanilla extract is more convenient and still flavorful, but it lacks those specks and has a slightly酒精/alcohol-based note. For the most luxurious strawberry vanilla bean ice cream, the bean is superior. If using extract, add 1 tablespoon to the cooled custard, not the hot mixture, to preserve flavor.
Can I use frozen strawberries instead of fresh?
Absolutely. Frozen strawberries are often picked and frozen at peak ripeness, so they can be very flavorful. Thaw them completely and drain off any excess liquid before cooking. You might need to reduce the added sugar slightly, as frozen berries can sometimes be sweeter. They work wonderfully, especially when fresh berries are not in season.
How long can I store homemade ice cream?
For optimal texture and flavor, enjoy your strawberry vanilla delight within one week. After that,冰 crystals will slowly enlarge, and it can become grainy and harder. Proper storage in an airtight container with parchment pressed on the surface maximizes shelf life. It will still be safe to eat for weeks, but the premium creamy quality diminishes over time.
Can I add chocolate or other mix-ins to this recipe?
Of course! This recipe is a fantastic base. In the last minute of churning, you can add mini chocolate chips, chopped toasted nuts, or even crumbled pieces of Tropical Pineapple Dream Swirl for a fun fusion. Ensure mix-ins are cold or frozen so they don’t melt the ice cream. Be creative—it’s你的 homemade treat!
Why do I need to strain the custard?
Straining through a fine-mesh sieve catches any small, accidental curdled bits of egg that might have formed during cooking. It also ensures any stubborn vanilla bean pod fibers or unmixed ingredients are removed. This step guarantees your final custard base is perfectly silky smooth, leading to the creamiest possible strawberry vanilla bean ice cream.
Is this recipe safe for pregnant women or young children?
The recipe involves cooking the custard to a safe温度 that should pasteurize the egg yolks, making it generally safe. However, if you have concerns about using raw egg yolks, you can use pasteurized eggs or ensure the custard reaches 160°F on an instant-read thermometer. Always consult with a healthcare professional for specific dietary advice. For children, it’s a wonderful treat,但当然是 in moderation due to its richness and sugar content.
The Final Scoop
So there you have it! My heart-felt recipe for strawberry vanilla bean ice cream. It’s more than just steps and ingredients. It’s about taking a sunny afternoon and turning it into something you can taste later. It’s about sharing a scoop with someone you love. The real vanilla bean, the fresh strawberries, the耐心 chilling—it all matters. It creates a homemade strawberry vanilla delight that商店 just can’t match. Now, go grab those berries, scrape that vanilla pod, and make some sweet memories. Your perfect summer scoop is waiting.
And if you’re craving another show-stopping dessert, combining rich layers with a glossy finish, you might love the process of creating a Layered Red Velvet Cheesecake with Mirror Glaze. It’s another wonderful way to impress with homemade goodness.
Equipment
- Moyenne casserole
- Cuillère en bois ou spatule
- Fouet
- Passoire fine
- Bol pour réfrigérer
- Machine à glace
- Conteneur hermétique pour congeler
Ingredients
- 6 gros jaunes d'œufs
- 250 g sucre granulé
- 250 ml lait entier
- 500 ml crème épaisse
- 2 càc gousse de vanille fendue et graines grattées
- 500 g fraises frais, équeutées et tranchées
Instructions
- Combinez les fraises tranchées, le sucre et les graines de gousse de vanille dans une casserole et faites cuire à feu moyen jusqu'à ce qu'elles deviennent sirupeuses, puis laissez refroidir complètement.
- Dans une autre casserole, réchauffez délicatement la crème épaisse et le lait entier à feu moyen jusqu'à ce qu'ils commencent à frémir, puis retirez du feu.
- Battez les jaunes d'œufs dans un bol jusqu'à obtenir une texture lisse et d'une couleur jaune clair. Ajoutez lentement le mélange de crème chaud tout en fouettant constamment pour tempérer les jaunes.
- Remettez le mélange sur le feu et faites cuire à feu doux tout en remuant constamment jusqu'à épaississement, environ 5-10 minutes.
- Filtrez la crème dans un bol propre, laissez refroidir à température ambiante, puis réfrigérez jusqu'à ce qu'elle soit complètement froide (au moins 4 heures ou toute la nuit).
- Versez la crème glacée refroidie dans une machine à glace et turbinez selon les instructions du fabricant jusqu'à obtenir une consistance de crème glacée molle.
- Dans les dernières minutes du turbinage, ajoutez délicatement le mélange de fraises refroidi pour créer un effet tourbillon.
- Transférez la crème glacée dans un conteneur hermétique et congelez pendant au moins 2-4 heures pour raffermir avant de servir.