
Escape to Paradise with This Dreamy Dessert
Picture this: it’s a warm summer evening, and you’re craving something sweet, refreshing, and oh-so-tropical. That’s when I discovered the magic of Tropical Cream Cheese Pie. It’s creamy, zesty, and loaded with pineapple goodness. I first made this pie for a family barbecue, and let me tell you, it was gone in minutes! Everyone raved about how it tasted like a vacation in a slice. If you’re looking for a dessert that’s easy to whip up but feels fancy, this is your golden ticket.
A Little History Behind the Sweetness
Pineapple desserts have been a favorite in tropical regions for generations. Pineapples are native to South America but quickly became a symbol of hospitality and luxury once they reached Europe and North America. This Tropical Cream Cheese Pie is a modern twist on classic no-bake pies. It combines the tangy creaminess of cheesecake with the sunny vibes of pineapple. Whether served at a luau or a backyard BBQ, this pie bridges cultures and flavors in one delicious bite.
Why You’ll Love This Recipe
This pie is a winner for so many reasons. First, it’s no-bake, which means no oven stress during hot weather. Second, it’s packed with flavor—creamy, tangy, and fruity all at once. Third, it’s super simple to make, even if you’re not a baking pro. Plus, it’s versatile! You can tweak it to suit your taste or dietary needs. Trust me, once you try it, you’ll want to make it again and again.
Perfect Occasions for This Tropical Treat
This Tropical Cream Cheese Pie is perfect for summer parties, potlucks, or holiday gatherings. Bring it to a Fourth of July picnic for a refreshing dessert option. It’s also great for birthdays, bridal showers, or just because you need a little sunshine in your life. Honestly, any occasion—or no occasion at all—is a good excuse to enjoy this pie!
What You’ll Need
- 1 (8 oz) package cream cheese, softened
- 1 (14 oz) can sweetened condensed milk
- 1 (20 oz) can crushed pineapple, drained
- 1/4 cup lemon juice
- 1 (9-inch) graham cracker crust
- Whipped cream and pineapple slices for garnish
Substitution Options
If you’re feeling adventurous or need alternatives, here are some swaps:
- Cream cheese: Use dairy-free cream cheese for a vegan-friendly version.
- Sweetened condensed milk: Coconut milk sweetened with sugar works as a substitute.
- Graham cracker crust: Try a vanilla wafer crust or even a gluten-free option.
- Pineapple: Mango or peaches can add a different tropical twist.
Step 1: Beat the Cream Cheese
Start by grabbing your softened cream cheese and beating it in a large bowl until it’s smooth and velvety. This step is crucial because lumps will ruin the silky texture we’re aiming for. Pro tip: Let the cream cheese sit out for about 30 minutes before starting—it’ll soften faster and mix easier. As you beat it, you’ll notice how creamy and dreamy it becomes, setting the stage for the rest of the filling.
Step 2: Add the Sweetened Condensed Milk
Gradually pour in the sweetened condensed milk while continuing to mix. The mixture will start to thicken slightly and take on a glossy sheen. This is where the sweetness comes in, balancing the tangy cream cheese and zesty lemon juice we’ll add later. Don’t rush this step; adding the milk slowly ensures everything blends smoothly.
Step 3: Stir in the Pineapple and Lemon Juice
Now for the star of the show: the crushed pineapple! Make sure it’s well-drained to avoid a watery filling. Fold it into the cream cheese mixture along with the lemon juice. The lemon adds a bright, citrusy kick that elevates the tropical flavors. Take a moment to admire the golden-yellow color—it’s like sunshine in a bowl!
Step 4: Pour and Chill
Pour the filling into your graham cracker crust and spread it evenly with a spatula. Pop the pie into the fridge for at least 4 hours, or until it’s firm and set. Chef’s tip: Cover the pie with plastic wrap to prevent any fridge odors from sneaking in. Patience is key here—the chilling time lets the flavors meld together beautifully.
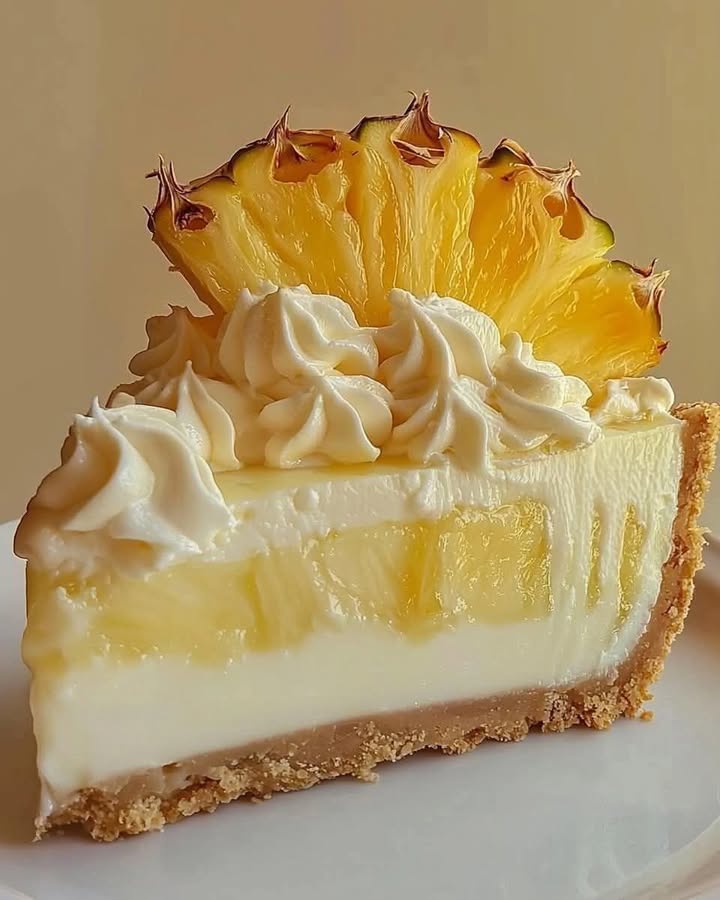
Step 5: Garnish and Serve
Before serving, top the pie with whipped cream and a few slices of fresh pineapple for a picture-perfect finish. The contrast of the fluffy whipped cream against the golden filling is irresistible. Slice it up and watch everyone dig in with delight!
Timing
Prep Time: 15 minutes
Chill Time: 4 hours
Total Time: 4 hours 15 minutes
Servings: 8
Chef’s Secret
For an extra burst of flavor, toast the graham cracker crust lightly before adding the filling. It adds a subtle crunch and enhances the overall texture of the pie.
Extra Info
Did you know pineapples are a natural source of bromelain, an enzyme that aids digestion? So not only is this pie delicious, but it’s also a tiny bit good for you. Win-win!
Necessary Equipment
You don’t need much to make this pie—a large mixing bowl, electric mixer, spatula, measuring cups, and a refrigerator are all you need. Simple tools for a simply amazing dessert!
Storage Tips
To store leftovers, cover the pie tightly with plastic wrap or transfer slices to an airtight container. Keep it in the fridge for up to 3 days. The flavors deepen over time, making it even tastier the next day. If you live in a humid area, keep the pie chilled until the last possible moment to prevent the crust from getting soggy.
Freezing isn’t recommended for this pie, as the texture may change. However, if you must freeze it, do so without the whipped cream topping. Thaw in the fridge overnight before serving.
Always check for freshness before serving stored pie. A quick sniff test will tell you if it’s still good to go.
Tips and Advice
Here are a few tips to make your pie shine:
- Use room-temperature cream cheese for easier mixing.
- Drain the pineapple thoroughly to avoid a watery filling.
- Let the pie chill overnight for maximum flavor development.
Presentation Ideas
Get creative with your presentation! Add a sprinkle of shredded coconut around the edges, or drizzle caramel sauce for a decadent touch. Serve each slice on a colorful plate with a sprig of mint for a pop of green. Presentation matters—it makes the pie feel extra special!
Healthier Alternatives
Looking to lighten up this recipe? Here are six variations:
- Low-Sugar Version: Use sugar-free sweetened condensed milk and a low-sugar crust.
- Vegan Option: Swap cream cheese and condensed milk for plant-based alternatives.
- Gluten-Free: Use a gluten-free graham cracker crust.
- Protein-Packed: Add a scoop of vanilla protein powder to the filling.
- Fruit Swap: Replace pineapple with mango or peach for a new twist.
- No-Crust Version: Layer the filling in jars for individual parfaits.
Mistake 1: Not Draining the Pineapple Properly
One common mistake is skipping the draining step for the crushed pineapple. Excess liquid can make the filling runny and ruin the texture. To avoid this, press the pineapple through a fine mesh strainer or squeeze it gently in a clean kitchen towel. Your pie will thank you!
Mistake 2: Rushing the Chilling Process
Patience is key with this pie. Skipping or shortening the chilling time can result in a soft, un-set filling. Plan ahead and give it the full 4 hours (or more) it needs to firm up properly.
Mistake 3: Overmixing the Filling
Overmixing can incorporate too much air, making the filling airy instead of dense and creamy. Mix just until the ingredients are combined. Pro tip: Stop the mixer and scrape down the sides of the bowl to ensure even blending.
FAQ
Can I use fresh pineapple instead of canned?
Absolutely! Just chop it finely and drain any excess juice. Fresh pineapple adds a vibrant flavor, though canned works perfectly too.
How long does the pie last in the fridge?
The pie stays fresh for up to 3 days when stored properly. Always cover it tightly to keep it tasting great.
Can I freeze this pie?
Freezing isn’t ideal, as the texture may change. However, you can freeze it without the whipped cream topping. Thaw in the fridge overnight before serving.
Is this pie gluten-free?
It can be! Simply use a gluten-free graham cracker crust to make it safe for those with gluten sensitivities.
What can I substitute for lemon juice?
Lime juice works wonderfully as a substitute. It provides a similar zesty kick that complements the pineapple beautifully.
Can I make this pie ahead of time?
Yes! In fact, making it a day in advance allows the flavors to meld, resulting in an even tastier pie.
Why is my filling too runny?
A runny filling usually happens if the pineapple wasn’t drained well or if the pie didn’t chill long enough. Double-check these steps next time.
Can I use a different crust?
Of course! Try a vanilla wafer crust or a chocolate cookie crust for a fun twist.
What’s the best way to serve this pie?
Serve chilled, topped with whipped cream and a slice of fresh pineapple. It’s refreshing and looks stunning on the plate.
Can I add nuts to the crust?
Yes! Crushed macadamia nuts or almonds pair beautifully with the tropical flavors of this pie.
Final Thoughts
This Tropical Cream Cheese Pie is more than just a dessert—it’s a taste of paradise. With its creamy texture, tangy flavor, and tropical flair, it’s sure to become a favorite in your recipe collection. Whether you’re hosting a party or treating yourself, this pie delivers happiness in every bite. So grab your ingredients, roll up your sleeves, and let’s bake a little sunshine together!
Equipment
- Large mixing bowl
- Electric mixer
- Spatula
- Measuring cups
- Refrigerator
Ingredients
- 227 g cream cheese softened
- 396 g sweetened condensed milk
- 567 g crushed pineapple drained
- 60 ml lemon juice
- 1 (9-inch) graham cracker crust
- q.s. whipped cream for garnish
- q.s. pineapple slices for garnish
Instructions
- Beat the softened cream cheese in a large bowl until smooth and velvety.
- Gradually pour in the sweetened condensed milk while continuing to mix until combined.
- Stir in the well-drained crushed pineapple and lemon juice until evenly mixed.
- Pour the filling into the graham cracker crust, spreading it evenly, and refrigerate for at least 4 hours until firm.
- Before serving, garnish with whipped cream and pineapple slices.
Notes
Nutrition

Hi, I’m Olivia Parker, the founder of BakingSecret.com and a lifelong lover of all things sweet and homemade. I grew up in a small town in Oregon, where the smell of fresh cookies in my family’s kitchen sparked my passion for baking. Over the years, I turned that passion into a mission: to help home bakers feel confident, inspired, and creative.
After studying food science and working in several artisan bakeries across the U.S., I decided to create a space where everyone from beginners to seasoned bakers can find reliable recipes, expert tips, and a warm, welcoming community. BakingSecret.com is my way of sharing the magic of baking with the world. When I’m not testing new recipes, you’ll find me exploring farmers’ markets, collecting vintage cookbooks, or perfecting my sourdough technique.