
Why These Tropical Pineapple Tartlets Are a Must-Try
Picture this: you’re at a cozy family gathering, and someone pulls out these golden, buttery Tropical Pineapple Tartlets. The aroma of caramelized pineapple wafts through the air, and suddenly everyone’s eyes light up. That’s exactly what happened to me last summer! I decided to recreate this Caribbean-inspired treat, and let me tell you, it was love at first bite. Crispy pastry on the outside, juicy sweet-and-tangy filling inside—these tartlets are simply irresistible. Whether you’re baking for a party or just because, they’re sure to impress.
A Bite of History: Pineapple Treats Around the World
Pineapple desserts have been around for centuries, especially in tropical regions where the fruit grows abundantly. In Southeast Asia, pineapple tarts are a beloved snack during celebrations like Chinese New Year. Meanwhile, in the Caribbean, pineapple is often paired with spices like cinnamon to create rich, flavorful dishes. My version combines these global influences into one delightful package. I tested this recipe over several weekends, tweaking it until it was just right. The result? A modern twist on a classic dessert that’s easy enough for home bakers but fancy enough to wow guests.
Why You’ll Fall Head Over Heels for This Recipe
What makes these Tropical Pineapple Tartlets so special? First, they’re bursting with flavor—from the buttery crust to the zesty, fragrant pineapple filling. Second, they’re surprisingly simple to make. Even if you’re not a seasoned baker, you can pull this off. Plus, they’re versatile! Serve them warm or cold, plain or decorated—they always taste amazing. And did I mention how quickly they disappear? Trust me, once you try them, you’ll want to bake another batch immediately.
Perfect Occasions for These Tartlets
These tartlets are perfect for almost any occasion. Bring them to a potluck, and watch them vanish before dessert time even starts. They’re also ideal for holidays like Christmas or Lunar New Year when pineapple symbolizes good fortune. Hosting a brunch? Pair them with coffee or tea for an elegant touch. Or keep things casual by gifting them to friends—they’re portable, adorable, and universally loved.
Ingredients You’ll Need
- For the dough:
- 400 g wheat flour
- 200 g cold butter, cubed
- 100 g sugar
- 1 egg + 1 yolk
- 1 tsp vanilla essence
- 1 pinch of salt
- Up to 24 tbsp cold water (if needed)
- For the pineapple filling:
- 1 ripe pineapple (about 600 g)
- 150 g sugar
- 2 tbsp cornstarch dissolved in water
- Juice of 1 lemon
- Optional: a dash of vanilla or cinnamon
Substitution Options
If you don’t have fresh pineapple, canned crushed pineapple works fine—just reduce the sugar slightly since it’s already sweetened. For vegans, swap the butter with plant-based margarine and use flaxseed meal mixed with water instead of eggs. Instead of wheat flour, almond or oat flour can work for gluten-free diets. Want a lighter option? Cut the sugar in half and add more lemon juice for brightness.
Step 1: Make the Dough
To start, mix your dry ingredients—flour, sugar, and salt—in a large bowl. Add the cold butter cubes and rub them into the flour using your fingertips. Imagine playing in sand at the beach; you want a crumbly, sandy texture. Next, beat the egg and yolk together and pour them in along with the vanilla essence. Knead gently until the dough comes together. If it feels too dry, sprinkle in a little cold water, tablespoon by tablespoon. Wrap the dough in plastic wrap and chill it in the fridge for 30 minutes. Pro tip: Keep everything cold—it helps the dough stay tender.
Step 2: Prepare the Filling
Peel and dice the pineapple into small chunks. Combine it with sugar and lemon juice in a saucepan over medium heat. Let it simmer for about 10 minutes until the pineapple softens and releases its juices. Stir in the dissolved cornstarch mixture and cook for another 5 minutes until thickened. Remove from heat and let it cool completely. This step transforms the sharp tang of raw pineapple into a lush, jammy filling. Optional: toss in a pinch of cinnamon for extra warmth.
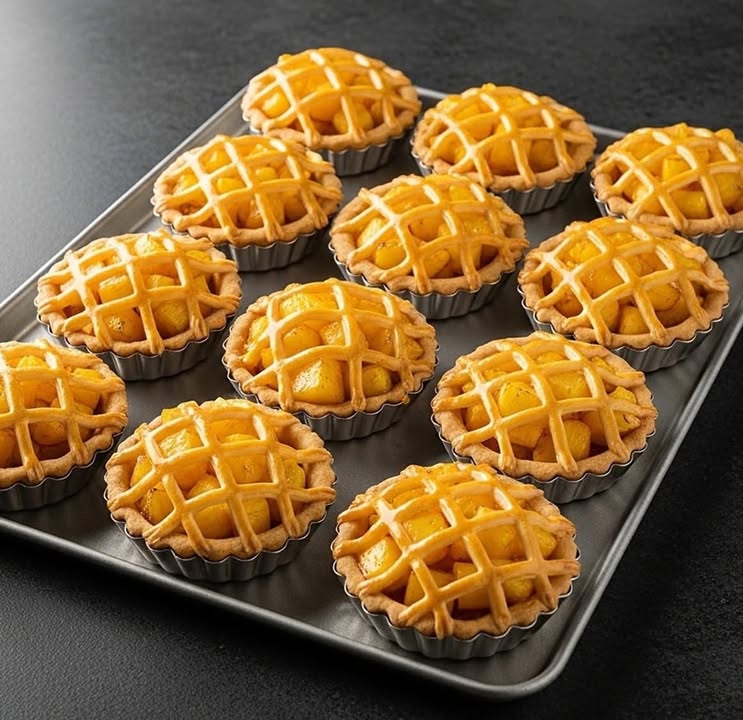
Step 3: Assemble the Tartlets
Preheat your oven to 180°C (350°F). Roll out the chilled dough on a floured surface to about ¼-inch thickness. Cut circles slightly larger than your tartlet molds and press them gently into place. Spoon the cooled pineapple filling into each shell, leaving a bit of space at the top. Use leftover dough to cut thin strips and weave a lattice pattern on top. Brush the tops with an egg wash and sprinkle with sugar for a golden finish. Doesn’t it look cute already?
Step 4: Bake Until Golden
Pop the tartlets into the preheated oven and bake for 25–30 minutes. Keep an eye on them—they’re done when the edges turn golden brown and the filling bubbles slightly. Once baked, transfer them to a wire rack to cool. Resist the urge to dig in right away—the flavors deepen as they rest. Your kitchen will smell heavenly, trust me!
Chef’s Tip
Here’s my secret: grate a tiny bit of lemon zest into the dough. It adds a subtle citrus note that pairs beautifully with the pineapple filling. Also, roll the dough evenly—this ensures every bite has the perfect balance of crust and filling.
Timing Breakdown
- Preparation Time: 30 minutes (plus chilling)
- Cooking Time: 45 minutes total (filling + baking)
- Resting Time: 30 minutes (chilling dough)
- Total Time: About 1 hour 45 minutes
An Interesting Fact About Pineapples
Did you know pineapples were once considered a luxury item in Europe? Back in the 1700s, only wealthy families could afford them. Some hosts would even rent a pineapple for parties just to display it as a centerpiece! Thankfully, today we can enjoy this tropical gem anytime we want—and turning it into tartlets makes it feel extra posh.
Necessary Equipment
- Mixing bowls
- Saucepan
- Rolling pin
- Tartlet molds or muffin tin
- Parchment paper
- Pastry brush
Storage Tips
Let’s talk leftovers—who am I kidding, there probably won’t be any! But if you do end up with extras, store them properly. Place the cooled tartlets in an airtight container lined with parchment paper to prevent sticking. They’ll stay fresh at room temperature for up to two days.
For longer storage, refrigerate them for up to five days. Just bring them back to room temp before serving so the buttery crust regains its crispiness. You can also freeze them for up to three months. Simply wrap each tartlet individually in plastic wrap and place them in a freezer-safe bag.
When reheating, pop them in the oven at 150°C (300°F) for 5–10 minutes. Avoid microwaving, as it can make the crust soggy.
Tips and Advice
Don’t rush the chilling step—it’s crucial for achieving a flaky crust. Be gentle when handling the dough; overworking it can make it tough. For the filling, taste as you go. Adjust the sugar and lemon juice based on your preference. If you’re making these for a crowd, double the recipe—you’ll thank yourself later!
Presentation Ideas
- Dust with powdered sugar for a snowy effect.
- Add a sprig of mint for a pop of color.
- Serve on tiered dessert stands for a fancy touch.
- Pair with whipped cream or vanilla ice cream.
Healthier Alternatives
Want to lighten up this recipe? Try these variations:
- Whole Wheat Pastry: Swap half the wheat flour with whole wheat for added fiber.
- Reduced Sugar: Halve the sugar in both the dough and filling.
- Coconut Oil Crust: Replace butter with solid coconut oil.
- Fruit Swap: Use mango or papaya instead of pineapple.
- Gluten-Free Option: Use almond flour for the crust.
- Vegan Version: Use plant-based butter and flax eggs.
Mistake 1: Overmixing the Dough
Overmixing leads to tough, chewy tartlets—not what we’re aiming for! Mix just until the dough holds together. Tip: Use a light touch and stop as soon as the ingredients combine.
Mistake 2: Skipping the Chilling Step
Skipping this step makes the dough hard to handle and results in a dense crust. Chill it for at least 30 minutes—it’s worth the wait.
Mistake 3: Overfilling the Shells
Too much filling causes spillage during baking. Leave a small border around the edges to prevent messy ovens.
Mistake 4: Underbaking
Underbaked tartlets lack that satisfying crunch. Look for golden-brown edges and bubbling filling before removing them from the oven.
Mistake 5: Rushing the Cooling Process
Rushing ruins the texture. Let the tartlets cool completely so the filling sets properly.
Frequently Asked Questions
Can I Use Store-Bought Dough?
Absolutely! While homemade dough tastes better, store-bought puff pastry works in a pinch. Just roll it thinner for a crispier base.
How Long Do These Last?
They’re best eaten within two days at room temperature or five days refrigerated. Freeze for longer storage.
What Can I Substitute for Cornstarch?
Arrowroot powder or tapioca starch works well as thickeners.
Can I Make Mini Tartlets?
Yes! Use mini muffin tins and adjust baking time accordingly—about 15–20 minutes.
Is Lemon Juice Necessary?
Yes, it balances the sweetness and enhances the pineapple flavor. Don’t skip it!
Can I Add Spices?
Definitely! Cinnamon, nutmeg, or cardamom pairs wonderfully with pineapple.
Why Is My Filling Runny?
You may need more cornstarch. Reheat and stir in a slurry of 1 tsp cornstarch dissolved in water.
Can I Prep Ahead?
Yes! Make the dough and filling a day in advance. Assemble and bake when ready.
Do I Have to Use Fresh Pineapple?
No, canned pineapple works fine. Drain excess syrup and reduce sugar.
Can I Double the Recipe?
Of course! Just ensure your bowls and pans are big enough to accommodate double quantities.
Final Thoughts
These Tropical Pineapple Tartlets are more than just a dessert—they’re a celebration of flavor, texture, and creativity. Whether you’re baking for yourself or sharing with loved ones, they bring joy with every bite. So grab your apron, crank up some music, and get ready to shine in the kitchen. Happy baking!
Equipment
- Mixing bowls
- Saucepan
- Rolling pin
- Tartlet molds or muffin tin
- Parchment paper
- Pastry brush
Ingredients
- 400 g wheat flour
- 200 g cold butter, cubed
- 100 g sugar
- 1 egg
- 1 egg yolk
- 1 tsp vanilla essence
- 1 pinch salt
- 24 tbsp cold water if needed
- 1 ripe pineapple about 600 g
- 150 g sugar
- 2 tbsp cornstarch dissolved in water
- 1 juice of lemon
- q.s. vanilla or cinnamon optional
Instructions
- Mix the flour, sugar, and salt in a large bowl; rub in the cold butter until crumbly.
- Beat the egg and yolk, then pour into the flour mixture with vanilla; knead gently until combined.
- Wrap the dough in plastic wrap and chill in the fridge for 30 minutes.
- Peel and dice the pineapple; combine with sugar and lemon juice in a saucepan over medium heat.
- Simmer the pineapple for about 10 minutes, then stir in the dissolved cornstarch and cook for an additional 5 minutes until thickened; cool completely.
- Preheat the oven to 180°C (350°F).
- Roll out the chilled dough to about ¼-inch thickness; cut circles for the tartlet molds.
- Press the dough circles into the molds and spoon cooled pineapple filling into each shell.
- Use leftover dough to create a lattice pattern on top, brush with egg wash, and sprinkle with sugar.
- Bake for 25–30 minutes until golden brown; cool on a wire rack.