
A Dessert That Will Make Your Heart Skip a Beat
Let me tell you about the day I discovered the magic of Velvet Cheesecake Delight. It was my best friend’s birthday, and I wanted to bake something unforgettable. I combined two of my favorite desserts—red velvet cake and creamy cheesecake—and topped it with a tangy red fruit glaze. The result? Pure bliss. This dessert is soft, creamy, and packed with flavor, making it perfect for celebrations or just because you deserve something sweet.
A Match Made in Dessert Heaven
Red velvet cake has always been a classic. Its deep red color, velvety texture, and mild cocoa flavor make it a crowd-pleaser. Cheesecake, on the other hand, is rich, creamy, and comforting. Put them together, and you’ve got a dessert that’s greater than the sum of its parts. This fusion started gaining popularity in modern bakeries, but trust me, making it at home is way more satisfying (and cheaper!).
Why You’ll Fall Head Over Heels for This Recipe
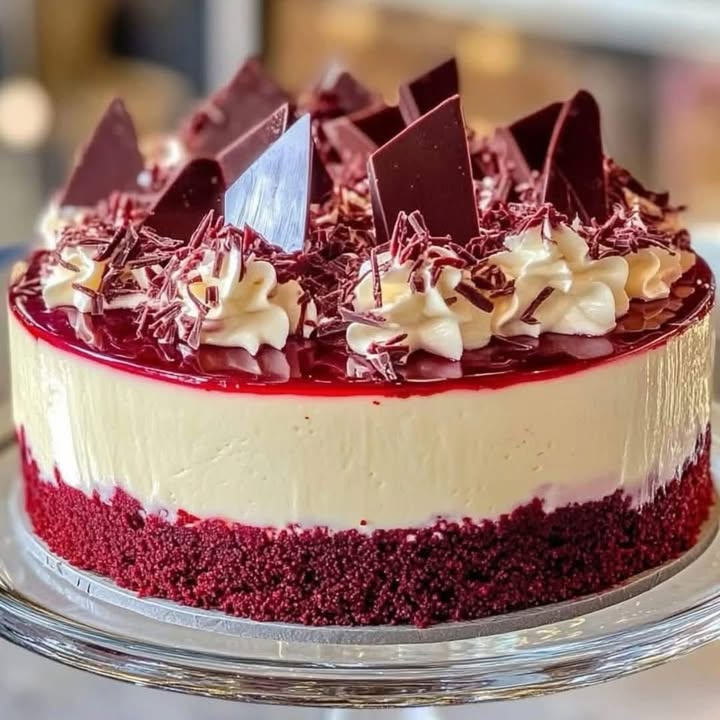
What makes this Velvet Cheesecake Delight so special? First, it’s stunning to look at. The vibrant red cake layer topped with white chocolate cheesecake and glossy red fruit glaze is a feast for the eyes. Second, it’s surprisingly easy to make. If you can mix, pour, and chill, you’re halfway there. Plus, the flavors are balanced—rich but not overwhelming, sweet but with a hint of tartness from the fruit topping.
Perfect Occasions for This Showstopper
This dessert shines at holiday gatherings, birthdays, and dinner parties. Imagine serving it at a Christmas celebration—the red and white colors scream festive! Or bring it to a summer barbecue; the fruity topping adds a refreshing twist. Honestly, any occasion where you want to impress is perfect for this Velvet Cheesecake Delight.
Ingredients You’ll Need
- For the Red Velvet Cake:
- 1 cup all-purpose flour
- 2 tablespoons cocoa powder
- 1 cup granulated sugar
- 1/2 cup buttermilk
- 1 teaspoon vinegar
- Red food coloring (just enough to make it pop)
- For the Cheesecake Layer:
- 8 oz cream cheese, softened
- 1/2 cup white chocolate, melted
- 1 cup whipped cream
- 1 tablespoon gelatin
- For the Fruit Topping:
- 1 cup red fruit juice (raspberry or cranberry works well)
- 2 tablespoons sugar
- 1 tablespoon gelatin
Substitution Options
Not everyone has everything on hand, and that’s okay! Here are some swaps:
- If you don’t have buttermilk, mix regular milk with a splash of lemon juice.
- Use dark chocolate instead of white chocolate for a richer flavor.
- Vegan? Try plant-based cream cheese and whipped cream alternatives.
Step 1: Bake the Red Velvet Cake
Start by preheating your oven to 180°C (350°F). In a bowl, mix the dry ingredients—flour, cocoa, and sugar. In another bowl, whisk together buttermilk, vinegar, and red food coloring. Combine the wet and dry mixtures until smooth. Pour the batter into a lined cake pan and bake for 25-30 minutes. You’ll know it’s done when a toothpick comes out clean. The aroma of cocoa and sweetness will fill your kitchen—it’s heavenly!
Step 2: Prepare the Cheesecake Layer
While the cake cools, whip up the cheesecake layer. Blend the softened cream cheese with melted white chocolate until smooth. Fold in the whipped cream gently to keep it light and airy. Add the gelatin to help it set. Pour this luscious mixture over the cooled cake and smooth it out. Pop it in the fridge for at least 4 hours. Pro tip: Use a spatula dipped in warm water for a flawless finish.
Step 3: Add the Fruit Topping
Now for the crowning glory! Heat the red fruit juice and sugar in a saucepan until the sugar dissolves. Stir in the gelatin and let it cool slightly before pouring it over the chilled cheesecake layer. Let it set in the fridge for another hour. As it chills, you’ll notice the colors come together beautifully—a true work of art.
Timing Breakdown
- Prep Time: 20 minutes
- Cooking Time: 30 minutes
- Chilling Time: 5 hours
- Total Time: About 6 hours
Chef’s Secret
Here’s a little secret: brush the baked cake layer with a thin syrup made of sugar and water before adding the cheesecake layer. This keeps the cake moist and adds an extra touch of sweetness.
Did You Know?
Red velvet cake became famous during World War II when rationing made cocoa scarce. Bakers added beet juice to enhance the color and flavor. Thankfully, today we can use food coloring for convenience!
Necessary Equipment
You’ll need a few basic tools:
- Mixing bowls
- Whisk and spatula
- Cake pan
- Saucepan
- Refrigerator
Storage Tips
Store your Velvet Cheesecake Delight in the fridge, covered with plastic wrap or in an airtight container. It stays fresh for up to 3 days. Always serve it chilled for the best texture.
If you need to freeze it, wrap individual slices tightly in plastic wrap and foil. They’ll last up to a month. Thaw overnight in the fridge before serving.
Avoid leaving it at room temperature for too long, as the cheesecake layer can soften and lose its structure.
Tips and Advice
– Use room-temperature ingredients for smoother mixing.
– Don’t skip the chilling time—it’s crucial for setting.
– Taste as you go! Adjust sweetness or tartness to your liking.
Presentation Ideas
Dress it up with fresh berries, mint leaves, or a dusting of powdered sugar. Serve it on a elegant plate for a restaurant-worthy look.
Healthier Alternatives
Want to lighten things up? Try these variations:
- Low-Sugar Version: Use a sugar substitute like stevia.
- Gluten-Free: Swap regular flour for almond or oat flour.
- Dairy-Free: Use coconut cream instead of whipped cream.
- No-Bake Option: Skip baking by using a premade red velvet crust.
- Fruit Swap: Use mango or passionfruit juice for the topping.
- Mini Versions: Make bite-sized treats in cupcake liners.
Mistake 1: Overmixing the Batter
Overmixing can lead to a dense cake. Mix just until the ingredients are combined. A light hand ensures a fluffy texture.
Mistake 2: Skipping the Chilling Time
Patience is key! Rushing the chilling process can cause the layers to separate. Give it the full 5 hours.
Mistake 3: Using Old Gelatin
Expired gelatin won’t set properly. Always check the expiration date before using.
Mistake 4: Overbaking the Cake
Keep an eye on the cake while it bakes. Overbaking dries it out. Stick to the recommended time and test with a toothpick.
Mistake 5: Not Greasing the Pan
A greased pan ensures the cake comes out cleanly. Line it with parchment paper for extra insurance.
Frequently Asked Questions
Can I use store-bought red velvet cake?
Absolutely! While homemade is always better, a store-bought cake saves time and still tastes great.
How do I prevent cracks in the cheesecake layer?
Cracks happen when the mixture sets too quickly. Chill it gradually and avoid sudden temperature changes.
Can I make this ahead of time?
Yes! It’s actually better made a day in advance since the flavors meld overnight.
What fruits work best for the topping?
Raspberries, strawberries, and cranberries are excellent choices. Their tartness balances the sweetness.
Is this recipe kid-friendly?
Totally! Kids love the bright colors and creamy textures. Just skip the alcohol if you’re adding any.
How do I fix a runny topping?
If the topping doesn’t set, add more gelatin or chill it longer. Patience pays off!
Can I double the recipe?
Yes, just adjust the quantities accordingly. Use a larger pan or make two separate cakes.
What’s the best way to cut neat slices?
Dip your knife in hot water, wipe it dry, and then slice. Repeat for each cut to keep edges clean.
Does it taste overly sweet?
Not at all! The tart fruit topping balances the sweetness perfectly.
Can I add nuts or sprinkles?
Sure thing! Crushed pistachios or colorful sprinkles add crunch and flair.
Final Thoughts
The Velvet Cheesecake Delight is more than just a dessert—it’s an experience. Whether you’re baking for loved ones or treating yourself, this recipe promises joy in every bite. So grab your apron, turn on some music, and let’s get baking!
Equipment
- Mixing bowls
- Whisk
- Spatula
- Cake pan
- Saucepan
- Refrigerator
Ingredients
- 120 g all-purpose flour
- 2 tbsp cocoa powder
- 200 g granulated sugar
- 120 ml buttermilk
- 1 tsp vinegar
- q.s. red food coloring just enough to make it pop
- 225 g cream cheese softened
- 115 g white chocolate melted
- 250 ml whipped cream
- 1 tbsp gelatin
- 240 ml red fruit juice (raspberry or cranberry works well)
- 25 g granulated sugar
- 1 tbsp gelatin
Instructions
- Preheat your oven to 180°C (350°F).
- In a bowl, mix the dry ingredients: flour, cocoa powder, and sugar.
- In another bowl, whisk together buttermilk, vinegar, and red food coloring.
- Combine the wet and dry mixtures until smooth.
- Pour the batter into a lined cake pan and bake for 25-30 minutes until a toothpick comes out clean.
- While the cake cools, prepare the cheesecake layer by blending softened cream cheese with melted white chocolate until smooth.
- Fold in the whipped cream gently to keep it light and airy.
- Add the gelatin to the cheesecake mixture and pour it over the cooled cake, smoothing it out.
- Chill in the fridge for at least 4 hours.
- For the fruit topping, heat the red fruit juice and sugar in a saucepan until dissolved.
- Stir in the gelatin and let it cool slightly before pouring it over the cheesecake layer.
- Let it set in the fridge for another hour before serving.
Notes
Nutrition

Hi, I’m Olivia Parker, the founder of BakingSecret.com and a lifelong lover of all things sweet and homemade. I grew up in a small town in Oregon, where the smell of fresh cookies in my family’s kitchen sparked my passion for baking. Over the years, I turned that passion into a mission: to help home bakers feel confident, inspired, and creative.
After studying food science and working in several artisan bakeries across the U.S., I decided to create a space where everyone from beginners to seasoned bakers can find reliable recipes, expert tips, and a warm, welcoming community. BakingSecret.com is my way of sharing the magic of baking with the world. When I’m not testing new recipes, you’ll find me exploring farmers’ markets, collecting vintage cookbooks, or perfecting my sourdough technique.