
The Ultimate Red Velvet Cheesecake Delight Is Waiting for You
I still remember the first time I made this cake for a friend’s birthday. The look on their face when they cut into that stunning red layer, revealing the creamy cheesecake center? Pure magic. It’s the kind of dessert that makes you feel like a professional pastry chef without needing to be one. This Red Velvet Cheesecake Delight is my go-to for turning an ordinary day into a celebration. Let me show you how.
A Slice of History: From Humble Cake to Showstopper
Red velvet cake has a fascinating past, often linked to the South and the famous Waldorf-Astoria Hotel. Its distinct color originally came from a reaction between natural cocoa and acidic ingredients like buttermilk. Today, we use a touch of food coloring for that iconic, vibrant red. Cheesecake, of course, has ancient roots, beloved by everyone from Greek athletes to New York delis. This recipe combines both traditions into a stunning layered marvel that’s both classic and modern.
Why You’ll Fall in Love With This Red Velvet Recipe
This isn’t just another cake. It’s a textural dream. You get the moist, tender crumb of the red velvet layer hugging a dense, luscious cheesecake filling. The flavors are a perfect duet: slight chocolate tang meets rich, creamy sweetness. And the best part? It looks incredible but is surprisingly forgiving to make. Whether you’re a baking newbie or a seasoned pro, this recipe is designed for success and smiles all around.
Perfect Occasions for Your Cheesecake Masterpiece
This cake is a star at any gathering. I’ve served it for Valentine’s Day (that red is perfect!), Christmas dinners, and summer BBQs. It’s a birthday showstopper and the dessert you bring when you really want to impress the in-laws. Honestly, it’s so good that “just because it’s Tuesday” is a perfectly valid reason to make it.
Gather Your Ingredients for This Layered Masterpiece
Here’s everything you’ll need to create this layered masterpiece, plus tips to make it come together seamlessly.
- 1 cup all-purpose flour: Provides the base structure for the red velvet cake layer. Sift it beforehand for a lighter, fluffier texture.
- 1/4 cup cocoa powder: This adds the subtle chocolate undertone that makes red velvet cakes so unique. Use unsweetened cocoa for the best balance.
- 1/2 teaspoon baking soda: Ensures the cake rises beautifully while staying moist and tender.
- 1/4 teaspoon salt: Enhances the flavors in both the cake and the cheesecake.
- 1/2 cup buttermilk: Buttermilk is key for that classic red velvet tang. Don’t have it? Mix regular milk with a teaspoon of vinegar as a quick substitute.
- 1 teaspoon vanilla extract: A touch of vanilla rounds out the flavors in both layers.
- 1 tablespoon red food coloring: This gives the cake its iconic vibrant hue. Gel food coloring works best for an intense color without extra liquid.
- 1/4 cup unsalted butter, softened: For a rich, moist cake layer. Let it soften at room temperature for easy mixing.
- 1/4 cup granulated sugar: Sweetens the cake layer just enough without overpowering the cheesecake.
- 2 large eggs, divided: One goes into the cake batter; the other will be part of the cheesecake filling.
- 16 ounces cream cheese, softened: The foundation of the creamy cheesecake layer. Use full-fat for the ultimate texture.
- 1/2 cup powdered sugar: Keeps the cheesecake filling smooth and sweet.
- 1/2 cup heavy cream: Adds luxurious creaminess to the cheesecake layer.
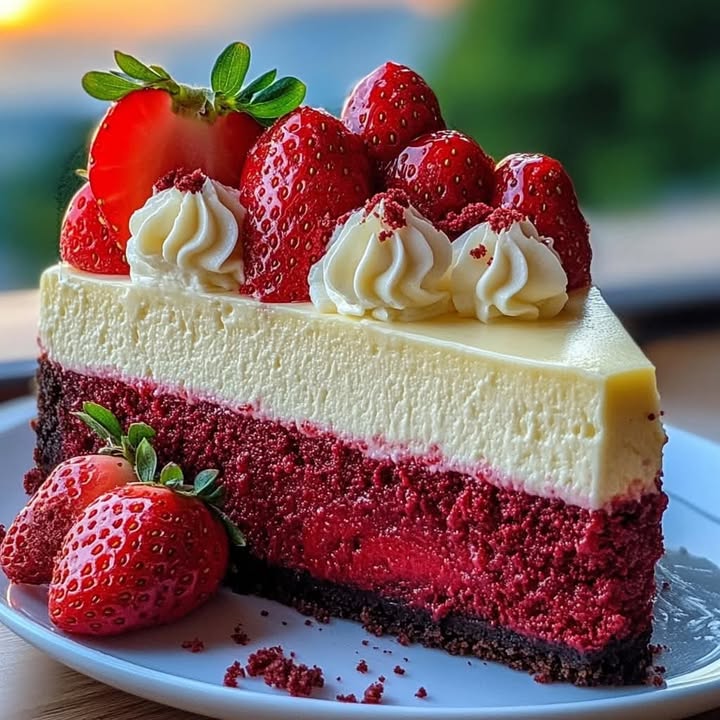
- Fresh strawberries, sliced: For a gorgeous and refreshing topping.
- Whipped cream: Optional, but highly recommended for added flair and flavor.
No-Problem Ingredient Substitutions
Out of something? Don’t panic. Here are easy swaps: Use gluten-free 1:1 flour for the all-purpose. Swap the buttermilk for that milk-vinegar mix I mentioned. For a slightly tangy twist, use Greek yogurt thinned with a splash of milk in the cheesecake layer instead of some heavy cream. You can even use a berry reduction for natural color instead of food coloring.
Crafting Your Red Velvet Cheesecake Delight: Step-by-Step
Step 1: Prep and Make the Red Velvet Layer
Start by preheating your oven to 350°F (175°C). Grease an 8-inch springform pan. Now, let’s make that beautiful red layer. In a bowl, whisk together your sifted flour, cocoa powder, baking soda, and salt. In another bowl, whisk the buttermilk, vanilla, and that vibrant red food coloring. In a larger mixing bowl, cream the softened butter and sugar until it’s light and fluffy. Beat in that single egg. The magic happens next: you’ll alternate adding the dry ingredients and the red buttermilk mixture to the butter bowl, starting and ending with the dry. Pro tip: Mix just until everything is combined. Overmixing is the enemy of a tender cake! Spread this gorgeous scarlet batter into the bottom of your prepared pan. It will be a thin layer, and that’s perfect.
Step 2: Create the Luxurious Cheesecake Filling
Time for the creamy heart of our dessert. In a clean bowl, beat the softened cream cheese until it’s completely smooth—no lumps allowed! Sift in the powdered sugar and beat again until creamy. Now, pour in the heavy cream and add that second egg. Beat on medium speed until the mixture is thick, luscious, and holds soft peaks. You want it to be billowy and smooth. Gently pour this creamy cloud over the red velvet batter in the pan. Use a spatula to spread it evenly, reaching all the way to the edges.
Step 3: The Water Bath Bake for Perfection
This step is your secret weapon against cracks. Wrap the bottom of your springform pan tightly with aluminum foil to prevent water from sneaking in. Place the pan inside a larger roasting dish. Carefully pour hot water into the larger dish until it comes about halfway up the sides of the springform pan. This water bath creates a gentle, steamy environment for the cheesecake to bake evenly and stay supremely creamy. Chef’s tip: Bake for 45-50 minutes. The center should be just set but still have a slight jiggle, like firm Jell-O. A perfect cheesecake is a patient one.
Step 4: The Chill, The Reveal, The Glory
Turn off the oven and crack the door open slightly. Let the cake cool in this cozy environment for about an hour. This gradual cooling helps prevent sinking and major cracks. Then, take it out, remove it from the water bath, and let it cool completely on a rack. Once it’s room temperature, cover it and refrigerate for at least 4 hours, but overnight is truly best. The long chill sets the layers perfectly and makes slicing a dream. When you’re ready, run a thin knife around the edge, release the springform, and behold your masterpiece.
Your Red Velvet Cheesecake Timeline
Plan ahead for the best results! Prep time is about 25 minutes, and baking takes 45-50 minutes. Remember the crucial hour of cooling in the turned-off oven. Then, factor in that all-important chilling time. So, from start to finish, you’re looking at about 6 hours total, with most of that being hands-off chilling. Making it the day before? You’re a genius.
My Secret for the Perfect Swirl
Want to make it extra pretty? Before baking, dollop a couple of tablespoons of reserved red velvet batter on top of the cheesecake layer. Use a toothpick or knife to swirl it into a beautiful marble pattern. It’s a simple trick that makes it look bakery-perfect.
A Fun Fact About That Red Hue
During World War II, bakers started using beet juice to enhance the color of their cakes due to food rationing. It added moisture and a natural red tone! While we use food coloring today for a consistent, vibrant color, experimenting with beet powder is a fun, natural nod to history.
What You’ll Need in Your Kitchen
- 8-inch springform pan
- Mixing bowls (a few sizes)
- Electric hand mixer or stand mixer
- Whisk and spatula
- Measuring cups and spoons
- Large roasting pan for the water bath
- Aluminum foil
Keeping Your Velvet Cheesecake Delight Fresh
Once assembled, your cheesecake is best stored covered in the refrigerator. It will stay fresh and delicious for up to 4-5 days. Make sure it’s covered tightly with plastic wrap or in an airtight container to prevent it from absorbing any other fridge odors.
You can also freeze this cake for longer storage. Wrap the whole cake or individual slices tightly in plastic wrap, then a layer of aluminum foil. It will keep well for up to 2 months. For the best texture, thaw it overnight in the refrigerator before serving.
For more detailed information on keeping your baked goods at their peak, you can refer to official food storage guidelines for general best practices on food quality and safety.
Helpful Hints for a Flawless Finish
- Room temperature is key: Let your cream cheese, eggs, and buttermilk sit out for about 30 minutes before starting. This ensures a smooth, lump-free batter and filling.
- Sift your dry ingredients: It incorporates air and prevents lumps, giving you a finer cake crumb.
- Don’t overmix the cake batter: Once you add the flour, mix just until you see no more dry streaks. Overworking develops gluten and makes the cake tough.
- Patience with chilling: I know it’s hard to wait, but that long chill is what gives you clean, perfect slices.
Make It Look Like a Million Bucks
- Top with fresh, sliced strawberries and a dusting of powdered sugar just before serving.
- Pipe rosettes of whipped cream around the edge and place a whole strawberry in the center.
- For a dramatic look, drizzle slices with a simple chocolate ganache or a raspberry coulis.
- Serve on simple, elegant cake stands to let the beautiful colors shine.
Explore More Delicious Cakes and Cupcakes
If you loved the creative baking process here, you’ll find so many more inspiring ideas in our collection of incredible cake and cupcake recipes. From birthday classics to festive wonders, there’s always a new baking adventure waiting.
Mix It Up: Healthier & Fun Variations
This recipe is wonderfully adaptable. Here are six ways to make it your own:
- Gluten-Free Red Velvet Delight: Simply swap the all-purpose flour for your favorite 1:1 gluten-free baking blend. The texture is just as lovely.
- Dairy-Free Dream: Use plant-based cream cheese, butter, and milk (with apple cider vinegar for the buttermilk swap). Choose a coconut-based whipping cream for the topping.
- Mini Cheesecake Bites: Bake in a muffin tin with liners for perfect individual portions. Just reduce the baking time to about 18-22 minutes.
- Chocolate Ganache Drizzle: Melt together equal parts chocolate and heavy cream. Let it cool slightly, then drizzle artfully over the chilled cake for a decadent finish.
- Orange-Velvet Twist: Swap the vanilla for orange extract in the cheesecake layer and add a teaspoon of zest. Use orange food coloring for a stunning sunset hue.
- Peppermint Holiday Version: Add a 1/4 teaspoon of peppermint extract to the cheesecake layer and top with crushed candy canes for a festive winter dessert.
Common Mistakes to Avoid
Mistake 1: Using Cold Ingredients
This is the biggest culprit for a lumpy cheesecake filling or a dense cake layer. Cold cream cheese won’t blend smoothly, and cold eggs can cause the batter to curdle. Always plan ahead. Take your cream cheese, eggs, and buttermilk out of the fridge about 30-60 minutes before you start baking. They should feel cool to the touch, not cold. This simple step makes mixing a breeze and gives you that velvety texture we’re after.
Mistake 2: Skipping the Water Bath
I know, it feels like an extra, fussy step. But baking a cheesecake without a water bath is like trying to bake bread without letting the dough rise. The hot water creates a gentle, moist heat in the oven. This stops the top from drying out and cracking, and it cooks the cheesecake evenly from the edges to the center. A great tip is to use a slow cooker liner bag instead of foil to wrap your pan—it’s stronger and less likely to leak.
Mistake 3: Overbaking the Cheesecake
A perfectly baked cheesecake should still wobble slightly in the very center when you gently shake the pan. It will set fully as it cools. If you wait until the top is completely firm and a knife comes out clean, it’s overdone. The residual heat will continue to cook it as it cools in the oven with the door cracked. Remember, jiggle is good! Pull it when the edges look set but the center has a slight, creamy wiggle, about the size of a quarter.
Mistake 4: Rushing the Chill Time
You’ve waited through baking and cooling. Now you want to slice it right away, right? Please, don’t. A cheesecake needs hours in the fridge to properly set its structure. Slicing into a warm or even room-temperature cheesecake will result in a soupy, messy slice. For the cleanest cuts and the best flavor and texture, chill it for a minimum of 4 hours, but truly, overnight is the gold standard. Your patience will be deliciously rewarded.
Your Red Velvet Cheesecake Questions, Answered
Can I make this red velvet delight ahead of time?
Absolutely, and I highly recommend it! In fact, making it a day ahead is the best strategy. The long chill time in the refrigerator allows all the flavors to meld together beautifully and gives the cheesecake layer the firm, perfect texture you need for clean slicing. Simply bake and cool it the day before your event, let it chill overnight, and then just add your fresh strawberry and whipped cream toppings right before you serve. This makes it a fantastic, stress-free dessert for parties and holidays.
Why did my red velvet layer turn out dry?
A dry cake layer usually points to two common issues. First, you might have overmixed the batter after adding the flour. Once the wet and dry ingredients are combined, mix only until you see no more white streaks. Overmixing develops gluten, which leads to toughness. Second, it could be overbaking. Since this layer is thin, it bakes quickly under the cheesecake. The water bath should prevent this, but all ovens vary. Using an oven thermometer to ensure an accurate temperature is a small tool that makes a huge difference.
What’s the best way to get a clean slice?
For those picture-perfect slices, you need two things: a fully chilled cake and a hot, clean knife. First, make sure your cheesecake has chilled for at least 4 hours, preferably overnight. Then, take a long, thin-bladed knife and run it under very hot water. Wipe it dry with a towel. The heat will slice through the creamy filling and firm cake cleanly, without dragging or sticking. Repeat this hot-water wipe-dry process for every single cut, and you’ll have pristine slices every time.
Can I use liquid food coloring instead of gel?
You can, but you might need a lot more to achieve a vibrant red color. The problem is that liquid food coloring adds extra moisture to your batter, which can throw off the balance of wet and dry ingredients. Gel or paste food coloring is highly concentrated, so you need much less to get a deep, rich red. This means you get the bold color without risking a soggy or dense cake texture. If liquid is all you have, use it, but add it slowly and be aware the final color might be more pink than deep red.
My cheesecake cracked on top. What did I do wrong?
Don’t worry, it still tastes amazing! Cracks usually happen from a sudden temperature change, like opening the oven door during baking, or from overbeating the filling too much and incorporating too much air. The water bath is the best defense against cracks. If you do get a crack, it’s an easy fix—just cover it with your sliced strawberries and a generous swirl of whipped cream. No one will ever know, and you get an extra helping of delicious toppings.
How do I know when the cheesecake is done baking?
This is the trickiest part for many bakers. The cheesecake is done when the edges are puffed and slightly golden, but the center—about a 3-inch circle in the middle—still has a slight jiggle. It should look set but move like soft Jell-O when you gently shake the pan. Remember, the cake will continue to cook from residual heat as it cools. Taking it out at this “wobbly center” stage ensures a creamy, not dry, final texture. Trust the jiggle!
Can I freeze the leftover cheesecake?
Yes, freezing is a great option. To freeze individual slices, place them on a baking sheet until solid, then wrap each one tightly in plastic wrap and foil. For a whole cake, wrap it well after it’s fully chilled. It will keep for 1-2 months. To serve, thaw it overnight in the refrigerator. I don’t recommend freezing it with the fresh strawberry topping, as they will get mushy. Add fresh berries and cream after thawing.
Is there a natural alternative to red food coloring?
There is! You can use beet powder or pureed cooked beets. For beet powder, mix 2-3 tablespoons with the buttermilk before adding it. For puree, you’ll need about 1/2 cup, and you may need to slightly reduce another liquid (like the buttermilk) by a tablespoon or two. The color will be more of a deep reddish-brown than a vibrant fire-engine red, but the flavor is wonderful and it’s a fun, natural option. For an intense red without artificial dyes, try a specialty product like powdered red algae color.
What type of pan is essential for this recipe?
A springform pan is non-negotiable for this layered dessert. The removable sides allow you to release the cake without flipping it over or damaging the beautiful layers. An 8-inch or 9-inch pan works best. Make sure yours has a tight seal so the water bath doesn’t leak in. Wrapping the bottom in heavy-duty foil or a slow cooker liner bag provides an extra layer of protection against any sneaky water.
My cream cheese filling was lumpy. How can I prevent that?
Lumpy filling almost always comes from cold cream cheese. The number one rule is to let it soften completely at room temperature. Don’t try to microwave it, as that can melt it unevenly. Once soft, beat it alone for a full minute or two until it’s completely smooth and creamy. Then add your powdered sugar and other ingredients. Taking these few extra minutes at the start makes the rest of the process smooth and guarantees a silky-smooth cheesecake layer.
The Final Slice
And there you have it—the secrets to a truly stunning Red Velvet Cheesecake Delight. It’s a recipe that brings joy, from the moment you see that bright red batter to the “oohs” and “aahs” when you serve the first slice. Remember to have fun with it. Maybe you’ll try the swirl trick, or add a chocolate drizzle. This cake is a celebration in itself. So preheat that oven, pull out your ingredients, and get ready to create something wonderfully delicious. I can’t wait for you to try it!
Equipment
- Grand bol
- Fouet
- Spatule
- Plaque à pâtisserie
- Papier sulfurisé
Ingredients
- 1 tasse farine tout usage
- 1/4 tasse cacao en poudre
- 1/2 cuillère à café poudre à lever
- 1/4 cuillère à café sel
- 1/2 tasse buttermilk
- 1 cuillère à café extrait de vanille
- 1 cuillère à soupe colorant alimentaire rouge
- 1/4 tasse beurre non salé, ramolli
- 1/4 tasse sucre granulé
- 2 œufs, divisés
- 16 onces fromage à la crème, ramolli
- 1/2 tasse sucre en poudre
- 1/2 tasse crème épaisse
- Fraises fraîches, tranchées pour le topping
- Crème fouettée facultatif pour le topping
Instructions
- Préchauffez votre four à 175°C et graissez un moule à charnière de 20 cm.
- Dans un bol, mélangez la farine tamisée, le cacao en poudre, la poudre à lever et le sel.
- Dans un autre bol, battez le buttermilk, la vanille et le colorant alimentaire.
- Dans un grand bol, crémez le beurre ramolli et le sucre jusqu'à ce que le mélange soit léger et mousseux.
- Battez un œuf et ajoutez alternativement les ingrédients secs et humides au mélange de beurre, en commençant et en terminant par les ingrédients secs.
- Étalez la pâte au chocolat rouge dans le fond du moule préparé.
- Dans un bol propre, battez le fromage à la crème jusqu'à ce qu'il soit lisse, puis incorporez le sucre en poudre jusqu'à obtenir une consistance crémeuse.
- Ajoutez la crème épaisse et le deuxième œuf, et battez jusqu'à ce que le mélange épaississe et forme des pics souples.
- Versez délicatement le mélange de cheesecake sur la pâte au chocolat rouge et étalez uniformément.
- Enveloppez le fond du moule à charnière dans du papier aluminium et placez-le dans un grand plat à rôtir.
- Versez de l'eau chaude dans le plat à rôtir jusqu'à mi-hauteur des côtés du moule à charnière.
- Faites cuire pendant 45 à 50 minutes jusqu'à ce que les bords soient pris mais que le centre ait encore un léger mouvement.
- Éteignez le four, ouvrez la porte et laissez le gâteau refroidir pendant environ une heure.
- Retirez le cheesecake du bain-marie et laissez-le refroidir complètement sur une grille.
- Couvrez et réfrigérez pendant au moins 4 heures, de préférence toute la nuit, avant de servir.