
Your Red Velvet Cheesecake Delight Awaits!
There’s magic in a layered cake, don’t you think? I remember the first time I tried to make this Red Velvet Cheesecake with a mirror glaze. My kitchen looked like a science lab exploded in red, but oh, that first perfect slice was pure joy. It’s the showstopper of all desserts. It combines the warm, cocoa-kissed crumb of red velvet with the cool, creamy hug of cheesecake, all wrapped in a shiny, red glaze. This isn’t just a cake. It’s an experience you bake for the people you love most.
A Tale of Two Desserts: The Story of This Velvet Cheesecake Delight
The classic red velvet cake has a rich, somewhat mysterious history, often tied to the American South. Some say the red color originally came from a chemical reaction between natural cocoa and acidic ingredients. The cheesecake layer is its perfect partner, a nod to New York-style richness. My modern twist? That dazzling mirror glaze. It turns a beloved dessert into a stunning centerpiece. It’s like giving a classic painting a gorgeous, modern frame. This version celebrates tradition while having a whole lot of fun with it.
Why You’ll Fall in Love With This Velvet Cheesecake Recipe
You’ll love this recipe because it delivers maximum ‘wow’ with manageable steps. Yes, it has layers, but we take them one at a time. The flavors are a dream team: tangy buttermilk cake, rich and smooth cheesecake, and sweet white chocolate glaze. The contrast of textures—from the soft cake to the firm cheesecake to the glossy glaze—is simply irresistible. It’s a project that fills your home with amazing smells and your heart with pride when you present it.
When to Whip Up This Showstopping Dessert
This cake is made for celebration. It’s the star of birthdays, anniversaries, and Valentine’s Day (that red glaze is so romantic!). Bring it to a potluck and watch it become the most photographed dish of the night. It’s also a wonderful Sunday baking project. You can spend an afternoon creating something beautiful, then enjoy it all week. Any day you want to feel like a pastry chef is the perfect day for this Velvet Cheesecake Delight.
Gathering Your Ingredients for Red Velvet Cheesecake Perfection
Here’s your shopping list for this beautiful cake. Let’s get everything to room temperature where noted—it makes a huge difference for a smooth batter and filling!
For the Red Velvet Cake Layers:
- 1 1/2 cups all-purpose flour
- 1 cup granulated sugar
- 1 tablespoon cocoa powder
- 1/2 teaspoon baking soda
- 1/2 teaspoon salt
- 3/4 cup buttermilk, room temperature
- 1/2 cup vegetable oil
- 1 large egg, room temperature
- 1 tablespoon red food coloring
- 1 teaspoon vanilla extract
- 1 teaspoon white vinegar
For the Cheesecake Layer:
- 16 oz cream cheese, softened
- 1/2 cup granulated sugar
- 2 large eggs, room temperature
- 1 teaspoon vanilla extract
- 1/4 cup sour cream
For the Mirror Glaze:
- 1 tablespoon gelatin powder
- 1/4 cup cold water
- 1/2 cup water
- 1/2 cup sugar
- 1/2 cup sweetened condensed milk
- 8 oz white chocolate, chopped
- Red gel food coloring
For Decoration:
- Whipped cream
- Chocolate pieces or shards
- Powdered sugar (optional)
No Stress Substitutions
Missing an ingredient? Don’t worry! Here are some easy swaps.
- Buttermilk: Make your own by adding 1 tablespoon of lemon juice or white vinegar to 3/4 cup of regular milk. Let it sit for 5 minutes.
- Sour Cream: Plain, full-fat Greek yogurt works beautifully.
- Vegetable Oil: Any neutral oil like canola or grapeseed is fine.
- White Chocolate: High-quality white chocolate chips can be used instead of a bar.
- Gel Food Coloring: Gel is best for a vibrant red without thinning the glaze, but liquid will work in a pinch.
Creating Your Layered Red Velvet Cheesecake Masterpiece
Follow these steps, take your time, and enjoy the process. Baking is love made edible!
Step 1: Baking the Red Velvet Layers
Start by preheating your oven to 350°F (175°C). Grease and line the bottoms of two 6-inch round cake pans. In a medium bowl, whisk together the flour, sugar, cocoa, baking soda, and salt. Watch the cocoa powder create little brown clouds in the white flour. In a larger bowl, whisk the wet ingredients: the room-temperature buttermilk, oil, egg, that dramatic red food coloring, vanilla, and vinegar. The vinegar will react with the baking soda later for a lift. Gently mix the dry ingredients into the wet until you have a smooth, shockingly red batter. Divide it between the pans and bake for 20-25 minutes. Your kitchen will smell amazing. A toothpick should come out clean. Let them cool completely. Pro tip: Wrap the cooled cake layers in plastic and freeze them for 30 minutes. This makes them easier to handle and stack later.
Step 2: Making the Creamy Cheesecake Layer
Lower your oven to 325°F (163°C). This gentle heat is key for a crack-free cheesecake. Line the bottom of a 6-inch springform pan and wrap the outside tightly with foil. This is your water bath armor. Beat the softened cream cheese and sugar in a bowl until it’s completely smooth and silky. No lumps allowed! Add the eggs one at a time, letting each fully blend into the creamy mixture. Then mix in the vanilla and sour cream. The sour cream adds a wonderful tang. Pour this luscious filling into your prepared pan. Place the springform pan inside a larger roasting pan. Pour hot water into the roasting pan until it comes halfway up the side of the springform. Bake for 45-50 minutes until the center is just set but still slightly jiggly. Turn off the oven, crack the door, and let it cool slowly for an hour. This prevents shocking cracks. Then, chill it for at least 4 hours, or overnight is even better.
Step 3: Assembling the Layers
Now for the fun part—building your tower of deliciousness! Place one fully cooled red velvet layer on your serving plate. Carefully remove the chilled cheesecake from its pan and place it right on top of the cake layer. It should be firm and easy to handle. Top the cheesecake with the second red velvet layer. Gently press down so everything is steady. Now, pop the whole assembled cake into the freezer for about an hour. This firmness is absolutely crucial for the next step. A frozen cake gives the mirror glaze a smooth, cold surface to set against, creating that perfect, glossy finish.
Step 4: Crafting the Shiny Red Mirror Glaze
This step feels like kitchen alchemy. First, ‘bloom’ your gelatin by sprinkling the powder over 1/4 cup of cold water. It will become a spongy, translucent blob. Let it sit for 5-10 minutes. Meanwhile, in a small saucepan, heat the 1/2 cup water, sugar, and sweetened condensed milk. Stir just until it starts to simmer, then remove from heat. Add the bloomed gelatin and whisk until it completely dissolves. Place your chopped white chocolate in a heatproof bowl. Pour the hot liquid mixture over the chocolate. Let it sit for a few minutes to melt, then whisk until it’s perfectly smooth and shiny. Now, stir in your red gel food coloring. Add a little at a time until you get a deep, rich red you love. Let this glaze cool to about 90°F (32°C). You want it warm and liquid, but not hot.
Step 5: The Grand Finale – Glazing and Decorating
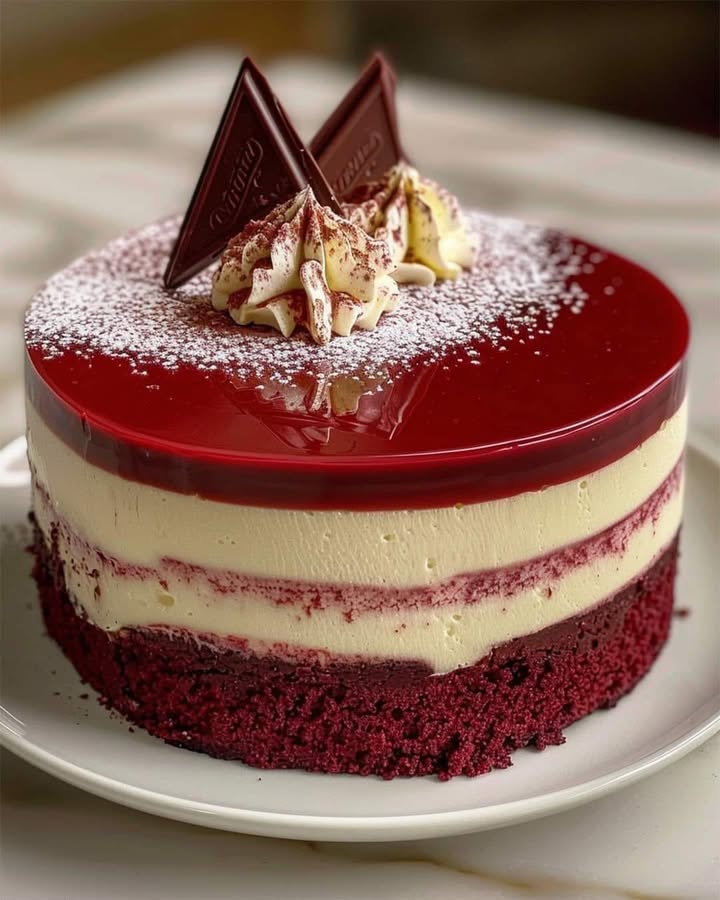
Take your chilled cake from the freezer and place it on a wire rack set over a baking sheet or tray. This catches the gorgeous excess glaze. Slowly pour your beautifully red mirror glaze over the top center of the cake. Use a ladle or a measuring cup with a spout for control. Watch in awe as it cascades over the edges, covering the entire cake in a glossy, red coat. You can use a spatula to gently guide it down the sides. Let the glaze set for 5-10 minutes. Now, decorate! Pipe little swirls of whipped cream on top. Add some elegant chocolate shards or curls. A light dusting of powdered sugar looks like snow on red satin. Your Velvet Cheesecake Delight is ready to steal the show.
Your Timeline to Dessert Success
Good things take time, and this cake is worth it! Here’s a realistic schedule:
- Prep Time: 1 hour (for all components)
- Baking Time: 1 hour 15 minutes (cakes + cheesecake)
- Chilling Time: At least 5 hours (4 for cheesecake, 1 for assembly)
- Glazing & Decorating: 30 minutes
- Total Time (hands-off chilling included): About 8 hours
Chef’s Tip: I highly recommend making the cheesecake layer the day before. This breaks up the work and ensures it’s perfectly set and chilled.
The Secret to a Flawless Mirror Glaze
My number one secret? Temperature is everything. The glaze must be between 85°F and 95°F (29°C-35°C), and the cake must be frozen solid. Test the glaze on the back of a spoon. It should coat it thinly and evenly. If the glaze is too hot, it will melt the cake layers and look thin. If the cake isn’t cold enough, the glaze will be too thick and won’t drip smoothly. Getting this contrast right is the magic trick to that professional, mirror-like shine.
A Fun Slice of Cake History
Did you know the original “velvet” cakes got their name from their texture, not their color? Recipes for “velvet” cakes used to rely on the fine, soft crumb created by cake flour or, later, the reaction of cocoa with vinegar and buttermilk. The vibrant red color we know today became popular in the mid-20th century, partly thanks to food coloring advertisements! So while we love the red, the true soul of this cake is that tender, “velvety” bite.
Your Kitchen Toolbox
You don’t need fancy equipment, but these tools will help:
- Three 6-inch round pans (two cake pans, one springform)
- Stand mixer or hand mixer
- Mixing bowls
- Fine-mesh sieve (for sifting dry ingredients)
- Whisk and rubber spatula
- Large roasting pan (for the water bath)
- Aluminum foil
- Wire cooling rack
- Small saucepan and heatproof bowl (for glaze)
How to Keep Your Red Velvet Cheesecake Fresh
Once glazed and decorated, this cake is best stored in the refrigerator. Cover it loosely with a cake dome or large inverted bowl to protect the glaze and decorations. The mirror glaze will stay shiny and beautiful for about 24 hours. After that, it may start to lose a bit of its luster, but the taste will still be fantastic.
For longer storage, you can keep slices in an airtight container in the fridge for up to 5 days. The flavors actually deepen and meld together, making it even more delicious on day two or three. Just note that the whipped cream decorations may soften over time.
You can also freeze the un-glazed assembled cake (cake + cheesecake layers) for up to a month. Wrap it tightly in several layers of plastic wrap and foil. Thaw it overnight in the fridge, then freeze it again for an hour before you make and apply your fresh mirror glaze.
Helpful Hints for a Perfect Cake Every Time
- Room Temperature is Key: For both the cake and cheesecake batters, ensure your dairy and eggs are at room temp. This helps everything blend smoothly and prevents overmixing.
- Don’t Skip the Water Bath: It’s the best insurance against a cracked, dry cheesecake. The steam creates a gentle, even heat.
- Use Gel Food Coloring: For the brightest red in both cake and glaze, gel or paste food coloring is superior. Liquid coloring can thin your batter and give a less vibrant color.
- Strain for Smoothness: For an ultra-silk cheesecake filling, pour it through a fine-mesh sieve into the pan. This catches any tiny lumps of cream cheese.
Presentation Ideas to Make Them Gasp
How you serve it is the final flourish!
- Use a hot, clean knife to slice. Wipe it between cuts for pristine, beautiful slices.
- Serve on simple, white plates to let the red color really pop.
- Add a fresh raspberry or mint leaf next to each slice on the plate.
- Drizzle a little extra melted white chocolate or caramel sauce on the plate before placing the slice.
- For a party, decorate the cake board with scattered chocolate pearls or gold leaf flakes.
Explore More Cheesecake Adventures
If you loved this project, you’ll adore these other creative cheesecake ideas. For a lighter, fruit-forward option, my Cheesecake Fruit Salad is a refreshing hit at summer gatherings. When the holidays roll around, nothing beats the festive charm of my Cranberry Pistachio Truffles—they’re adorable no-bake bites. For a zesty, nutty twist in bar form, you must try the bright flavors in these Lemon-Lime Pistachio Cheesecake Bars. And if you’re craving a childhood classic all grown up, my Peanut Butter and Jelly Cheesecake is pure, nostalgic bliss.
Common Mistakes to Avoid With Your Velvet Cheesecake Delight
Mistake 1: Using Cold Ingredients for the Cheesecake
This is the biggest culprit for a lumpy filling. Straight-from-the-fridge cream cheese and eggs don’t blend smoothly. You end up overmixing to try and beat out the lumps. Overmixing incorporates too much air, which can cause the cheesecake to rise and fall dramatically, leading to cracks. The fix is simple: take the cream cheese, eggs, and sour cream out of the fridge at least an hour before you start. The cream cheese should feel soft and pliable when poked.
Mistake 2: Skipping or Messing Up the Water Bath
“It’s just an extra step, I’ll skip it.” Famous last words! Baking the cheesecake without a water bath exposes it to direct, harsh oven heat. This often leads to overcooked edges, a sunken middle, and a network of cracks on the surface. The secret is the steam from the water bath. It creates a gentle, humid environment for baking. This results in an evenly cooked, incredibly creamy, and crack-free cheesecake. Just make sure your springform pan is well-wrapped in heavy-duty foil to keep water out.
Mistake 3: Glazing a Cake That Isn’t Cold Enough
Pouring the warm mirror glaze onto a cake that’s merely refrigerated is a recipe for a messy glaze puddle. The glaze will be too thin, soak into the cake, and not set with that signature shine. Your cake needs to be frozen solid for at least an hour. This provides a firm, cold barrier. The glaze sets almost instantly upon contact, creating that beautiful, smooth, and glossy coat. Think of it like dipping a frozen banana in chocolate versus a room-temperature one.
Mistake 4: Overbaking the Red Velvet Layers
Red velvet cake should be moist and tender. Overbaking dries it out, making your layers crumbly and difficult to stack. Because of the red coloring, it’s harder to tell when it’s done by sight alone. Always rely on the toothpick test. Start checking at 20 minutes. The toothpick should come out with a few moist crumbs attached, not completely clean. Also, remember to cool the cakes in the pan for only 10 minutes before moving them to a rack. This stops the cooking process.
Mistake 5: Rushing the Cooling Process
Patience is a baker’s secret weapon. Taking the cheesecake straight from the oven to the fridge causes thermal shock. This almost guarantees major cracking. The slow cooling method in the turned-off oven with the door ajar is non-negotiable. It allows the cheesecake to gradually adjust to lower temperatures, setting gently and evenly. Rushing any chilling step in this recipe risks texture problems and structural issues when you assemble and glaze.
Remember, indulgent desserts like this are part of a happy life. For guidance on enjoying all foods in a healthy way, the MyPlate guidelines offer great advice for a balanced diet.
Feeling inspired? You can find this recipe and many more stunning creations in my full collection of favorite cheesecake recipes online.
Your Red Velvet Cheesecake Questions, Answered
Can I make this cake in a different size pan?
Absolutely! This recipe is written for 6-inch pans for a tall, elegant look. For 8-inch pans, you’ll need to increase the recipe by about 1.5 times to get similar layer heights. The baking times will be slightly shorter for the thinner cakes, so start checking 5-10 minutes earlier. For a 9×13 sheet pan style, you could double the red velvet recipe, bake it as one layer, then cut it in half. You’d also need to double the cheesecake filling and use a large rectangular pan. The key is keeping your layer proportions similar.
Why did my mirror glaze turn out dull or streaky?
A dull or streaky glaze usually points to two issues. First, the glaze itself might have been over-stirred or had tiny air bubbles after blending. Let it settle for a few minutes and gently pop any surface bubbles with a toothpick before pouring. Second, and more common, the cake temperature was wrong. If the cake is not frozen, the glaze absorbs and loses its shine. If the glaze is too cold, it will be thick and set too quickly, creating streaks. Always use a thermometer to get the glaze to 90°F and a fully frozen cake.
Can I use a different color for the mirror glaze?
Of course! The mirror glaze is your creative canvas. Gel food coloring works best. For a pastel pink, use just a dot of red. For a deep chocolate glaze, omit the white chocolate and use dark chocolate with black or brown coloring. You can even divide the glaze and color it in multiple shades for a stunning ombre or marbled effect. Just remember that the color will appear more translucent on the cake, so go slightly darker than you think you need.
How far in advance can I assemble and glaze the cake?
For the absolute best visual impact, glaze the cake the day you plan to serve it. The mirror glaze is at its shiniest within the first 12-24 hours. However, you can prepare all the components ahead of time. Bake and freeze the cake layers up to a month in advance. Make and chill the cheesecake layer up to 3 days ahead. Assemble the un-glazed layers and freeze the whole cake a day ahead. Then, simply make your fresh glaze and pour it on the day of your event. This is my preferred method for stress-free entertaining.
My cheesecake cracked. Can I still use it?
Don’t despair! A cracked cheesecake is still a delicious cheesecake. For this layered recipe, it’s especially forgiving because the crack will be hidden between cake layers. Just make sure it’s fully chilled and firm before assembling. If you’re worried about looks for a non-layered cheesecake, a simple fix is to cover the top with a layer of sweetened sour cream before chilling, or use whipped cream or fruit to cover it. The taste will be perfect.
What’s the best way to get clean slices?
Slicing a beautiful cake can be nerve-wracking! The trick is a hot, dry, sharp knife. Run your knife under very hot water, wipe it completely dry with a clean towel, and make your slice in one smooth, confident motion. The heat helps the knife glide through the cold cheesecake and firm glaze without dragging or sticking. Wipe the knife clean and reheat it between every single slice. You’ll get picture-perfect, clean cuts every time.
Can I make this without a springform pan?
For the cheesecake layer, a springform is highly recommended because it has a removable side. If you don’t have one, you can use a regular cake pan of the same size. You’ll need to line it very thoroughly with parchment paper, letting the paper overhang the sides. Once frozen solid, you can use the paper “slings” to lift the entire cheesecake disk out. It’s a bit trickier, but it can be done. For the red velvet layers, regular cake pans are just fine.
Is there a substitute for gelatin in the mirror glaze?
The gelatin is what gives the glaze its signature set and shine. It’s very difficult to replicate. Agar-agar is a plant-based alternative, but it sets firmer and behaves differently with temperature. The substitution ratio and method would change, so I don’t recommend it for this specific recipe if you’re new to it. If you need a vegetarian option, look for a dedicated vegetarian mirror glaze recipe formulated with agar.
Why use vinegar in the red velvet cake?
The vinegar isn’t there for taste. It reacts with the baking soda (a base) to create carbon dioxide bubbles. These little bubbles give the cake a wonderful, light, and tender lift. Combined with the acidic buttermilk, it’s part of the science that creates that distinct “velvety” texture. You won’t taste it at all in the final cake. It’s a tiny ingredient with a very important job!
Can I use homemade cream cheese for the cheesecake?
While homemade cream cheese is a fun project, I don’t recommend it for this specific baked cheesecake layer. Store-bought, full-fat brick cream cheese has a specific consistency, fat content, and stability that’s been tested for baking. Homemade versions can vary widely in moisture and acidity. This can affect how the cheesecake sets, bakes, and tastes. For guaranteed results, stick with a trusted brand of full-fat cream cheese from the store.
Ready to Bake Some Memories?
So there you have it—your guide to creating a true showstopper. This Layered Red Velvet Cheesecake with Mirror Glaze is more than just a recipe. It’s a chance to play, create, and share something spectacular. It might take a little time, but every second is worth it when you see the smiles it brings. Don’t be afraid of the layers or the glaze. Take a deep breath, follow the steps, and trust yourself. You are about to make something amazing. Now, preheat that oven, and let’s get baking. Your Velvet Cheesecake Delight is waiting to happen!
Equipment
- Grand bol
- Fouet
- Spatule
- Plaque à pâtisserie
- Papier sulfurisé
Ingredients
- 1.5 tasse farine tout usage
- 1 tasse sucre granulé
- 1 cuil. à soupe cacao en poudre
- 0.5 cuil. à café bicarbonate de soude
- 0.5 cuil. à café sel
- 0.75 tasse babeur température ambiante
- 0.5 tasse huile végétale
- 1 grand œuf grand œuf température ambiante
- 1 cuil. à soupe colorant alimentaire rouge
- 1 cuil. à café extrait de vanille
- 1 cuil. à café vinaigre blanc
- 450 g fromage à la crème ramolli
- 100 g sucre en poudre
- 2 grands œufs grands œufs température ambiante
- 1 cuil. à café extrait de vanille
- 60 ml crème sure
- 1 cuil. à soupe gélatine en poudre
- 60 ml eau froide
- 120 ml eau
- 100 g sucre
- 120 ml lait concentré sucré
- 120 g chocolat blanc haché
- q.s. colorant alimentaire rouge
Instructions
- Préchauffez votre four à 175°C et graissez deux moules à gâteau ronds de 15 cm.
- Dans un bol moyen, mélangez la farine, le sucre, le cacao, le bicarbonate de soude et le sel.
- Dans un grand bol, mélangez les ingrédients humides : babeur, huile, œuf, colorant alimentaire, vanille et vinaigre.
- Mélangez les ingrédients secs aux ingrédients humides jusqu'à obtenir une pâte lisse, puis divisez le mélange entre les moules et faites cuire pendant 20-25 minutes.
- Laissez refroidir complètement ; enveloppez dans du plastique et mettez au congélateur pendant 30 minutes.
- Abaissez la température du four à 163°C. Tapissez un moule à charnière de 15 cm et enveloppez l'extérieur avec du papier aluminium.
- Battez le fromage à la crème et le sucre jusqu'à consistance lisse, puis ajoutez les œufs un par un, suivi de la vanille et de la crème sure.
- Versez la garniture dans le moule préparé, placez-la dans un grand plat de rôtissage, et remplissez d'eau chaude jusqu'à mi-hauteur.
- Faites cuire pendant 45-50 minutes, laissez refroidir pendant une heure, puis réfrigérez pendant au moins 4 heures.
- Assemblez le gâteau en plaçant une couche de velours rouge sur une assiette de service, en ajoutant la cheesecake, puis la seconde couche de velours rouge.
- Congélez le gâteau assemblé pendant environ une heure.
- Pour le glaçage miroir, faites gonfler la gélatine dans l'eau froide ; chauffez l'eau, le sucre et le lait concentré sucré à feu doux, puis incorporez la gélatine.
- Versez le mélange chaud sur le chocolat blanc et remuez jusqu'à ce qu'il soit lisse, puis ajoutez le colorant alimentaire rouge à la teinte désirée.
- Laissez refroidir le glaçage jusqu'à 32°C, puis versez-le sur le gâteau refroidi sur une grille.
- Décorez avec de la crème fouettée, des morceaux ou éclats de chocolat, et du sucre glace selon vos désirs.