
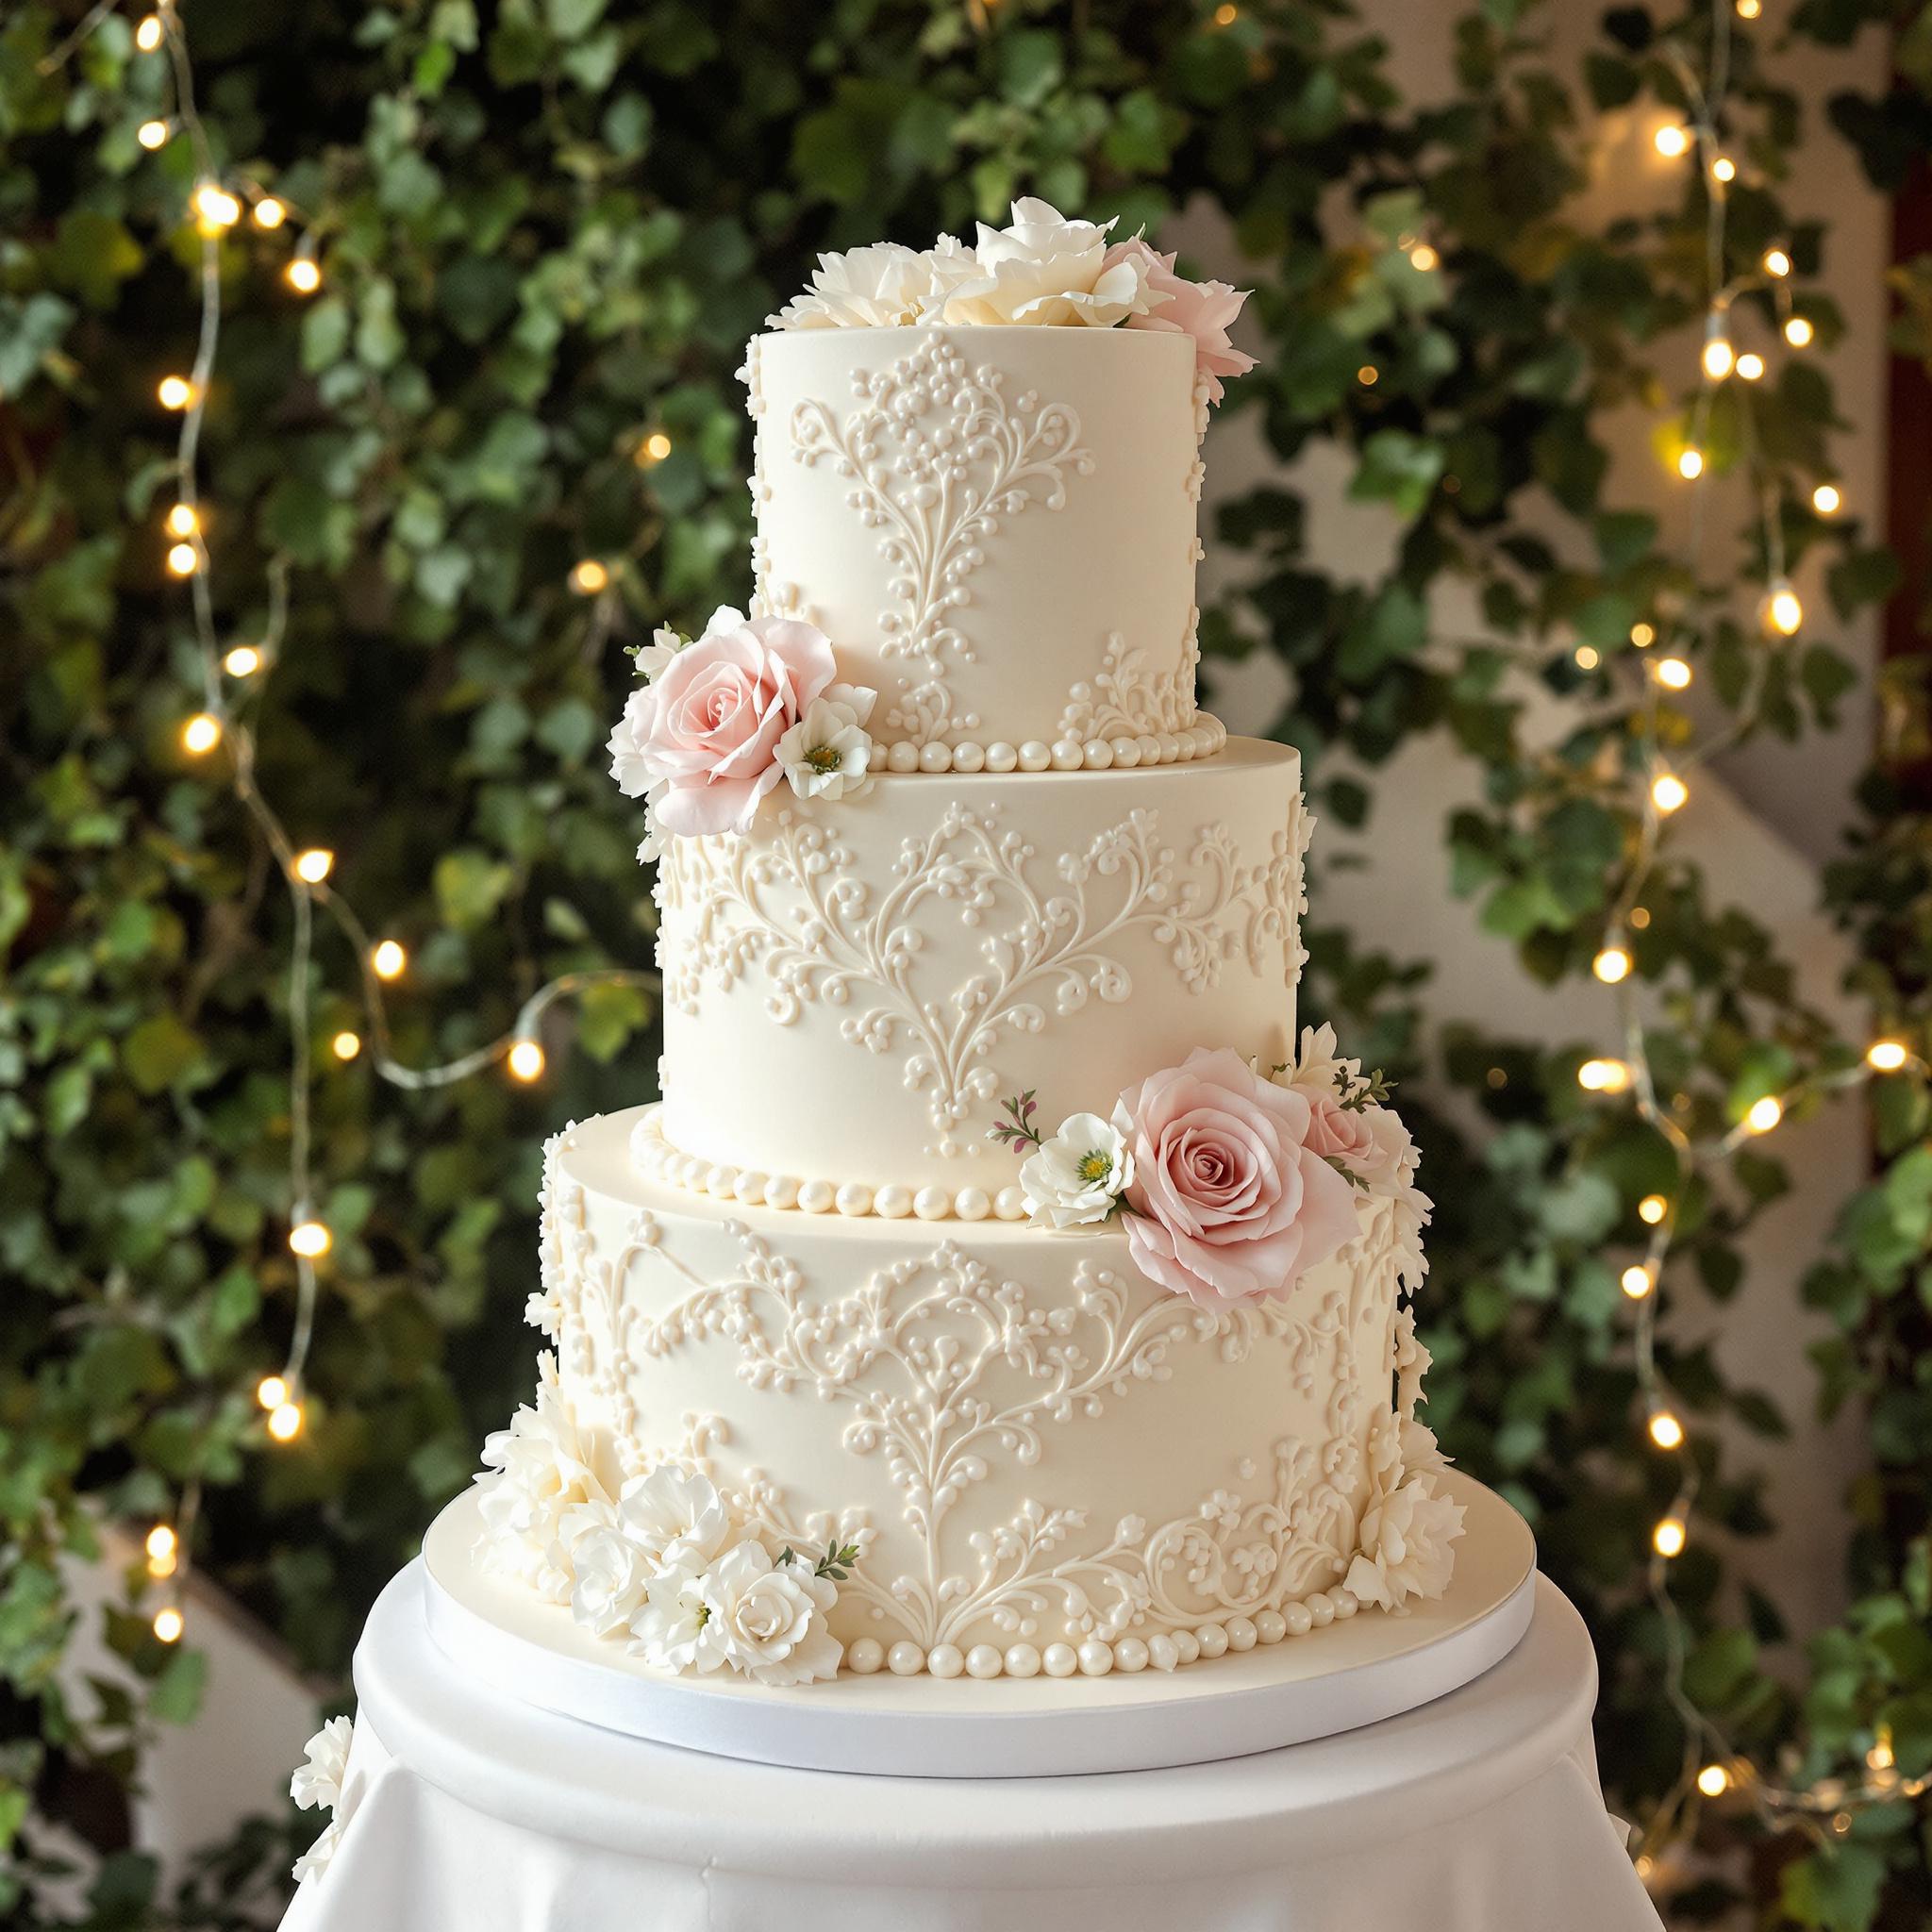
Introduction to the Perfect Wedding Cake
There’s something magical about a wedding cake. It’s not just a dessert; it’s a centerpiece, a symbol of love and celebration. When I first baked this Wedding Cake, I was nervous—would it live up to the expectations? But let me tell you, the moment I saw the smiles on my family’s faces, I knew this recipe was special. Whether you’re preparing for a wedding or simply want to recreate that celebratory vibe at home, this classic wedding cake recipe is your ticket to success.
The History Behind the Wedding Cake
The tradition of the wedding cake dates back centuries, with its origins in ancient Rome. Back then, a simple loaf of bread was broken over the bride’s head to symbolize fertility and prosperity. Fast forward to today, and we’ve got towering masterpieces adorned with intricate designs. My version of the wedding cake blends tradition with modern flavors—a moist vanilla sponge layered with creamy buttercream and fresh berries. I tested this recipe multiple times, tweaking it until it was just right. Each bite feels like a warm hug, and trust me, your guests will be asking for seconds!
Why You’ll Love This Wedding Cake Recipe
This wedding cake is all about balance: light, fluffy layers paired with rich, velvety frosting. What makes it stand out is its simplicity—you don’t need to be a professional baker to pull this off. Plus, the aroma of vanilla wafting through your kitchen? Absolutely irresistible! Whether you’re a seasoned baker or a beginner, this recipe will make you feel like a star.
Perfect Occasions to Prepare This Wedding Cake
Of course, this wedding cake shines brightest at weddings, but it’s also perfect for anniversaries, bridal showers, or even a cozy family gathering. Imagine slicing into this beauty during a holiday dinner—it’s guaranteed to spark joy and create lasting memories.
Ingredients for the Perfect Wedding Cake
- 2 cups all-purpose flour
- 1 ½ cups granulated sugar
- 1 cup unsalted butter (softened)
- 4 large eggs
- 2 teaspoons vanilla extract
- 2 ½ teaspoons baking powder
- ½ teaspoon salt
- 1 cup whole milk
- For frosting: 2 cups heavy cream, 1 cup powdered sugar, 1 teaspoon vanilla extract
Substitution Options
Not everyone has the same pantry staples, so here are some swaps:
- Use almond or oat milk instead of whole milk for a dairy-free option.
- Swap granulated sugar with coconut sugar for a deeper flavor.
- If you’re out of vanilla extract, almond extract works beautifully too.
Preparation
Step 1: Preheat and Prep
Start by preheating your oven to 350°F (175°C). Grease three round cake pans and line them with parchment paper. This ensures your wedding cake layers come out smooth and easy to handle. Pro tip: Dust the pans lightly with flour after greasing for extra non-stick power.
Step 2: Mix Dry Ingredients
In a medium bowl, whisk together the flour, baking powder, and salt. This step might seem basic, but it’s crucial for evenly distributing the leavening agents. Imagine sifting clouds of flour into the bowl—it sets the foundation for those soft, airy layers.
Step 3: Cream Butter and Sugar
In a large mixing bowl, beat the softened butter and sugar until light and fluffy. The mixture should turn pale yellow and almost double in volume. This is where the magic begins! As you mix, inhale the sweet scent of vanilla—it’s pure happiness in the air.
Step 4: Add Eggs and Vanilla
One by one, add the eggs to the butter-sugar mixture, beating well after each addition. Then stir in the vanilla extract. The batter will look glossy and inviting, promising a cake that’s as delicious as it is beautiful.
Step 5: Combine Wet and Dry Ingredients
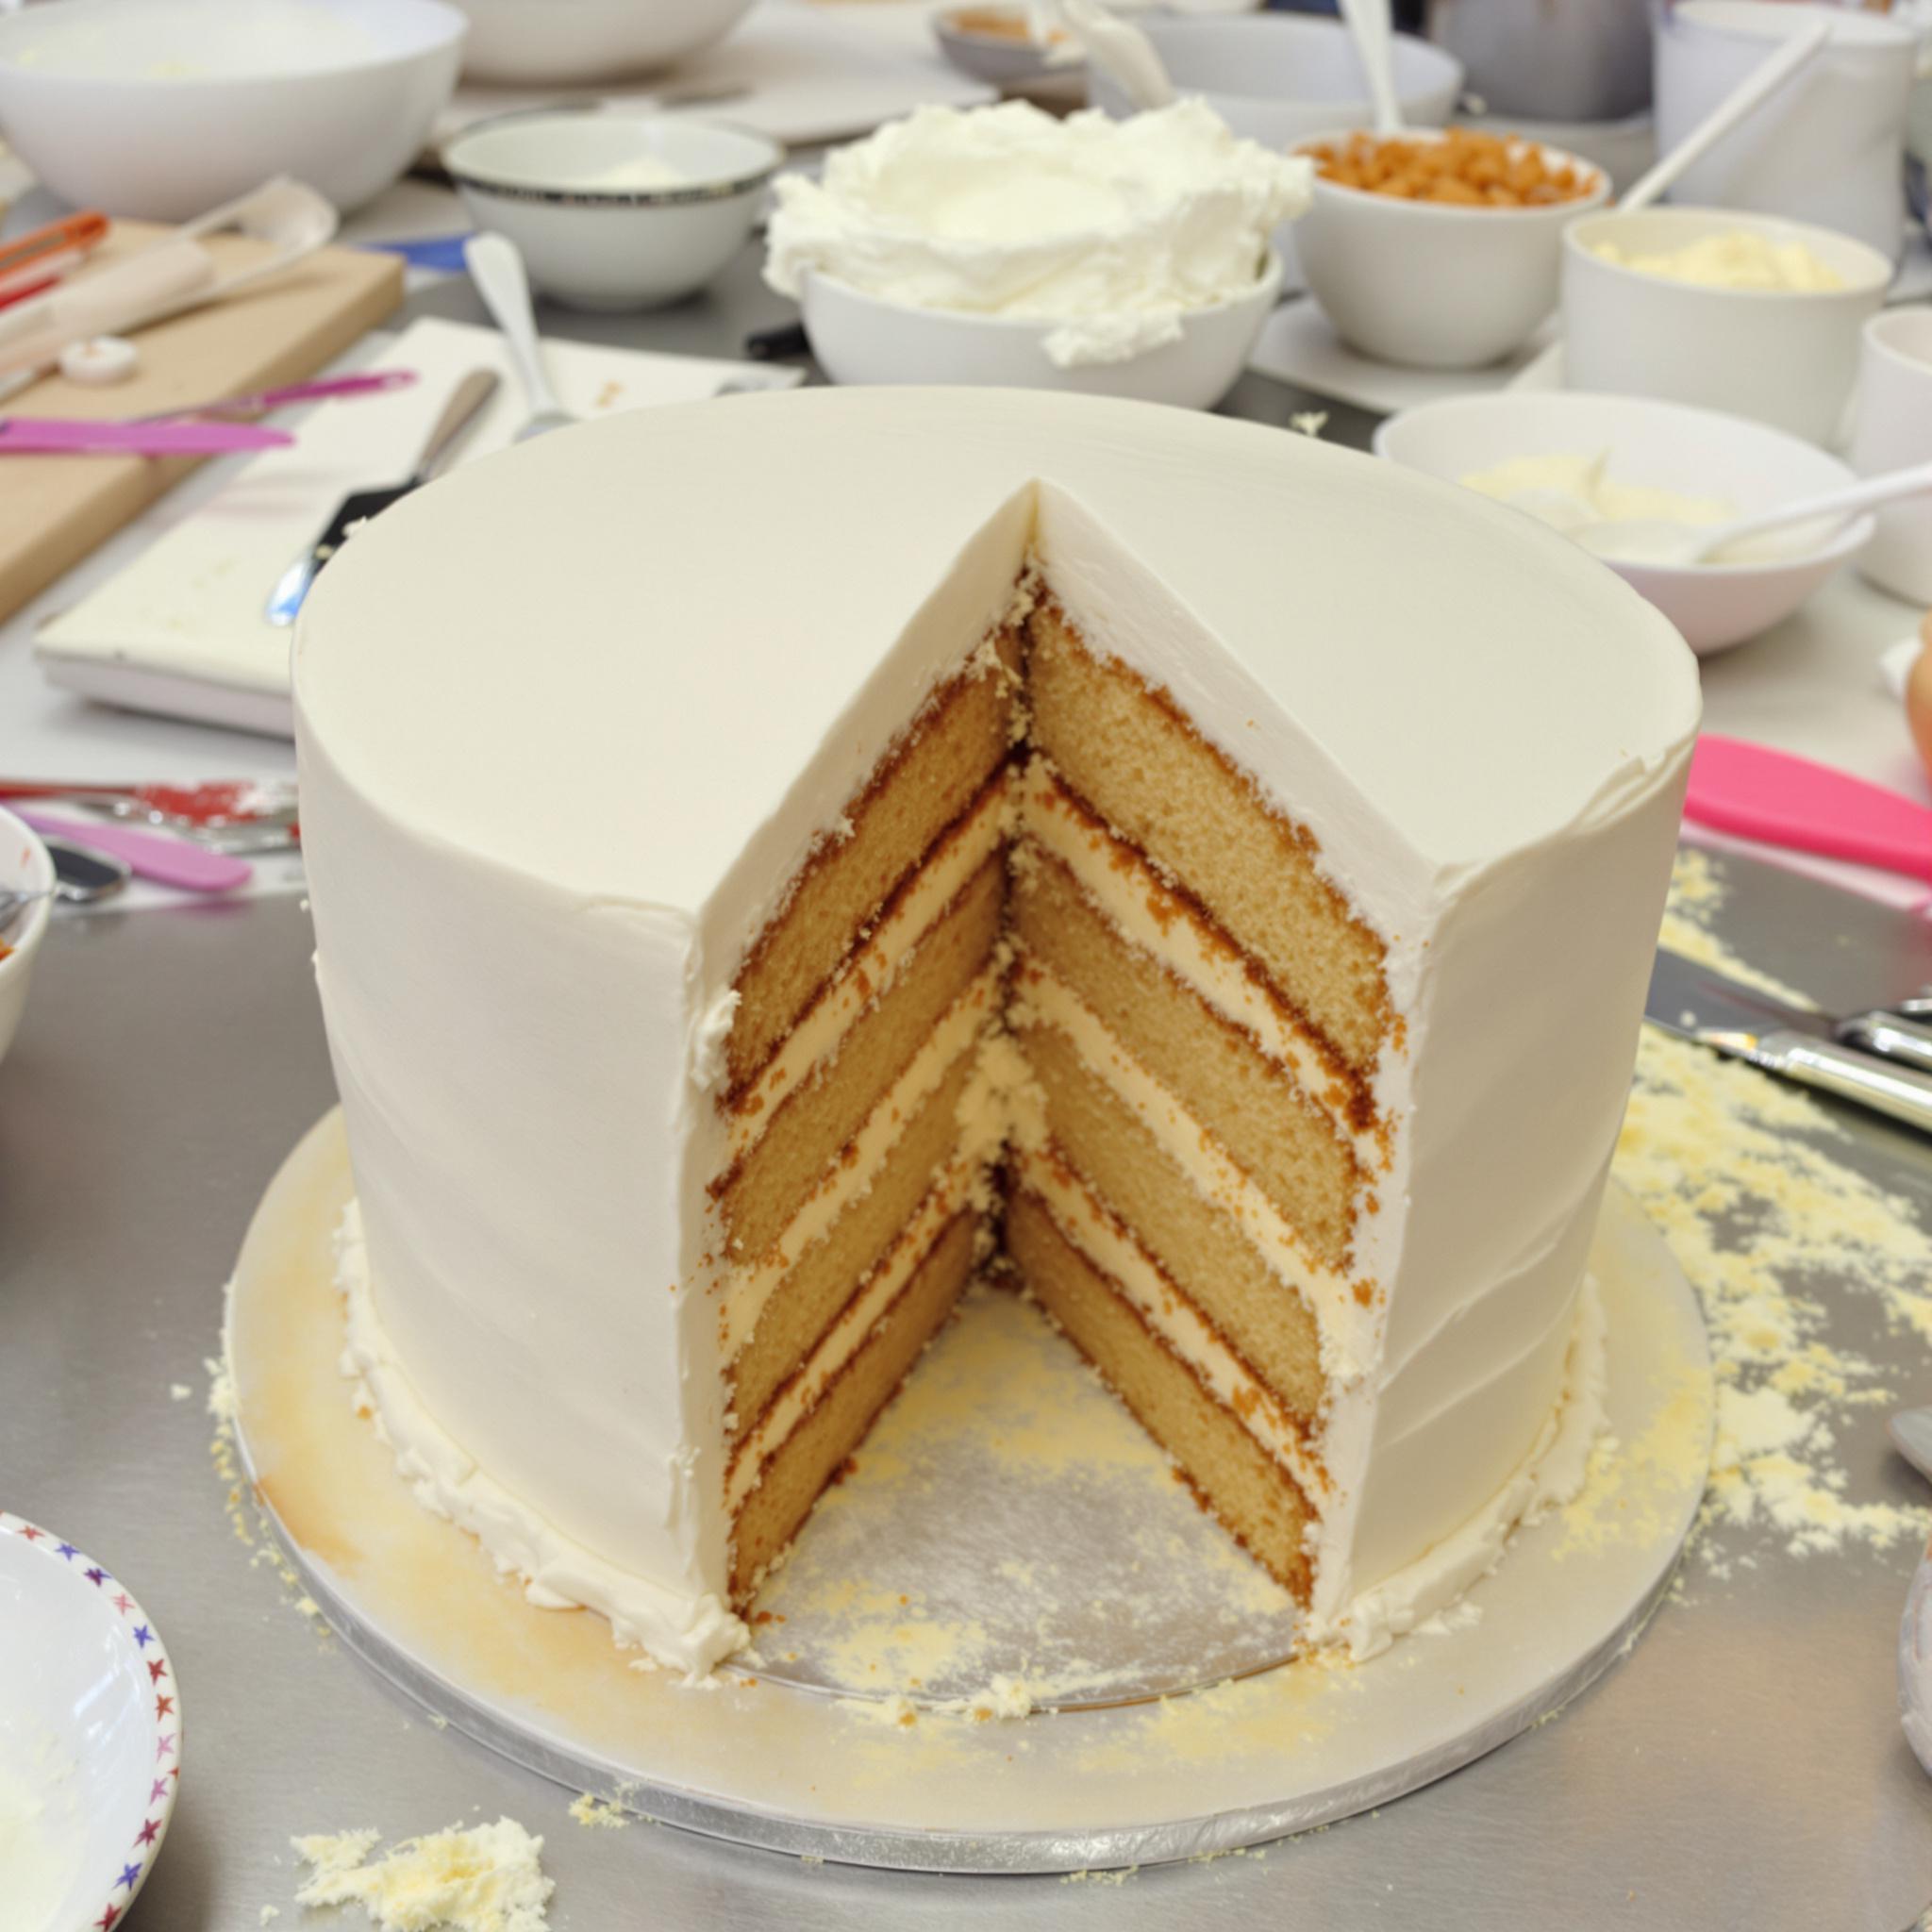
Alternate adding the dry ingredients and milk to the wet mixture, starting and ending with the dry ingredients. Mix gently to avoid overworking the batter. Overmixing can lead to dense layers, and we want our wedding cake to be light and dreamy.
Step 6: Bake and Cool
Divide the batter evenly among the prepared pans and bake for 25-30 minutes, or until a toothpick inserted comes out clean. Let the cakes cool completely before frosting. Cooling is key—if they’re warm, the frosting will melt, and no one wants a melty mess!
Chef’s Tip
For an extra touch of elegance, brush each layer with a simple syrup infused with lemon zest. It adds moisture and a hint of brightness that pairs beautifully with the vanilla.
Time Required
- Prep time: 30 minutes
- Baking time: 30 minutes
- Cooling time: 1 hour
- Total time: 2 hours
Nutritional Information
Each slice contains approximately:
- Calories: 350
- Protein: 5g
- Fat: 18g
- Carbohydrates: 42g
Extra Information
Did you know? Traditionally, the top tier of a wedding cake was saved for the couple’s first anniversary. While modern couples often opt for fresh cakes, the sentiment remains timeless.
Necessary Tools
- Stand mixer or hand mixer
- Round cake pans
- Parchment paper
- Offset spatula for frosting
Storage Instructions
Once frosted, store your wedding cake in an airtight container at room temperature for up to two days. If you live in a warm climate, refrigerate it to prevent the frosting from melting. For longer storage, wrap individual slices tightly in plastic wrap and freeze for up to three months. Thaw overnight in the fridge before serving.
When reheating, let the cake come to room temperature naturally. Never microwave it, as this can ruin the texture. Proper storage ensures every bite tastes as fresh as the day it was made.
Tips and Tricks
– Use room-temperature ingredients for a smoother batter.
– Chill the cake layers briefly before frosting to minimize crumbs.
– Invest in a turntable for easier decorating.
Serving Suggestions
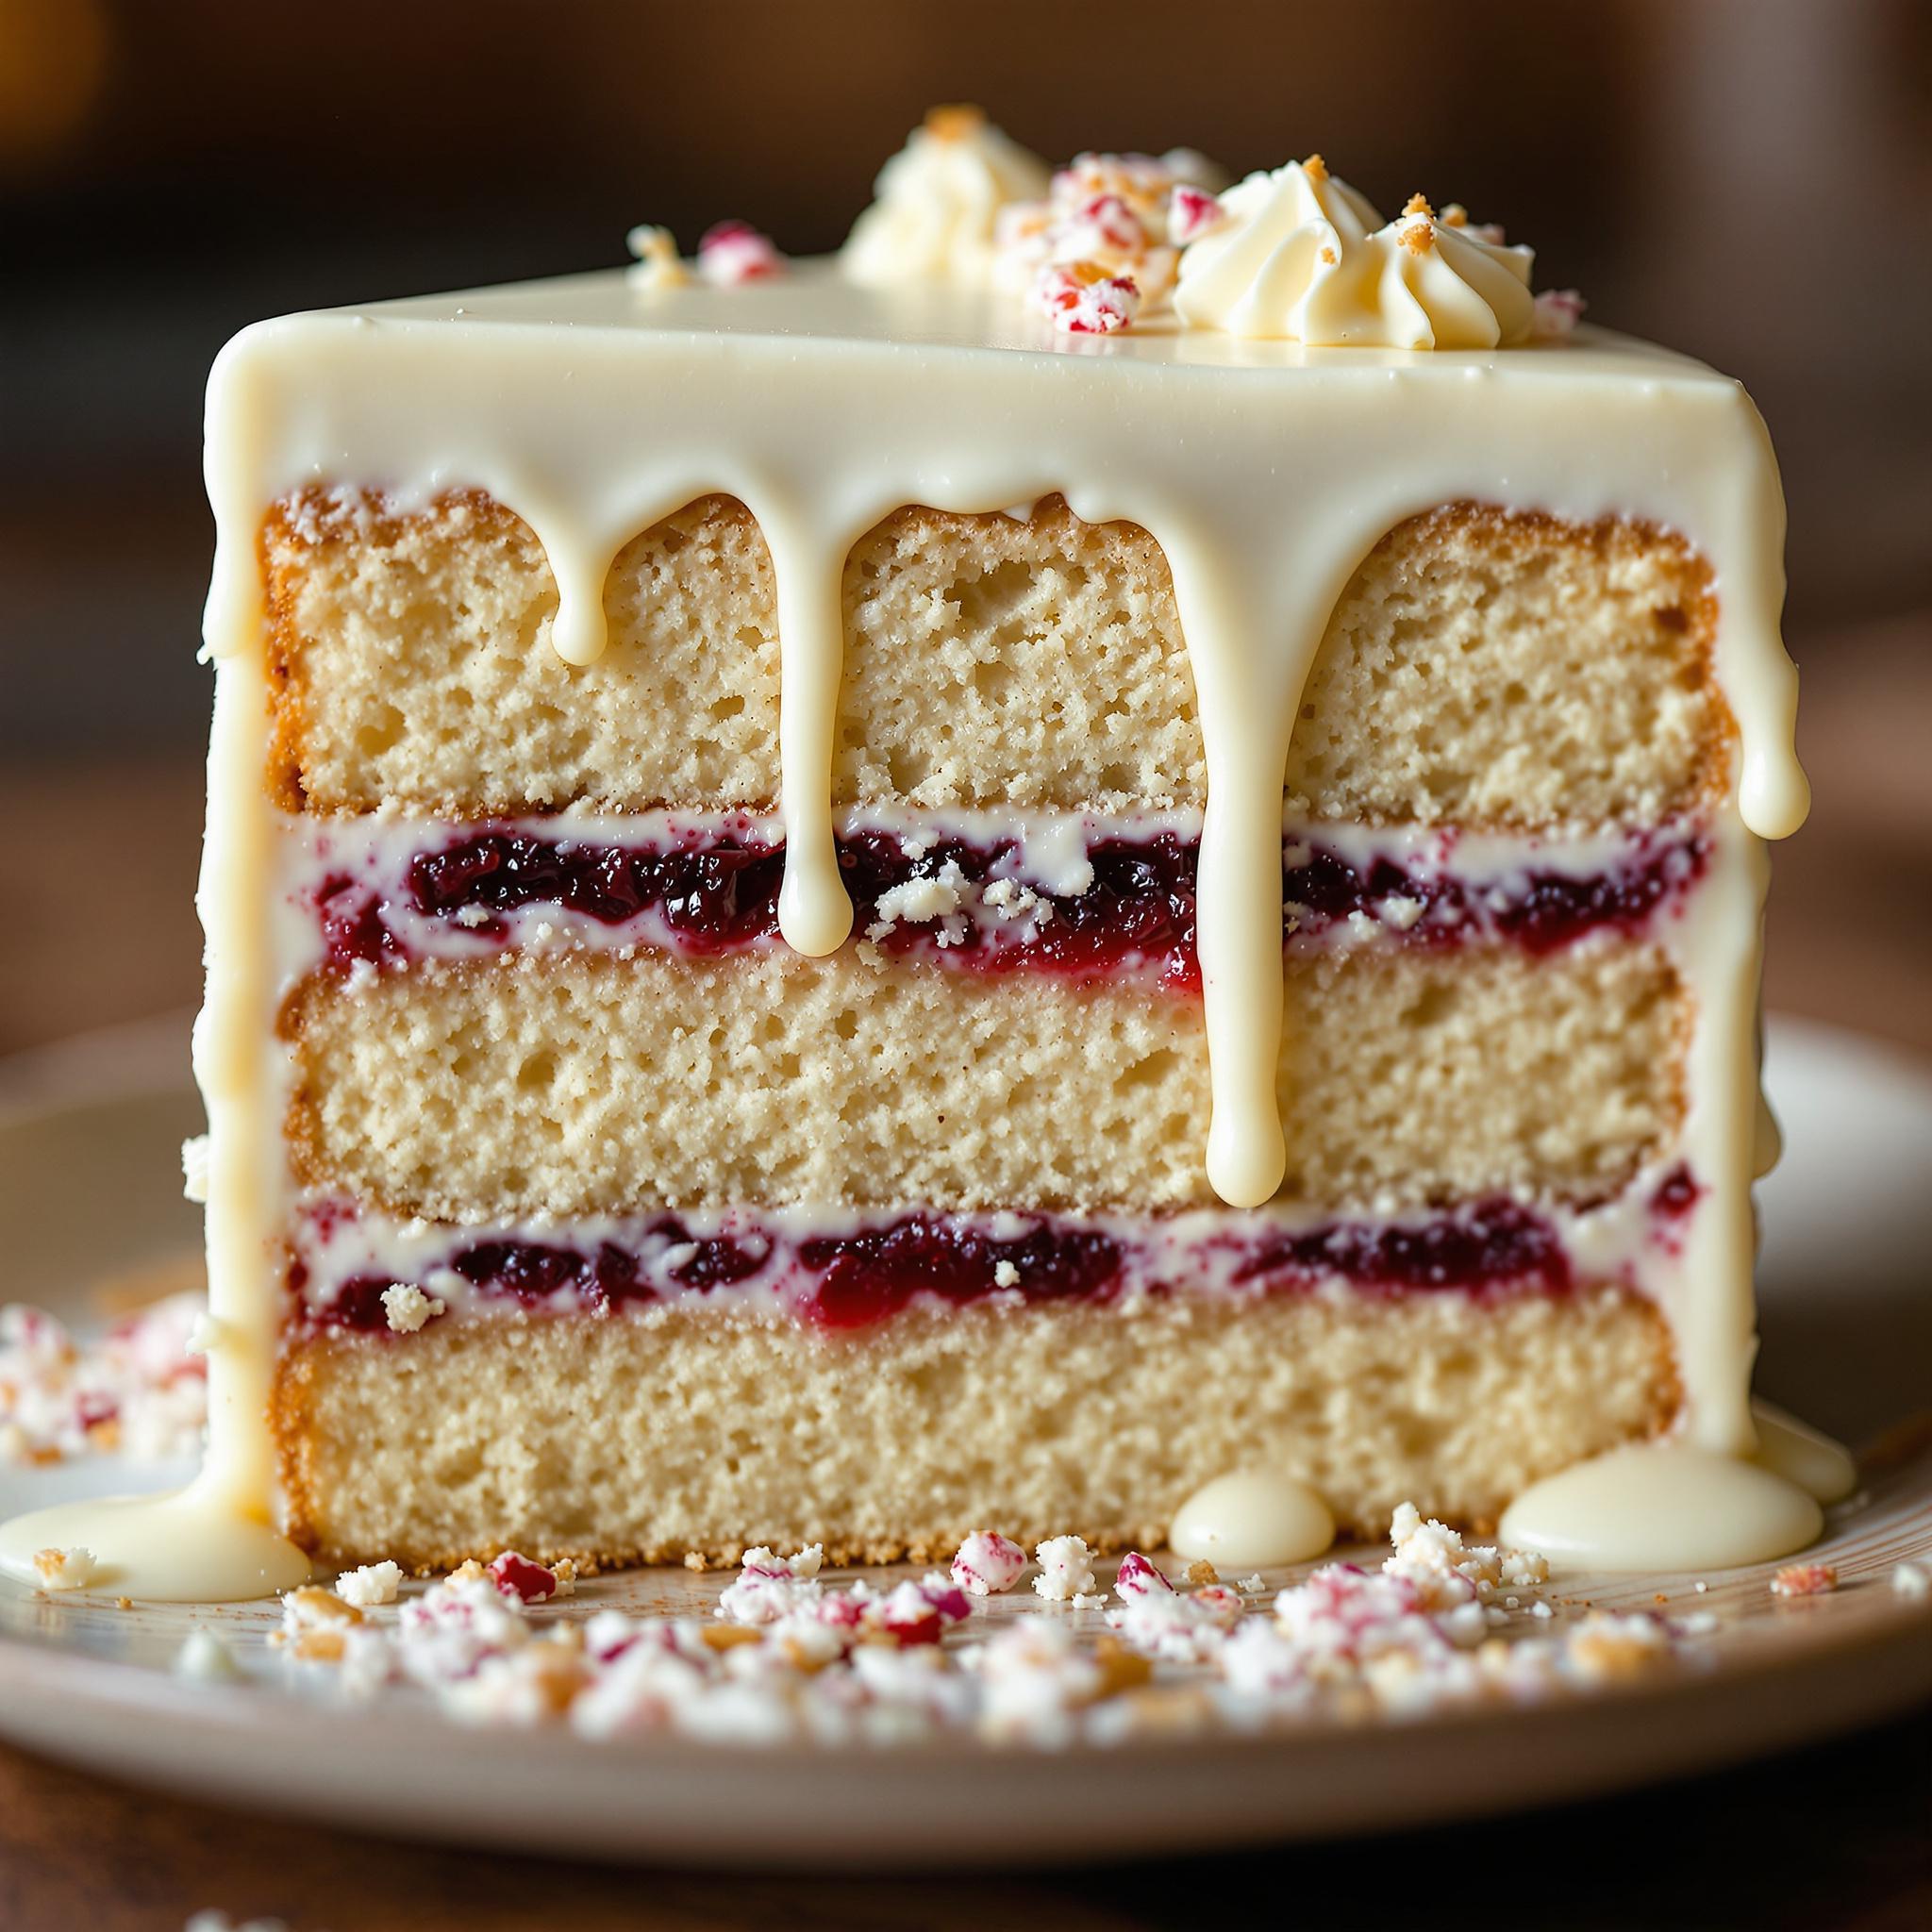
Serve your wedding cake with a dollop of whipped cream or a scoop of vanilla ice cream. Garnish with fresh berries for a pop of color and flavor.
Healthier Alternatives for the Recipe
Looking to lighten things up? Try these variations:
- Gluten-Free Option: Replace all-purpose flour with almond or coconut flour.
- Low-Sugar Version: Use monk fruit sweetener instead of granulated sugar.
- Vegan Adaptation: Swap eggs with flaxseed meal and butter with coconut oil.
- Fruit-Infused Layers: Fold mashed bananas or applesauce into the batter.
- Dairy-Free Frosting: Opt for coconut cream instead of heavy cream.
- Spiced Twist: Add cinnamon or nutmeg for warmth.
Common Mistakes to Avoid
Mistake 1: Skipping the Parchment Paper
Forgetting to line your pans can result in stuck layers. Always use parchment paper—it’s a lifesaver!
Mistake 2: Overmixing the Batter
Overmixing leads to tough, dense cakes. Mix just until combined, and stop as soon as you see no streaks of flour.
Mistake 3: Frosting a Warm Cake
Warm cakes cause frosting to slide off. Patience pays off here; wait until the layers are completely cool.
Frequently Asked Questions
Can I make this cake ahead of time?
Absolutely! You can bake the layers a day in advance and frost them the next day.
How do I prevent my cake from doming?
To avoid domed tops, tap the filled pans gently on the counter before baking to release air bubbles.
What if I don’t have round pans?
Square or rectangular pans work fine; just adjust the cutting and stacking accordingly.
Can I use fondant instead of buttercream?
Yes, fondant gives a sleek finish, though buttercream offers more flavor.
Is this recipe kid-friendly?
Definitely! Kids love helping decorate with sprinkles and edible flowers.
How many servings does this recipe yield?
This recipe serves 12-16 people, depending on slice size.
Can I add food coloring to the batter?
Yes, gel-based food coloring won’t alter the texture.
What’s the best way to transport the cake?
Place it in a sturdy box and secure the layers with dowels for stability.
Can I omit the berries?
Sure, the cake tastes great without them, though they add freshness.
How long does the frosting last?
Stored in the fridge, homemade frosting stays fresh for up to a week.
Conclusion
Baking a wedding cake may seem daunting, but with this recipe, you’ll find it surprisingly approachable. From its rich history to its versatility, this cake is a true showstopper. So roll up your sleeves, gather your ingredients, and let’s create something unforgettable together!
Equipment
- Stand mixer or hand mixer
- Whisk
- Spatula
- Round cake pans
- Parchment paper
Ingredients
- 2 cups all-purpose flour
- 1 ½ cups granulated sugar
- 1 cup unsalted butter softened
- 4 large eggs
- 2 teaspoons vanilla extract
- 2 ½ teaspoons baking powder
- ½ teaspoon salt
- 1 cup whole milk
- 2 cups heavy cream for frosting
- 1 cup powdered sugar for frosting
Instructions
- Preheat your oven to 350°F (175°C). Grease three round cake pans, line with parchment paper, and dust with flour. Whisk together the flour, baking powder, and salt.
- Cream the butter and sugar together until light and fluffy. Add eggs one by one, mix in vanilla extract.
- Alternate adding dry ingredients and milk to the wet batter, starting and ending with dry. Mix gently.
- Divide batter evenly between pans. Bake for 25-30 minutes until a toothpick comes out clean.
- Cool completely before frosting. For frosting, whip heavy cream with powdered sugar and vanilla extract until stiff peaks form.
Notes
Nutrition

Hi, I’m Olivia Parker, the founder of BakingSecret.com and a lifelong lover of all things sweet and homemade. I grew up in a small town in Oregon, where the smell of fresh cookies in my family’s kitchen sparked my passion for baking. Over the years, I turned that passion into a mission: to help home bakers feel confident, inspired, and creative.
After studying food science and working in several artisan bakeries across the U.S., I decided to create a space where everyone from beginners to seasoned bakers can find reliable recipes, expert tips, and a warm, welcoming community. BakingSecret.com is my way of sharing the magic of baking with the world. When I’m not testing new recipes, you’ll find me exploring farmers’ markets, collecting vintage cookbooks, or perfecting my sourdough technique.