
Sunshine in a Shell: My Zesty Lemon Cannoli Adventure
I’ll never forget the first time I brought these to a potluck. The pie was gone, the cake was half-eaten, but these little Zesty Lemon Meringue Pie Cannolis vanished in seconds. My friend’s kid looked at me, cream on his nose, and said, “It’s like a lemon cloud ate a cookie!” That’s the magic of this recipe. It takes the bright, tangy joy of a classic lemon meringue pie and tucks it into a crispy, handheld cannoli shell. It’s fun, it’s different, and it’s guaranteed to make you the star of any dessert table.
A Sweet Mash-Up: From Sicilian Streets to Your Kitchen
Traditional cannolis hail from Sicily, featuring rich ricotta filling in fried pastry tubes. Lemon meringue pie is an American classic, with its silky curd and fluffy topping. My zesty lemon cannoli is a delicious rebellion! It’s a modern shortcut recipe that respects the spirit of both desserts. Instead of frying dough, we use convenient pie crust for the shells. Instead of making curd from scratch, we blend it with marshmallow fluff for that iconic, stable meringue flavor. It’s a fusion that honors tradition while making your life wonderfully easy.
Why You’ll Fall Head Over Heels for This Recipe
You will love this because it’s a total crowd-pleaser with minimal fuss. The filling comes together in minutes, and the shells bake up golden and crisp. The contrast between the crunchy shell and the light, airy, tangy-sweet lemon filling is pure happiness. It’s also incredibly versatile—perfect for fancy parties or a casual Tuesday treat. Plus, kids adore helping to pipe the filling. It’s messy, fun, and ends with a delicious reward.
When to Whip Up Your Zesty Lemon Cannolis
These are your secret weapon for any event that needs a wow factor. Think spring brunches, baby showers, Mother’s Day, or Fourth of July cookouts. They’re ideal for bridal showers where a light, feminine dessert is perfect. I always make a double batch for holiday gatherings because they look so beautiful on a tiered stand. They’re also the ultimate “just because” bake—when you need a little sunshine on a cloudy day.
Gathering Your Zesty Lemon Cannoli Ingredients
Here’s what you’ll need. The beauty is in its simplicity!
For the Cannoli Shells:
- 2 (9-inch) round pie dough circles (I highly recommend Pillsbury Pie Crusts for reliability)
- 1 egg (for egg wash)
- 1 teaspoon water (for egg wash)
For the Filling:
- 3/4 cup lemon curd (store-bought is perfectly fine!)
- 3/4 cup marshmallow fluff
- 1 cup frozen whipped topping (like Cool Whip), thawed
- 1 teaspoon fresh lemon zest (optional, but highly recommended for extra zing)
For Garnish:
- 1 teaspoon powdered sugar
No Stress Substitutions
Don’t have every ingredient? No problem! Here are easy swaps:
- Pie Dough: Use homemade pie crust or even phyllo dough wrapped in layers for extra crispness.
- Lemon Curd: You can use homemade lemon curd. If you want a stronger tartness, add a tiny squeeze of fresh juice to the filling.
- Marshmallow Fluff: You can substitute with an equal amount of homemade Italian meringue, but the fluff gives a stable, no-cook sweetness.
- Frozen Whipped Topping: Freshly whipped heavy cream can be used. Just whip 1 cup of heavy cream with 2 tablespoons of powdered sugar until stiff peaks form.
Crafting Your Zesty Lemon Cannoli Masterpieces
Follow these steps for perfect results every time. Let’s get baking!
Step 1: Prepare the Oven and Pan
Start by preheating your oven to 425°F (218°C). This high heat is key for a crispy shell. Take your pie dough circles out of the fridge and let them sit on the counter for about 10 minutes. This makes them easier to roll without cracking. While that happens, grab your metal cannoli forms and give them a light but thorough spray with non-stick cooking spray. Trust me, this will save you from heartbreak when trying to remove the baked shells!
Step 2: Creating the Shells
On a lightly floured surface, unroll one pie crust. Use a 4-inch round cutter (a glass works in a pinch!) to cut out four circles. You should get eight circles total from both crusts. In a small bowl, whisk the egg and water together until smooth—this is your egg wash glue. Wrap each dough circle around a cannoli form, overlapping the edges slightly. Brush a little egg wash on the overlap and press to seal. You’ll see the rustic, handmade shape start to form. Pro tip: If the dough gets too soft, pop it in the freezer for 5 minutes. It’s much easier to handle when cold.
Step 3: Bake to Golden Perfection
Place all the wrapped forms on a parchment-lined baking sheet and freeze the whole tray for 10 minutes. This crucial step prevents the shells from shrinking during baking. Slide the sheet into your hot oven. Bake for 10 to 12 minutes. Watch for a beautiful, even golden brown color and a gentle puffiness. The kitchen will smell like buttery pastry. Let them cool completely on the forms. Rushing this will cause shells to crack. Patience is your friend here.
Step 4: Filling Preparation
While the shells cool, make the magical filling. In a medium bowl, combine the lemon curd and marshmallow fluff. Use a spatula to fold them together until you have a smooth, pale yellow blend. Then, gently fold in the thawed whipped topping. Add the fresh lemon zest for a fragrant burst. The filling will be light, fluffy, and dreamy. Cover the bowl and refrigerate it. A cold filling is much easier to pipe and helps keep the shells crisp after assembly.
Step 5: Assembly and Final Touch
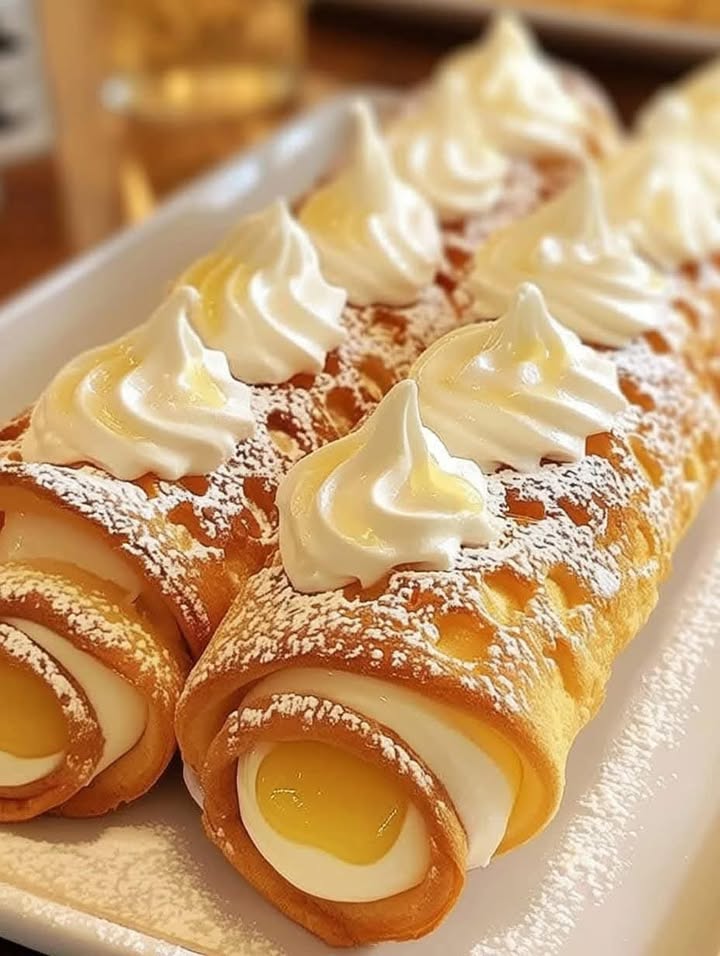
Once the shells are completely cool, gently twist them off the metal forms. They should slide right off if you sprayed well. Fit a piping bag with a large star or plain round tip and fill it with the chilled lemon mixture. Pipe the filling into both ends of each shell until it’s generously full. Place them on your serving platter. Just before serving, use a fine-mesh sieve to dust a delicate snow of powdered sugar over the top. Chef’s tip: For an extra professional look, dip the very ends of the filled cannoli in finely crushed graham cracker crumbs. It nods to the pie crust base of a lemon meringue pie!
Timing is Everything
| Activity | Time |
|---|---|
| Prep Time (shells & filling) | 20 minutes |
| Chilling/Freezing Time | 20 minutes |
| Baking Time | 12 minutes |
| Cooling Time | 30 minutes |
| Total Time | About 1 hour 20 minutes |
My Chef’s Secret for the Best Zesty Lemon Cannoli
Here’s my little secret: freeze the filled cannolis for 15 minutes before serving. This quick chill sets the filling firmly, making them easier to eat without mess, and provides a fantastic cool, creamy texture that contrasts even more with the crisp shell. It’s a game-changer for summer parties.
The word “cannoli” actually means “little tubes” in Italian. Traditionally, the tubes were made by rolling dough around river reeds before frying! Our oven-baked version is a bit more modern, but the fun, tubular shape remains. It’s a perfect vessel for holding that sunshine-bright filling.
Tools You’ll Need
- Metal cannoli forms (about 6-inch long)
- Rolling pin
- 4-inch round cutter
- Parchment paper
- Baking sheet
- Mixing bowls
- Spatula
- Piping bag with large tip
- Pastry brush
Storing Your Lemon Pie Cannolis
For Short-Term Storage: Assembled cannolis are best eaten the day they are made. If you must store them, place them in a single layer in an airtight container in the refrigerator for up to 4-6 hours. The shells will slowly soften from the moisture in the filling, but they’ll still be delicious.
The Make-Ahead Strategy: For the best results, store shells and filling separately. Keep the baked, cooled shells in an airtight container at room temperature for up to 2 days. Store the filling in a sealed container in the fridge for up to 2 days. Assemble and dust with sugar just before serving. This keeps the shells perfectly crisp.
Freezing is Not Recommended: I do not recommend freezing the assembled cannolis. The filling does not thaw well and can become watery, and the shells will become soggy. However, you can freeze the unfilled baked shells in an airtight container for up to a month. Thaw at room temperature before filling.
Tips and Advice for Foolproof Success
- Let the pie dough thaw just enough to be pliable but still cold. If it gets too warm, it becomes sticky and hard to handle.
- When sealing the dough around the form, make sure the overlap is secure. A good seal prevents the shell from opening up during baking.
- Do not overfill the piping bag. Work with half the filling at a time to keep control and avoid messy bursts.
- If you don’t have cannoli forms, you can mold the dough around the handle of a wooden spoon or a clean, grease-coated dowel. Just aim for a similar tube shape.
Presentation Tips to Impress Your Guests
- Arrange the cannolis on a rustic wooden board or a elegant white platter for contrast.
- Garnish the platter with thin lemon slices, sprigs of mint, or edible flowers.
- Serve alongside fresh berries for a colorful and refreshing accompaniment.
- For a dramatic effect, pipe a little extra filling on the platter and stand the cannolis up in it.
Healthier & Fun Zesty Lemon Cannoli Variations
Love the idea but want to mix it up? Here are six inspired twists:
- Berry Lemon Cannoli: Fold 1/4 cup of finely chopped strawberries or raspberries into the filling for a berry-lemon blast.
- Lime & Coconut Twist: Substitute lime curd for lemon curd and fold in 1/4 cup of toasted coconut flakes. Dip the ends in toasted coconut instead of powdered sugar.
- Whole Wheat Shells: Use a whole wheat pie crust for the shells for added fiber and a nuttier flavor.
- Greek Yogurt Filling: Replace the whipped topping with an equal amount of thick, strained Greek yogurt sweetened with a little honey. It’s tangier and higher in protein.
- Mini Cannoli Bites: Use a 2-inch cutter to make tiny shells. Perfect for party finger food! Fill them using a small piping tip.
- Chocolate-Dipped Dreams: Melt semi-sweet chocolate and dip one end of each cooled shell before filling. Let the chocolate set. It adds a decadent touch that pairs wonderfully with lemon.
If you’re a fan of dazzling layered desserts, you must try our stunning Elegant Raspberry Chocolate Mousse Cake. For the ultimate chocolate experience, our Triple Chocolate Mousse Cake is a dream come true. When cherries are in season, this Black Forest Roll Cake is always a hit. And for a tropical escape, the Mango Tango Cheesecake Cake brings pure joy.
Common Mistakes to Avoid with Zesty Lemon Cannolis
Mistake 1: Using Warm Shells for Filling
This is the biggest culprit for soggy cannolis. If you pipe the cold filling into a shell that’s still even slightly warm, the moisture will instantly soften the pastry. It loses that satisfying crunch. Always, always let the shells cool completely on the forms before removing them. Touch them to make sure they are room temperature. A little patience here makes all the difference in texture.
Mistake 2: Overworking the Pie Dough
When you re-roll the scraps of pie dough to cut more circles, you can overwork it. This makes the dough tough and less flaky once baked. Handle the dough as little as possible. Try to cut your circles efficiently to minimize scraps. If you do re-roll, do it gently and only once. The shells should be delicate and crisp, not hard.
Mistake 3: Skipping the Freeze Before Baking
Placing the wrapped forms directly into the oven without that 10-minute freeze can lead to disaster. The dough slips down the form, the shells lose their shape, or they shrink dramatically. Freezing firms up the butter in the dough, setting its shape so it bakes up perfectly. Don’t skip this simple step—it’s your insurance for perfect cannoli shells.
Mistake 4: Deflating the Filling
The filling should be light and airy. If you stir or mix it too vigorously after adding the whipped topping, you’ll knock out all the air. This results in a dense, heavy filling that’s hard to pipe and less enjoyable to eat. Use a folding motion with a spatula, turning the bowl as you go, until just combined. A few streaks are okay.
Good meal organization can help you prep components like the shell dough ahead of time, making baking feel less hectic and more joyful.
Frequently Asked Questions
Can I make the cannoli shells a day ahead?
Absolutely! This is actually a great strategy for party planning. Once the baked shells are completely cooled, store them in an airtight container at room temperature for up to 2 days. Make sure the container is sealed tightly to keep them crisp. You can also freeze the baked shells for longer storage. When you’re ready to serve, just take them out, let them come to room temperature if frozen, fill, and dust with sugar. This separation of tasks makes assembly a breeze when guests arrive.
I don’t have metal cannoli forms. What can I use instead?
No forms, no problem! You can get creative with what you have in your kitchen. The handle of a wooden spoon or a clean, smooth dowel rod (about 1/2 to 3/4 inch thick) works well. Just make sure to grease it generously with non-stick spray or butter. You can also try foil: crumple aluminum foil into a log shape about 6 inches long and 1 inch thick, then wrap it smoothly in another layer of foil to create a solid, reusable form. The key is to create a tube shape the dough can wrap around.
Why is my filling runny or not holding its shape?
A runny filling usually has two causes. First, the whipped topping might not have been fully thawed, or it was a brand that is less stable. Make sure it’s completely thawed but still cold. Second, the filling might have gotten too warm. Always chill it thoroughly before piping. If it’s still too soft, you can pop the whole mixing bowl in the freezer for 15-20 minutes to firm it up. Also, ensure you’re folding, not stirring, to maintain airiness.
Can I use homemade lemon curd?
Yes, homemade lemon curd is a fantastic choice and will give you an even brighter, fresher lemon flavor. Just make sure it’s completely cooled before you mix it with the marshmallow fluff. If your homemade curd is very soft or warm, it can thin out the filling. Chilling it first is the best practice. The beauty of this recipe is its flexibility—high-quality store-bought curd works wonderfully, but homemade adds a special touch.
How far in advance can I assemble them?
For the absolute best texture, assemble no more than 1-2 hours before serving. The powdered sugar dusting should be done at the very last minute, as it can dissolve into the filling if left too long. If you need to prepare them earlier, follow the make-ahead method: store shells and filling separately in the fridge, then assemble an hour before your event. This keeps the shells as crisp as possible.
What’s the purpose of the marshmallow fluff?
The marshmallow fluff is a genius shortcut! It replicates the sweet, stable, fluffy texture of Italian meringue or the topping on a lemon meringue pie without any cooking or whipping of egg whites. It adds volume, sweetness, and that iconic “meringue” flavor and texture to the filling. It also helps stabilize the mixture so it holds its shape when piped.
Can I make these without a piping bag?
You can! If you don’t have a piping bag, use a heavy-duty zip-top bag. Spoon the filling into one corner of the bag, press out the air, and seal. Then, snip off a small corner of the bag to create your own makeshift piping tip. You can also carefully spoon the filling into each end of the cannoli shell, though piping gives a prettier, more professional look and ensures the shell is filled completely.
Are these very sweet?
The sweetness is balanced by the tangy lemon curd. The filling is sweet, but the tartness from the lemon curd cuts through it nicely, preventing it from being cloying. If you prefer a less sweet dessert, you can use a tart-er brand of lemon curd or reduce the amount of marshmallow fluff slightly, adding a bit more whipped topping to maintain volume. The fresh lemon zest also adds a bright, aromatic note that isn’t sweet.
Can I bake the shells on a different setting?
Stick to 425°F. This high temperature is important for creating a quick burst of steam in the dough, which leads to a flaky, crispy texture. Baking at a lower temperature might result in shells that are pale, soft, or greasy. If your oven runs hot, check them at 9 minutes. They should be a deep golden brown. Consistent oven temperature is key for perfect shells.
What other fillings would work with these shells?
These versatile shells are a blank canvas! Once you’ve mastered the zesty lemon cannoli, try a classic sweet ricotta filling with chocolate chips. Or, for a chocolate lover’s version, mix chocolate pudding mix into the whipped topping. A simple vanilla pastry cream or even a pumpkin spice filling in the fall would be delightful. The possibilities are endless, which is what makes homemade cannolis so fun.
Exploring different pastry projects is so rewarding. If you love the crisp shell of this dessert, you’ll find countless other inspirations in our full collection of pie and tart recipes.
Your New Signature Dessert Awaits
So there you have it—my foolproof path to creating these unforgettable Zesty Lemon Meringue Pie Cannolis. They’re more than just a dessert; they’re a conversation starter, a burst of joy, and a testament to how fun baking can be. Whether you’re serving them at a big party or enjoying one with a cup of tea, that perfect combo of crisp, buttery shell and cloud-like lemon filling never fails to delight. Now, go preheat that oven and get ready for the compliments to roll in. Happy baking!
Equipment
- Formes de cannoli en métal
- Rouleau à pâtisserie
- Spatule
- Plaque à pâtisserie
- Papier sulfurisé
Ingredients
- 2 circles cercles de pâte à tarte (9 pouces)
- 1 œuf (pour dorure)
- 1 cuillère à café eau (pour dorure)
- 3/4 tasse curd au citron peut être acheté en magasin
- 3/4 tasse fluff de guimauve
- 1 tasse garniture fouettée congelée comme Cool Whip
- 1 cuillère à café zeste de citron frais (facultatif)
- 1 cuillère à café sucre glace (pour la garniture)
Instructions
- Préchauffez votre four à 220°C (425°F) et laissez les cercles de pâte à tarte reposer pendant 10 minutes.
- Vaporisez les formes de cannoli en métal avec un spray de cuisson antiadhésif.
- Sur une surface farinée, déroulez une croûte à tarte et découpez huit cercles de 10 cm.
- Enveloppez chaque cercle de pâte autour d'une forme de cannoli, en scellant avec l'œuf battu au niveau du chevauchement.
- Congelez les formes enveloppées sur une plaque à pâtisserie pendant 10 minutes.
- Faites cuire pendant 10 à 12 minutes jusqu'à ce qu'elles soient dorées et enflées, puis laissez refroidir complètement.
- Mélangez le curd au citron et le fluff de guimauve dans un bol, puis incorporez la garniture fouettée et le zeste de citron.
- Réfrigérez la garniture jusqu'à ce qu'elle soit froide.
- Poussez un sac de pâtisserie rempli dans les coquilles, en remplissant la garniture des deux extrémités jusqu'à ce qu'elles soient pleines.
- Parsemez de sucre glace avant de servir.