
The Ultimate No-Bake Peanut Butter Dream
Is there anything more perfect than the combination of chocolate and peanut butter? I don’t think so! I first made this Reese’s Peanut Butter Cup Pie for my son’s birthday, and let me tell you, it disappeared faster than a plate of warm cookies. It’s the kind of dessert that makes eyes go wide and gets everyone asking for the recipe. No oven required, just a big bowl, a spoon, and all your favorite treats.
A Slice of Happy History
Peanut butter pies have been a staple at Southern potlucks and diners for ages. They’re creamy, comforting, and pure joy on a fork. This version is my fun, super-indulgent twist on that classic. By folding in chopped Reese’s cups and using a chocolate crust, it takes that beloved flavor and turns it all the way up to eleven. It’s a modern tribute to the candy we all sneak from the checkout line, transformed into a shareable, show-stopping pie.
Why This Reese’s Peanut Butter Pie Will Steal Your Heart
You will adore this recipe! First, it’s impossibly easy. If you can beat cream cheese and fold in whipped topping, you’re a pie-making pro. Second, the texture is magical—ultra-creamy, light, and packed with those crunchy, chocolatey peanut butter cup pieces. Finally, it’s a guaranteed crowd-pleaser. From kids to grandparents, no one can resist a slice of this peanut butter heaven.
When to Serve Your Masterpiece
This pie is your secret weapon for so many occasions! It’s perfect for summer cookouts because there’s no baking. It shines on holiday tables between the pumpkin and pecan pies. I love bringing it to potlucks—it travels like a dream. Honestly, any Tuesday night that needs a little extra sweetness is also a perfectly valid reason to make it.
Gathering Your Ingredients
Here’s what you’ll need for this simple, luscious pie:
- 8 ounces cream cheese, softened
- 1 cup creamy peanut butter
- 1 cup powdered sugar
- 8 ounces whipped topping (like Cool Whip), thawed
- 1 (9-inch) pre-made chocolate cookie crust
- 10 mini Reese’s Peanut Butter Cups, chopped
- 2 ounces chocolate syrup or hot fudge for topping
Easy Swaps and Substitutions
No problem if you need to change things up! Use an Oreo crust or a graham cracker crust instead of chocolate. Almond butter or a nut-free sunflower seed butter can stand in for peanut butter (though the flavor will change). For a lighter option, use reduced-fat cream cheese and a light whipped topping. You can even swap the chocolate syrup for caramel sauce for a fun twist!
Creating Your No-Bake Peanut Butter Pie
Step 1: The Creamy Base
Place your softened cream cheese and peanut butter in a large mixing bowl. Beat them together with a hand mixer on medium speed. Watch as the two creamy ingredients become one smooth, velvety dream. Scrape down the sides of the bowl to make sure everything is incorporated. This base is the heart of your pie, so getting it silky smooth is key. Pro tip: Really let that cream cheese sit out until it’s soft. This prevents lumpy filling!
Step 2: Sweetening the Deal
Add the powdered sugar to the peanut butter mixture. Start mixing on low speed first, unless you want a sweet, white cloud in your kitchen! Once the sugar is somewhat incorporated, increase the speed. Mix until the sugar disappears completely into the creamy base, leaving you with a thick, sweet, and profoundly peanut-buttery mixture.
Step 3: Folding in Fluff
Now, grab your thawed whipped topping. Using a large rubber spatula, add about one-third of it to the bowl. Gently fold it in by scooping from the bottom and lifting over the top. This keeps the filling airy. Repeat with the remaining whipped topping until no white streaks remain. You’ll see the mixture transform into something light, fluffy, and utterly spoonable.
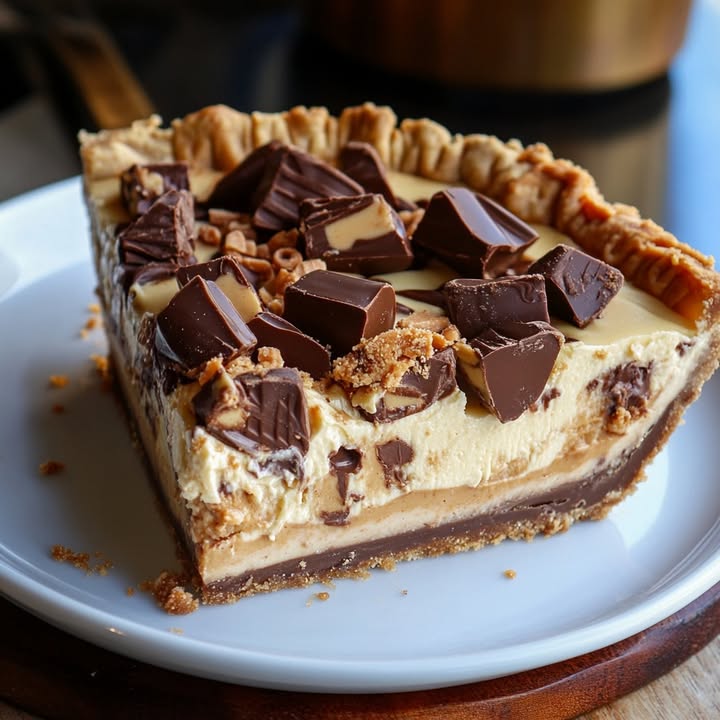
Step 4: The Best Part – Reese’s!
Unwrap and roughly chop your mini Reese’s cups. You want some bigger chunks for great texture. Stir half of these delicious pieces into the fluffy filling. Hear that satisfying *crunch* as you mix them in. Imagine those little bites of peanut butter and chocolate hiding in every single slice.
Step 5: Assembly and Toppings
Scoop all of the glorious filling into your waiting chocolate crust. Spread it out evenly with your spatula. Now, decorate the top with the remaining Reese’s pieces. Finish it off with a generous drizzle of chocolate syrup or warmed hot fudge. The contrast of the dark drizzle against the peanut butter filling is just beautiful. Chef’s tip: For cleaner slices, chill the pie completely before adding the final drizzle of fudge.
Time Investment for Sweet Rewards
This recipe is wonderfully quick on your feet but needs a little patience.
- Prep Time: A speedy 15 minutes.
- Chill Time: At least 2 hours (trust me, it’s worth the wait!).
- Total Time: About 2 hours and 15 minutes from start to first heavenly bite.
- Servings: Makes 8 generous slices.
- Calories: Approximately 450 per slice—this is pure celebration food!
My Secret for the Perfect Slice
Here’s my little trick: For absolutely perfect, clean slices, dip your sharp knife in very hot water and wipe it dry between each cut. The heat glides right through the creamy filling and the chocolate crust, giving you picture-perfect pieces every single time.
A Little Peanut Butter Fact
Did you know the average American child will eat about 1,500 peanut butter and jelly sandwiches before graduating high school? This pie is like the glamorous, grown-up cousin of that beloved lunchbox staple, celebrating our lifelong love affair with peanut butter!
What You’ll Need to Make It
You likely have most of this in your kitchen already! Gather a large mixing bowl, a hand mixer or sturdy whisk, a rubber spatula, a measuring cup, and a knife and cutting board for chopping the Reese’s. That’s it! No fancy equipment needed.
Keeping Your Pie Fresh and Happy
This pie must be stored in the refrigerator. Cover it loosely with plastic wrap or place it in a cake carrier. The cool temperature keeps the creamy filling firm and delicious.
For best quality, enjoy your Reese’s Peanut Butter Pie within 3 to 4 days. The crust may start to soften slightly after a day or two, but the flavor will still be amazing.
You can also freeze this pie for up to a month! Wrap it tightly in plastic wrap and then foil. Thaw it in the refrigerator overnight before you plan to serve. Add a fresh drizzle of chocolate after thawing for the prettiest presentation.
Helpful Tips for Pie Success
- Let all cold ingredients (cream cheese, whipped topping) sit out for 20-30 minutes before starting. Room temp ingredients blend smoothly without lumps.
- Use a high-quality creamy peanut butter, not the natural kind that separates. The consistency is more reliable for the filling.
- Chop your Reese’s cups into different sizes—some small bits and some larger chunks. This gives you a great mix of textures.
- For a firmer pie that slices even cleaner, you can chill it for 4 hours or overnight.
Make It Look Like It Came from a Bakery
- Serve on a colorful plate with a tiny extra sprinkle of sea salt on top. It makes the sweet flavors pop!
- Add a dollop of fresh whipped cream on the side of each slice.
- Drizzle both chocolate AND caramel sauce over the top in a pretty pattern.
- Garnish with a whole mini Reese’s Cup right in the center of the pie.
Love This? Try These Other Amazing Desserts!
If you’re a fan of easy, crowd-pleasing desserts, you have to explore my other recipes! For a fruity, individual treat, you must try these adorable single-serving Pineapple Upside-Down Sugar Cookies. If you adore the creamy texture of this pie, you’ll fall head over heels for a rich and swirly Cinnamon Roll Cheesecake. For a fun, handheld fair-food fix, these crispy Funnel Cake Bites are pure joy. And for the ultimate cozy, nutty comfort dessert, my Pecan Pie Bread Pudding is a holiday masterpiece.
Common Mistakes to Avoid
Mistake 1: Using Cold, Hard Cream Cheese
This is the number one reason for a lumpy, difficult-to-mix filling. Cold cream cheese won’t blend smoothly with the peanut butter or sugar. You’ll end up with little white bits throughout your otherwise creamy pie. Always plan ahead and let your cream cheese soften on the counter for at least 30 minutes. It should be cool to the touch but yield easily when pressed.
Mistake 2: Overmixing After Adding the Whipped Topping
When you fold in the whipped topping, you need a gentle hand. If you use the mixer or stir too aggressively, you’ll deflate all the air whipped into that topping. The result is a dense, heavy pie instead of a light and fluffy one. Use a folding motion with a spatula and stop as soon as the mixture is uniform. A few extra folds can make a big difference in texture.
Mistake 3: Not Chilling Long Enough
I know it’s tempting to cut right in, but patience is key. That two-hour chill (or longer) is what allows the pie to “set.” If you slice it too soon, the filling will be soft and messy, sliding right off the crust. It won’t hold its shape. For perfect slices that look as good as they taste, give it the full chill time. Overnight is even better!
Mistake 4: Using Crunchy Peanut Butter
While you might love crunchy peanut butter on toast, it doesn’t work the same here. The goal of this filling is a luxuriously smooth, creamy texture. The crunchy bits interrupt that experience and can make the filling harder to spread evenly. Stick with a standard creamy peanut butter for the best, silkiest results.
A Note on Ingredients and Enjoyment
Remember, part of the joy of cooking and baking comes from feeling good about the food you share. Making smart food choices includes knowing when to indulge in a special treat like this pie and when to balance it with other nutritious foods. It’s all about the celebration!
This Reese’s Peanut Butter Cup Pie is just one of many no-bake wonders you can create. For more inspiration on flaky, fruity, and creamy delights, be sure to browse all my other creations in the Pies and Tarts collection. You’ll find your next favorite dessert waiting for you there!
Your Reese’s Pie Questions, Answered
Can I make this Reese’s Peanut Butter Pie ahead of time?
Absolutely! This pie is a fantastic make-ahead dessert. You can prepare it completely, cover it well, and store it in the refrigerator for up to 24 hours before serving. In fact, making it the night before allows the flavors to meld beautifully and ensures it’s perfectly set. Just hold off on the final chocolate drizzle until right before you serve it for the freshest look. If you need to store it longer, the freezer is your friend for up to a month.
Can I use a homemade crust instead of a store-bought one?
You sure can! A homemade Oreo crust is a wonderful option. Simply crush about 20-24 regular Oreos (filling included) into fine crumbs, mix with 5-6 tablespoons of melted butter, and press firmly into your pie plate. Bake at 350°F for 8-10 minutes, then let it cool completely before filling. A graham cracker crust is also a delicious, slightly less chocolatey alternative that pairs perfectly with the peanut butter.
My filling is too soft. What did I do wrong?
A soft filling usually points to two things. First, the pie likely hasn’t chilled long enough. The whipped topping and cream cheese need that refrigerator time to firm up. Second, the whipped topping may have been overfolded and lost its structure, or the cream cheese may have been too warm when mixed. Always ensure your ingredients are cool, not warm, when combining. If it’s still soft, just give it several more hours in the fridge; it should firm up nicely.
Can I use natural peanut butter for this recipe?
I don’t recommend using natural peanut butter (the kind with oil that separates on top). The consistency can be too oily or too thick, and it often doesn’t blend as smoothly with the cream cheese, leading to a greasy or grainy texture. For the most reliable, creamy, and stable filling, a standard commercially-made creamy peanut butter like Jif or Skippy works best. Their consistent texture guarantees pie success.
How do I get clean slices without making a mess?
Clean slices are all about the right tool and technique. Use a sharp, thin-bladed knife. Dip the blade in a tall glass of very hot water and wipe it completely dry with a towel before making each cut. The heat will help the knife glide effortlessly through the cold, creamy filling and the chocolate crust. Wiping it clean ensures each slice looks neat and picture-perfect on the plate.
Can I add other mix-ins besides Reese’s cups?
Get creative! This filling is a fantastic base. Try mixing in crushed pretzels for a sweet and salty crunch, mini chocolate chips for extra chocolate bursts, or even a handful of chopped salty peanuts. If you love the peanut butter cup theme, try chopping up some of the Reese’s Pieces candies for a different texture and a pop of color. Just keep the total volume of add-ins to about 1 cup so the filling still holds together.
Is there a way to make this recipe a bit lighter?
You can make some simple swaps for a lighter version. Use reduced-fat or Neufchâtel cream cheese, a light or sugar-free whipped topping, and a natural peanut butter powder reconstituted with water instead of regular peanut butter. Be aware that the texture and richness will be slightly different, but it will still be a tasty, peanut-buttery treat with fewer calories and fat per slice.
How long will leftovers last in the fridge?
Leftover pie (if you’re lucky enough to have any!) will stay fresh and delicious in the refrigerator for 3 to 4 days. Keep it covered tightly with plastic wrap or in an airtight container. The crust will gradually soften from the moisture of the filling the longer it sits, but the flavor will still be wonderful. For the best texture, enjoy it within the first couple of days.
Can I freeze the whole pie?
Yes, this pie freezes very well! Wrap the chilled, fully assembled pie tightly in two layers of plastic wrap, then a layer of aluminum foil to prevent freezer burn. It will keep for up to 1 month. To serve, transfer it to the refrigerator to thaw overnight. You may want to add a fresh drizzle of chocolate syrup or hot fudge after it thaws to refresh the presentation.
What can I use if I don’t have chocolate syrup or hot fudge?
No problem! You have several tasty options. Melt about 1/4 cup of chocolate chips with a teaspoon of coconut oil for a smooth, shell-like topping. A simple dusting of cocoa powder or powdered sugar looks elegant. You could also use a salted caramel sauce for a fantastic flavor contrast, or even just sprinkle the top with a little flaky sea salt to enhance all the sweet flavors already in the pie.
Ready to Make Some Memories?
So there you have it—the easiest, most delicious path to peanut butter and chocolate bliss. This Reese’s Peanut Butter Cup Pie is more than just a recipe; it’s a guaranteed smile-maker. Whether it’s for a big celebration or a simple family dinner, this pie brings a little bit of magic to the table. Grab your bowl, your favorite peanut butter, and get ready for the compliments to roll in. Happy baking… or should I say, happy no-baking!
Equipment
- Grand bol
- Fouet
- Spatule
- Plaque à pâtisserie
- Papier sulfurisé
Ingredients
- 8 oz fromage à la crème ramolli
- 1 cup beurre de cacahuète crémeux
- 1 cup sucre glace
- 8 oz garniture fouettée décongelée
- 1 9-inch croûte de biscuits au chocolat préparée
- 10 mini Reese's hachés
- 2 oz sirop au chocolat ou sauce chaude
Instructions
- Placez le fromage à la crème ramolli et le beurre de cacahuète dans un grand bol à mélanger et battez jusqu'à obtenir un mélange lisse.
- Ajoutez le sucre glace au mélange de beurre de cacahuète et mélangez jusqu'à ce qu'il soit complètement incorporé.
- Incorporez délicatement la garniture fouettée décongelée jusqu'à ce qu'il n'y ait plus de stries blanches.
- Hachez les mini Reese's et ajoutez la moitié à la garniture moelleuse.
- Versez la garniture dans la croûte au chocolat et étalez uniformément, en ajoutant les morceaux restants de Reese's et un filet de sirop au chocolat ou de sauce chaude sur le dessus.
Notes
Nutrition

Hi, I’m Olivia Parker, the founder of BakingSecret.com and a lifelong lover of all things sweet and homemade. I grew up in a small town in Oregon, where the smell of fresh cookies in my family’s kitchen sparked my passion for baking. Over the years, I turned that passion into a mission: to help home bakers feel confident, inspired, and creative.
After studying food science and working in several artisan bakeries across the U.S., I decided to create a space where everyone from beginners to seasoned bakers can find reliable recipes, expert tips, and a warm, welcoming community. BakingSecret.com is my way of sharing the magic of baking with the world. When I’m not testing new recipes, you’ll find me exploring farmers’ markets, collecting vintage cookbooks, or perfecting my sourdough technique.