
The Search for the Perfect Chocolate Chip Cookie Ends Here
You know the feeling. You’re craving that perfect chocolate chip cookie—crispy edges, chewy center, and bursting with melty chips. But every recipe seems to need weird ingredients or an entire day of chilling. I was so tired of cookie disappointment! After dozens of trials (my family happily volunteered as taste-testers), I finally nailed it. This is the one. The Best Chocolate Chip Cookies Ever. Simple ingredients, no chill time, and pure, happy results every single time.
A Little Slice of Cookie History
The classic chocolate chip cookie has a wonderful “oops” story. In the 1930s, Ruth Wakefield ran the Toll House Inn. She expected her chocolate to melt into her butter drop cookies. Instead, the chopped bits held their shape. A happy accident was born! My version is a nod to that simple, homespun spirit. It skips the modern fuss but keeps all the soul-warming goodness. It’s the kind of recipe that gets passed on a handwritten card, stained with butter and love.
Why You’ll Fall in Love with This Recipe
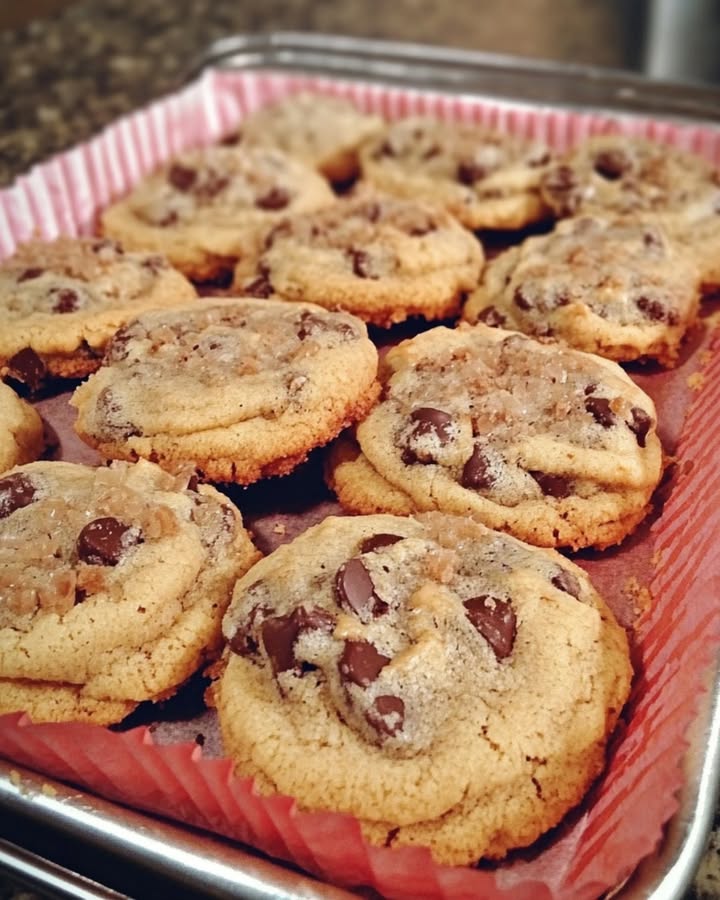
First, it’s unfussy. You probably have everything in your pantry right now. No special flours or fancy chocolate required. Second, there’s no chilling. You can go from craving to cookie in under 30 minutes. That’s a win in my book! The texture is the true star—golden brown with a slightly crisp rim leading to a wonderfully soft, tender center packed with chocolate and walnuts. It’s the perfect balance every time.
When to Bake These Perfect Chocolate Chip Cookies
This recipe is your new best friend for any occasion. It’s perfect for after-school surprises, a last-minute bake sale, or a cozy movie night. I love bringing a batch to potlucks—they disappear instantly! They also make a heartfelt gift. Tuck a few into a mason jar with a ribbon for a neighbor. Honestly, Tuesday is a great reason to bake these homemade cookies too. Any day is sweeter with a warm cookie.
What You’ll Need: Simple, Stellar Ingredients
Gather these pantry staples. Quality matters, but simple works beautifully here.
- 1 cup (2 sticks) unsalted butter, softened
- 1 cup white sugar
- 1 cup packed brown sugar
- 2 large eggs
- 2 teaspoons pure vanilla extract
- 3 cups all-purpose flour
- 1 teaspoon baking soda
- 2 teaspoons hot water
- 1/2 teaspoon salt
- 2 cups semisweet chocolate chips
- 1 cup chopped walnuts
Easy Ingredient Swaps (No Stress!)
Out of something? No worries! Here are my favorite swaps:
- Nuts: Swap walnuts for pecans, almonds, or leave them out entirely.
- Chocolate: Use milk chocolate chips, dark chocolate chunks, or even chopped candy bars.
- Flour: For a plant-forward twist, you can substitute half the all-purpose flour with whole wheat pastry flour.
- Sugar: You can use all brown sugar for a deeper, caramel flavor.
- Butter: If using salted butter, just omit the extra 1/2 teaspoon of salt.
Let’s Make the Best Chocolate Chip Cookies Ever!
Put on your apron and preheat that oven to 350°F (175°C). Let’s make some magic.
Step 1: The Creamy Foundation
In a large mixing bowl, cream together the softened butter, white sugar, and brown sugar. Use a hand mixer or stand mixer for about 2-3 minutes. You want it light, fluffy, and pale in color. This step is key for that perfect cookie texture! It creates tiny air pockets that help the cookies rise. Pro tip: Your butter should be soft enough to leave an indent when pressed, but not melty.
Step 2: Bringing in the Richness
Beat in the eggs one at a time. Let the first egg fully blend into the creamy sugar mixture before adding the second. This ensures a smooth, emulsified batter. Now, pour in the vanilla extract. That beautiful, warm aroma will start to fill your kitchen. It’s the smell of happy memories in the making.
Step 3: The Secret Lift
In a small cup or bowl, dissolve the baking soda in the 2 teaspoons of hot water. It will fizz a little—that’s science in action! Pour this fizzy mixture and the salt right into your batter. Mix it in. This trick helps activate the baking soda for a better, more even rise in your cookies.
Step 4: The Grand Final Mix
Now, gradually stir in the flour. I usually add it in two batches to make mixing easier. Once the flour is just combined, fold in the glorious chocolate chips and crunchy chopped walnuts. The dough will be thick and chunky, studded with delicious bits. Try not to eat all the raw dough! Chef’s tip: Reserve a handful of chips to press on top of the dough balls before baking for a bakery-style look.
Step 5: Scoop and Bake to Perfection
Drop large, generous spoonfuls of dough onto ungreased baking sheets. Leave about 2 inches between them—they will spread! Bake for about 10 minutes. Watch for golden brown edges while the centers still look soft. They will continue to cook on the hot tray. For the softest cookies, take them out just as they look barely set.
Your Cookie Timeline
This recipe is wonderfully quick!
- Prep Time: 15 minutes
- Cook Time: 10 minutes per batch
- Resting Time: 5 minutes on the pan
- Total Time: About 30 minutes from bowl to mouth
My One Secret for Perfect Texture
Here’s my non-negotiable secret: Underbake them slightly. Pull the baking sheet out when the cookies look puffy and the edges are just turning golden. Let them sit on the hot pan for 5 minutes. They will finish cooking and deflate into the perfect chewy, soft-centered cookie as they cool. This one trick changes everything!
A Sweet Cookie Fact
Did you know the chocolate chip cookie is the official state cookie of both Massachusetts and Pennsylvania? It’s true! It’s a cookie that brings people together, crossing all sorts of borders. I think it deserves to be the official cookie of cozy afternoons everywhere.
Gear You’ll Need
You don’t need anything fancy:
- Large mixing bowls
- Hand mixer or stand mixer (a strong arm and spoon works too!)
- Measuring cups and spoons
- Baking sheets
- Spatula
- Wire cooling rack
How to Keep Your Cookies Delicious
To keep your Best Chocolate Chip Cookies tasting fresh, let them cool completely first. Then, store them in an airtight container at room temperature. Place a piece of bread in the container with them. The cookies will steal moisture from the bread, staying soft for days! The bread gets hard, but your cookies stay perfect.
You can also freeze the baked cookies for up to 3 months. Layer them between parchment paper in a freezer-safe bag or container. Thaw at room temperature for an instant treat.
For the ultimate make-ahead, freeze the dough balls! Scoop the dough onto a tray, freeze solid, then transfer to a bag. You can bake frozen dough balls anytime—just add 1-2 minutes to the baking time. Fresh, warm cookies on demand is a superpower.
My Best Tips for Cookie Success
- Use a cookie scoop for evenly sized cookies that bake at the same rate.
- Rotate your baking sheet halfway through cooking for even browning.
- If your dough seems too soft after mixing, you can let it sit for 5-10 minutes to firm up slightly before scooping.
- Always use pure vanilla extract for the best flavor.
Fun Ways to Serve Your Masterpiece
- Stack them high on a vintage cake stand for a party.
- Serve warm with a cold glass of milk for the classic experience.
- Crumble one over a bowl of vanilla ice cream for an epic sundae.
- Pack them in a cute box with tissue paper as a gift from the heart.
Love This Recipe? Try These Variations!
Once you’ve mastered this base, the world is your cookie! Here are six delicious spins:
- Sea Salt Dark Chocolate: Swap semisweet chips for dark chocolate chunks. Right after baking, sprinkle each cookie with a pinch of flaky sea salt.
- M&M Carnival Cookies: Replace the chocolate chips and nuts with a colorful mix of M&M’s. Perfect for kids’ parties and holidays.
- Oatmeal Chocolate Chip: Replace 1 cup of the all-purpose flour with old-fashioned rolled oats for a heartier, chewy texture.
- Peanut Butter Cup: Fold in chopped peanut butter cups instead of chocolate chips. Use peanut butter in place of 1/2 cup of the butter for a double peanut punch.
- White Chocolate Cranberry: A festive twist! Use white chocolate chips and dried cranberries instead of semisweet and walnuts.
- Double Chocolate: Add 1/2 cup of cocoa powder to the flour mixture. Use white or dark chocolate chips for a stunning contrast.
If you’re looking for another classic that’s always a hit, you must try my Ultimate Chewy Oatmeal Raisin Cookies. For a fun, seasonal treat, my Pumpkin Spice Snickerdoodles are a fall favorite. And when you need something supremely fudgy, these Triple Chocolate Brownie Cookies never disappoint. You can find all these and more in my collection of favorite cookie and biscuit recipes.
Common Mistakes to Avoid for Perfect Cookies
Mistake 1: Measuring Flour Incorrectly
The most common cookie flub is using too much flour. Scooping flour directly from the bag packs it down, adding extra. This makes cookies dense and dry. Always spoon your flour lightly into the measuring cup. Then, level it off with the flat edge of a knife. For absolute precision, use a kitchen scale. Three cups of all-purpose flour should weigh about 360 grams.
Mistake 2: Using Butter That’s Too Soft or Melted
Butter that’s melted or super soft won’t trap air during creaming. This leads to flat, greasy cookies that spread too much. Your butter should be cool to the touch but yield to gentle pressure. A perfect indent should remain. If it’s shiny or oily, it’s too warm. Pop it in the fridge for 5-10 minutes to firm up.
Mistake 3: Overmixing the Dough After Adding Flour
Once you add the flour, mix just until you see no more white streaks. Overmixing develops the gluten in the flour. This makes cookies tough and cakey instead of tender and chewy. Stir gently by hand when adding the chocolate chips and nuts. This preserves that perfect texture.
Mistake 4: Baking on a Hot Pan
Putting dough onto a warm baking sheet is a recipe for spread. The butter starts melting before the cookie even hits the oven. Always use a cool, room-temperature pan for each new batch. If you only have one sheet, rinse it under cold water to cool it down quickly. Dry it thoroughly before reusing.
Your Chocolate Chip Cookie Questions, Answered
Can I make the dough ahead and chill it?
You absolutely can, even though this recipe doesn’t require it. Chilling dough for 24-48 hours allows the flour to fully hydrate and the flavors to deepen. The sugars caramelize more in the oven, leading to a richer taste and a slightly chewier texture. If you choose to chill, let the dough scoop soften at room temp for 10-15 minutes before baking. This recipe is wonderfully flexible for both immediate and delayed gratification.
Flat cookies usually point to two issues: butter or baking soda. Your butter was likely too warm or melted, causing excess spread. Also, check that your baking soda is fresh and active. Old baking soda loses its lifting power. To test it, mix a little with vinegar—it should bubble vigorously. Using a light-colored, cool baking sheet instead of a dark one can also help prevent the bottoms from overheating and spreading too fast.
Can I use chocolate bars instead of chips?
Yes, and many bakers prefer it! Chopped chocolate bars create beautiful, irregular puddles and shards of chocolate. Chocolate chips contain stabilizers to help them hold their shape. Baking bars or high-quality eating chocolate will melt more. This creates gorgeous marbled pockets. I like using a mix of dark and milk chocolate for complex flavor. Just chop it into chunks roughly the size of standard chips or a bit larger.
The secret to soft, chewy cookies is all in the bake and the brown sugar. First, use the full cup of brown sugar as directed—its molasses content adds moisture. Second, slightly underbake them. Pull them out when the centers look soft and puffy, not fully set. They will firm up perfectly as they cool on the hot pan. Storing them in an airtight container with a piece of bread also works wonders to maintain that soft texture for days. For another chewy favorite, check out my Perfectly Chewy Ginger Molasses Cookies.
Of course! The nuts add a nice crunch, but they are optional. Simply leave them out. You don’t need to replace them with anything, but you could add an extra 1/4 cup of chocolate chips if you like. The cookie dough is perfectly balanced on its own. This makes the recipe great for people with nut allergies or for picky eaters who prefer just chocolate in every bite.
Freezing dough is a genius trick. Scoop the dough into balls as if you were going to bake them. Place them on a parchment-lined tray and flash-freeze for 1-2 hours until rock solid. Then, transfer the frozen dough balls to a labeled freezer bag. Squeeze out all the air. You can bake them straight from frozen—just add 1-2 extra minutes to the baking time. This means warm, fresh cookies are never more than 15 minutes away.
A cakey texture often comes from too much leavening or overmixing. Double-check your baking soda measurement—it’s just one teaspoon. Also, recall if you overbeat the dough after adding the flour. Overmixing develops gluten, which gives a bread-like structure. Finally, make sure your baking soda was dissolved in the hot water as directed. This activates it evenly. If you add it dry, it can create uneven air pockets that lead to a cakier crumb.
Can I use a gluten-free flour blend?
Yes, a 1:1 gluten-free all-purpose flour blend should work well in this recipe. Look for a reputable brand that contains xanthan gum, which helps bind the dough. The texture might be slightly more delicate or crumbly, but you’ll still get delicious cookies. I recommend chilling gluten-free dough for 30 minutes before scooping and baking, as it can be stickier. Always do a test cookie first to check for spreading.
Why do you dissolve the baking soda in water?
Dissolving the baking soda in hot water is a little trick from older, classic recipes. It helps activate and distribute the leavening agent evenly throughout the dough. This promotes a more consistent rise and a better texture. It also helps neutralize any slightly bitter taste from the baking soda. It’s a simple step that makes a real difference in creating that perfect, tender cookie crumb we all love.
It depends on how big you make them! Using a standard 2-tablespoon cookie scoop, you’ll get about 24 large, bakery-style cookies. If you prefer smaller cookies, use a 1-tablespoon scoop for about 4 dozen. The baking time will be slightly less for smaller cookies—start checking at 8 minutes. The recipe doubles beautifully if you need a bigger batch for a crowd or a bake sale. Just be sure to mix in a very large bowl.
Happy Baking!
There you have it—my heart, soul, and favorite chocolate chips in one perfect recipe. This isn’t just a list of steps. It’s a promise of a warm, delicious, and utterly satisfying result. No more searching, no more complicated methods. Just the Best Chocolate Chip Cookies Ever, waiting for you in your own kitchen. Now go preheat that oven, grab a mixing bowl, and make some joy. Your friends, family, and most importantly, your taste buds will thank you. Don’t forget to share!
Equipment
- Grand bol
- Fouet
- Spatule
- Plaque à pâtisserie
- Papier sulfurisé
Ingredients
- 1 tasse beurre non salé, ramolli
- 1 tasse sucre blanc
- 1 tasse sucre brun tassé
- 2 œufs
- 2 cuil. à thé extrait de vanille pur
- 3 tasses farine tout usage
- 1 cuil. à thé bicarbonate de soude
- 2 cuil. à thé eau chaude
- 1/2 cuil. à thé sel
- 2 tasses pépites de chocolat semi-sucrées
- 1 tasse noix hachées
Instructions
- Préchauffez votre four à 175°C.
- Dans un grand bol, crémez ensemble le beurre ramolli, le sucre blanc et le sucre brun avec un batteur électrique pendant 2-3 minutes jusqu'à ce que le mélange soit léger et crémeux.
- Ajoutez les œufs un à un, en vous assurant que chaque œuf soit bien incorporé avant d'ajouter le suivant, puis incorporez l'extrait de vanille.
- Dans un petit bol, dissolvez le bicarbonate de soude dans l'eau chaude et ajoutez-le au mélange, ainsi que le sel. Mélangez bien.
- Incorporez progressivement la farine en deux fois jusqu'à ce que le mélange soit juste combiné, puis ajoutez les pépites de chocolat et les noix hachées.
- Déposez de grosses cuillerées de pâte sur des plaques à pâtisserie non graissées, en laissant environ 5 cm entre chaque cookie.
- Faites cuire au four pendant environ 10 minutes, en surveillant les bords dorés tandis que les centres restent moelleux.
- Laissez les cookies reposer sur la plaque à pâtisserie pendant 5 minutes avant de les transférer sur une grille pour les laisser refroidir.
Notes
Nutrition

Hi, I’m Olivia Parker, the founder of BakingSecret.com and a lifelong lover of all things sweet and homemade. I grew up in a small town in Oregon, where the smell of fresh cookies in my family’s kitchen sparked my passion for baking. Over the years, I turned that passion into a mission: to help home bakers feel confident, inspired, and creative.
After studying food science and working in several artisan bakeries across the U.S., I decided to create a space where everyone from beginners to seasoned bakers can find reliable recipes, expert tips, and a warm, welcoming community. BakingSecret.com is my way of sharing the magic of baking with the world. When I’m not testing new recipes, you’ll find me exploring farmers’ markets, collecting vintage cookbooks, or perfecting my sourdough technique.