
Condensed Milk Chocolate Cream: The No-Bake Dream
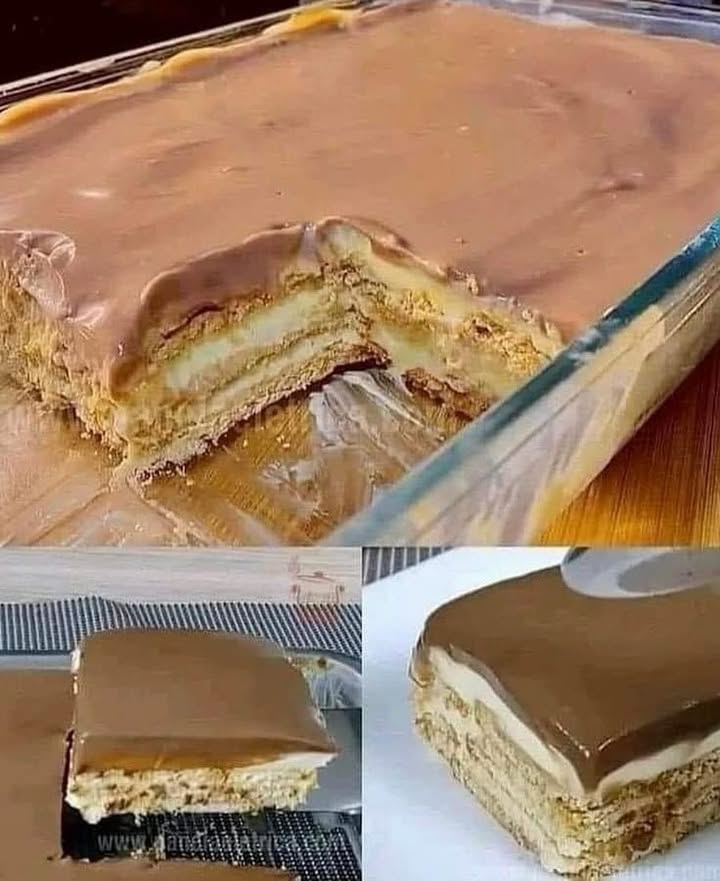
Have you ever had one of those hectic days where you crave something sinfully good but just can’t face turning on the oven? I have, more times than I care to admit! That’s exactly when my condensed milk chocolate cream became my family’s hero. Imagine layers of soft, milk-soaked cookies, a cloud of sweetened cream, and a glossy chocolate ganache that makes you want to dive right in with a spoon. It’s the kind of dessert that looks like you spent all day in the kitchen, but our little secret? It’s almost too easy to make.
A Sweet Story: From Grandma’s Kitchen to Yours
This dessert feels like a hug from my childhood. While the exact origins are a bit fuzzy (much like my memory after eating this cream!), it’s inspired by classic South American and European layered desserts like *tres leches* and tiramisu. My version, with its rich condensed milk cream, is my own happy accident. I was trying to recreate a treat my grandmother made, ran out of mascarpone, and grabbed a can of condensed milk instead. The result was even creamier and more decadent. It’s now the most requested dish for every family gathering, and I love that it has no complicated baking involved.
Why You’ll Absolutely Love This Chocolate Cream
If you need reasons beyond “it’s chocolate,” I have a few! First, it’s a no-bake miracle. This means no heating up the house and no stress about cakes falling. Second, the texture is pure magic—creamy, cold, and deeply satisfying. Third, it’s incredibly versatile. You can make it fancier for a dinner party or keep it simple for a weeknight treat. It’s a foolproof recipe that makes everyone think you’re a pastry chef.
Perfect Occasions for This Decadent Dessert
This condensed milk chocolate cream is your go-to for so many events! It’s a lifesaver for potlucks because it travels so well in its dish. Birthdays? Just add some sprinkles. Need a show-stopper for the holidays? This is it. I’ve even served it at summer barbecues because it’s so refreshingly cold. It’s the dessert that fits in everywhere, just like that one friend who gets along with everyone.
Gathering Your Ingredients for Chocolate Cream Success
Let’s talk about what you need. The beauty here is in the simplicity. Here is your shopping list for this heavenly condensed milk chocolate cream:
- 2 packages of milk cookies (like Maria or tea biscuits)
- 1 can of condensed milk (the “lady” of the show!)
- 2 jars (300g each) of cold whipping cream
- 2 tablets (90g each) of half-dark chocolate (or semi-sweet)
- 1 box (about 200g) of milk cream (table cream or heavy cream for ganache)
No Stress Substitutions
Out of something? Don’t panic! Here are easy swaps to keep your condensed milk chocolate cream dream alive:
- Milk Cookies: Graham crackers or vanilla wafers work perfectly.
- Half-Dark Chocolate: Use all dark chocolate for a less sweet treat, or milk chocolate for extra sweetness.
- Milk Cream (for ganache): Regular heavy cream or double cream is ideal. In a pinch, a bit of warm milk can work, but the ganache won’t be as rich.
- Whipped Cream: Ensure it’s full-fat and very cold for the best volume. You can also use chilled coconut cream for a dairy-free version.
Creating Your Condensed Milk Chocolate Cream Masterpiece
Alright, let’s get our hands (figuratively) dirty and build this beauty! Clear some space in your fridge first—you’ll need it.
Step 1: The Dreamy Cream Base
Take your large mixing bowl and pour in the entire can of that glorious, thick condensed milk. Now, add both jars of cold whipping cream. Using a hand mixer or a whisk, beat them together on medium speed. Watch as the pale mixture thickens and becomes lush and homogeneous. It should hold soft peaks when you lift the beaters. This creamy base is the heart of our dessert, so make sure it’s well combined. Pro tip: Chill your bowl and beaters in the freezer for 10 minutes beforehand. This helps the cream whip up faster and higher.
Step 2: Building the Luscious Layers
Grab your serving dish—a pretty glass trifle bowl or a rectangular baking dish works great. Spread a generous layer of your condensed milk cream on the bottom. Now, for the cookies! Quickly dip each milk cookie in a shallow dish of regular milk. You want it moist but not soggy and falling apart. Arrange a single layer of these soaked cookies over the cream. Repeat the process: cream, then cookies, then cream. Keep going until you run out, ending with a final, beautiful layer of the white cream on top.
Step 3: Crafting the Silky Chocolate Ganache
Time for the chocolate crown! Break your chocolate tablets into pieces and place them in a heatproof bowl. Set this bowl over a pot of barely simmering water, making sure the bottom of the bowl doesn’t touch the water. Stir gently as the chocolate melts into a smooth, glossy pool. Once fully melted, take it off the heat and let it cool for just a minute. Then, slowly pour in the box of milk cream, stirring constantly. You’ll see it transform into a shiny, pourable ganache.
Step 4: The Grand Finale and Chill Time
Carefully pour the warm chocolate ganache over the top cream layer of your dessert. Use a spatula to guide it to the edges for full coverage. If you’re feeling fancy, scatter some chocolate chips or shavings on top for decoration. Now, the hardest part: walk away. Gently cover the dish with plastic wrap and place it in the refrigerator for at least 5 hours, but overnight is even better. This waiting time is crucial for the cookies to soften into a cake-like layer and for all the flavors to marry perfectly. Chef’s tip: For cleaner slices, dip your knife in hot water and wipe it dry before cutting each piece.
Timing is Everything
Let’s break down the clock so you can plan your day:
- Prep Time: 25 minutes
- Cooking Time: 10 minutes (for the ganache)
- Chilling Time: 5 hours minimum
- Total Time: About 5 hours 35 minutes
Most of this is hands-off chilling, meaning you can prep it in the morning and forget about it until dessert time!
My Chef’s Secret for the Best Chocolate Cream
Here’s my little secret: add a tiny pinch of fine sea salt to the condensed milk and cream mixture before whipping. You won’t taste the salt itself, but it will make the chocolate flavor in the ganache pop and balance the sweetness beautifully. It’s a game-changer that always has people asking, “What’s your special ingredient?”
A Fun Fact About Your Main Star
That can of condensed milk has a cool history! It was invented in the 1850s as a way to preserve milk without refrigeration. The process of removing water and adding sugar created this thick, sweet product that became a staple in pantries worldwide. It’s the reason our condensed milk chocolate cream is so reliably rich and stable without any artificial stabilizers. Using quality ingredients matters, as better food quality can support overall nutrient absorption and enjoyment.
What You’ll Need to Make It
You don’t need fancy tools! Here’s your equipment list:
- Large mixing bowl
- Hand mixer or whisk
- Medium heatproof bowl (for ganache)
- Small saucepan (for bain-marie)
- Serving dish (glass is pretty!)
- Spatula
- Measuring cups/spoons (or just your trusted eye!)
How to Store Your Condensed Milk Chocolate Cream
This dessert stores wonderfully, making it perfect for making ahead. Always keep it covered tightly with plastic wrap or in an airtight container in the refrigerator.
It will stay fresh and delicious for up to 3-4 days. The flavors actually improve after the first day as everything continues to meld together.
I do not recommend freezing it, as the creamy layers can separate and become watery when thawed, losing that perfect texture we love.
Tips and Advice for Flawless Results
- Cold is Key: Your cream and condensed milk mix will whip best if everything is cold. Even chill the can of condensed milk if you have time.
- Don’t Over-Soak: A quick dip in the milk is all the cookie needs. A soggy cookie will make the layers too mushy.
- Ganache Patience: Let the melted chocolate cool slightly before adding the cream to prevent it from seizing or splitting.
- Slice Smart: For picture-perfect portions, use a sharp, thin knife dipped in hot water for each cut.
Presentation Ideas to Wow Your Guests
Make it look gorgeous with these simple ideas:
- Serve in individual glasses or mason jars for a personal touch.
- Top with fresh berries like raspberries or strawberries for a pop of color and tartness.
- Add a sprinkle of crushed toasted nuts (hazelnuts are amazing) for crunch.
- Dust with a little cocoa powder or icing sugar right before serving.
- Garnish with a sprig of fresh mint for an elegant finish.
6 Delicious Variations to Try
Love this base recipe? Mix it up! Here are six ways to create a new favorite:
- Coffee Kick Cream: Add 2 tablespoons of instant coffee granules dissolved in 1 tablespoon of hot water to the condensed milk mixture. It gives a wonderful mocha flavor.
- Fruity Berry Cream: Spread a thin layer of your favorite berry jam (raspberry is perfect) between the cookie layers along with the cream.
- Nutty Caramel Cream: Swap the chocolate ganache for a homemade or store-bought dulce de leche topping. Sprinkle with chopped pecans.
- Tropical Coconut Cream: Use coconut milk to soak the cookies, and add 1 cup of toasted coconut flakes to the cream mixture.
- Orange Chocolate Cream: Add the zest of one orange to the condensed milk cream, and use orange-flavored dark chocolate for the ganache.
- Peanut Butter Cup Cream: Swirl ½ cup of smooth peanut butter into the condensed milk cream. Use milk chocolate for the ganache and top with chopped peanut butter cups.
If you’re hooked on easy desserts, you’ll love exploring more no-bake dessert recipes on our site. For instance, our classic No-Bake Cheesecake is another crowd-pleaser, or try a refreshing Mango Mousse in the summer. For chocolate lovers, our Chocolate fridge cake is a must, and if you have leftover condensed milk, our Magic Lemon Icebox Pie uses it in the most brilliant way.
Common Mistakes to Avoid with Your Chocolate Cream
Mistake 1: Using Warm Cream for Whipping
This is the biggest culprit for a runny cream layer. If your whipping cream or condensed milk is at room temperature, it simply won’t hold air and thicken properly. You’ll end up with a soup instead of a fluffy cloud. Always make sure both ingredients are fridge-cold. For an extra guarantee, chill your mixing bowl and beaters in the freezer for 10 minutes before you start.
Mistake 2: Creating Soggy, Falling-Apart Cookie Layers
It’s tempting to dunk the cookies in milk for a long time, thinking it will make them softer. But an over-soaked cookie turns to mush and can make the whole dessert wet and unstable. The goal is to simply moisten them. Practice a quick, one-second dip. The cookie will continue to absorb moisture from the creamy layers during the long chill, reaching perfect softness without collapsing.
Mistake 3: Rushing the Chilling Time
I know, the wait is tough! But pulling the dessert out of the fridge after just an hour or two is a recipe for disappointment. The layers won’t have set, the cookies will be hard, and it will be messy to serve. The condensation milk chocolate cream needs that full 5+ hours to transform. The cookies soften into a lovely cake-like texture, and the cream firms up enough to slice neatly. Patience is your most important ingredient here.
Mistake 4: Adding Cold Cream to Very Hot Chocolate
When making the ganache, if you pour cold milk cream directly into piping hot melted chocolate, the shock can cause the fats to separate. This results in a grainy, oily ganache that won’t pour smoothly. To avoid this, always take the melted chocolate off the heat and let it cool for a minute or two. Then, add your cream (which can be at room temperature for this step) slowly while stirring constantly. This gentle approach guarantees a silky, glossy topping.
Your Condensed Milk Chocolate Cream Questions, Answered
Can I make this condensed milk chocolate cream dairy-free?
Absolutely! You can find some great plant-based alternatives. Use coconut condensed milk, chilled full-fat coconut cream for whipping, and dairy-free chocolate. For soaking the cookies, use a dairy-free milk like almond or oat milk. The texture and flavor will be slightly different but still wonderfully delicious. Just ensure all your substitute creams are very cold to whip properly.
What’s the best type of chocolate to use for the ganache?
For this recipe, I love using the “half-dark” or semi-sweet chocolate as listed. It provides a rich chocolate flavor without being overly bitter or too sweet. If you prefer a deeper taste, go for a 70% dark chocolate. If you have a serious sweet tooth, milk chocolate works too. Just avoid chocolate chips meant for baking, as they often contain stabilizers that can make the ganache less smooth. A good quality baking bar is your best bet.
My cream mixture is runny. What did I do wrong and can I fix it?
A runny cream usually means the cream wasn’t cold enough, or it was over-whipped until it started to separate (become grainy and liquid). Unfortunately, once it’s runny, you can’t really whip it back. But don’t toss it! You can still use it. Pour the runny mixture into a bowl and freeze it for about 30-45 minutes, stirring every 10 minutes, until it thickens to a soft-serve consistency. Then, use it to assemble your layers quickly. It will set firm in the fridge.
How far in advance can I prepare this dessert?
This is one of its best features! You can make the entire condensed milk chocolate cream up to 24 hours in advance. In fact, I highly recommend making it the day before you need it. The extra time allows the cookies to become perfectly tender and the flavors to develop fully. Just keep it covered tightly in the refrigerator until you’re ready to serve. Add any fresh garnish like berries or mint right before serving.
Of course! While mild milk cookies are traditional, graham crackers are a fantastic substitute and add a hint of honey. Digestive biscuits, vanilla wafers, or even soft ladyfingers (which don’t need soaking) work beautifully. Avoid cookies that are too hard or too sweetly flavored, like ginger snaps or shortbread, as they can overpower the delicate cream and chocolate balance.
Do I have to use a bain-marie to melt the chocolate?
The bain-marie (double boiler) method is the safest way to melt chocolate without burning it. If you’re careful, you can melt it in the microwave. Chop the chocolate finely, place it in a microwave-safe bowl, and heat in 20-second bursts at 50% power, stirring well after each burst. Stop when just a few lumps remain—the residual heat will melt them as you stir. Never microwave chocolate on high or for long periods.
Why is my ganache not shiny and smooth?
A dull or grainy ganache usually means the chocolate got too hot and “seized,” or the cream was added when the chocolate was too hot. To fix a seized ganache (which looks thick and clumpy), try stirring in a teaspoon of warm milk or cream, one at a time, until it becomes smooth again. To prevent it, always melt chocolate gently and let it cool slightly before adding your liquid.
Yes, for the classic texture, soaking is key. The quick milk bath softens the cookies so they become cake-like as they chill. If you skip this step, the cookies will remain hard and crunchy, which isn’t the pleasant, melt-in-your-mouth experience we’re going for. Think of it as the step that turns separate cookies and cream into one cohesive, luxurious dessert.
Can I add alcohol to this recipe?
You can, for an adult twist! A tablespoon or two of a liqueur like Baileys, Kahlúa (for coffee flavor), amaretto, or Grand Marnier can be delicious. Add it to the milk you use for soaking the cookies, or mix it directly into the condensed milk cream. Just remember that adding too much liquid can thin out your cream, so go easy and adjust accordingly.
How do I get perfectly clean slices when serving?
The secret is a hot, dry knife. Run your sharp knife under very hot tap water for a few seconds, then dry it completely with a clean towel. Make a smooth, confident cut. Wipe the blade clean and repeat the hot water process for each slice. This melts through the ganache and firm cream cleanly, giving you beautiful, professional-looking portions.
Ready to Make Some Sweet Memories?
So there you have it—everything you need to create this stunning, no-fuss condensed milk chocolate cream. It’s more than just a recipe; it’s a ticket to becoming the hero of your next get-together. The look on your friends’ and family’s faces when they take that first creamy, chocolatey bite is pure joy. I hope this dessert brings as much happiness to your table as it has to mine. Now go grab that can of condensed milk and get whipping. Your delicious reward is just a few hours away!
Equipment
- Grand bol
- Fouet
- Spatule
- Plaque à pâtisserie
- Papier sulfurisé
Ingredients
- 2 paquets biscuits au lait (comme Maria ou biscuits de thé)
- 1 boîte lait condensé
- 2 jarres crème fouettée froide
- 2 tablettes chocolat noir demi-amer
- 1 boîte crème au lait (crème de table ou crème épaisse pour la ganache)
Instructions
- Versez la boîte de lait condensé dans un grand bol et ajoutez les deux jarres de crème fouettée froide.
- Fouettez le mélange jusqu'à ce qu'il soit épais et que des pics mous se forment.
- Étalez une couche de crème de lait condensé au fond de votre plat de service.
- Trempez rapidement les biscuits au lait dans du lait normal, puis disposez-les sur la crème.
- Répétez le processus de superposition de crème et de biscuits jusqu'à ce que tous les ingrédients soient utilisés, en terminant par la crème sur le dessus.
- Pour la ganache, faites fondre le chocolat dans un bol résistant à la chaleur au-dessus d'une casserole d'eau frémissante, puis incorporez la crème de lait pour créer une ganache brillante.
- Versez la ganache sur la couche supérieure de crème et lissez-la avec une spatule.
- Couvrez le plat et réfrigérez pendant au moins 5 heures, de préférence toute une nuit.
Notes
Nutrition

Hi, I’m Olivia Parker, the founder of BakingSecret.com and a lifelong lover of all things sweet and homemade. I grew up in a small town in Oregon, where the smell of fresh cookies in my family’s kitchen sparked my passion for baking. Over the years, I turned that passion into a mission: to help home bakers feel confident, inspired, and creative.
After studying food science and working in several artisan bakeries across the U.S., I decided to create a space where everyone from beginners to seasoned bakers can find reliable recipes, expert tips, and a warm, welcoming community. BakingSecret.com is my way of sharing the magic of baking with the world. When I’m not testing new recipes, you’ll find me exploring farmers’ markets, collecting vintage cookbooks, or perfecting my sourdough technique.