
Why This Mint Chocolate Delight Cake Is a Game-Changer
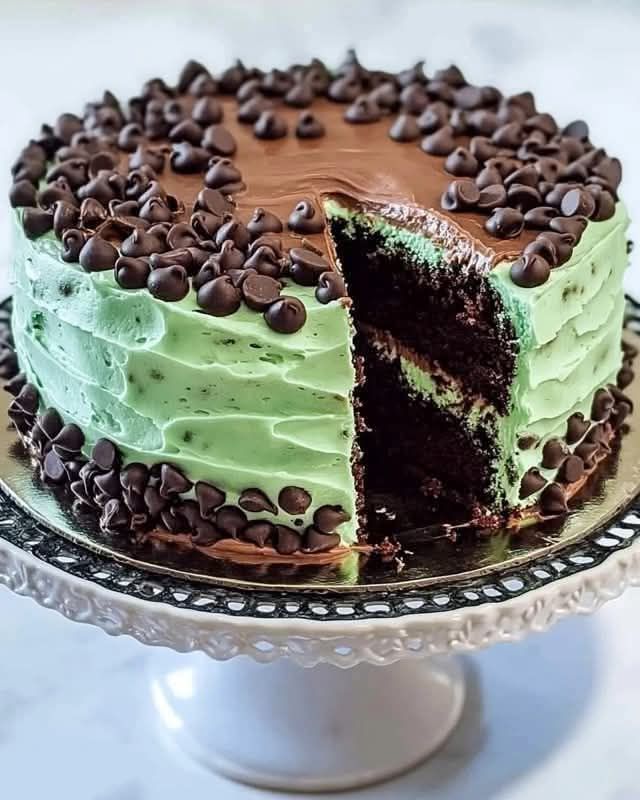
Picture this: a slice of cake so rich, minty, and chocolatey that it makes your taste buds do a happy dance. That’s exactly what happened when I baked my first Mint Chocolate Delight cake for a family gathering. Everyone raved about the fresh mint flavor paired with the gooey chocolate chips. It was love at first bite! If you’re looking for a dessert that’s both comforting and exciting, this recipe is your golden ticket.
A Little History Behind the Mint and Chocolate Love Affair
Let’s take a quick trip down memory lane. Mint and chocolate have been a match made in heaven for centuries. The combo became popular in the U.S. during the 19th century, thanks to peppermint creams and chocolate-covered mints. Fast forward to today, and we’ve got everything from mint chocolate chip ice cream to decadent cakes like this one. My version adds a modern twist with its fluffy texture, vibrant green hue, and generous chocolate chips throughout every layer.
Why You’ll Fall Head Over Heels for This Recipe
This Mint Chocolate Delight isn’t just another cake—it’s an experience. The mint extract gives it a refreshing kick, while the mini chocolate chips add bursts of sweetness in every bite. Plus, it’s surprisingly easy to make! Whether you’re a seasoned baker or a newbie, this recipe guides you step by step. Trust me, once you try it, you’ll want to bake it over and over again.
Perfect Occasions to Wow Your Crowd
Need a show-stopping dessert for Easter brunch? Check. Want to impress guests at a birthday party? Double check. This Mint Chocolate Delight fits any occasion where you need something sweet, festive, and unforgettable. I even made it for my friend’s bridal shower, and she said it was “better than wedding cake.” High praise, right?
What You’ll Need for This Minty Masterpiece
- 1 cup whole milk, room temperature
- 6 large egg whites, room temperature
- 2 teaspoons vanilla extract
- 2 1/4 cups bleached cake flour
- 1 3/4 cups sugar
- 4 teaspoons baking powder
- 12 tablespoons unsalted butter, softened but still cool
- 1 cup mini chocolate chips
- 1 1/2 teaspoons mint extract
- 5 drops green food coloring
- 20 tablespoons unsalted butter, softened
- 8 ounces bittersweet chocolate, melted and cooled
- 1 teaspoon vanilla extract
- 1/8 teaspoon salt
- 2 cups confectioners sugar
- 1 1/2 cups mini chocolate chips (for decoration)
Substitutions to Make It Your Own
- Milk: Swap whole milk with almond or oat milk for a dairy-free option.
- Egg Whites: Use aquafaba if you’re vegan—3 tablespoons per egg white works wonders.
- Butter: Coconut oil or plant-based butter are great alternatives.
- Food Coloring: Skip it entirely or use natural green options like spinach powder.
Step 1: Preheat and Prep Like a Pro
Start by preheating your oven to 350°F and greasing three 8-inch cake pans. Line them with parchment paper for extra insurance against sticking. Why three pans? Because layers make life—and cakes—more fun! As you prep, imagine the aroma of butter and chocolate filling your kitchen. Doesn’t that sound heavenly?
Pro tip: Bring all ingredients to room temperature before starting. Cold eggs or milk can sabotage the batter’s texture.
Step 2: Mix Up the Magic Batter
In a stand mixer, combine the dry ingredients—flour, sugar, baking powder, and salt. Gradually add the butter until the mixture looks like coarse crumbs. Then, pour in half the milk-egg mixture and crank up the speed. Watch as the batter transforms into a light, airy masterpiece. Add the remaining liquid, followed by the mint extract, green food coloring, and chocolate chips. Stir gently to keep those chips from sinking.
Chef’s tip: Fold in the chocolate chips with a spatula instead of the mixer to prevent breaking them.
Step 3: Bake Until Golden Perfection
Pour the batter evenly into the prepared pans and pop them in the oven. After 20–25 minutes, test for doneness with a toothpick. If it comes out clean, you’re golden! Let the cakes cool in the pans for 10 minutes before transferring them to a wire rack. Cooling is key; otherwise, the layers might crack or crumble.
Pro tip: Place a damp towel under the cooling rack to catch drips and keep your counters tidy.
Step 4: Whip Up the Dreamy Frosting
For the frosting, beat together softened butter, melted chocolate, vanilla, and salt. Slowly add confectioners sugar until smooth, then whip on high speed until fluffy. This frosting is so good, you might be tempted to eat it straight from the bowl. (Guilty as charged.)
Chef’s tip: Chill the bowl and whisk attachment before whipping for extra stability.
Step 5: Assemble and Decorate Like a Boss
Now for the fun part—assembly! Spread frosting generously between each layer, pressing mini chocolate chips onto the sides for a professional touch. Finish with a final swirl of frosting on top. Voilà! Your Mint Chocolate Delight is ready to steal the spotlight.
Pro tip: Use a bench scraper to smooth the sides for a polished look.
Timing Breakdown
- Prep Time: 30 minutes
- Cooking Time: 25 minutes
- Resting/Cooling Time: 1 hour
- Total Time: About 2 hours
The Secret Ingredient You Didn’t Know You Needed
Here’s a little secret: adding a pinch of salt to the frosting enhances the chocolate flavor without making it salty. It’s a trick I learned from my grandma, and it works like magic every time.
An Interesting Tidbit About Mint Extract
Did you know mint extract is made from real mint leaves steeped in alcohol? That’s why it has such a pure, refreshing taste compared to artificial flavors. Always opt for high-quality extract—it makes all the difference.
Essential Tools for Success
- Stand mixer (hand mixer works too)
- Three 8-inch round cake pans
- Parchment paper
- Measuring cups and spoons
- Offset spatula for frosting
How to Store Your Mint Chocolate Delight
To store leftovers, wrap the cake tightly in plastic wrap or transfer slices to an airtight container. Keep it at room temperature for up to two days or refrigerate for up to a week. Just let it sit out for 15 minutes before serving to bring back its full flavor.
If freezing, wrap individual slices in foil and place them in a freezer-safe bag. They’ll stay fresh for up to three months. Thaw overnight in the fridge before enjoying.
One last note: never store frosted cakes uncovered. Air exposure dries out the frosting faster than you’d think!
Tips and Tricks to Elevate Your Cake Game
- Sift the flour and sugar to avoid lumps.
- Use a digital scale for precise measurements.
- Don’t overmix the batter—it leads to dense layers.
- Chill the cake briefly before frosting for cleaner edges.
Presentation Ideas That Will Impress
- Dust powdered sugar on top for a rustic vibe.
- Add fresh mint leaves for a pop of color.
- Drizzle melted chocolate across the surface.
- Serve with a scoop of vanilla ice cream on the side.
Healthier Alternatives to Satisfy Every Craving
Want to lighten things up? Here are six variations:
- Gluten-Free: Substitute cake flour with a gluten-free blend.
- Vegan: Use aquafaba and plant-based butter.
- Low-Sugar: Replace sugar with monk fruit or stevia.
- Dairy-Free: Opt for coconut milk and vegan butter.
- Dark Chocolate Lovers: Use dark chocolate chips instead of bittersweet.
- No Food Coloring: Skip the dye and let the mint shine naturally.
Mistake 1: Overmixing the Batter
Overmixing leads to tough, rubbery layers because it develops too much gluten. To avoid this, mix only until the ingredients are combined. Think gentle folds, not vigorous stirs.
Mistake 2: Skipping Room Temperature Ingredients
Cold ingredients won’t blend properly, leaving streaks of butter or uneven textures. Set them out ahead of time to ensure smooth results.
Mistake 3: Rushing the Cooling Process
As tempting as it is to frost a warm cake, resist the urge. The heat will melt the frosting and ruin your hard work. Patience pays off here!
Frequently Asked Questions
Can I Use Regular Chocolate Chips Instead of Mini?
Absolutely! While mini chips distribute more evenly, regular ones work fine too. Just chop them slightly for better incorporation.
What Can I Do If I Don’t Have Mint Extract?
You can substitute peppermint oil, but use half the amount since it’s stronger. Alternatively, infuse fresh mint leaves into hot water and reduce it to a syrup.
How Long Does This Cake Stay Fresh?
When stored correctly, it stays fresh for up to a week in the fridge or three months in the freezer.
Is There a Way to Make This Cake Gluten-Free?
Yes! Swap the cake flour with a gluten-free alternative like almond or rice flour. Adjust the liquid accordingly to maintain consistency.
Why Did My Cake Sink in the Middle?
This usually happens if the oven door is opened too early or the batter isn’t mixed enough. Stick to the recommended times and techniques to avoid sinkholes.
Can I Make This Cake Ahead of Time?
Definitely! Bake the layers a day in advance and store them wrapped in plastic. Frost the next day for maximum freshness.
What’s the Best Way to Transport This Cake?
Place it in a sturdy cake carrier or box. Secure the lid with tape to prevent shifting during transit.
Can I Omit the Green Food Coloring?
Of course! The flavor won’t change, though the visual appeal might differ slightly.
How Can I Prevent the Chocolate Chips from Sinking?
Toss the chips in a bit of flour before folding them into the batter. This helps them stay suspended.
What Other Flavors Pair Well with Mint and Chocolate?
Try adding orange zest or espresso powder for a unique twist. Both complement the mint-chocolate duo beautifully.
Final Thoughts on This Mint Chocolate Delight
Baking this Mint Chocolate Delight cake is like creating edible art. With its vibrant colors, irresistible flavors, and crowd-pleasing charm, it’s sure to become a favorite in your recipe collection. So grab your apron, gather your ingredients, and get ready to wow everyone with this minty marvel. Happy baking!
Equipment
- Stand Mixer
- Three 8-inch Round Cake Pans
- Parchment Paper
- Measuring Cups and Spoons
- Offset Spatula
Notes
Nutrition

Hi, I’m Olivia Parker, the founder of BakingSecret.com and a lifelong lover of all things sweet and homemade. I grew up in a small town in Oregon, where the smell of fresh cookies in my family’s kitchen sparked my passion for baking. Over the years, I turned that passion into a mission: to help home bakers feel confident, inspired, and creative.
After studying food science and working in several artisan bakeries across the U.S., I decided to create a space where everyone from beginners to seasoned bakers can find reliable recipes, expert tips, and a warm, welcoming community. BakingSecret.com is my way of sharing the magic of baking with the world. When I’m not testing new recipes, you’ll find me exploring farmers’ markets, collecting vintage cookbooks, or perfecting my sourdough technique.