
The Surprising Treat That Convinced My Friends I’m a Fancy Baker
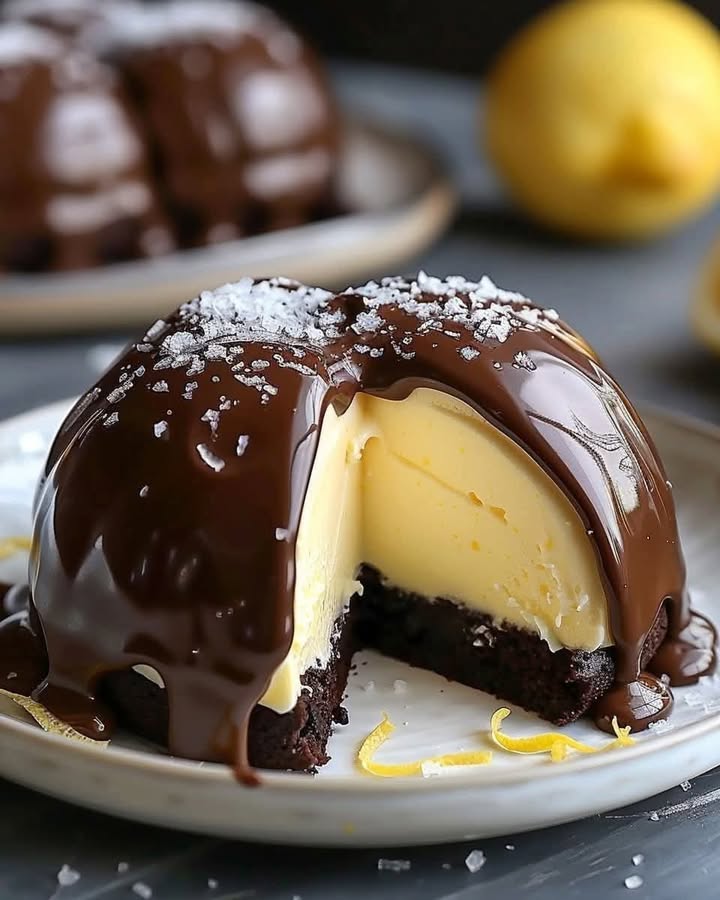
Let me tell you a secret. I once brought a platter of these Chocolate Lemon Mousse Domes to a potluck, and you’d think I’d spent all day at a Parisian patisserie. The truth? They’re way easier than they look. The magic is in that first bite: the crack of dark chocolate, the smooth, tangy lemon cloud, and the soft, rich cake base. It’s like a flavor party where everyone gets along perfectly. If you want to impress someone without breaking a sweat, this is your recipe.
The Story Behind the Flavor Combo
Chocolate and lemon might sound like an odd couple, but they’re actually a classic pair in European desserts. Think of a rich chocolate tart with a twist of lemon zest, or a dense chocolate cake served with a bright lemon curd. This recipe takes that elegant tradition and turns it into a fun, individual-sized treat. I put my own spin on it by using a dome shape, which makes each serving feel special and personal. It’s a modern take on a timeless combination that never fails to delight.
Why You’ll Fall in Love With These Chocolate Lemon Domes
First, the contrast is everything. The deep, bittersweet chocolate glaze and cake play against the sunny, tart lemon mousse. It’s a balance that keeps you coming back for another bite. Second, they’re make-ahead marvels! You can assemble them a day before your event, letting you be a calm, cool hostess. Finally, they’re just plain fun to make. Watching the glossy glaze pour over the creamy dome is a little moment of kitchen magic that I never get tired of.
The Perfect Occasion for a Show-Stopping Dessert
These domes are your secret weapon for any event where you want to “wow.” They’re perfect for bridal showers or afternoon tea parties, adding a touch of elegance. I love serving them as the grand finale to a fancy dinner party. They also make birthdays and holidays feel extra special. Honestly, a quiet Tuesday night is a great occasion too. Sometimes, you just deserve a beautifully plated, restaurant-quality dessert at home.
What You’ll Need for Your Chocolate Lemon Mousse Domes
Gathering your ingredients is the first step to success. Here’s the full list, separated by component for easy shopping and prepping.
For the Chocolate Cake Base:
- ¾ cup all-purpose flour, sifted
- ½ cup cocoa powder, rich and dark
- ½ teaspoon baking soda
- ¼ teaspoon salt
- ¾ cup granulated sugar
- ⅓ cup unsalted butter, melted
- 1 large egg, at room temperature
- ½ cup milk
- 1 teaspoon vanilla extract
For the Lemon Mousse:
- ½ cup lemon juice, freshly squeezed
- Zest of 1 lemon
- ⅓ cup granulated sugar
- 1 tablespoon unflavored gelatin
- ¼ cup water
- 1 cup heavy whipping cream
For the Chocolate Glaze & Garnish:
- ½ cup heavy cream
- ⅔ cup dark chocolate, finely chopped
- 1 tablespoon unsalted butter
- Lemon twists & sea salt flakes for garnish
No Worries! Handy Ingredient Substitutions
Don’t have everything on hand? No problem. Here are some easy swaps to keep you baking.
- Flour: A 1-to-1 gluten-free baking blend works perfectly for the cake base.
- Cocoa Powder: Use natural or Dutch-processed cocoa; both are great here.
- Heavy Cream: For the mousse, full-fat coconut cream (chilled) can be whipped as a dairy-free alternative, though it will impart a slight coconut flavor.
- Gelatin: For a vegetarian option, use an equal amount of agar-agar powder, but follow the package instructions for setting liquid.
- Dark Chocolate: A good-quality semi-sweet chocolate works wonderfully for the glaze if you prefer a slightly sweeter finish.
Step-by-Step Guide to Perfect Chocolate Lemon Domes
Follow these steps, take your time, and you’ll create something truly beautiful. Let’s get started!
Step 1: Bake the Chocolate Cake Base
First, heat your oven to 350°F (175°C). Grease your muffin tin or dome molds well. In a bowl, whisk together the flour, dark cocoa, baking soda, and salt. See those little clouds of cocoa? That’s the good stuff. In another bowl, mix the sugar with the warm melted butter. Then whisk in the egg, milk, and vanilla until it’s silky smooth. Gently mix the dry ingredients into the wet batter. The aroma is already amazing! Spoon the batter into the molds, filling them only halfway. They just need to be a sturdy base. Bake for 12-15 minutes until a toothpick comes out clean. Let them cool completely in the pan. Pro tip: A cold cake is easier to carve. I sometimes pop them in the freezer for 15 minutes.
Step 2: Whip Up the Lemon Mousse
Now for the star: the lemon mousse. In a small pan, warm the fresh lemon juice and sugar until the sugar melts. In a little bowl, sprinkle the gelatin over the water and let it sit for 5 minutes. It will puff up like a sponge. Stir this bloomed gelatin into the warm lemon juice until it vanishes. Let this mixture cool down until it’s just slightly warm to the touch. Meanwhile, whip your heavy cream in a chilled bowl until you have firm peaks. Gently fold the lemony mixture into the whipped cream. Be patient and fold gently to keep all that air in! Chill the mousse for about 30 minutes. You want it thick enough to scoop but not fully set.
Step 3: Assemble Your Masterpiece
Once your chocolate cakes are cool, use a small spoon or melon baller to carve out a little well in the center of each. Don’t go all the way through! This little nest is for the mousse. Spoon or pipe the slightly firmed lemon mousse into each well, piling it up over the rim to create that beautiful dome shape. Use a spatula or knife dipped in hot water to smooth the top. Carefully place them on a plate or tray and let them set in the fridge for at least 2 hours. This chill time is crucial for a clean glaze later.
Chef’s tip: For the smoothest dome shape, spoon the mousse into a piping bag and pipe it in a spiral starting from the center.
Step 4: Create the Silky Chocolate Glaze
When your domes are almost set, make the magic shell. Heat the heavy cream in a saucepan until it just starts to simmer. Pour it over your finely chopped dark chocolate in a heatproof bowl. Let it sit for one minute—this melts the chocolate gently. Then, stir slowly from the center outwards until you have a glossy, dark river of chocolate. Stir in the butter last for an incredible shine. Let the glaze cool for 5-10 minutes. You want it slightly thickened so it clings to the dome instead of running right off.
Step 5: The Grand Finale: Glazing & Garnishing
Place a wire rack over a baking sheet (for easy cleanup). One by one, take a chilled dome and place it on the rack. Pour a generous spoonful of the warm glaze right over the top. Watch as it cascades down the sides, covering every bit of that pale yellow mousse. It’s so satisfying! Use a small offset spatula to help cover any bare spots. Return the glazed domes to the fridge for 30 minutes to set that beautiful shell. Just before serving, add a thin twist of fresh lemon and a tiny sprinkle of sea salt flakes. The salt makes the chocolate flavor pop!
Your Timeline for Success
Good baking is about planning. Here’s how your time will break down:
- Prep Time: 40 minutes (gathering, measuring, and simple mixing)
- Baking Time: 15 minutes for the cake bases
- Chilling/Setting Time: 3 hours (for the mousse to firm and the glaze to set)
- Total Time (Including Chilling): About 4 hours
Remember, most of this is hands-off chilling time. Perfect for running errands or catching up on your favorite show!
Chef’s Secret for the Ultimate Mousse
My secret weapon? Truly cold equipment. For the lightest, fluffiest lemon mousse, chill your mixing bowl and beaters in the freezer for 15 minutes before whipping the cream. Cold cream whips faster and holds more air, giving you that cloud-like texture. Also, when folding the lemon mixture into the cream, make sure they are close in temperature. If the lemon is too warm, it will deflate your beautiful whipped cream.
A Zesty Bit of Information
Did you know that the acid in lemon juice does more than just add flavor? It can help balance sweetness and even support your body’s natural electrolyte balance, especially with the potassium from the chocolate. It’s a tiny science lesson in every delicious, tangy bite!
Equipment You’ll Want in Your Kitchen
- Muffin tin or small dome-shaped silicone molds (I love silicone for easy popping out!)
- Medium and small mixing bowls
- Whisk and spatulas
- Electric hand mixer or stand mixer
- Small saucepan
- Fine grater or zester
- Juicer for fresh lemon juice
- Wire rack for glazing
How to Keep Your Chocolate Lemon Domes Fresh
These domes are best enjoyed within 24 hours of assembly, but they will keep well. Store them in a single layer in an airtight container in the refrigerator for up to 3 days. The glaze will stay shiny, and the mousse will remain set. If you need to store them longer, you can freeze the unglazed, assembled domes (mousse and cake) for up to a month.
To freeze, place them on a parchment-lined baking sheet until solid, then transfer to a freezer bag. Thaw in the refrigerator overnight before glazing and serving. The glaze itself is best made fresh, but you can make it ahead and gently re-warm it over a double boiler.
Remember, condensation is the enemy of a shiny glaze! Always let chilled domes sit at room temperature for just a minute or two before serving to prevent moisture from dulling that beautiful chocolate shell.
Mistake 1: Using Bottled Lemon Juice
This is a common shortcut that really changes the final flavor. Bottled lemon juice often has preservatives and a flat, sometimes bitter taste. Freshly squeezed lemon juice is vibrant, aromatic, and perfectly tart. The zest is just as important—it holds the bright, sunny lemon oils. Skipping the fresh ingredients will leave your mousse tasting one-dimensional. Squeeze those lemons! Your taste buds will thank you.
Mistake 2: Adding Warm Lemon to Cold Cream
If your lemon-gelatin mixture is too warm when you fold it into the whipped cream, it will melt the cream. You’ll end up with a runny, liquid mess instead of a fluffy mousse. The key is to let the lemon mixture cool until it’s just slightly warm or at room temperature. Test it by dabbing a bit on your wrist; it should feel neutral, not hot. This patience ensures your mousse sets up with a gorgeous, airy texture.
Mistake 3: Glazing with Hot Chocolate
Pouring a piping hot glaze onto a cold mousse dome is a recipe for a puddle. The heat can instantly melt the delicate mousse, causing it to slump and the glaze to run right off. Always let your glaze cool and thicken slightly for 5-10 minutes after mixing. It should coat the back of a spoon nicely. A slightly warm, thickened glaze will cling to the dome, creating that perfect, shiny shell without wrecking your hard work.
Mistake 4: Over-Baking the Cake Bases
Since these are small cake bases, they bake very quickly. Over-baking them for even a few minutes can make them dry and crumbly, which makes carving the well difficult and the final texture less enjoyable. Start checking at the 12-minute mark with a toothpick. It should come out with a few moist crumbs, not bone dry. A slightly underdone cake is moister and holds together better for this application.
Tips for Flawless Domes Every Time
- Ensure all your ingredients, especially the egg and milk for the cake, are at room temperature for a smooth, even batter.
- When folding, use a gentle, sweeping motion with a spatula to preserve the air in the whipped cream.
- If your glaze seems too thick, add a tiny splash of warm cream. If it’s too thin, let it cool a bit more.
- For a super-clean presentation, dip a knife in hot water and wipe it dry before smoothing the mousse or fixing a glaze drip.
Make Them Look Like a Million Bucks
Presentation is half the fun! Serve each dome on a simple white plate for dramatic contrast. Add a dusting of powdered sugar or edible gold flakes for a holiday touch. A small mint leaf next to the lemon twist adds lovely color. You can also drizzle a tiny bit of leftover lemon curd or melted white chocolate on the plate in an artful swirl before placing the dome on top.
Love This? Try These Other Decadent Treats!
If you adore making impressive, layered desserts, you might be ready to explore more baking projects. I have a whole collection of indulgent dessert bar and brownie recipes that are equally satisfying. For other show-stopping cakes, you must try a classic New York-style cheesecake with a fun twist, or these adorable individual raspberry white chocolate mini cheesecakes. Chocolate lovers can’t miss the layers in this decadent chocolate peanut butter cake, and for a timeless favorite, my simple, moist chocolate cake is always a winner.
Healthier Twists on the Chocolate Lemon Dome
Want to lighten things up? Here are six tasty variations.
- Vegan Delight: Use a flax egg (1 tbsp ground flax + 3 tbsp water) for the cake, coconut cream for the mousse, and agar-agar. The glaze can be made with full-fat coconut milk and vegan dark chocolate.
- Lower-Sugar Option: Swap the granulated sugar in the cake and mousse with a monk fruit or erythritol blend made for baking. Use a sugar-free dark chocolate for the glaze.
- Gluten-Free Dome: Simply replace the all-purpose flour with your favorite 1-to-1 gluten-free baking flour blend. Everything else stays the same!
- Dairy-Free Version: Use plant-based milk and butter in the cake. For the mousse and glaze, use chilled, full-fat coconut cream and dairy-free chocolate.
- Protein-Packed Mousse: Blend a scoop of vanilla or lemon protein powder into the cooled lemon mixture before folding it into the whipped cream for an extra boost.
- Mini Citrus Trio: Make three small batches of mousse: one with lemon, one with lime, and one with orange. Layer them in the dome for a beautiful, colorful surprise inside.
Your Chocolate Lemon Domes Questions, Answered
Can I make these Chocolate Lemon Mousse Domes ahead of time?
Absolutely! In fact, I highly recommend it. You can bake the cake bases a day ahead and store them in an airtight container at room temperature. The fully assembled (but unglazed) domes can be kept in the fridge for a full day before you add the glaze. The glaze itself is best made fresh, but you can make it a few hours ahead, keep it at room temperature, and gently re-warm it over a double boiler if it thickens too much. This make-ahead quality makes them perfect for stress-free entertaining.
My mousse didn’t set. What went wrong?
A runny mousse usually points to one of two issues. First, the gelatin might not have dissolved completely in the warm lemon juice. Make sure you stir it thoroughly until you see no granules. Second, and more common, is that the lemon-gelatin mixture was too hot when mixed into the whipped cream, causing the cream to deflate and melt. Always let the lemon mixture cool to room temperature or just slightly warm before folding. Also, ensure you whip the cream to stiff peaks so it has enough structure to hold the lemon mixture.
What can I use instead of dome molds?
Don’t worry if you don’t have special molds! A standard muffin tin works perfectly. Just grease it well or use paper liners. After baking and cooling, you can use a small spoon to carve a well in the center of each cupcake-like base. For a more pronounced dome shape, you can scoop the mousse on top and use a spatula to shape it into a dome. Rounded bowls or even clean, half-circle plastic containers can also be used as makeshift molds if you’re getting creative.
Can I freeze Chocolate Lemon Domes?
Yes, you can freeze them, but with a specific method. It’s best to freeze the assembled but unglazed domes. Place them on a baking sheet until solid, then wrap each one tightly in plastic wrap and store in a freezer bag for up to a month. Thaw overnight in the refrigerator. Make and pour the fresh glaze on the day you plan to serve them. Freezing after glazing can cause the glaze to become dull and develop condensation spots.
Why did my chocolate glaze turn out lumpy or grainy?
A grainy glaze usually means the chocolate seized. This happens if even a tiny drop of water gets into the chocolate when you’re melting it with the cream. Always ensure your bowls and utensils are completely dry. If it’s lumpy, it often means the cream wasn’t hot enough to fully melt the chocolate. Heat the cream until it simmers, then pour it over the finely chopped chocolate. Let it sit for a full minute before stirring to allow the heat to penetrate gently. If lumps remain, you can strain the glaze through a fine-mesh sieve.
Is there a way to make this recipe without gelatin?
For a vegetarian version, you can use agar-agar powder. However, it behaves differently than gelatin. Use 1 teaspoon of agar-agar powder (not flakes) for the 1 tablespoon of gelatin. Whisk it directly into the lemon juice and sugar before heating. Bring the mixture to a full boil and simmer for 1-2 minutes to activate the agar, then let it cool slightly before folding into the whipped cream. It sets firmer and faster than gelatin, so work quickly.
My cake bases are very dense. How can I make them lighter?
A dense cake base often comes from over-mixing the batter. Once you add the dry ingredients to the wet, mix only until the flour disappears. A few small lumps are okay. Over-mixing develops the gluten in the flour, leading to a tough, dense texture. Also, make sure your baking soda is fresh, as it’s the main leavening agent here. Finally, don’t overfill your molds—halfway is perfect to allow for a good rise.
Can I use milk chocolate or white chocolate for the glaze?
You can, but it will change the flavor profile dramatically. Milk chocolate will make a much sweeter, less intense glaze that might overpower the subtle lemon. White chocolate will be very sweet and create a beautiful contrast, but you’ll need to adjust the ratio: use 6 oz of white chocolate for ½ cup of cream, as white chocolate is softer. Dark chocolate provides the best bitter contrast to the sweet-tart mousse, which is why it’s recommended.
How do I get a perfectly smooth dome of mousse?
The easiest way is to use a piping bag. After chilling the mousse for 30 minutes, spoon it into a large piping bag (no tip needed, just cut the end). Pipe the mousse in a tight spiral motion, starting from the center of the cake well and building upwards. Then, use a small offset spatula or a knife dipped in hot water to smooth the top into a perfect dome. Chilling the mousse first is key—if it’s too runny, it won’t hold its shape.
What’s the purpose of the sea salt garnish?
That tiny sprinkle of flaky sea salt is a flavor powerhouse! Salt enhances and balances flavors, especially sweetness. A small amount on top of the rich chocolate glaze heightens the chocolate’s depth and complexity, making it taste even more chocolatey. It also creates a delightful little crunch and burst of salinity that contrasts beautifully with the sweet and tart elements. Don’t skip it—it’s a game-changer!
There you have it—your guide to creating stunning Chocolate Lemon Mousse Domes that are sure to impress. Remember, baking is about joy and sharing. Don’t stress if your first dome isn’t perfect. The taste, that incredible blend of rich chocolate and bright lemon, is what people will remember. So gather your ingredients, play some good music, and have fun creating this little bite of elegance. I can’t wait for you to see the look on your friends’ and family’s faces when you serve these. Happy baking!
Equipment
- Moule à muffins ou moules en silicone en forme de dôme
- Grands et petits bols
- Fouet et spatules
- Mixeur à main ou mélangeur sur pied
- Petite casserole
Ingredients
- ¾ tasse farine tout usage, tamisée
- ½ tasse cacao en poudre, riche et noir
- ½ cuil. à café poudre à lever
- ¼ cuil. à café sel
- ¾ tasse sucre granulé
- ⅓ tasse beurre non salé, fondu
- 1 œuf, à température ambiante
- ½ tasse lait
- 1 cuil. extrait de vanille
- ½ tasse jus de citron, fraîchement pressé
- ⅓ tasse sucre granulé
- 1 cuil. gélatine sans saveur
- ¼ tasse eau
- 1 tasse crème épaisse
- ½ tasse crème épaisse
- ⅔ tasse chocolat noir, finement haché
- 1 cuil. beurre non salé
- q.s. torsades de citron et flocons de sel de mer pour la garniture
Instructions
- Préchauffez votre four à 175°C et graissez bien votre moule à muffins ou vos moules en forme de dôme.
- Dans un bol, fouettez ensemble la farine, le cacao en poudre, la poudre à lever et le sel.
- Dans un autre bol, mélangez le sucre avec le beurre fondu chaud, puis incorporez l'œuf, le lait et la vanille jusqu'à obtenir une préparation lisse.
- Incorporez délicatement les ingrédients secs dans la pâte humide, puis remplissez les moules à moitié.
- Faites cuire pendant 12-15 minutes jusqu'à ce qu'un cure-dent en ressorte propre et laissez-les refroidir complètement.
- Pour la mousse au citron, chauffez le jus de citron et le sucre jusqu'à dissolution du sucre; faites gonfler la gélatine dans l'eau pendant 5 minutes, puis incorporez-la à la préparation au citron jusqu'à dissolution.
- Laissez refroidir la préparation au citron jusqu'à ce qu'elle soit légèrement tiède, puis fouettez la crème épaisse jusqu'à ce qu'elle soit bien ferme et incorporez-la délicatement à la préparation au citron.
- Creusez un petit puits dans les gâteaux au chocolat refroidis et remplissez-le de mousse au citron, puis lissez le dessus et réfrigérez pendant au moins 2 heures.
- Pour le glaçage au chocolat, faites chauffer la crème épaisse, versez-la sur le chocolat haché et remuez jusqu'à obtenir une consistance lisse; ajoutez le beurre et laissez refroidir légèrement.
- Placez les dômes refroidis sur une grille et versez le glaçage sur le dessus, en laissant l'excédent s'écouler; remettez au réfrigérateur pour que le glaçage prenne et décorez avec des torsades de citron et une pincée de sel de mer avant de servir.
Notes
Nutrition

Hi, I’m Olivia Parker, the founder of BakingSecret.com and a lifelong lover of all things sweet and homemade. I grew up in a small town in Oregon, where the smell of fresh cookies in my family’s kitchen sparked my passion for baking. Over the years, I turned that passion into a mission: to help home bakers feel confident, inspired, and creative.
After studying food science and working in several artisan bakeries across the U.S., I decided to create a space where everyone from beginners to seasoned bakers can find reliable recipes, expert tips, and a warm, welcoming community. BakingSecret.com is my way of sharing the magic of baking with the world. When I’m not testing new recipes, you’ll find me exploring farmers’ markets, collecting vintage cookbooks, or perfecting my sourdough technique.