
The Magical No-Bake Funfetti Oreo Icebox Cake
Have you ever stared into your pantry and dreamed of a dessert that feels like a party in a pan? I have, countless times. With two kids who see every day as a potential celebration, I needed something fast, fun, and foolproof. That’s when I threw Oreos, sprinkles, and cream together and created pure magic. This No-Bake Funfetti Oreo Icebox Cake is my secret weapon for smiles. It’s the happiest dessert you’ll ever make without turning on your oven.
A Slice of Whimsy: Where Did Icebox Cakes Come From?
This no-bake wonder isn’t just a modern hack. It’s a nod to a classic American tradition! Icebox cakes became popular in the early 20th century, right when home refrigerators (called “iceboxes”) became common. Clever home cooks, like my own grandma, layered cookies or wafers with sweet cream. They let the fridge do all the work, softening the layers into a cake-like texture. My Funfetti Oreo version is a playful twist on that heritage. We use everyone’s favorite cookie and add a shower of colorful sprinkles. It’s tradition, but with a confetti explosion!
Why You’ll Absolutely Love This Funfetti Icebox Cake
This recipe is a total dream for so many reasons. First, it’s impossibly easy. If you can whisk and layer, you’re a master baker. Second, it’s a textural dream team. You get the creamy, fluffy filling, the crunchy Oreos that soften just right, and the little pops of sprinkles. The best part? You make it ahead of time. No last-minute stress. It just sits in the fridge getting more delicious while you relax. It’s the ultimate low-effort, high-reward dessert.
When to Whip Up This Celebration Cake
This cake is your new go-to for any event that calls for a smile! It’s perfect for birthday parties (it’s basically a birthday cake in disguise), potlucks, backyard barbecues, or a simple “Happy Tuesday” treat. I’ve even made it for baby showers and school events. The colorful look makes it feel special, but the simple prep means you can make it “just because.” Any day feels like a party with a slice of this on your plate.
What You’ll Need: Funfetti Oreo Icebox Cake Ingredients
Here’s your shopping list for joy. Everything is simple and likely in your kitchen already!
- 1 package (14.3 oz) Oreo cookies
- 1 cup heavy cream
- 1 cup powdered sugar
- 8 oz cream cheese, softened
- 1 teaspoon vanilla extract
- 1/2 cup rainbow sprinkles (jimmies work best, not nonpareils)
- 1/2 cup mini chocolate chips (optional, but recommended!)
No Stress Substitutions
Don’t have something? No problem! Here are some easy swaps:
- Oreos: Use Golden Oreos for a vanilla twist or mint Oreos for a fun flavor.
- Heavy Cream: For a lighter option, you can use cold full-fat coconut milk (the solid part).
- Cream Cheese: Use mascarpone cheese for an even richer, silkier filling.
- Sprinkles: Any colorful sprinkle mix works! Just avoid liquid-based colors that might bleed.
Let’s Make Some Magic: Step-by-Step Instructions
Step 1: Whip the Dreamy Cream
Start with a large, cold bowl. Pour in your heavy cream and powdered sugar. Using a hand mixer or a strong whisk, start beating. Watch as the liquid transforms into soft clouds. Keep going until you have firm, glorious peaks that stand straight up when you lift the beaters. This fluffy base is what gives our Funfetti Oreo cake its light, airy feel. Pro tip: Chilling your bowl and beaters for 10 minutes beforehand helps the cream whip up faster and higher!
Step 2: Prepare the Fluffy Filling
Now, grab another bowl for your softened cream cheese. Beat it on its own until it’s completely smooth and lump-free. This step is crucial for a silky filling. Then, mix in that fragrant vanilla extract. The fun part? Gently fold the mountain of whipped cream into the cream cheese. Use a big spatula and a light hand, turning the mixture over until it’s one unified, pale, and pillowy mix. Be patient here to keep all that air in.
Step 3: Add the Funfetti Fun!
This is where the party starts! Dump in your rainbow sprinkles and mini chocolate chips. The chips add a lovely chocolatey surprise. Fold them in gently just until they’re evenly distributed. The batter will look like a carnival with all those bright colors peeking through the creamy white. Try not to overmix, or you might crush your sprinkles and lose some color.
Step 4: Assemble Your Icebox Cake
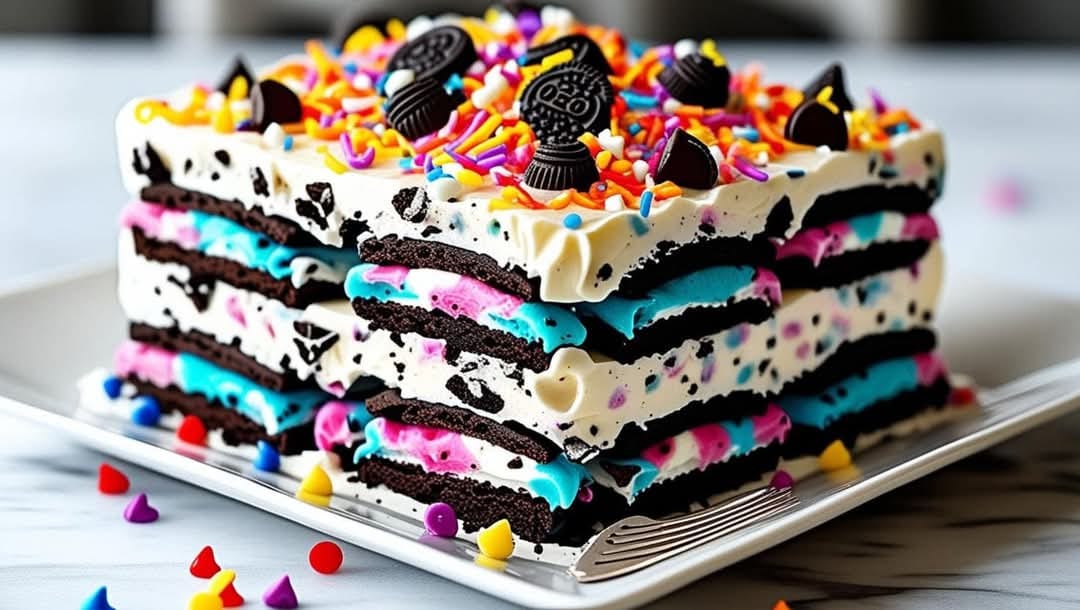
Get your 9×13-inch dish ready. Place a single layer of Oreo cookies across the bottom. You might need to break a few to fill gaps—that’s perfectly fine. Now, scoop a generous layer of your Funfetti cream over the cookies. Use a spatula to spread it into an even blanket, making sure to cover every cookie edge. Repeat! Add another Oreo layer, then more cream. Keep going until you run out, always ending with a beautiful top layer of the sprinkle-filled cream.
Step 5: The Patient Part: Set in the Fridge
This is the “icebox” part. Cover the dish and tuck it into the refrigerator. Let it chill for at least 4 hours, but overnight is truly best. This waiting time is pure alchemy. The cookies soften from the moisture of the cream, becoming wonderfully cake-like. The flavors all mingle and become one perfect, chilled dessert. Trust me, it’s worth the wait.
Step 6: Decorate & Serve the Celebration
Just before serving, it’s time for the final flair! Scatter a handful of extra sprinkles over the top. Crush a few extra Oreos and sprinkle those on for texture and a hint of drama. Slice it into squares and watch everyone’s eyes light up. The layers look so pretty, and the first bite is pure creamy, crunchy, joyful bliss.
Chef’s Secret for the Best Funfetti Oreo Cake
The secret is in the texture of the Oreos. For a more uniform, soft cake-like bite, use the cookies straight from the package. But if you love a distinct crunch, lightly toast the Oreos on a baking sheet at 300°F for 5 minutes before assembling. They’ll hold more of their structure and provide a fantastic contrast to the fluffy filling.
Funfetti Oreo Icebox Cake Timeline
| Prep Time | 20 minutes |
| Refrigeration Time | 4 hours (or overnight) |
| Total Time | 4 hours 20 minutes |
| Servings | 12 |
A Sweet Fact About Sprinkles
Those little rainbow sprinkles (often called “jimmies”) are more than just pretty! The bright colors are achieved with food-grade waxes and oils that help them hold their shape and prevent bleeding. This is why they stay vibrant and don’t turn your filling into a muddy mess. It’s a tiny bit of food science that keeps our dessert looking as festive as it tastes.
Simple Equipment You’ll Need
You don’t need any fancy tools for this no-bake wonder. Just gather:
- A large mixing bowl
- Hand mixer or stand mixer (a whisk and strong arms work too!)
- Rubber spatula
- 9×13-inch baking dish or pan
How to Store Your Icebox Cake
This cake is a dream for make-ahead planning. Once assembled, it must stay covered in the refrigerator. It will keep perfectly for up to 3-4 days. The flavors actually get better the second day as everything continues to meld together beautifully.
I do not recommend freezing this cake. While it might survive, the texture of the creamy filling and the softened cookies can become icy and grainy upon thawing. It’s best enjoyed fresh from the fridge.
If you have leftovers (a rare event in my house!), simply cover the dish tightly with plastic wrap or transfer slices to an airtight container. Pop it back in the fridge. It’s the best late-night snack you could ask for.
Tips & Advice for Success
- Softened Cream Cheese is Key: Take the cream cheese out of the fridge at least an hour before. Room-temperature cheese blends smoothly without lumps.
- Don’t Skimp on Chilling: The 4-hour minimum is non-negotiable. This is what creates the perfect sliceable, layered texture.
- Sprinkle Wisdom: Use “jimmies” (long, cylindrical sprinkles) rather than tiny nonpareils or sanding sugar. Jimmies hold their color and shape better without bleeding.
- Layer Evenly: When spreading the cream, try to make each layer about the same thickness. This ensures every bite has the perfect cookie-to-cream ratio.
Presentation that Wows
Make your Funfetti Oreo Icebox Cake look extra special! Serve it in clear glasses for a parfait-style treat. Use cookie cutters to cut out fun shapes for kids. For a dinner party, garnish each plate with a drizzle of chocolate sauce and a single, perfect sprinkle. You can also pipe extra whipped cream around the edges for a more finished look.
Love This? Try These Other No-Bake Favorites!
If you’re hooked on easy, no-oven desserts, you have to explore our treasure trove of no-bake dessert recipes. Here are six fun variations to try next:
- Chocolate & Caramel Icebox Cake: Swap the sprinkles for a swirl of salted caramel sauce between layers. Use chocolate cookies for a double-chocolate delight.
- Berry Bliss Version: Fold in 1 cup of finely chopped fresh strawberries and use Golden Oreos. It’s a fruity, creamy summer dream.
- Mocha Chip Funfetti Cake: Add 2 tablespoons of instant espresso powder to the cream cheese mixture. Use chocolate-covered espresso beans instead of chips for a coffee lover’s twist.
- Peanut Butter Cup: Swirl 1/2 cup of creamy peanut butter into half of the filling. Layer with chopped peanut butter cups for a decadent treat akin to a Decadent Chocolate Peanut Butter Cake but without baking.
- Tropical Dream: Fold in 1 cup of toasted coconut and 1/2 cup of crushed pineapple (well-drained). Use a coconut or vanilla cookie for a vacation in a pan.
- Mint Chocolate Chip: Use mint extract instead of vanilla and green food coloring if you like. Fold in chopped Andes mints. It’s refreshing and cool!
Common Mistakes to Avoid
Mistake 1: Using Cold Cream Cheese
This is the number one reason for a lumpy filling. Cold cream cheese doesn’t blend smoothly. It stays in little chunks that never fully incorporate into the whipped cream. Your cake will have bits of plain cream cheese throughout. To avoid this, let the block sit on your counter for about 60-90 minutes before you start. It should feel soft to the touch but not melted.
Mistake 2: Under-Whipping the Cream
If your heavy cream is still runny or soft, your whole cake will be soupy. The stiff peaks from the whipped cream give structure to the filling. They hold up the sprinkles and prevent the layers from collapsing. To test, lift your beaters out of the cream. The peak that forms should stand straight up and not flop over at all. If it droops, keep whipping!
Mistake 3: Not Letting It Set Long Enough
Impatience is the enemy of a perfect icebox cake. If you serve it after just an hour or two, the cookies will be hard and the layers won’t hold. The magic happens in the fridge as the cookies absorb moisture. Cutting into it too early means a messy, layered parfait instead of a sliceable cake. Plan ahead and give it the full 4 hours, or better yet, let it set overnight for the absolute best texture.
Mistake 4: Using the Wrong Sprinkles
All sprinkles are not created equal for this recipe. Tiny nonpareils or sanding sugar have a lot of dye that can bleed into your beautiful white cream, turning it a muddy color. For the best visual appeal and texture, stick with rainbow jimmies. Their waxy coating locks in the color, so your cake stays bright and festive from assembly to the last bite.
Frequently Asked Questions (FAQ)
Can I make this Funfetti Oreo Icebox Cake ahead of time?
Absolutely! In fact, I highly recommend it. This cake is the perfect make-ahead dessert. You can assemble it up to 24 hours before you need to serve it. Just keep it tightly covered in the refrigerator. The longer it sits, the softer the cookies become and the more the flavors blend. It actually tastes better on day two. Add the final garnish of extra sprinkles and crushed Oreos right before serving so they stay crisp and look fresh.
What’s the best way to soften cream cheese quickly?
Forgot to take the cream cheese out? No worries! Remove it from the foil wrapper and place it on a microwave-safe plate. Microwave it on low power (10% power) for 15-second intervals, checking after each. You want it soft, not melted and bubbling. It usually takes about 30-45 seconds total. You can also place the sealed block in a bowl of warm water for 10-15 minutes. Quick softening is fine, but room-temperature is always best for the smoothest texture.
Can I use Cool Whip instead of homemade whipped cream?
You can, but the texture and taste will be different. Using real whipped cream and cream cheese gives a richer, less sweet, and more stable filling. If you substitute with an 8-ounce tub of thawed Cool Whip, fold it into your beaten cream cheese mixture. The final cake will be lighter and airier but may be slightly softer. Avoid the “lite” or “fat-free” versions, as they don’t hold up as well and can become watery.
Why did my sprinkles bleed their color into the cream?
This usually happens with certain types of sprinkles, particularly nonpareils or low-quality ones with liquid dye. To prevent a tie-dye effect, use sprinkles labeled as “jimmies.” Their colors are sealed with a food-grade wax coating. Also, fold them in gently and just until combined. Over-mixing can break the coating. Storing the cake properly and eating it within a few days also helps keep colors bright. Proper nutrient absorption isn’t a concern here, but ingredient quality always impacts your final dish!
Of course! This recipe is very flexible. Golden Oreos create a delicious vanilla-based cake. Ginger snaps would be amazing for the holidays. Even graham crackers work wonderfully, creating a version similar to the crust in our popular Mini Cheesecakes with White Chocolate & Raspberry. Just make sure your cookies are roughly the same size and thickness for even layering.
How do I get clean slices when serving?
For the prettiest slices, use a sharp chef’s knife. Run it under very hot water for a few seconds, wipe it dry, and then make your cut. The heat helps the knife glide through the creamy layers cleanly. Wipe the blade clean and reheat it between each slice for perfect, Instagram-worthy pieces every time.
Is it okay to leave out the mini chocolate chips?
It’s totally okay! The chocolate chips add a nice extra bit of chocolate flavor and texture, but they are optional. If you prefer just the pure taste of Oreos and cream with sprinkles, feel free to skip them. You could also substitute with other small add-ins like chopped nuts, toffee bits, or even white chocolate chips for a different twist.
My filling seems too runny after mixing. What did I do wrong?
A runny filling is almost always due to under-whipped cream or cream cheese that was too warm. If you catch it before assembling, you can try to fix it. Place the entire bowl of filling in the refrigerator for 20-30 minutes to firm up, then give it a quick, gentle fold. If it’s still too soft, you can whip an additional 1/2 cup of heavy cream to stiff peaks and gently fold it in to add more structure.
Can I make this in a springform pan for a round cake?
Yes, you can create a stunning round cake! Use a 9-inch springform pan. Line the bottom with a circle of parchment paper. Follow the same layering process, starting with a layer of cookies. You may need to break some cookies to fill in gaps around the edges. This presentation is fantastic for birthdays and looks just like a classic frosted layer cake when you unmold it.
How long will leftovers last in the fridge?
Leftovers (if you have any!) will keep well, covered tightly, in the refrigerator for 3 to 4 days. The texture will remain excellent. The cookies will continue to soften, becoming almost entirely cake-like. The sprinkles may start to fade slightly in color after a few days, but the flavor will still be delicious. This cake does not freeze well, as the creamy filling can separate and become grainy when thawed.
The Final Slice
This No-Bake Funfetti Oreo Icebox Cake is more than just a recipe. It’s a guarantee of joy. It’s proof that the simplest ingredients can create something spectacular. No oven, no fuss, just layers of happy flavor that make everyone ask for the recipe. It’s the dessert you’ll turn to again and again when you need a guaranteed hit. So grab those Oreos and sprinkles, and get ready for the easiest celebration you’ve ever hosted. Happy no-baking!
Equipment
- Grand bol
- Fouet
- Spatule
- Plat de cuisson 9x13 pouces
- Papier sulfurisé
Ingredients
- 1 paquet Oreo
- 240 ml crème épaisse
- 120 g sucre glace
- 225 g fromage à la crème ramolli
- 5 ml extrait de vanille
- 120 g pépites de chocolat mini, optionnel
- 80 g sprinkles arc-en-ciel
Instructions
- Dans un grand bol froid, mélangez la crème épaisse et le sucre glace, puis battez jusqu'à formation de pics fermes.
- Dans un autre bol, battez le fromage à la crème ramolli jusqu'à ce qu'il soit lisse, puis incorporez l'extrait de vanille.
- Incorporez délicatement la crème fouettée dans le mélange de fromage à la crème jusqu'à ce que le tout soit bien mélangé.
- Ajoutez les sprinkles et les pépites de chocolat, en mélangeant délicatement pour les répartir.
- Dans un plat de cuisson 9x13 pouces, disposez une couche de cookies Oreo au fond, suivie d'une couche du mélange de crème. Répétez les couches en terminant par le mélange de crème.
- Couvrez et réfrigérez pendant au moins 4 heures, de préférence toute la nuit.
- Avant de servir, ajoutez des sprinkles supplémentaires et des Oreo écrasés sur le dessus, puis coupez et servez.
Notes
Nutrition

Hi, I’m Olivia Parker, the founder of BakingSecret.com and a lifelong lover of all things sweet and homemade. I grew up in a small town in Oregon, where the smell of fresh cookies in my family’s kitchen sparked my passion for baking. Over the years, I turned that passion into a mission: to help home bakers feel confident, inspired, and creative.
After studying food science and working in several artisan bakeries across the U.S., I decided to create a space where everyone from beginners to seasoned bakers can find reliable recipes, expert tips, and a warm, welcoming community. BakingSecret.com is my way of sharing the magic of baking with the world. When I’m not testing new recipes, you’ll find me exploring farmers’ markets, collecting vintage cookbooks, or perfecting my sourdough technique.