
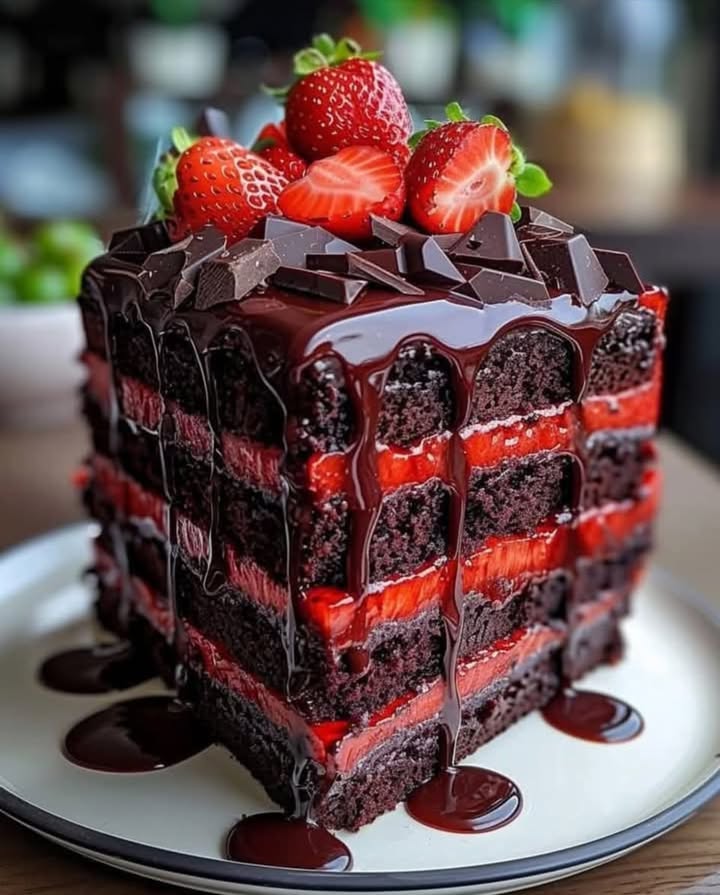
The Dark Velvet Strawberry Cake: A Flavor Worth a Standing Ovation!
You know that moment when you take a bite of something so perfect, you have to stop and just enjoy it? That’s this cake. The Dark Velvet Strawberry Cake is my new favorite party trick. It looks like a deep, mysterious red velvet. But one bite reveals a secret: the bright, sunny flavor of real strawberries. It’s a conversation starter, a crowd-pleaser, and honestly, just pure joy on a plate. I created this for my daughter’s birthday, and let me tell you, the “oohs” and “aahs” were louder than the singing! It’s the kind of dessert that makes people ask for the recipe before they’ve even finished their slice.
A Cake with a Twist: From Red Velvet to Strawberry Velvet
We all know and love classic red velvet cake. Its story is rich with history, from the chemical reaction between natural cocoa and acidic ingredients to the wartime bakers using beet juice for color. My Dark Velvet Strawberry Cake is a fun, fruity spin on that beloved tradition. Instead of relying solely on food coloring for its signature hue, I wanted the color and flavor to come from a real source: strawberries. The puree gives it a subtle berry sweetness that plays so nicely with the cocoa. It’s a modern take that feels both fancy and wonderfully homemade.
Why You’ll Fall in Love with This Velvet Strawberry Indulgence
First, the flavor balance is magic. It’s not overly chocolatey or overly fruity. It’s a perfect partnership. Second, it’s surprisingly simple! The batter comes together in one bowl after a quick mix of dry ingredients. The stunning color does most of the “wow” work for you. Finally, that strawberry buttercream? It’s so good you might just eat it with a spoon. This cake feels luxurious but is totally approachable for a weekend baker. It’s the ultimate edible hug.
When to Whip Up This Strawberry Velvet Cake
This cake is your secret weapon for so many occasions! It’s a showstopper for birthdays (especially Valentine’s Day or Mother’s Day). It’s elegant enough for a dinner party dessert. I’ve even made it for a simple “just because” Sunday treat. The deep red layers make it perfect for Christmas, too! Any day that calls for a little extra sweetness and a lot of smiles is the right day for this Velvet Strawberry Indulgence.
What You’ll Need for Your Dark Velvet Strawberry Cake
For the Cake:
- 2 1/2 cups all-purpose flour
- 1 1/2 teaspoons baking powder
- 1/2 teaspoon baking soda
- 1/2 teaspoon salt
- 1/2 cup unsweetened cocoa powder
- 1 cup buttermilk
- 1 teaspoon vanilla extract
- 1/2 cup vegetable oil
- 2 large eggs
- 1 cup granulated sugar
- 1/2 cup strawberry puree (fresh or frozen strawberries blended)
- 1 tablespoon red food coloring (optional, for deeper color)
For the Strawberry Buttercream Frosting:
- 1 cup unsalted butter, softened
- 4 cups powdered sugar
- 1/2 cup strawberry puree
- 1 teaspoon vanilla extract
- 1-2 tablespoons heavy cream (if needed for consistency)
- A pinch of salt
No Buttermilk? No Problem! Easy Ingredient Swaps
Out of an ingredient? Don’t run to the store just yet! Here are some easy fixes:
- Buttermilk: Make your own! Add 1 tablespoon of lemon juice or white vinegar to a measuring cup. Fill with milk to the 1-cup line. Stir and let it sit for 5-10 minutes until it curdles slightly.
- Strawberry Puree: You can use high-quality store-bought strawberry jam or preserves. Warm it slightly and strain out any big seeds if you want a smoother frosting.
- Cocoa Powder: Use natural or Dutch-processed cocoa here. Both work great!
- Heavy Cream: Whole milk or even a splash of extra strawberry puree can thin your frosting in a pinch.
Baking Your Velvet Strawberry Indulgence: A Step-by-Step Journey
Step 1: Prepare the Cake
Start by preheating your oven to 350°F (175°C). Grease and flour two 9-inch round cake pans. This little step is your insurance policy for perfect, un-stuck layers. In a medium bowl, whisk together your dry ingredients: flour, baking powder, baking soda, salt, and that gorgeous cocoa powder. It will look like a dusty, chocolatey landscape. In a separate large bowl, combine the wet ingredients. Whisk the buttermilk, vanilla, oil, eggs, sugar, and strawberry puree until it’s a smooth, pink, speckled liquid. Pro tip: Use room temperature eggs and buttermilk for a smoother batter that bakes more evenly. Now, gently pour the dry ingredients into the wet. Mix until the flour just disappears. The batter will be thick and luscious. For that dramatic dark velvet color, stir in the optional red food coloring now. Watch as it transforms into a deep, romantic crimson. Divide this beautiful batter between your two pans and smooth the tops.
Step 2: Bake and Cool
Slide the pans into your preheated oven. Your kitchen will start to smell amazing. Bake for 25-30 minutes. You’ll know it’s done when a toothpick poked into the center comes out clean or with just a few moist crumbs. Don’t overbake! The cakes should spring back lightly when touched. Let them cool in the pans for exactly 10 minutes. This allows them to firm up a bit. Then, run a knife around the edges and flip them onto a wire rack to cool completely. Patience is key here. Frosting a warm cake is a recipe for a melty, sliding mess.
Step 3: Make the Strawberry Buttercream Frosting
While the cakes cool, make your frosting. In a large bowl, beat the softened butter until it’s pale, fluffy, and creamy. This takes a good 3-5 minutes. Don’t rush it! Fluffy butter makes fluffy frosting. Gradually add the powdered sugar, one cup at a time, mixing on low speed at first. Otherwise, you’ll create a sweet, white cloud in your kitchen! Once the sugar is incorporated, add the strawberry puree, vanilla, and that pinch of salt. The salt is a magic trick that makes all the flavors pop. Beat it all together. If the frosting seems too stiff to spread, add a tablespoon of heavy cream. If it’s too thin, add a bit more powdered sugar. You’re aiming for a smooth, spreadable, pink dream.
Step 4: Assemble Your Masterpiece
Time for the fun part! Place one completely cool cake layer on your serving plate. I sometimes put a small dollop of frosting underneath to keep it from sliding. Spread a generous, even layer of your strawberry buttercream on top. Think of it as the delicious glue. Carefully place the second cake layer on top. Now, cover the entire cake with the remaining frosting. Use an offset spatula or a simple butter knife to create swoops and swirls. There’s no wrong way to do it! For a final touch, garnish with a ring of fresh strawberries or a sprinkle of decorative sprinkles. Chef’s tip: For super clean slices, pop the assembled cake in the fridge for 20-30 minutes before cutting. This sets the frosting perfectly.
Your Baking Timeline
| Task | Time |
|---|---|
| Prep (Measuring, Pureeing) | 20 minutes |
| Baking | 30 minutes |
| Cooling (Crucial!) | 1 hour |
| Frosting & Assembly | 20 minutes |
| Total Time | About 2 hours 10 minutes |
My Secret for Intense Strawberry Flavor
Here’s my not-so-secret secret: reduce your strawberry puree. If you have the time, simmer your 1/2 cup of puree for the cake in a small pan over low heat for 5-10 minutes. Let it cook down by about half. This concentrates the flavor and removes extra water, giving you a much more powerful strawberry punch in every bite. Let it cool completely before adding it to the batter. It makes a world of difference!
A Berry Interesting Fact!
Did you know the tiny seeds on the outside of a strawberry are actually the fruit’s ovaries, and each one holds a single seed? They’re called “achenes.” The sweet, red part we love is the “receptacle” that holds them. So when you’re making that puree, you’re technically blending up a flower’s base! Baking with science is the most delicious kind.
Gear You’ll Need
- Two 9-inch round cake pans
- Mixing bowls (one large, one medium)
- Whisk and spatula
- Electric hand mixer or stand mixer (for frosting)
- Blender or food processor (for strawberry puree)
- Wire cooling rack
- Offset spatula or butter knife for frosting
Keeping Your Cake Fresh and Fabulous
Because of the fresh strawberry puree in both the cake and frosting, this cake is best stored in the refrigerator. Cover it with a cake dome or place it in an airtight container. It will stay fresh and delicious for up to 3-4 days. The cold will make the cake layers even more moist and fudgy!
You can also freeze this cake for longer storage. Wrap unfrosted, cooled cake layers tightly in plastic wrap and then aluminum foil. They’ll keep for up to 3 months. The buttercream can also be frozen in an airtight container. Thaw everything in the refrigerator overnight before assembling and serving.
When you’re ready to serve, let the cake sit at room temperature for about 30 minutes. This takes the chill off and allows the frosting to soften slightly. It makes for the perfect texture and brings all the flavors back to life. For the ultimate experience in food freshness and quality, try to enjoy it within the first couple of days.
Tips for a Picture-Perfect Cake Every Time
- Measure your flour correctly: Spoon it into your measuring cup and level it off. Don’t scoop directly from the bag. Scooping packs in too much flour and leads to a dry cake.
- Don’t overmix the batter: Once you add the dry ingredients, mix just until the flour disappears. Overmixing develops gluten and makes cakes tough.
- Use a kitchen scale: For absolute precision, weigh your ingredients, especially the flour. It’s the single best way to guarantee consistent results.
- Tap the pans: Before baking, gently tap the filled cake pans on the counter a few times. This releases any large air bubbles for a more even crumb.
Making It Look as Good as It Tastes
Presentation is part of the fun! Here are a few easy ideas:
- Top with a cascade of whole fresh strawberries and mint leaves.
- Create a “naked cake” look by doing a thin crumb coat and leaving the sides slightly exposed.
- Press crushed freeze-dried strawberries onto the sides for a pretty pink crumb and extra flavor.
- Pipe pretty rosettes or swirls of leftover frosting on top using a star tip.
- Dust the top with a light snowfall of powdered sugar right before serving.
Love This Cake? Try These Tasty Variations!
The basic recipe is a wonderful canvas. Here are six fun ways to change it up:
- Chocolate Ganache Drip: Add a layer of rich chocolate ganache over the frosting for an extra-decadent treat, perfect for fans of a super fudgy brownie cake.
- Lemon-Strawberry Twist: Add the zest of one lemon to the cake batter and use lemon juice instead of cream in the frosting for a bright, tangy kick.
- Berry Medley: Use a mix of pureed strawberries, raspberries, and blackberries. The flavor will be complex and gorgeous, reminiscent of a stunning raspberry cream cake.
- Coconut Strawberry Delight: Fold 1 cup of toasted coconut into the frosting and sprinkle more on top. It adds a fantastic tropical texture, much like a creamy coconut bliss cake.
- Mini Layer Cakes: Bake the batter in three 6-inch pans for a taller, more dramatic cake. It’s perfect for smaller gatherings.
- Strawberry-Chocolate Chip: Fold 1/2 cup of mini chocolate chips into the batter for little pockets of melted chocolate in every bite, a combo as classic as a Matilda-inspired chocolate cake.
Common Mistakes to Avoid
Mistake 1: Not Cooling the Cakes Completely
This is the number one reason frosting slides off or melts into a gooey mess. Frosting a warm cake is a disaster waiting to happen. The residual heat melts the butter in your beautiful strawberry buttercream. Be patient! Let the layers cool in the pan for 10 minutes, then on a wire rack until they are truly room temperature. Touch the bottom of the cake layer. If it feels even slightly warm, it’s not ready.
Mistake 2: Overmixing the Batter
Once you add the flour, you need to be gentle. Overmixing activates the gluten in the flour. This makes your cake tough and chewy instead of tender and velvety. Mix the wet and dry ingredients together just until you no longer see streaks of flour. A few small lumps are absolutely fine. They will bake out. A heavy hand with the mixer is your cake’s enemy here.
Mistake 3: Using Runny Strawberry Puree
If your strawberry puree is too watery, it can throw off the liquid balance in both the cake and frosting. For the cake, it might make the center sink. For the frosting, it can make it too soft to hold its shape. The fix is simple. If using frozen berries, thaw them in a strainer over a bowl to catch the excess juice. You can also simmer the puree for a few minutes to reduce it and concentrate the flavor, as mentioned in the secret tip above.
Mistake 4: Skipping the Salt
Salt is not the enemy in baking. It’s a flavor enhancer. That tiny pinch of salt in the frosting is not meant to make it taste salty. It works to balance the extreme sweetness of the powdered sugar and brighten the strawberry flavor. Without it, your frosting can taste one-dimensional and overly sweet. Don’t leave it out!
Your Dark Velvet Strawberry Cake Questions, Answered!
Can I use frozen strawberries for the puree?
Absolutely! Frozen strawberries are a great, cost-effective option. Just make sure to thaw them completely first. I recommend thawing them in a colander or sieve over a bowl. This lets the excess liquid drain away. Using that liquid can make your puree too runny. Blend the thawed berries until smooth. You might need to strain the puree if you don’t want the tiny seeds in your cake or frosting. The color from frozen berries can be a bit lighter, which is why the optional red food coloring is helpful for that classic “velvet” look.
My cake layers didn’t rise much. What went wrong?
This usually points to the leavening agents (baking powder and soda). First, check their expiration dates. Old baking powder or soda loses its power. Second, make sure you measured them correctly. Using a measuring spoon meant for liquids for dry ingredients can give you too little. Finally, don’t overmix the batter after adding them. Overmixing can deflate the air bubbles that help the cake rise. Make sure your oven is fully preheated before the pans go in, too. A cold start can hinder the initial rise.
Can I make this cake in advance?
You can definitely get a head start. The baked and cooled cake layers can be wrapped tightly in plastic wrap and stored at room temperature for a day, or frozen for up to 3 months. The strawberry buttercream frosting can be made 1-2 days ahead. Store it in an airtight container in the refrigerator. When you’re ready to use it, let it come to room temperature and give it a good re-whip with your mixer to bring back its fluffy texture. I often assemble the whole cake a day before serving and keep it covered in the fridge. The flavors actually meld and improve!
Why did my frosting turn out too soft/runny?
This is almost always a temperature or liquid issue. First, was your butter too soft? It should be softened (slightly cool to the touch but indents easily), not melted or greasy. Second, the strawberry puree might have been too watery. Next time, try reducing it as described in the “secret” section. If your frosting is already runny, don’t panic. Just chill it in the fridge for 20-30 minutes, then whip it again. You can also add a bit more sifted powdered sugar, a quarter cup at a time, to stiffen it up until it’s spreadable.
Can I use a different type of pan?
Yes, but baking times will change. For a 9×13-inch sheet cake, bake for 30-35 minutes. For cupcakes, fill liners 2/3 full and bake for 18-22 minutes. You’ll likely get 24-28 cupcakes. For three 8-inch round pans, reduce the baking time to 22-27 minutes. Always do the toothpick test to check for doneness. No matter the pan, letting the layers cool completely is still the golden rule for easy frosting.
How do I get my cake layers perfectly flat?
Cakes often dome in the center because the edges set faster than the middle. To prevent this, you can use “cake strips.” These are fabric strips you soak in water and wrap around the outside of the pan. They keep the edges cooler, allowing the cake to rise evenly. If you don’t have them, you can gently press down on the domed part of the cooled cake with a clean kitchen towel, or carefully slice it off with a long serrated knife to create a flat surface. This is called “torting” and it makes your cake stack beautifully.
The food coloring stained my batter bowl. How do I clean it?
Ah, the red velvet struggle is real! For plastic bowls, a good soak in hot, soapy water with a little baking soda usually does the trick. For stubborn stains on stainless steel or glass, make a paste of baking soda and dish soap. Let it sit on the stain for 10 minutes before scrubbing. You can also try wiping the stained area with a paper towel soaked in white vinegar or lemon juice. Acting quickly is your best bet!
Is there a way to make this cake without food coloring?
Of course! The food coloring is purely for visual drama. The cake will still taste wonderful without it. It will just have a more muted, brownish-pink color from the cocoa and strawberry puree. To boost the natural color without dyes, you could try adding a little extra reduced strawberry puree or even a teaspoon of beet powder for a natural red tint, though the flavor will be very mild.
My buttercream is too sweet. How can I fix it?
This is a common complaint with American buttercream. The pinch of salt is your first defense against cloying sweetness. If it’s still too sweet for you, you can add a tiny bit of lemon juice or a sprinkle of citric acid to brighten and cut the sugar. Another option is to use a different frosting base, like a cream cheese frosting or an Italian meringue buttercream sweetened with less sugar. The strawberry puree’s tartness also helps balance the sweetness naturally.
Can I use this recipe to make a dairy-free cake?
You can make several easy swaps. For the buttermilk, use 1 cup of unsweetened almond or soy milk mixed with 1 tablespoon of vinegar or lemon juice. For the butter in the frosting, use a high-quality plant-based butter stick (not the tub kind, as it’s often too soft). Use a dairy-free whipping cream alternative or a splash of your non-dairy milk to adjust the frosting consistency. Just be aware that the flavor and texture might be slightly different, but it will still be delicious!
There you have it! The world of baking is full of wonderful creations, and this Dark Velvet Strawberry Cake is just one delicious example. If you loved making this, you’ll find so many more inspiring ideas in our full collection of delicious cake recipes online.
Ready to Bake Some Magic?
So, there you have it. Your guide to creating a truly stunning and delicious Dark Velvet Strawberry Cake. This isn’t just a recipe. It’s an experience. From the first whiff of cocoa and berries in the oven to the last creamy bite of frosting, it’s a labor of love that pays off in smiles. Don’t be intimidated by its beauty. The steps are simple, and the result is pure pride. Gather your ingredients, put on some music, and bake yourself a slice of joy. Trust me, your friends and family will thank you. Now get baking!
Equipment
- Deux moules à gâteau ronds de 9 pouces
- Grand bol
- Fouet
- Spatule
- Réseau de refroidissement
Ingredients
- 2 1/2 tasses farine tout usage
- 1 1/2 cuil. à café poudre à lever
- 1/2 cuil. à café bicarbonate de soude
- 1/2 cuil. à café sel
- 1/2 tasse cacao en poudre non sucré
- 1 tasse babeurre
- 1 cuil. à café extrait de vanille
- 1/2 tasse huile végétale
- 2 œufs
- 1 tasse sucre granulé
- 1/2 tasse purée de fraises fraises fraîches ou congelées réduites en purée
- 1 cuil. à soupe colorant alimentaire rouge optionnel, pour une couleur plus profonde
Instructions
- Préchauffez votre four à 175°C et graissez deux moules à gâteau ronds de 9 pouces.
- Dans un bol moyen, fouettez la farine, la poudre à lever, le bicarbonate de soude, le sel et le cacao en poudre.
- Dans un grand bol, mélangez le babeurre, la vanille, l'huile végétale, les œufs, le sucre et la purée de fraises ; fouettez jusqu'à consistance lisse.
- Ajoutez progressivement les ingrédients secs aux ingrédients humides et mélangez jusqu'à ce qu'ils soient juste combinés ; ajoutez le colorant alimentaire si désiré.
- Divisez la pâte également entre les moules préparés et lissez le dessus.
- Faites cuire pendant 25 à 30 minutes ou jusqu'à ce qu'un cure-dent inséré en ressorte propre ; laissez refroidir dans les moules pendant 10 minutes avant de transférer sur une grille.
- Pendant que les gâteaux refroidissent, préparez le glaçage en créme de fraise : battez le beurre ramolli jusqu'à ce qu'il soit pâle et aéré, puis ajoutez progressivement le sucre glace.
- Incorporez la purée de fraises, la vanille et le sel ; ajoutez de la crème si nécessaire pour obtenir une consistance tartinable.
- Assemblez le gâteau en plaçant un étage sur un plat de service ; étalez le glaçage au-dessus, puis ajoutez la deuxième couche et glacer le gâteau entier.
- Décorez avec des fraises fraîches ou des paillettes si désiré.
Notes
Nutrition
Hi there! I’m Emma Lawson, and I’m thrilled to be part of the BakingSecret.com team! Baking has been a part of my life since I was a little girl, growing up in a family that loved to bake together. From birthday cakes to cookies, I learned early on that the kitchen was a place of creativity and connection.
After studying culinary arts at The Culinary Institute of America, I fell in love with the science behind baking. Understanding how different ingredients interact and how slight adjustments can change the final product is something that continues to fascinate me. My background in pastry arts and food science has helped me develop recipes that are not only delicious but also reliable.
At BakingSecret.com, I’m excited to share recipes that cater to all levels, from beginners to seasoned bakers. My goal is to make sure that you feel confident in the kitchen and have fun with every bake. When I’m not in the kitchen, you can find me experimenting with new flavor combinations, hiking, or trying out new coffee shops in town!