
The Ultimate Chocolate Peanut Butter Layer Cake Recipe
Have you ever had a cake so good it made you pause? You know, the kind where you have to put your fork down, close your eyes, and just…savor it? That’s this cake. I first made this Decadent Peanut Butter Cake for my husband’s birthday last year, and let’s just say it’s now a family legend. The rich, moist chocolate layers, the creamy peanut butter center, and that glossy dark chocolate ganache—it’s pure, unapologetic joy on a plate. Forget fancy bakeries. This homemade hero is easier than you think and so much more special.
A Little History on Our Favorite Flavor Combo
Chocolate and peanut butter is a match made in heaven, right? This iconic American pairing really took off in the 1920s. That’s when peanut butter started appearing in candy recipes. The salty, nutty flavor of peanut butter cut through the sweetness of chocolate perfectly. It created a crave-worthy balance. Our Peanut Butter Chocolate Layer Cake recipe honors this classic duo. It takes it to a whole new level of indulgence. My version uses a super-moist “hot water” cocoa cake. It’s topped with a simple, luxurious ganache. It’s a modern twist on a timeless favorite that never gets old.
Why You’ll Absolutely Fall in Love With This Recipe
This is the cake for every celebration, big or small. Why? First, the flavor is unbeatable. It’s deeply chocolatey and wonderfully nutty. The textures are a dream team: tender cake, smooth filling, and silky frosting. Second, it’s straightforward. No tricky techniques are needed. If you can stir batter and spread peanut butter, you can make this masterpiece. Finally, it’s a total crowd-pleaser. I’ve never brought this to a potluck without someone asking for the recipe. It’s that good.
The Perfect Occasions for This Showstopper
This isn’t just a cake; it’s an event! Here are my favorite times to bake it:
- Birthday Bash: It makes the birthday person feel incredibly loved.
- Weekend Family Dinner: Turn a regular Sunday into something memorable.
- Potluck Contribution: Be the person everyone remembers (in the best way).
- Just Because: Sometimes Tuesday deserves a chocolate peanut butter layer cake.
Gathering Your Ingredients
Here is your shopping list for this incredible Peanut Butter Chocolate Cake:
- 2 cups all-purpose flour
- 1 3/4 cups granulated sugar
- 3/4 cup unsweetened cocoa powder
- 2 tsp baking powder
- 1 1/2 tsp baking soda
- 1 tsp salt
- 2 large eggs
- 1 cup whole milk
- 1/2 cup vegetable oil
- 2 tsp vanilla extract
- 1 cup boiling water
- 1 cup creamy peanut butter
- 1 cup heavy cream
- 2 cups dark chocolate chips
- Crushed peanuts for garnish
Easy Ingredient Swaps
Out of something? No panic. Here are some easy swaps:
- Cocoa Powder: Use natural or Dutch-processed. Both work great here.
- Milk: Any milk you have on hand—2%, almond, or oat—will work.
- Peanut Butter: Use the creamy, shelf-stable kind for easy spreading. Avoid natural peanut butter that separates.
- Chocolate Chips: Use semi-sweet or milk chocolate if you prefer a sweeter ganache.
Your Step-by-Step Guide to Chocolate Peanut Butter Bliss
Step 1: Preheat and Prepare
Start by heating your oven to 350°F (175°C). Grease the sides of two 9-inch round cake pans with butter or spray. Then, add a spoonful of flour to each pan and shake it around until the bottom and sides are coated. Tap out the extra flour. This “grease and flour” trick is my secret for cakes that pop out perfectly every time. Place a round of parchment paper in the bottom of each pan for absolute insurance.
Step 2: Mix the Dry Goods
Grab your biggest mixing bowl. Whisk together the flour, sugar, cocoa powder, baking powder, baking soda, and salt. You’ll see a beautiful, deep brown mixture. Getting rid of any lumps now means a smoother batter later. I like to sift the cocoa powder if it’s clumpy. The smell of that rich cocoa is already promising amazing things.
Step 3: Bring in the Wet Ingredients
Make a well in the center of your dry ingredients. Crack in the eggs, then pour in the milk, oil, and vanilla. Use a hand mixer or just a sturdy whisk. Mix on medium speed until everything is combined. The batter will be thick and shiny. Pro tip: Make sure your eggs and milk aren’t ice-cold. Room temperature ingredients blend together much more easily.
Step 4: The Secret for Super-Moist Cake
Here’s the magical step! Carefully measure one cup of boiling water. With the mixer on low speed, slowly pour the hot water into the batter. It will look very thin and liquid—that’s exactly right! The hot water “blooms” the cocoa powder. It intensifies the chocolate flavor and guarantees an unbelievably moist crumb. Stir just until the batter is smooth and uniform.
Step 5: Bake to Perfection
Pour the batter evenly into your two prepared pans. Slide them into your preheated oven. Bake for 30-35 minutes. You’ll know it’s done when the cake tops spring back lightly when touched. A toothpick inserted into the center should come out with a few moist crumbs, not wet batter. The kitchen will smell like a chocolate factory. It’s heavenly.
Step 6: Cool With Patience
Let the cakes cool in their pans on a wire rack for 10 minutes. This allows them to firm up a bit. Then, run a thin knife around the edges. Invert the pans onto the rack, lift them off, and carefully peel away the parchment paper. Let the layers cool completely before you frost. A warm cake will melt your filling and make a mess. I know it’s hard to wait!
Step 7: Make the Silky Chocolate Ganache
While the cakes cool, make the easy frosting. Put the dark chocolate chips in a heatproof bowl. In a small saucepan, heat the heavy cream over medium heat. Watch for small bubbles around the edge—you want it just to a simmer, not a rolling boil. Pour the hot cream over the chocolate chips. Let it sit undisturbed for one minute. This melts the chocolate gently. Then, stir slowly from the center outward until you have a smooth, glossy, dark chocolate ganache. Let it cool and thicken slightly as you assemble the cake.
Step 8: Assemble Your Masterpiece
Place one completely cool cake layer on your serving plate or cake stand. Use a spatula or spoon to spread the entire cup of creamy peanut butter evenly over the top. It’s a thick, generous layer. Gently place the second cake layer on top, pressing down slightly so it sticks. Chef’s tip: For a neat look, spoon a dollop of ganache on the plate first. It will act as “glue” to keep the bottom layer from sliding.
Step 9: The Glorious Ganache Finish
Now for the fun, dramatic part! Pour your slightly thickened ganache onto the center of the top cake layer. Use an offset spatula or the back of a spoon to gently push it towards the edges. Let the gorgeous chocolate cascade over the sides in natural, beautiful drips. Don’t worry about making it perfect. Rustic drips look absolutely stunning and homemade.
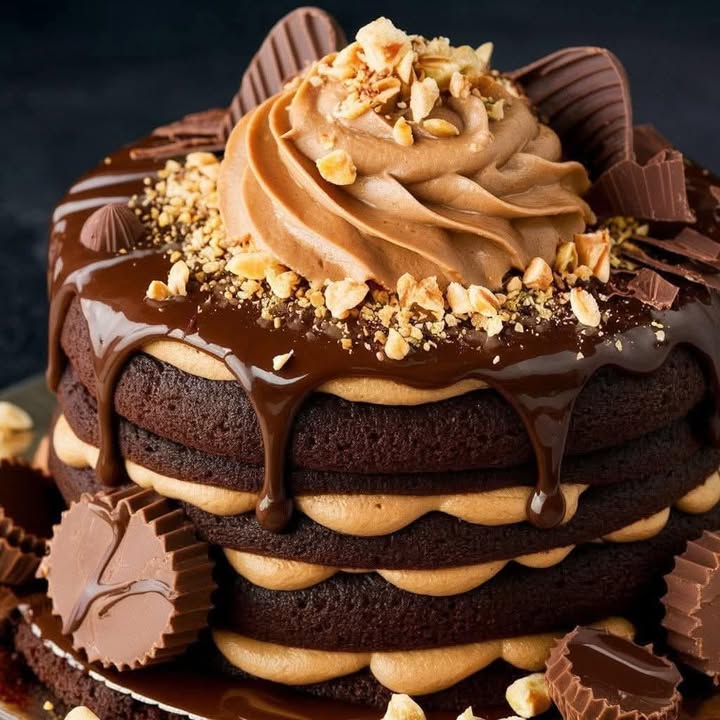
Step 10: The Final Flourish
If you have any leftover ganache, you can put it in a piping bag. Pipe pretty swirls or dollops around the top edge. Finally, take a handful of crushed peanuts and sprinkle them generously over the top. This adds a wonderful crunch and a hint of salty flavor that cuts through all that sweetness. It’s the perfect finishing touch.
Time You’ll Need From Start to Slice
Prep Time: 30 minutes
Cook Time: 35 minutes
Cooling Time: 1 hour (very important!)
Total Time: About 1 hour 30 minutes active time
Servings: 12 happy people
My Secret Chef’s Trick
For an extra-intense peanut butter experience, mix a couple of tablespoons of powdered sugar into your peanut butter before spreading it. This stabilizes it just a touch and prevents it from oozing out too much when you cut the cake. It’s a tiny step with a big payoff for neat slices.
A Fun Fact About Your Dessert
Did you know that boiling water in cake batter is an old baker’s secret? It’s often used in “Depression-era” or “Wacky Cake” recipes that used no eggs or dairy. The hot water helps dissolve the sugar and cocoa fully. It creates a uniquely tender and moist texture that’s hard to beat. We’re using it here for that same perfect crumb. Science is delicious!
What You’ll Need in Your Kitchen
- Two 9-inch round cake pans
- Large and medium mixing bowls
- Hand mixer or stand mixer (a whisk and strong arm works too!)
- Wire cooling racks
- Small saucepan
- Offset spatula for smoothing
- Measuring cups and spoons
How to Keep Your Cake Fresh and Delicious
Because this cake has dairy and peanut butter, it’s best stored in the fridge. Cover it loosely with plastic wrap or place a cake dome over it. You won’t want to seal it airtight until the ganache is fully set, or it might get sticky.
The cold fridge will firm up the ganache and peanut butter layer beautifully. Let the cake sit at room temperature for about 20-30 minutes before serving. This takes the chill off and allows all the flavors to shine their brightest. The texture is at its absolute best this way.
Properly stored, your Chocolate Peanut Butter Layer Cake will stay fresh and delicious for up to 4-5 days in the refrigerator. I doubt it will last that long, though! The cake can also be frozen for up to 2 months. Wrap individual slices tightly in plastic wrap and then foil.
My Best Tips for Success
- Measure Flour Correctly: Spoon flour into your measuring cup and level it off. Don’t scoop directly from the bag. Scooping packs the flour down and can lead to a dry cake.
- Cool Completely: I can’t stress this enough. Warm cakes will cause the peanut butter and ganache to melt and slide right off.
- Ganache Consistency: If your ganache is too runny, let it cool longer. If it gets too thick, gently re-warm it for 5 seconds in the microwave.
- Glass of Milk: Serve each slice with a cold glass of milk. It’s the classic, perfect pairing.
How to Present Your Cake Like a Pro
- Drizzle a little extra melted peanut butter over the ganache before adding the peanuts.
- Place mini peanut butter cups or chocolate shards on top for decoration.
- Serve on a beautiful cake stand with a pretty cake server.
- Dust the plate edges with a little cocoa powder or powdered sugar for a café-style look.
Love This Cake? Try These Tasty Twists!
Once you’ve mastered this showstopper, you might want to play with the formula! Here are six fun variations on our Decadent Peanut Butter Cake:
- Peanut Butter Cup Lover’s Dream: Chop up a cup of Reese’s Peanut Butter Cups and fold them into the cake batter before baking.
- Banana Chocolate Peanut Butter Cake: Add 1 cup of mashed ripe bananas to the wet ingredients for a delicious, moist twist.
- Dark Chocolate & Sea Salt: Use a high-quality dark chocolate for the ganache and finish with a light sprinkle of flaky sea salt instead of peanuts.
- Mocha Layer Cake: Add 1 tablespoon of instant espresso powder to the boiling water for a rich mocha-flavored cake.
- Cookies and Cream: Swap the peanut butter layer for a mixture of crushed Oreos and a little whipped cream.
- Peanut Butter Buttercream: For a sweeter finish, whip up a peanut butter frosting using butter, powdered sugar, and peanut butter to frost the whole cake instead of ganache.
If you’re a fan of easy, impressive layer cakes, you’ll adore our other creations. For a fruity, tropical escape, our Pineapple Cheesecake is a sunshine-filled treat. Or, for a stunning visual and flavor contrast, try the gorgeous layers in our Red Velvet Cheesecake Delight. And when you need a fantastic dessert in a flash, our 10-Minute Easy Tiramisu is a lifesaver. For something bright and citrusy, our simple Orange Jello Cake is always a crowd-pleaser.
Common Mistakes to Avoid
Mistake 1: Not Cooling the Cakes Completely
This is the number one mistake! Frosting a warm cake is a recipe for a melted, sliding mess. The peanut butter will become oily and the ganache won’t set properly. Your beautiful layers can even start to break apart. How to avoid it: Let the cakes cool in the pan for 10 minutes, then on a wire rack until they are completely cool to the touch. I sometimes bake the cakes the night before and frost them the next day. Patience makes perfect here.
Mistake 2: Overmixing the Batter
Once you add the flour, you need to mix just until the ingredients are combined. Overmixing develops the gluten in the flour. This can lead to a tough, dense, and gummy cake instead of a light and tender one. How to avoid it: When adding the dry ingredients to the wet, mix on low speed. Stop as soon as you no longer see streaks of flour. It’s okay if the batter has a few small lumps—they will bake out.
Mistake 3: Using the Wrong Peanut Butter
Using natural or “stir-style” peanut butter that separates will cause problems. The oils can separate out and make your filling layer greasy and unstable. It might also seep into the cake. How to avoid it: Stick with a classic creamy, shelf-stable peanut butter like Jif or Skippy. These brands have emulsifiers that keep the oil and solids together. This gives you a smooth, spreadable layer that holds its place.
Mistake 4: Adding Boiling Water Too Fast
Pouring the boiling water in all at once on high mixer speed can be dangerous. It can splash and create a mess, or even worse, cause a steam burn. It can also cause the batter to splatter everywhere. How to avoid it: Turn your mixer speed to low. Pour the hot water in a slow, steady stream down the side of the bowl. This incorporates it gently and safely.
Smart Baking and Nutrition Info
For those curious about the quality of ingredients, it’s a good habit to check labels. Understanding nutrition labeling from trusted sources can help you make informed choices about the cocoa, peanut butter, and other staples you use in your baking.
This amazing cake is just one of many beloved creations in our collection of cake recipes, perfect for any skill level or celebration.
Frequently Asked Questions
Can I make this cake ahead of time?
Absolutely! You can bake the cake layers up to two days in advance. Let them cool completely, then wrap each layer tightly in plastic wrap. Store them at room temperature. You can also freeze the wrapped layers for up to a month. Thaw them overnight in the fridge before assembling. The ganache is best made the day you plan to serve the cake. You can assemble the whole cake (with ganache) a day ahead and keep it covered in the fridge.
Can I use natural peanut butter?
I don’t recommend it for this specific recipe. Natural peanut butter tends to be more oily and less stable. When you spread it between the layers, the oil can separate and soak into the cake. This can make it greasy. It might also not hold its shape when you slice the cake. For the best results and neat slices, use a standard creamy peanut butter from the jar.
Why do I add boiling water to the cake batter?
The boiling water does two wonderful things. First, it helps to “bloom” the cocoa powder. Blooming simply means it opens up the cocoa particles. This releases more of its deep, complex chocolate flavor. Second, the hot water helps to dissolve the sugar and other dry ingredients more completely. This creates a smoother, more liquid batter. That batter then bakes up into an incredibly moist and tender cake with a fine crumb. Don’t worry, the cake won’t taste watery!
My ganache is too runny. How can I fix it?
If your ganache is too thin to coat the cake nicely, just let it sit at room temperature. Stir it occasionally. It will thicken as it cools. You can also pop it into the refrigerator for 10-15 minutes, stirring every 5 minutes. Be careful not to let it get too hard. If it does become too thick, you can gently reheat it for a few seconds in the microwave or over a double boiler. Stir until it’s pourable again.
Can I make cupcakes with this batter?
Yes, this chocolate cake recipe makes fantastic cupcakes. Line your muffin tin with paper liners. Fill each cup about 2/3 full with batter. Bake at 350°F for 18-22 minutes, or until a toothpick comes out clean. Let them cool. Instead of a peanut butter layer, you can pipe or spread peanut butter frosting on top. Then, dip the tops in the chocolate ganache and sprinkle with peanuts.
How do I get the ganache to drip neatly down the sides?
The temperature of your ganache and cake is key. Make sure your cake layers are completely cool. The ganache should be slightly warm but not hot. It should be the consistency of thick pancake syrup. Pour about half of it onto the center of the cake. Use an offset spatula to push it gently to the edges. Once it starts to drip, you can help it along by using a spoon to guide small amounts over the edge in spots that look bare.
Can I use a different frosting instead of ganache?
Of course! While the ganache is rich and glossy, a peanut butter buttercream would be delicious too. You could also use a classic chocolate buttercream or even a vanilla Swiss meringue buttercream. Any frosting that pairs well with chocolate and peanut butter will work. Just make sure it’s a stable frosting if you plan to decorate heavily with it.
Do I have to use dark chocolate chips for the ganache?
No, you can use your favorite chocolate. Semi-sweet chocolate chips are a great choice and very common. Milk chocolate will make a much sweeter ganache. You can even use a chopped-up chocolate bar. Just make sure it’s good quality for the best flavor and texture. Avoid using chocolate with a very low cocoa butter content, as it may not set as well.
How do I store leftover cake?
Store any leftover cake covered in the refrigerator. You can place it under a cake dome or loosely cover it with plastic wrap. Because of the ganache and peanut butter, it’s safer kept cold. It will stay fresh for 4-5 days. Before serving leftovers, let a slice sit out at room temperature for 20 minutes to take the chill off. This makes the texture perfect again.
Can I add a layer of peanut butter frosting inside?
That sounds amazing! If you want an even stronger peanut butter hit, you can make a simple frosting. Beat together 1 cup of creamy peanut butter, 1/2 cup of softened butter, 2 cups of powdered sugar, and a splash of milk until smooth. Use this in place of, or even in addition to, the plain peanut butter layer. Just spread a thinner amount of each.
Ready to Bake Some Memories?
This Decadent Chocolate Peanut Butter Layer Cake is more than just a dessert. It’s a celebration on a plate. It’s the cake you make for the people you love most. It might seem fancy, but each step is simple and forgiving. Don’t be intimidated by the layers or the glossy ganache. You’ve got this! Every bite, with its perfect balance of rich chocolate and creamy peanut butter, is worth the effort. So, preheat that oven, gather your ingredients, and get ready to bake something truly unforgettable. Your friends and family will be so glad you did. Happy baking!
Equipment
- Grand bol
- Fouet
- Spatule décalée
- Plaque à pâtisserie
- Papier sulfurisé
Ingredients
- 2 tasses farine tout usage
- 1.75 tasses sucre granulé
- 3/4 tasse cacao en poudre non sucré
- 2 cuillères à café poudre à lever
- 1.5 cuillères à café bicarbonate de soude
- 1 cuillère à café sel
- 1 tasse lait entier
- 1/2 tasse huile végétale
- 2 cuillères à café extrait de vanille
- 1 tasse eau bouillante
- 1 tasse beurre de cacahuète crémeux
- 1 tasse crème épaisse
- 2 tasses pépites de chocolat noir
- q.s. cacahuètes concassées pour garnir
Instructions
- Préchauffez le four à 175°C et préparez deux moules à gâteau ronds de 9 pouces avec du beurre et de la farine.
- Dans un grand bol, fouettez ensemble la farine, le sucre, le cacao en poudre, la poudre à lever, le bicarbonate de soude et le sel.
- Faites un puits au centre des ingrédients secs, puis ajoutez les œufs, le lait, l'huile et la vanille. Mélangez jusqu'à ce que le tout soit bien combiné.
- Versez lentement l'eau bouillante dans la pâte, en mélangeant à basse vitesse jusqu'à ce que la préparation soit lisse.
- Divisez la pâte également entre les moules préparés et faites cuire au four pendant 30 à 35 minutes.
- Laissez refroidir les gâteaux dans les moules pendant 10 minutes, puis retournez sur une grille pour refroidir complètement.
- Préparez la ganache en chauffant la crème épaisse et en la versant sur les pépites de chocolat noir. Remuez jusqu'à obtenir une consistance lisse.
- Une fois les gâteaux refroidis, étalez une généreuse couche de beurre de cacahuète sur l'un des couches de gâteau.
- Déposez la deuxième couche de gâteau sur le dessus, puis versez la ganache sur la couche supérieure, en laissant couler sur les côtés.
- Garnissez avec des cacahuètes concassées et laissez prendre avant de servir.
Notes
Nutrition
Hi there! I’m Emma Lawson, and I’m thrilled to be part of the BakingSecret.com team! Baking has been a part of my life since I was a little girl, growing up in a family that loved to bake together. From birthday cakes to cookies, I learned early on that the kitchen was a place of creativity and connection.
After studying culinary arts at The Culinary Institute of America, I fell in love with the science behind baking. Understanding how different ingredients interact and how slight adjustments can change the final product is something that continues to fascinate me. My background in pastry arts and food science has helped me develop recipes that are not only delicious but also reliable.
At BakingSecret.com, I’m excited to share recipes that cater to all levels, from beginners to seasoned bakers. My goal is to make sure that you feel confident in the kitchen and have fun with every bake. When I’m not in the kitchen, you can find me experimenting with new flavor combinations, hiking, or trying out new coffee shops in town!