
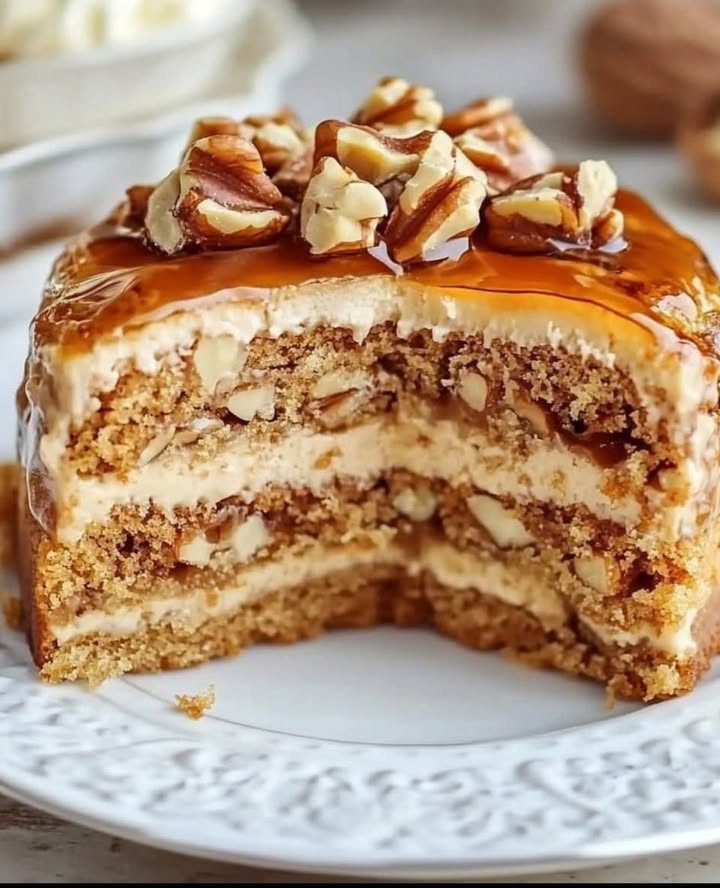
The Walnut Honey Delight: Your New Favorite Comfort Cake
Is there anything better than your kitchen filling with the warm, toasty scent of nuts and honey? I made this Walnut Honey Delight on a crisp autumn Sunday, and the happy silence that fell over my family as they took their first bites said it all. It’s not just a cake; it’s a hug on a plate.
A Slice of Sweet History
While honey cakes have roots in ancient celebrations from Rosh Hashanah to Greek traditions, my version is a simple, home-baked treasure. It mixes the rustic crunch of walnuts with the golden sweetness of honey. I’ve tested it countless times for friends and family, and its charm never fades. It’s a modern take on timeless, comforting flavors that feels both special and wonderfully simple.
Why You’ll Fall in Love With This Walnut Honey Cake
You’ll adore this recipe because it’s forgiving and fantastically flavorful. The texture is wonderfully moist, thanks to the honey, and every bite has a lovely crunch from the walnuts. It’s a one-bowl wonder (mostly!) that comes together in under an hour. It proves that the most stunning desserts don’t need fancy techniques, just good, honest ingredients.
Perfect Occasions for This Sweet Treat
This cake is your secret weapon! It’s perfect for a cozy coffee morning, a thoughtful gift for a neighbor, or as the star of a holiday dessert table. I love serving it at book club or as a sweet ending to a family dinner. It’s versatile enough for any day that needs a little extra sweetness.
Ingredients for Your Walnut Honey Delight
Gather these simple pantry staples for a masterpiece:
- 200 gm of flour – All-purpose works perfectly.
- 150 g of powdered sugar – For a fine, smooth crumb.
- 3 eggs – Let them come to room temperature.
- 150 g of melted butter – Unsalted, please!
- 100 g of chopped walnuts – The star of the show.
- 100 g of honey – Use a good-quality one you love.
- 1 sachet of chemical yeast (approx. 11 g) – That’s baking powder.
- 1 teaspoon cinnamon powder (optional) – My secret warming touch.
- 1 pinch of salt – To balance all the sweetness.
Easy Ingredient Swaps
Out of something? No worries!
- Flour: A 50/50 mix of all-purpose and whole wheat adds a nice depth.
- Walnuts: Pecans or almonds make fabulous substitutes.
- Honey: Maple syrup works in a pinch for a different flavor profile.
- Butter: A neutral oil like canola or vegetable oil can be used.
Baking Your Perfect Walnut Honey Delight
Let’s get baking! Follow these simple steps for a foolproof cake.
Step 1: Preheat and Prep
Start by preheating your oven to 180°C (350°F). This is the golden rule for even baking. While it warms, take a moment to butter and flour your cake pan. I like to use a piece of parchment paper at the bottom for an absolute guarantee of a clean release. The smell of warming butter and the promise of cake is already making the kitchen feel like home.
Step 2: Whip the Eggs and Sugar
In a large, cozy-looking bowl, crack your three eggs and add the powdered sugar. Now, beat them together with vigor! You want to keep going until the mixture turns pale, foamy, and leaves a gentle ribbon trail on the surface when you lift the whisk. This incorporates air, giving your cake a lovely lift. It should look like liquid sunshine.
Step 3: Blend in the Butter and Honey
Pour in the glorious, golden melted butter and that luscious honey. Mix gently but thoroughly until everything is beautifully combined. The mixture will become silky and fragrant. Pro tip: Make sure your melted butter has cooled slightly so it doesn’t cook the eggs! The scent here is absolutely heavenly.
Step 4: Combine the Dry Ingredients
In a separate bowl, whisk together the flour, baking powder (that’s your chemical yeast), cinnamon, and that all-important pinch of salt. Whisking now prevents little clumps of baking powder later, ensuring your cake rises evenly. It’s a quick step that makes a big difference in texture.
Step 5: Bring It All Together
Gradually add your dry flour mixture to the wet egg mixture. Fold and stir gently until you can’t see any more white flour streaks and you have a smooth, thick batter. Don’t overmix! Just a few gentle strokes are all you need once the flour is incorporated.
Step 6: Fold in the Walnuts
Now for the best part! Sprinkle your chopped walnuts over the batter. Using a spatula, fold them in with a gentle hand until they’re evenly distributed. You want every slice to be packed with nutty goodness. The batter will be thick and speckled with brown—that’s exactly what you want.
Step 7: Bake to Golden Perfection
Pour your beautiful batter into the prepared pan and smooth the top. Place it in the center of your preheated oven. Bake for 30-35 minutes. You’ll know it’s done when the top is a deep golden brown and a toothpick poked into the center comes out clean with just a few moist crumbs.
Step 8: Cool and Release
Once baked, let the cake rest in its pan for about 10 minutes on a cooling rack. This allows it to settle and firm up. Then, run a knife around the edge and carefully turn it out onto the rack to cool completely. Patience is key here—a warm cake can be fragile!
Chef’s Tip
For an extra sweet touch, warm a few extra tablespoons of honey and brush it over the top of the warm cake. It creates a gorgeous, sticky glaze that seals in moisture and makes it shine.
Your Baking Timeline
- Prep Time: 15 minutes (once you’ve done it a few times, it’s even faster!)
- Cooking Time: 35 minutes
- Cooling Time: 1 hour (trust me, it’s worth the wait)
- Total Time: About 1 hour 50 minutes
- Servings: 8 generous slices
- Kcal: Approximately 320 kcal per serving
A Little Kitchen Secret
Toasting your walnuts before chopping and adding them to the batter is a game-changer. Just spread them on a baking sheet and pop them in your preheating oven for 5-7 minutes. It unlocks their oils and intensifies their flavor tenfold, making your Walnut Honey Delight truly unforgettable.
Why Honey is a Baker’s Best Friend
Honey isn’t just a sweetener; it’s a natural humectant. This means it pulls moisture from the air into your cake, keeping it deliciously soft for days. It’s nature’s perfect preservative! For more on the nutritional benefits of using natural sweeteners like honey, trusted health resources offer great insights.
Equipment You’ll Need
- Two mixing bowls (one large, one medium)
- Whisk or electric hand mixer
- Spatula
- 8-inch round or loaf cake pan
- Cooling rack
- Toothpick or cake tester
How to Store Your Masterpiece
Once completely cool, this cake stores beautifully. The honey ensures it stays moist. The best way is to wrap it tightly in plastic wrap or store it in an airtight container at room temperature.
It will be at its peak for 3-4 days. If you live in a very warm climate, you can store it in the fridge, but let it come to room temperature before serving for the best texture and flavor.
You can also freeze this cake! Wrap the whole cake or individual slices tightly in a layer of plastic wrap and then foil. It will keep for up to 3 months. Thaw overnight at room temperature when you’re ready for a treat.
My Top Tips for Success
- Use room temperature eggs. They incorporate into the batter much more easily, giving you a better rise.
- Don’t skip sifting your flour and baking powder if you have time. It makes the cake extra light.
- Let the cake cool in the pan. It continues to cook from residual heat and will hold together better.
- For a stunning presentation, sprinkle the top with a few extra walnut halves before baking.
Pretty Presentation Ideas
- Dust with a snowfall of powdered sugar just before serving.
- Serve with a dollop of lightly sweetened whipped cream or a scoop of vanilla ice cream.
- Drizzle with a simple honey glaze (mix honey with a tiny bit of warm water until pourable).
- Arrange fresh figs or pear slices on the side for an elegant touch.
Love This Recipe? Try These Variations!
Once you’ve mastered this classic, the baking world is your oyster! If you love layered desserts, you must try this stunning Red Velvet Cheesecake that’s as beautiful as it is delicious. For a citrusy burst, this easy Orange Jello Cake is a family favorite. Chocolate lovers, rejoice! This Decadent Chocolate Peanut Butter Cake is pure indulgence. And for a no-bake treat, whip up my refreshing Strawberries & Cream Frappuccino. You’ll find even more inspiration in our full collection of cake and cupcake recipes.
1. Spiced Apple Walnut Cake
Add one cup of finely chopped apples and a dash of nutmeg to the batter. The apples keep it incredibly moist and pair wonderfully with the walnuts and cinnamon.
2. Honey Lemon Glaze
Brighten it up! Make a glaze with powdered sugar, fresh lemon juice, and a teaspoon of honey. Drizzle it over the cooled cake for a tangy twist.
3. Brown Butter Version
Take your butter one step further. Cook the melted butter until it turns a nutty, amber brown, then let it cool. It adds an incredible depth of flavor.
4. Gluten-Free Walnut Honey Delight
Swap the all-purpose flour for a 1-to-1 gluten-free baking blend. The nuts and honey provide so much structure and flavor that no one will guess it’s GF.
5. Individual Honey Cakes
Bake the batter in a greased muffin tin for perfect personal-sized cakes. Reduce the baking time to about 18-22 minutes. Great for packed lunches or parties!
6. Coffee-Infused Honey Cake
Replace two tablespoons of the honey with strong brewed coffee or a shot of espresso. It enhances the nutty, caramel notes without tasting like coffee.
Common Mistakes to Avoid
Mistake 1: Using Cold Ingredients
Pulling eggs and butter straight from the fridge is a common pitfall. Cold ingredients don’t blend smoothly, which can result in a dense, greasy cake. Always plan ahead and let your eggs and butter sit on the counter for 30-60 minutes before you start. Your batter will be smoother and your cake will rise much better.
Mistake 2: Overmixing the Batter
Once you add the flour, it’s time to be gentle! Overmixing develops the gluten in the flour, leading to a tough, chewy cake instead of a tender, soft crumb. Mix only until the last streaks of flour disappear into the wet ingredients. A few small lumps are perfectly fine.
Mistake 3: Not Testing for Doneness Properly
Relying solely on the clock or the color of the top can be misleading. Ovens vary. The only surefire way to know your cake is done is to use a toothpick or a thin skewer. Insert it into the very center of the cake. It should come out clean or with a few dry crumbs attached. If it has wet batter, bake for a few more minutes and test again.
Mistake 4: Skipping the Cooling Step in the Pan
It’s so tempting to turn that hot cake out immediately! But a fresh-from-the-oven cake is very delicate. Letting it cool in the pan for 10 minutes allows it to set and firm up just enough, so it holds its shape when you transfer it to a cooling rack. This simple wait prevents a crumbly mess.
Your Walnut Honey Delight Questions, Answered
Can I use a different type of nut?
Absolutely! This recipe is very flexible. Pecans are a fantastic substitute with their buttery flavor. Almonds or hazelnuts would also work wonderfully. Just make sure to chop them to a similar size as the walnuts so they distribute evenly and bake consistently throughout the cake.
My cake is very dark on top but not cooked inside. What happened?
This usually means your oven is running too hot, or your rack is positioned too high. Ovens can be inaccurate. I highly recommend using an inexpensive oven thermometer to check the true temperature. Next time, try lowering your oven temperature by 10°C (25°F) and baking for a slightly longer time. You can also tent a piece of aluminum foil loosely over the top for the last 10-15 minutes of baking to prevent over-browning.
Can I make this cake ahead of time?
Yes, and it might even be better! The flavors of honey cakes meld and deepen overnight. Bake and cool the cake completely, then wrap it tightly in plastic wrap. Store it at room temperature for up to two days before serving. The texture becomes even more moist and cohesive, making it ideal for planning ahead for a gathering or special occasion.
What’s the best type of honey to use?
Use a honey you enjoy eating on its own! A mild, classic clover honey will give a straightforward sweetness. For a more robust flavor, try a wildflower or orange blossom honey. Avoid very strong, dark honeys like buckwheat for this cake, as they can overpower the other flavors. The quality of your honey directly influences the taste of your final cake.
Is the cinnamon necessary?
Not at all—it’s listed as optional for a reason! The cake is delicious without it. The cinnamon simply adds a warm, cozy spice note that complements the nuts and honey beautifully. If you’re not a fan, feel free to leave it out. You could also experiment with a pinch of ginger or cardamom for a different spice profile.
Can I double this recipe?
You can, but don’t just double and bake in the same pan. Double the ingredients and divide the batter between two standard 8-inch or 9-inch cake pans. You’ll need to adjust the baking time. Start checking for doneness at around 25 minutes, as two thinner cakes will bake faster than one thick one. This is a great way to make a layer cake!
Why did my cake sink in the middle?
A sunken cake is often caused by underbaking or opening the oven door too early. The cake’s structure sets during the first 20-25 minutes of baking. If you open the door before then, the rush of cold air can cause it to collapse. Ensure your oven is fully preheated and use your oven light to check on it. Only open the door to test it after the minimum baking time has passed.
How can I tell if my baking powder is still active?
This is a great question! Baking powder loses its potency over time. To test it, put a half teaspoon in a small bowl and pour a few tablespoons of hot water over it. If it fizzes and bubbles vigorously, it’s still good to use. If the reaction is weak or nonexistent, it’s time for a new box. Using fresh leavening is crucial for a good rise.
Can I make this without an electric mixer?
You sure can! I often make it by hand. Just use a sturdy whisk and a strong arm for beating the eggs and sugar. It might take a few extra minutes of whisking to get them pale and foamy, but it’s excellent exercise and very satisfying. For the rest of the steps, a spatula and a wooden spoon are all you need.
My cake is very sticky. Is that normal?
Thanks to the honey, yes, a slightly sticky top is perfectly normal and desirable! It indicates a moist cake. If it feels overly wet or gummy, it was likely underbaked. Next time, bake for a few extra minutes. The sticky texture is part of the charm of a honey-based cake and is part of what keeps it so fresh for days.
Ready, Set, Bake!
So there you have it—my go-to recipe for a cake that feels like a warm embrace. It’s simple, satisfying, and always brings a smile. The mix of crunchy walnuts and sweet honey is a classic for a reason. I hope this Walnut Honey Delight finds a special place in your kitchen and becomes a recipe you return to again and again. Now, go preheat that oven and get baking! Don’t forget to share your creation with #lovealletherecipes.
Equipment
- Grand bol
- Fouet
- Spatule
- Moule à gâteau de 8 pouces
- Papier sulfurisé
Ingredients
- 200 g farine tout usage
- 150 g sucre en poudre
- 3 œufs à température ambiante
- 150 g beurre non salé, fondu
- 100 g noix hachées
- 100 g miel de haute qualité
- 11 g poudre à lever
- 1 cuillère à café cannelle en poudre facultatif
- une pincée sel
Instructions
- Préchauffez votre four à 180°C et préparez votre moule à gâteau en le beurrant et en le farinant, en ajoutant éventuellement du papier sulfurisé.
- Dans un grand bol, battez les œufs et le sucre en poudre jusqu'à obtenir un mélange pâle et mousseux.
- Ajoutez le beurre fondu et le miel, et mélangez bien.
- Dans un autre bol, tamisez la farine, la poudre à lever, la cannelle et le sel.
- Ajoutez progressivement le mélange sec au mélange humide, en pliant délicatement jusqu'à obtenir une pâte lisse.
- Incorporez les noix hachées dans la pâte jusqu'à ce qu'elles soient bien réparties.
- Versez la pâte dans le moule préparé et lissez le dessus.
- Faites cuire pendant 30-35 minutes ou jusqu'à ce que le dessus soit doré et qu'un cure-dent inséré en ressorte propre.
- Laissez refroidir le gâteau dans le moule pendant environ 10 minutes, puis transférez-le sur une grille pour qu'il refroidisse complètement.
Notes
Nutrition
Hi there! I’m Emma Lawson, and I’m thrilled to be part of the BakingSecret.com team! Baking has been a part of my life since I was a little girl, growing up in a family that loved to bake together. From birthday cakes to cookies, I learned early on that the kitchen was a place of creativity and connection.
After studying culinary arts at The Culinary Institute of America, I fell in love with the science behind baking. Understanding how different ingredients interact and how slight adjustments can change the final product is something that continues to fascinate me. My background in pastry arts and food science has helped me develop recipes that are not only delicious but also reliable.
At BakingSecret.com, I’m excited to share recipes that cater to all levels, from beginners to seasoned bakers. My goal is to make sure that you feel confident in the kitchen and have fun with every bake. When I’m not in the kitchen, you can find me experimenting with new flavor combinations, hiking, or trying out new coffee shops in town!