
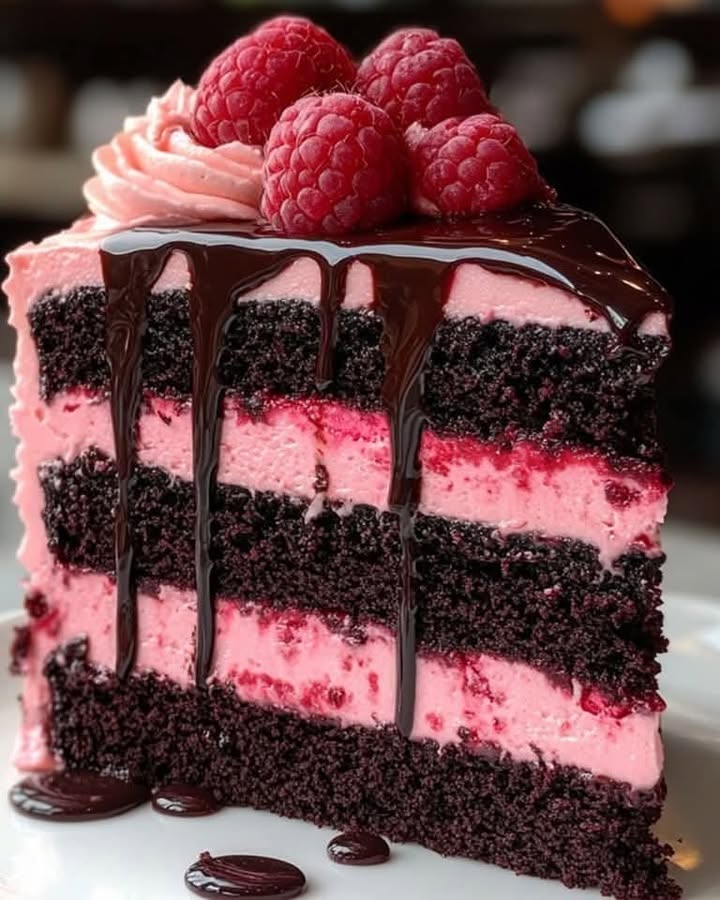
Double Layer Raspberry Truffle Cake: A Love Story in Chocolate and Berries
Let me tell you about the cake that made my nephew forget his phone exists. I’m not joking. It was his 16th birthday, and my usual vanilla sponge just wouldn’t cut it. I wanted drama. I wanted decadence. I wanted a cake that made people pause before they dug in. This Double Layer Raspberry Truffle Layer Cake was my experiment. The moment I saw the deep red raspberry filling swirl into that dark, velvety cake, I knew I had a winner. The sound of pure silence, followed by a chorus of “Oh my gosh,” is the highest compliment a home baker can get. This recipe is my edible trophy.
A Bite of History: From Grandeur to Your Kitchen
Layer cakes have always been a symbol of celebration. Think of grand European tortes or the classic American birthday cake. The combination of raspberry and chocolate, however, feels timeless. It’s like the fancy, black-tie version of a chocolate-dipped strawberry. I’ve taken that elegant idea and wrapped it in the luxurious texture of a truffle. This isn’t just frosting; it’s a smooth, rich chocolate ganache that sets like a dream. You’re not just baking a cake. You’re creating a dessert experience that feels both classic and incredibly special, perfect for marking life’s sweet moments.
Why You’ll Fall for This Raspberry Truffle Cake
This cake is a total showstopper, but the magic is in its balance. The dark chocolate cake is unbelievably moist, thanks to a little secret weapon: hot coffee. Don’t worry, it won’t taste like coffee! It just deepens the chocolate flavor. The raspberry filling is a bright, tangy jewel in the middle, cutting through the richness. And that truffle frosting? It’s like spreading pure, melted chocolate magic. It’s the kind of cake that looks like you spent days in a professional kitchen, but the steps are surprisingly straightforward. The reward is so much greater than the effort.
When to Bake This Chocolate Raspberry Delight
This cake is your secret weapon for any event that deserves a “wow.” Valentine’s Day is an obvious win—it’s the ultimate romantic dessert. But don’t save it just for love! It’s perfect for milestone birthdays, Mother’s Day brunch, or as the grand finale for a fancy dinner party. I even made a smaller version for a “just because it’s Tuesday” treat. Trust me, a Tuesday with this cake feels a lot more like a celebration. It turns an ordinary gathering into something memorable.
What You’ll Need: The Shopping List
Gather these simple ingredients to create something spectacular.
For the Cake:
- 2 cups all-purpose flour
- 1 ½ cups granulated sugar
- ¾ cup unsweetened cocoa powder
- 2 teaspoons baking powder
- 1 ½ teaspoons baking soda
- 1 teaspoon salt
- 2 large eggs, at room temperature
- 1 cup whole milk
- ½ cup vegetable oil
- 2 teaspoons vanilla extract
- 1 cup hot coffee or hot water
For the Raspberry Filling:
- 1 ½ cups fresh or frozen raspberries
- ¼ cup seedless raspberry jam
- 1 tablespoon fresh lemon juice
For the Chocolate Truffle Frosting:
- 1 cup heavy cream
- 8 oz good-quality dark chocolate, finely chopped
- ½ cup unsalted butter, softened
For Garnish:
- Fresh raspberries
- Chocolate shavings or curls
No Worries! Handy Ingredient Swaps
Don’t have something on the list? No panic. Here are easy swaps:
- Cocoa Powder: Use natural or Dutch-processed. Both work beautifully here.
- Milk: Any milk you have works—2%, almond, or oat milk are fine.
- Oil: Canola or melted coconut oil are great substitutes for vegetable oil.
- Raspberries: Frozen berries are perfect for the filling. No need to thaw.
- Dark Chocolate: Use semi-sweet chocolate chips if that’s what’s in your pantry.
Let’s Bake! Your Step-by-Step Guide to Chocolate Raspberry Heaven
Get your bowls ready and your oven preheated. Let’s make some magic.
Step 1: Bake the Perfect Chocolate Cake Layers
Start by preheating your oven to 350°F (175°C). Grease and line two 9-inch round cake pans with parchment paper. This little step is your insurance policy for perfect, un-stuck cakes. In a big bowl, sift together your flour, sugar, cocoa powder, baking powder, baking soda, and salt. Sifting is not just for show—it gets rid of lumps and makes your cake super light. Add the eggs, milk, oil, and vanilla. Beat on medium until the batter is smooth and glossy. Now, slowly pour in the hot coffee while the mixer runs. The batter will become thin and liquid. This is normal and perfect! It’s the key to an incredibly moist texture. Divide this dark, fragrant batter evenly between your pans. Bake for 30-35 minutes. You’ll know it’s done when a toothpick poked in the center comes out with just a few moist crumbs. Let them cool completely in the pans. Pro tip: Wrap the cooled cake layers in plastic wrap and pop them in the fridge for an hour. They’ll be much easier to frost!
Step 2: Cook Up the Vibrant Raspberry Filling
While the cakes cool, make your ruby-red filling. In a small saucepan, combine the raspberries, jam, and lemon juice. Cook this over medium heat. As it heats, the berries will break down and release their gorgeous juices. Stir it occasionally. Let it bubble gently for 5-7 minutes until it thickens to a lovely, spreadable jam consistency. You should be able to drag a spoon across the bottom of the pan and see a clear path for a second. Pour this into a bowl and let it cool completely. The color is spectacular—a deep, jewel-toned red that promises a burst of fruity flavor.
Step 3: Whip Up the Luxurious Truffle Frosting
This frosting is like edible silk. Chop your dark chocolate finely and place it in a heatproof bowl. Heat the heavy cream in a saucepan until it just begins to simmer—you’ll see small bubbles around the edges. Immediately pour the hot cream over the chocolate. Let it sit, untouched, for a full 3 minutes. This lets the heat gently melt the chocolate. Now, whisk it slowly from the center outwards. Watch as it transforms into a smooth, glossy chocolate ganache. Whisk in the softened butter until it’s fully blended in. The butter adds a wonderful richness and helps it set perfectly. Let this bowl sit at room temperature. Stir it every 10 minutes or so until it thickens to a spreadable, frosting-like consistency. This patience is rewarded with the richest frosting you’ll ever taste.
Step 4: Assemble Your Masterpiece
This is the fun part! Place your first cake layer on a plate or cake stand. If the dome is very high, you can slice it off to make it flat. Spread all of that beautiful, cooled raspberry filling evenly over the top, leaving a small border around the edge. Gently place the second cake layer on top, pressing down lightly. Now, take your thickened truffle frosting. Use an offset spatula or a butter knife to frost the top and sides of the cake. Don’t worry about it being perfectly smooth! A slightly rustic, swirly look is charming and lets people know it’s homemade with love.
Step 5: Decorate for Maximum Elegance
Now, for the crowning glory. Artfully arrange fresh raspberries on the top of the cake. I like to pile them in the center or scatter them around the edges. Then, take a vegetable peeler to a bar of chocolate to make delicate chocolate shavings. Sprinkle these over the top and let a few tumble down the sides. Chef’s tip: For a stunning professional touch, lightly brush the fresh raspberries with a simple apricot jelly glaze. It makes them glisten like little edible jewels.
Timing is Everything: Your Baking Schedule
Let’s map out your time so there’s no stress.
- Prep Time: 30 minutes (measuring, mixing, making the filling).
- Baking Time: 35 minutes.
- Cooling & Frosting Thickening Time: At least 1 hour (this is crucial!).
- Assembly & Decorating Time: 15 minutes.
- Total Time: About 2 hours, 20 minutes from start to gorgeous finish.
My Special Secret for the Ultimate Cake
My absolute best trick for a bakery-quality cake is simple: use a cake turntable. If you don’t have one, place your cake plate on a lazy Susan or even an upside-down bowl. Being able to spin the cake as you frost makes it infinitely easier to get beautiful, smooth sides and perfect swoops. It’s a small tool that makes a huge difference in your confidence and the final look.
A Delicious Fact About Your Ingredients
That hot coffee we add to the cake batter does a fascinating thing. The acidity helps to “bloom” the cocoa powder. This process opens up the cocoa particles, releasing its deepest, most complex chocolate flavors. So while you can’t taste the coffee, you can absolutely taste the difference it makes—a richer, more intense chocolate experience. It’s a baker’s science hack that tastes like pure magic.
Your Baking Toolkit
You don’t need fancy gear, just these basics:
- Two 9-inch round cake pans
- Parchment paper
- Mixing bowls (large and medium)
- Whisk and spatula
- Electric hand mixer or stand mixer
- Small saucepan
- Measuring cups and spoons
- Offset spatula or butter knife for frosting
- Wire cooling rack
Keeping Your Cake Fresh and Fabulous
This cake is best enjoyed the day it’s made, but it keeps wonderfully. To store it, place it in a cake carrier or under a large, inverted bowl on the counter for up to 2 days. The truffle frosting sets firmly at room temperature.
If you need to keep it longer, you can refrigerate it for up to 4 days. Be sure to let it sit out for about 30 minutes before serving. This allows the frosting to soften back to its glorious, silky texture.
You can also freeze the unfrosted cake layers for up to 3 months. Wrap them tightly in plastic wrap and then foil. Thaw in the refrigerator overnight before assembling. The assembled cake does not freeze well, as the fresh raspberry garnish will not thaw nicely.
My Top Tips for Raspberry Truffle Cake Success
- Room Temperature is Key: Ensure your eggs, milk, and butter are at room temperature before you start. This helps all the ingredients blend together smoothly for an even-textured cake.
- Don’t Over-mix: Once you add the dry ingredients, mix just until the flour disappears. Over-mixing develops gluten and can lead to a tough cake.
- Cool Completely: I know it’s tempting, but never frost a warm cake. The frosting will melt and slide right off! Patience is a baker’s best friend.
- Test for Doneness: Ovens can vary. Start checking your cakes at the 30-minute mark. The toothpick should have a few moist crumbs, not be wet with batter.
Make It Picture-Perfect
Presentation is the final flavor. Try these ideas:
- Dust the serving plate with a light sprinkling of powdered sugar or cocoa powder before placing the cake.
- Create a drip effect by warming a little extra ganache and drizzling it from the edges of the cake before adding the final decorations.
- Serve each slice with a quenelle of lightly sweetened whipped cream or a scoop of vanilla bean ice cream.
- Use edible gold leaf flakes on top of the raspberries for a truly special occasion.
Love This Cake? Try These Other Indulgent Bakes!
If this decadent combination of chocolate and fruit spoke to your soul, you absolutely must explore the world of fancy layer cakes and cupcakes on my site. It’s my favorite category for a reason! For another rich, nutty adventure, my Decadent Chocolate Peanut Butter Layer Cake is pure bliss. Craving something fruity but creamy? A Strawberries & Cream Frappuccino is your answer. For a cozy, comforting treat with wonderful texture, my simple Walnut and Honey Cake never fails. And when summer hits, nothing beats the cool, tropical vibes of my Cold Pineapple Cake.
Common Mistakes to Avoid
Steer clear of these common pitfalls for a perfect cake every time.
Mistake 1: Using Cold Ingredients
This is the number one cake-wrecker. Adding cold eggs or milk to your batter can cause it to curdle and not emulsify properly. This leads to a dense, gummy cake instead of a light and fluffy one. Always plan ahead! Take your eggs, milk, and butter out of the fridge about an hour before you start baking. They should feel cool to the touch, not cold. This simple step ensures everything blends together into a smooth, homogenous batter for the best texture.
Mistake 2: Frosting a Warm Cake
The excitement to assemble is real, but this is a disaster waiting to happen. A warm cake will melt your beautiful truffle frosting into a puddle. It will also make the cake layers crumble as you try to spread the filling. The heat creates steam, which can cause the layers to separate. Be patient. Let the cakes cool in their pans for 15 minutes, then remove them to a wire rack to cool completely. I sometimes even chill the layers in the fridge for an hour. A cool cake is a stable, frostable cake.
Mistake 3: Not Letting the Truffle Frosting Thicken
When you first make the ganache for the frosting, it will be a thin, pourable liquid. If you try to use it immediately, it will run right off the cake. You must let it cool at room temperature, stirring occasionally, until it reaches a thick, spreadable consistency, almost like softened butter. This can take 45 minutes to an hour. Rushing this step is the main reason for frosting that won’t stick. If you’re in a pinch, you can pop the bowl in the fridge for 10-minute intervals, stirring well each time, but watch it closely to avoid it getting too hard.
Mistake 4: Overbaking the Cake Layers
A dry cake is a sad cake. Overbaking happens when we rely solely on the timer and don’t use our senses. Ovens have hot spots and can be off by 25 degrees. Start checking your cakes at the 30-minute mark. The edges should be pulling away from the pan, and the top should spring back when lightly touched. The best test is the toothpick test: insert it into the center. It should come out with a few moist crumbs clinging to it, not clean and not wet with batter. A clean toothpick often means it’s overdone. Remember, the cake continues to cook a little as it cools in the pan.
A Note on Food and Your Body
Indulgent desserts like this raspberry truffle cake are meant to be enjoyed as part of a joyful, balanced life. The dark chocolate and raspberries even offer antioxidants. It’s interesting to learn how the quality of ingredients we choose can play a small role in our overall well-being. For instance, understanding how your body processes food, like how your metabolism works, can help you appreciate how to balance treats with nutrient-rich meals.
Your Raspberry Truffle Cake Questions, Answered!
Can I use frozen raspberries for the filling?
Absolutely! Frozen raspberries are a fantastic, year-round option for this filling. There’s no need to thaw them first. Just add them directly to the saucepan with the jam and lemon juice. You might need to cook the mixture for an extra minute or two to cook off any extra liquid released from the frozen berries. The taste and vibrant color will be just as wonderful as using fresh berries.
Can I make this cake ahead of time?
Yes, you can definitely get a head start. The best way is to bake the cake layers a day in advance. Let them cool completely, then wrap each layer tightly in plastic wrap. You can store them at room temperature overnight or in the fridge for up to two days. The raspberry filling can also be made a day ahead and stored covered in the fridge. Assemble and frost the cake the day you plan to serve it for the freshest taste and best texture of the frosting and fresh berry garnish.
My ganache frosting is too runny. How can I fix it?
Don’t worry, this is a common fix. If your truffle frosting is still too thin after an hour of cooling, place the bowl in the refrigerator. Check it every 10 minutes, stirring vigorously each time. It will thicken up quickly. Be very careful not to leave it in too long, or it will become too hard to spread. If it gets too firm, you can let it sit at room temperature to soften or gently re-warm it over a pan of simmering water for a few seconds, then let it cool again.
Can I use a different type of jam for the filling?
You can, but the flavor profile will change. Seedless raspberry jam reinforces the raspberry flavor perfectly. If you want to experiment, a blackberry or cherry jam would also pair beautifully with chocolate. Strawberry jam might be a bit too sweet and lack the slight tartness that balances the rich chocolate. I recommend sticking with a berry jam for the best results.
Why do I need to add hot coffee to the cake batter?
The hot coffee serves two brilliant purposes. First, it “blooms” the cocoa powder, intensifying its deep chocolate flavor. Second, the hot liquid helps to create a very thin, liquid batter. This batter bakes up into an incredibly moist and tender cake with a fine crumb. If you don’t have or want coffee, you can use an equal amount of hot water. You won’t taste the coffee, just a richer chocolate experience.
How do I get my cake layers perfectly flat for stacking?
If your cake layers have a significant dome (a rounded top), you can level them. Once the cakes are completely cool, use a long, serrated bread knife. Hold it horizontally and slowly saw back and forth, rotating the cake, to slice off the dome. This creates a flat surface so your cake stacks neatly and doesn’t wobble. You can save the scraps for a delicious chef’s treat or use them in cake pops!
Can I turn this into cupcakes?
Yes, this recipe adapts wonderfully to cupcakes! Line a muffin tin with paper liners. Fill each liner about 2/3 full with the batter. Bake at the same temperature (350°F) for 18-22 minutes, or until a toothpick comes out clean. Let them cool. To fill them, use a cupcake corer or a small knife to cut out a bit of the center. Fill the hole with the raspberry filling, then replace the cake plug. Frost with the truffle frosting and top with a single fresh raspberry. You’ll get about 24 stunning cupcakes.
Is there a way to make the frosting less rich?
If you find classic truffle frosting too intense, you can lighten it up. After your ganache has cooled to room temperature and thickened, fold in 1 cup of freshly whipped heavy cream. This creates a lighter, fluffier chocolate mousse frosting that’s still decadent but a bit airier. It’s a lovely variation that pairs well with the bold raspberry filling.
What’s the best way to chop chocolate for the frosting?
For quick, even melting, your chocolate should be chopped into small, uniform pieces. A chef’s knife on a cutting board works well. Start with chunks and use a rocking motion. You can also use a serrated bread knife, which grips the chocolate nicely. If you’re using chocolate chips, they are already a good size. Just make sure you are using good-quality chocolate chips meant for melting, as some have coatings that prevent smooth melting.
How do I get clean slices when serving the cake?
For picture-perfect, clean slices, use a sharp, thin-bladed knife. Run the knife under very hot water for 10 seconds, then wipe it completely dry with a towel. The hot knife will glide through the truffle frosting and cake layers without dragging or tearing. Clean and re-heat the knife between each slice for the neatest results.
The Final Slice
This Double Layer Raspberry Truffle Cake is more than a recipe. It’s a project of love, a centerpiece for your table, and a guaranteed memory-maker. It combines the deep comfort of chocolate with the bright joy of raspberries in a way that feels both impressive and completely approachable. So tie on your apron, preheat your oven, and get ready for the compliments. You’re about to bake something truly magical. Now, who’s ready for a slice?
Equipment
- Deux moules ronds de 9 pouces
- Papier sulfurisé
- Grand bol
- Fouet
- Spatule
Ingredients
- 2 tasses farine tout usage
- 1.5 tasses sucre
- 0.75 tasse cacao en poudre non sucré
- 2 cuil. à café poudre à lever
- 1.5 cuil. à café bicarbonate de soude
- 1 cuil. à café sel
- 2 grands œufs, à température ambiante
- 1 tasse lait entier
- 0.5 tasse huile de végétale
- 2 cuil. à café extrait de vanille
- 1 tasse café chaud ou eau chaude
Instructions
- Préchauffez le four à 175°C et graissez deux moules à gâteau ronds de 9 pouces.
- Tamisez la farine, le sucre, le cacao en poudre, la poudre à lever, le bicarbonate de soude et le sel dans un grand bol.
- Ajoutez les œufs, le lait, l'huile et la vanille ; battez à vitesse moyenne jusqu'à obtenir une consistance lisse.
- Ajoutez lentement le café chaud tout en mélangeant jusqu'à ce que le tout soit bien incorporé.
- Divisez la pâte également entre les moules préparés et faites cuire pendant 30-35 minutes, ou jusqu'à ce qu'un cure-dent en ressorte avec quelques miettes humides.
- Laissez les gâteaux refroidir complètement dans les moules. (Enveloppez dans du film plastique et réfrigérez pour faciliter le nappage.)
- Pour la garniture de framboises, faites cuire les framboises, la confiture de framboises et le jus de citron dans une casserole à feu moyen pendant 5-7 minutes jusqu'à épaississement ; laissez refroidir.
- Pour le glaçage truffe au chocolat, chauffez la crème épaisse jusqu'à frémissement, puis versez sur le chocolat haché pour faire fondre.
- Fouettez jusqu'à ce que le mélange soit lisse et incorporez le beurre ramolli ; laissez reposer à température ambiante, en remuant de temps en temps jusqu'à épaississement.
- Assemblez : placez un cercle de gâteau sur une assiette, étalez la garniture de framboise, ajoutez le deuxième cercle, et nappez avec le glaçage à la truffe.
- Décorez avec des framboises fraîches et des copeaux de chocolat.
Notes
Nutrition
Hi there! I’m Emma Lawson, and I’m thrilled to be part of the BakingSecret.com team! Baking has been a part of my life since I was a little girl, growing up in a family that loved to bake together. From birthday cakes to cookies, I learned early on that the kitchen was a place of creativity and connection.
After studying culinary arts at The Culinary Institute of America, I fell in love with the science behind baking. Understanding how different ingredients interact and how slight adjustments can change the final product is something that continues to fascinate me. My background in pastry arts and food science has helped me develop recipes that are not only delicious but also reliable.
At BakingSecret.com, I’m excited to share recipes that cater to all levels, from beginners to seasoned bakers. My goal is to make sure that you feel confident in the kitchen and have fun with every bake. When I’m not in the kitchen, you can find me experimenting with new flavor combinations, hiking, or trying out new coffee shops in town!