
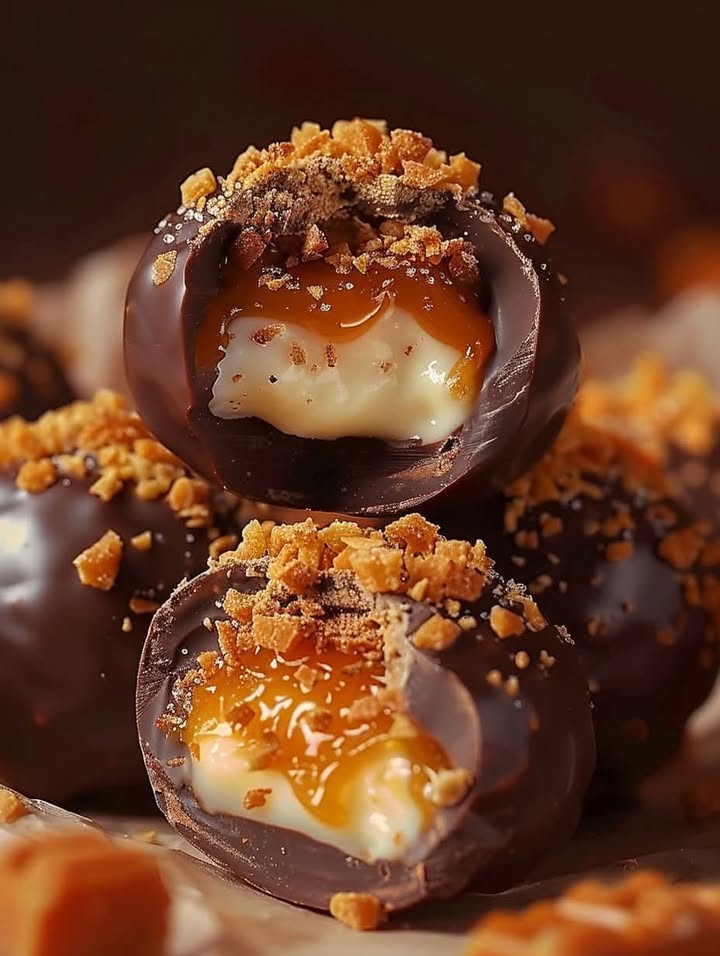
Butterfinger Chocolate Caramel Crunch Truffles: Your New Favorite Sweet Bite
You know that feeling when you’re craving something sweet, but a regular candy bar just won’t cut it? I was in that exact spot last weekend, staring into my pantry, when my eyes landed on a stash of leftover Butterfinger bars from Halloween. A lightbulb went off! What if I mashed them up with gooey caramel and dipped the whole thing in chocolate? The result was pure magic—these Butterfinger Chocolate Caramel Crunch Truffles. They disappeared from my kitchen counter so fast, I knew I had to share the recipe with you. They’re the perfect mix of crunchy, creamy, sweet, and salty, all in one no-bake bite.
The Story Behind These Irresistible Truffles
Honestly, I can’t claim some ancient family tradition here. This recipe was born from a happy kitchen accident and my deep love for Butterfingers. That unique, flaky, peanut-buttery crunch is something no other candy has! I wanted to turn that iconic flavor into a shareable treat for parties and potlucks. The caramel adds a chewy, buttery richness that holds everything together, while the pretzel and peanut topping gives that salty “pop” we all love. It’s my modern, homemade twist on a classic candy bar, perfect for when you want to impress without stress.
Why You’ll Fall in Love With This Recipe
First, they are incredibly easy. No oven, no fancy skills—just mix, roll, and dip. They’re also the ultimate crowd-pleaser. I’ve brought them to book club, soccer games, and even as a “thank you” gift for neighbors. Every single time, people beg for the recipe. The combination of textures is just unreal: a crisp chocolate shell, a soft caramel center, and that signature Butterfinger crunch. Plus, they look so fancy on a platter, but we’ll know our little secret—they took hardly any work at all!
When to Whip Up a Batch of Butterfinger Truffles
These truffles are your secret weapon for so many occasions! They’re ideal for holiday cookie swaps, birthday parties, or a fun after-school treat. I love setting out a plate during a movie night—they’re way better than store-bought popcorn candy. They also make wonderful homemade gifts. Just pop a few in a cute box or mason jar, and you’ve got a present that says, “I think you’re awesome.” Any time you need a guaranteed hit, these are your go-to.
What You’ll Need: Butterfinger Truffle Ingredients
Gather these simple ingredients. The beauty is in how they come together!
- 1 cup crushed Butterfinger candy bars
- 1/2 cup caramel sauce (the kind you use for ice cream)
- 2 cups milk chocolate chips
- 1/4 cup heavy cream
- 1/4 cup crushed pretzels
- 1/4 cup chopped peanuts
Easy Ingredient Swaps (No Stress!)
Don’t have every single item? No problem! Cooking should be fun, not a strict science.
- Butterfingers: Any similar crunchy peanut butter candy bar will work in a pinch.
- Caramel Sauce: You can use dulce de leche or even a very thick homemade caramel.
- Milk Chocolate Chips: Dark or semi-sweet chocolate are delicious, richer alternatives.
- Heavy Cream: A good full-fat coconut milk can be used for a dairy-free ganache.
- Toppings: Swap pretzels and peanuts for sea salt, toffee bits, or even more crushed Butterfinger!
Making Your Butterfinger Caramel Truffles: A Step-by-Step Guide
Let’s get our hands a little messy and make some joy! Clear off a bit of counter space and let’s begin.
Step 1: Create the Truffle Center
This is the fun, hands-on part. Start by placing your crushed Butterfinger pieces in a medium mixing bowl. Pour the rich, golden caramel sauce over the top. Use a sturdy spoon or spatula to mix it all together. You’ll see the mixture start to clump and hold its shape. It should look like a sticky, crumbly, irresistible dough. If it seems too dry to stick together, add another tablespoon of caramel. Pro tip: If the caramel is very thick, warm it for 10 seconds in the microwave to make mixing easier.
Step 2: Shape and Freeze
Now, use your hands or a small cookie scoop to roll the mixture into small, even balls, about the size of a cherry tomato. The warmth of your hands helps them form nicely. Line a baking sheet or plate with parchment paper (this is a must for easy removal!) and place each ball on it. Once they’re all rolled, slide the tray into the freezer for a solid 30 minutes. This chilling step is crucial—it firms up the centers so they won’t fall apart when you dip them in the warm chocolate later.
Step 3: Make the Chocolate Coating
While the centers chill, let’s make the silky chocolate ganache. In a microwave-safe bowl, combine the milk chocolate chips and heavy cream. The cream is what makes this a “ganache”—smooth, glossy, and perfect for dipping. Microwave on high for 30 seconds, then stop and stir well. Repeat this process in 15-20 second bursts, stirring in between, until the mixture is completely smooth and no lumps remain. Be patient! Burning chocolate is easy, but stirring gently will give you a velvety, perfect coating.
Step 4: The Big Dip!
Take your truffle centers out of the freezer. Using a fork or a special dipping tool, lower one frozen ball into the bowl of melted chocolate. Swirl it around gently until it’s completely coated. Lift it out, let the excess chocolate drip off for a second, and then place it back on the parchment paper. Work with one truffle at a time. You’ll love watching them transform from pale beige balls into glossy, chocolate-drenched gems.
Step 5: Add the Crunchy Topping
Here’s where the magic happens! You have to work quickly because the chocolate sets fast. Immediately after placing a dipped truffle on the sheet, sprinkle a pinch of the crushed pretzels and chopped peanuts right on top. The salty pretzel and nut pieces will stick to the soft chocolate. Do this for every truffle before moving on to dip the next one. This step gives that amazing texture and a beautiful, homemade look.
Step 6: Chill and Set
Once all your truffles are dipped and decorated, move the entire tray to the refrigerator. Let them chill for at least 1 hour. This allows the chocolate shell to harden completely and the center to firm up perfectly. The waiting is the hardest part, I know! But it’s worth it for that satisfying snap when you bite into one.
Chef’s Tip for Perfect Butterfinger Truffles
For a super professional look and to keep your hands clean, use two forks to dip the truffles. Place the frozen ball on one fork, lower it into the chocolate, and use the second fork to help roll it and then lift it out, letting the excess chocolate drip through the tines.
Timing Your Truffle Creation
Active prep time is just about 20 minutes of fun. The freezing and chilling times are mostly hands-off, so you can tidy up or start another project. From start to finish, you’re looking at about 1 hour and 50 minutes, with the majority of that time being the truffles happily setting in the fridge. This recipe makes about 12 generous truffles, but you can easily double it for a bigger crowd.
A Little Extra Fun Fact
The word “truffle” originally comes from the fancy, expensive mushroom because of their similar lumpy shape. Our sweet version is much more fun to hunt for in the fridge! The method of coating a creamy center in chocolate became popular in Europe long before we started using our favorite American candy bars inside. I think that’s a delicious tradition worth continuing.
Kitchen Tools You’ll Need
Medium mixing bowl
Baking sheet or tray
Parchment paper
Microwave-safe bowl
Fork or dipping tools
Measuring cups and spoons
Storing Your Homemade Truffles
Once fully set, these truffles store beautifully. The best way to keep them is in a single layer in an airtight container. Place a piece of parchment paper between layers if you need to stack them to prevent sticking. Pop the container in the refrigerator.
They will stay fresh and delicious for up to one week in the fridge. The cool temperature keeps the chocolate firm and the center perfect. If you want to keep them longer, they freeze wonderfully for up to 2 months.
To serve after freezing, just let them thaw in the refrigerator for a few hours. I don’t recommend leaving them out on the counter for long periods, as the chocolate can get soft and the caramel center may become too gooey.
Pro Tips for Truffle Success
- Use a food processor to quickly crush your Butterfingers and pretzels. Just pulse a few times—you want small pieces, not dust.
- If your chocolate ganache gets too thick while you’re dipping, you can gently re-warm it for 5-10 seconds in the microwave.
- For a drizzled finish, save a little of the melted chocolate, let it cool slightly, then use a spoon to drizzle pretty lines over the finished, topped truffles.
Presenting Your Masterpiece
Presentation is half the fun! Place them in petite paper candy cups for a classic look. Arrange them on a beautiful platter with some extra crushed Butterfinger sprinkled around. For a gift, pack them in a small gift box lined with tissue paper. You could even skewer them with lollipop sticks before dipping to make Butterfinger truffle pops!
Love No-Bake Treats? Try These Next!
If you’re a fan of easy, no-oven-required desserts, you are my kind of person! Our Butterfinger Truffles are just the beginning. For another amazing peanut butter and chocolate combo, you have to try our dreamy Reese’s Peanut Butter Roll Cake. It’s a showstopper! When you need a refreshing drink to serve with your sweets, our Festive Non-Alcoholic Sangria is a crowd favorite. And if you’re in a colorful baking mood, our dazzling Rainbow Cheesecake or the zesty Lemon Strawberry Cheesecake are perfect weekend projects. Don’t forget to check out our entire collection of easy no-bake recipes for more inspiration without turning on the oven.
Common Mistakes to Avoid
Mistake 1: Skipping the Freezing Step
It’s so tempting to skip ahead and dip the truffle centers right after rolling them. Don’t do it! The caramel-Butterfinger mixture is soft at room temperature. If you try to dip it, the centers will likely fall apart or melt into your beautiful chocolate coating. Freezing them solid for a full 30 minutes creates a firm base that holds its shape. Set a timer and be patient—this step makes the whole dipping process smooth and mess-free.
Mistake 2: Overheating the Chocolate
We’ve all been there—zapping the chocolate in the microwave for too long, hoping it will melt faster. Overheated chocolate can become grainy, clumpy, and seize up, making it impossible to dip. Always use short bursts of heat (30 seconds, then 15-second intervals) and stir vigorously in between. The residual heat from the bowl will often finish melting the chips. Your goal is a smooth, glossy, and fluid consistency, not a hot, scorched mess.
Mistake 3: Using Runny Caramel Sauce
The thickness of your caramel sauce is key. If you use a thin, syrupy sauce, your truffle mixture will be too wet and sticky to roll into neat balls. It might also leak out after dipping. Look for a thick, ice-cream-topping-style caramel in the jar. If yours seems thin, you can simmer it in a small saucepan for a few minutes to thicken it up and concentrate the flavor before mixing it with the candy.
Mistake 4: Letting Toppings Slide Off
The crunchy topping is what gives these their name! If you sprinkle the pretzels and peanuts on after the chocolate has already started to set, they won’t stick. You must sprinkle immediately after placing each dipped truffle on the parchment paper. The chocolate should still look wet and shiny. This ensures every bite has that perfect sweet and salty crunch.
Frequently Asked Questions
Can I use dark chocolate instead of milk chocolate?
Absolutely! Dark chocolate is a fantastic choice for these truffles. It provides a richer, less sweet flavor that contrasts beautifully with the sweet caramel and Butterfinger center. Just be sure to use the same method—combine the dark chocolate chips with the heavy cream and melt slowly. The ganache might be slightly thicker, so you can add an extra teaspoon of cream if needed to get a good dipping consistency.
How far in advance can I make these truffles?
These truffles are a great make-ahead treat. You can prepare them fully and store them in the refrigerator for up to one week before serving. They also freeze beautifully for up to two months. Just make sure they are in an airtight container to prevent them from absorbing any odors from the freezer. Thaw them overnight in the fridge before serving.
My mixture is too sticky to roll. What should I do?
If your Butterfinger-caramel mixture is too sticky, it likely needs more of the dry component or less of the wet. You can try adding another tablespoon or two of finely crushed Butterfinger or even some crushed pretzels to absorb the extra moisture. Also, chilling the mixture in the fridge for 15 minutes before rolling can make it much easier to handle. If all else fails, lightly dampen your hands with water to prevent sticking while you roll.
Can I make these without peanuts for an allergy?
Yes, you can adapt this recipe. While Butterfinger bars do contain peanuts, you could try using a peanut-free, crunchy toffee-style candy bar as a substitute for a similar texture. For the topping, simply omit the chopped peanuts and use only crushed pretzels, or use another allergy-friendly topping like sunflower seeds or extra candy pieces. Always check candy labels carefully for allergen information.
Why did my chocolate coating crack after chilling?
Chocolate cracking usually happens when there’s a big temperature difference between the frozen center and the warm coating. The center expands as it comes to temp, stressing the hard shell. To avoid this, let your dipped truffles set at cool room temperature for 10-15 minutes before moving them to the fridge. This allows everything to adjust more gradually. Also, ensure your coating isn’t too thin.
What’s the best way to crush the Butterfingers and pretzels?
The easiest method is to use a food processor. Pulse them a few times until you get small, even pieces. No food processor? No problem. Place the candy bars and pretzels in a sturdy zip-top bag, seal it tightly, and use a rolling pin or the bottom of a heavy pot to crush them. It’s a great way to work out a little frustration!
Can I use white chocolate for the coating?
You can, but white chocolate can be a bit trickier to work with because it melts at a different temperature and is more prone to seizing. If you use it, be extra gentle with the heat. You might also consider using a “coating” or “dipping” white chocolate which is formulated to set harder. The flavor combo of white chocolate, caramel, and peanut butter is actually divine!
Are these truffles very sweet?
They are a decadent, sweet treat—there’s no denying it! The combination of candy, caramel, and chocolate packs a sugary punch. However, the salt from the pretzels and peanuts and the slight bitterness if you use dark chocolate help balance that sweetness beautifully. Enjoying them with a cup of coffee or a glass of milk is the perfect pairing. Remember, thinking about food balance means enjoying treats like these as part of an overall healthy pattern of eating.
How do I get a really smooth, professional-looking chocolate shell?
The secret is in the dip and the drip. Use two forks to roll the truffle in the chocolate, then lift it and gently tap the fork on the edge of the bowl to let the excess chocolate drip off. The less excess chocolate, the smoother the finish. Also, make sure your chocolate ganache is perfectly smooth and at the right temperature—not too hot, not too cool.
Can I use homemade caramel sauce?
Homemade caramel sauce is a wonderful idea! It will give your truffles a fantastic, rich, buttery flavor. Just make sure your caramel is thick enough once it has cooled. If it’s too runny, it won’t bind the candy crumbs properly. Let it cool and thicken completely before mixing it with the crushed Butterfingers.
I hope you have as much fun making and sharing these Butterfinger Chocolate Caramel Crunch Truffles as I do. They’re proof that the most beloved treats often come from simple ideas and a little kitchen creativity. So grab those candy bars, get your kids or friends to help with the rolling, and prepare for the compliments to roll in. Happy cooking!
Equipment
- Bol mélangeur
- Plaque à pâtisserie
- Papier sulfurisé
- Bol adapté au micro-ondes
- Fourchette ou outils de trempage
Ingredients
- 1 tasse barres de bonbon Butterfinger écrasées
- 1/2 tasse sauce caramel pour glaces
- 2 tasses pépites de chocolat au lait
- 1/4 tasse crème épaisse
- 1/4 tasse prézel écrasés
- 1/4 tasse cacahuètes hachées
Instructions
- Placez les morceaux écrasés de Butterfinger dans un bol moyen et versez la sauce caramel par-dessus. Mélangez jusqu'à ce que ce soit homogène.
- Roulez le mélange en petites boules, de la taille d'une tomate cerise, et placez-les sur une plaque à pâtisserie recouverte de papier sulfurisé.
- Faites congeler les truffes pendant 30 minutes pour les raffermir.
- Dans un bol adapté au micro-ondes, combinez les pépites de chocolat au lait et la crème épaisse. Faites chauffer jusqu'à ce que le tout soit lisse, en remuant fréquemment.
- Trempez chaque truffe congelée dans le ganache au chocolat, en laissant l'excédent de chocolat s'égoutter, puis remettez-les sur le papier sulfurisé.
- Immédiatement, saupoudrez des prézel écrasés et des cacahuètes hachées sur le dessus de chaque truffe.
- Réfrigérez les truffes pendant au moins 1 heure pour laisser le chocolat durcir.