
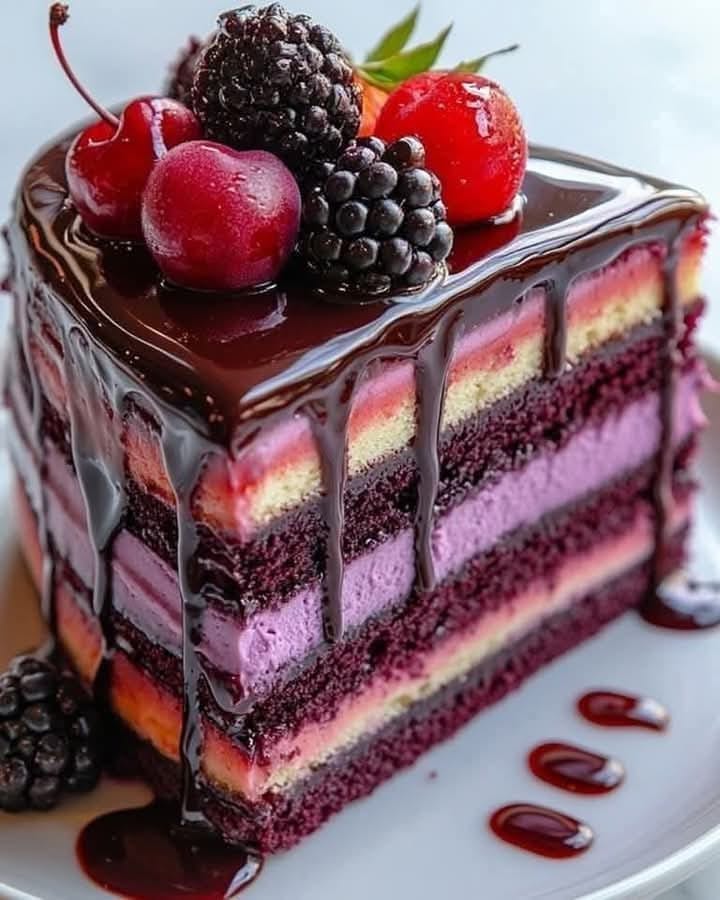
Why the Cherry-Blackberry Symphony Cake is My Go-To Celebration Dessert
Let’s be honest. Sometimes, a cake is just a cake. But then, there are those magical creations that feel like a hug for your taste buds. This Cherry-Blackberry Symphony cake is exactly that. It’s the kind of dessert that makes people stop mid-conversation, fork in hand, and just sigh with happiness. I first made it for my best friend’s summer birthday, and the look on her face—pure, unadulterated joy—told me this recipe was a keeper. It’s a stunning layer cake bursting with sweet-tart berry filling and the subtle, amazing flavor of cherry. It looks fancy but follows a simple, classic method.
A Little Slice of Tradition, Reimagined
Combining cherries and blackberries isn’t exactly new. Think of the classic deep-dish pies from the American Midwest, where summer’s bounty gets baked into a juicy, bubbling masterpiece. My grandmother always made a simple berry buckle with whatever fruits were ripe. This cake is my homage to that tradition, but dressed up for a party. It takes that familiar, comforting fruit pairing and layers it into a tender, moist cake worthy of a centerpiece. It’s classic Americana with a modern, elegant twist.
You’ll Fall in Love With This Cherry Blackberry Delight
You will adore this cake for so many reasons. First, the flavor harmony. The sweet, almost floral cherry cake and frosting balance perfectly with the bright, slightly earthy blackberry filling. It’s a symphony, indeed! Second, it’s incredibly moist, thanks to the buttermilk and fruit purees. No dry cake here! Finally, it’s versatile. While it’s perfect for celebrations, I’ve been known to make a simpler version as a sheet cake for a casual family BBQ. It’s a crowd-pleaser through and through.
When to Whip Up This Berry Bliss Cake
This cake screams celebration! It’s perfect for birthdays, Mother’s Day brunches, Fourth of July parties, or a fancy dinner with friends. I love bringing it to potlucks because it’s always the star of the dessert table. But my favorite occasion? Just because. Sometimes, a Tuesday needs a little extra sweetness, and this cake delivers it beautifully.
Ingredients for Your Cherry-Blackberry Symphony
For the Cake:
- 2 1/2 cups all-purpose flour
- 2 teaspoons baking powder
- 1/2 teaspoon baking soda
- 1/2 teaspoon salt
- 1 cup unsalted butter, softened
- 1 3/4 cups granulated sugar
- 4 large eggs
- 1 teaspoon vanilla extract
- 1/2 teaspoon almond extract (trust me on this!)
- 1 cup buttermilk
- 1/2 cup cherry puree*
For the Blackberry Filling:
- 2 cups fresh blackberries
- 1/4 cup granulated sugar
- 2 tablespoons lemon juice
- 2 tablespoons cornstarch mixed with 2 tablespoons water
For the Cherry Frosting:
- 1 cup unsalted butter, softened
- 4 cups powdered sugar
- 1/3 cup cherry puree
- 1 teaspoon vanilla extract
- Pinch of salt
For Garnish:
- 1/2 cup fresh cherries, pitted and halved
- 1/2 cup fresh blackberries
*Pro Tip: To make cherry puree, simply pit and blend about 1 1/2 cups of fresh or frozen cherries until smooth. You can strain it for a smoother puree, but I like a bit of texture.
Ingredient Swaps for Your Perfect Cake
Don’t fret if you’re missing something! Here are easy swaps:
- Buttermilk: No buttermilk? Make your own! Mix 1 cup of milk with 1 tablespoon of white vinegar or lemon juice. Let it sit for 5 minutes until it curdles. Good to go!
- Fresh Berries: Frozen berries work wonderfully for both the filling and puree. Just thaw and drain any excess liquid before using.
- Almond Extract: If you’re not a fan, just use an extra 1/2 teaspoon of vanilla extract.
- Cake Flour: For an even more tender crumb, you can replace the all-purpose flour with 2 1/2 cups of cake flour.
Baking Your Masterpiece: Step-by-Step
Step 1: Prep and Preheat
First things first! Get your oven heating to a nice 350°F (175°C). This gives it time to reach the perfect temperature. Now, grab your three 8-inch round pans. Grease them generously with butter or baking spray, then dust with a light coating of flour. Tap out the excess. This little ritual is your insurance policy for cakes that pop right out cleanly. Set them aside and let’s get mixing.
Step 2: Whisk the Dry Team
In a medium bowl, whisk together your flour, baking powder, baking soda, and salt. Whisking by hand does two great things. It combines everything evenly, and it aerates the flour a bit. This helps create a lighter cake texture. See those little clouds of flour? That’s what you want! Set this bowl aside for its grand entrance later.
Step 3: Cream the Butter and Sugar
This is the heart of a fluffy cake. In a large bowl, beat the softened butter and granulated sugar together. Use an electric mixer if you have one. Beat for a good 3-5 minutes, until the mixture is pale, light, and fluffy. It should look almost like a creamy frosting. Now, add your eggs one at a time. Mix well after each egg is fully incorporated. Then, stir in the vanilla and that wonderful almond extract. The smell already is fantastic!
Step 4: Combine Wet and Dry
Time to bring the team together. With your mixer on low speed, add about one-third of your flour mixture to the butter bowl. Mix just until it disappears. Now, pour in half of the buttermilk. Mix again. Repeat with another third of flour, the rest of the buttermilk, and finally, the last of the flour. Stop mixing as soon as the last streaks of flour vanish. Now, gently fold in the gorgeous pink cherry puree until you have a beautifully speckled, rosy batter.
Step 5: Bake to Golden Perfection
Divide that beautiful batter evenly among your three prepared pans. A kitchen scale is perfect for this, but eyeballing it works too. Smooth the tops with a spatula. Slide them into your preheated oven. Bake for 25-30 minutes. You’ll know they’re done when the tops are springy to the touch and a toothpick poked in the center comes out clean. Let the cakes cool in their pans for exactly 10 minutes. Then, run a knife around the edges and flip them onto a wire rack to cool completely. Patience is key here!
Step 6: Craft the Blackberry Filling
While the cakes cool, let’s make the filling. In a saucepan, combine the blackberries, sugar, and lemon juice. Cook over medium heat, mashing the berries gently with a spoon. You’ll love watching them release their deep, purple juices. Once bubbly and broken down, give your cornstarch-water slurry a quick stir and pour it in. Cook for 2-3 more minutes, stirring constantly, until the filling thickens into a glossy, jam-like consistency. Pour it into a bowl and let it cool completely. It will thicken more as it sits.
Step 7: Whip Up the Cherry Frosting
For the fluffy pink frosting, beat the softened butter in a clean bowl until it’s creamy and smooth. Gradually add the powdered sugar, about a cup at a time, alternating with spoonfuls of the cherry puree. This prevents a sugar dust storm! Once all is added, beat for another 2-3 minutes until it’s super light and fluffy. Stir in the vanilla and a tiny pinch of salt. The salt is a secret weapon—it makes all the flavors pop!
Step 8: Assemble Your Symphony
The fun part! Place your first cake layer on a plate or cake stand. Spread half of the cooled blackberry filling evenly over the top, leaving a small border to prevent squishing. Place the second layer on top and repeat with the remaining filling. Top with the final cake layer. Now, frost the entire cake with a thin “crumb coat” first. This seals in any crumbs. Chill for 15 minutes, then apply your final, beautiful layer of cherry frosting. Use a spatula or bench scraper to get those lovely smooth sides.
Step 9: The Grand Finale Garnish
For a stunning, professional finish, artfully arrange the fresh cherry halves and blackberries on top of the cake. I like to cluster them in one corner or make a ring around the edge. This cake is a true showstopper. The deep purples and reds against the soft pink frosting are simply gorgeous. It’s almost too pretty to cut… almost!
Timing Your Baking Session
Prep Time: 30 minutes (active time)
Baking Time: 30 minutes
Cooling Time: 1 hour (crucial!)
Total Time: About 2 hours from start to finish.
Chef’s Secret for the Ultimate Cherry Blackberry Delight
Here’s my little secret for intense flavor: reduce your cherry puree. After blending the cherries, simmer the puree in a small saucepan for 5-10 minutes until it reduces by about a quarter. Let it cool before using. This cooks off extra water and concentrates the cherry flavor like crazy. Your cake and frosting will taste profoundly of real cherries, not just sugar and color.
A Berry Interesting Fact
Did you know blackberries aren’t actually berries in the botanical sense? They’re an “aggregate fruit,” meaning each little juicy bead is its own tiny fruit with a seed! Cherries, on the other hand, are “drupes” with a single hard pit. Combining these two unique fruits creates a wonderfully complex texture and flavor profile in every bite of this cake.
Your Baking Toolbox
You don’t need fancy gear, but these help:
- Three 8-inch round cake pans
- Electric hand mixer or stand mixer
- Medium and large mixing bowls
- Whisk and spatulas
- Toothpick or cake tester
- Wire cooling racks
- Saucepan for the filling
Storing Your Fruit Layer Cake
Because of the fresh fruit filling and frosting, this cake is best stored in the refrigerator. Cover it with a cake dome or loosely with plastic wrap. It will stay fresh and delicious for up to 3 days. The flavors actually meld and become even better on the second day!
You can also store individual slices in airtight containers in the fridge. This makes for a fantastic ready-to-go treat. I sometimes pack a slice in my husband’s lunch for a sweet surprise.
For longer storage, you can freeze the unfrosted cake layers. Wrap each cooled layer tightly in two layers of plastic wrap and one layer of foil. Freeze for up to 2 months. Thaw overnight in the fridge before assembling and frosting.
Pro Tips for Baking Success
- Room Temperature is Key: Your butter, eggs, and buttermilk should be at room temperature. This helps them emulsify better, creating a smoother, higher-rising batter.
- Don’t Overmix: Once you add the flour, mix only until combined. Overmixing develops gluten and leads to a tough, dense cake.
- Cool Completely: I know it’s tempting, but never frost a warm cake. The frosting will melt and slide right off. Let those layers cool fully on a wire rack.
- Filling Barrier: To prevent the juicy blackberry filling from making the cake soggy, you can pipe a thin dam of frosting around the edge of each cake layer before adding the filling.
Presentation Ideas to Wow Your Guests
- Dust the top with a light snowfall of powdered sugar for a simple, elegant look.
- Add a drizzle of melted dark chocolate over the fresh berries for a decadent touch.
- Serve each slice with a small dollop of lightly sweetened whipped cream on the side.
- For a rustic look, skip the smooth frosting and use a spatula to create dramatic swirls and peaks all over the cake.
6 Ways to Play With This Cake Recipe
Love this concept? Try these delicious twists on the Cherry Blackberry Delight!
- Lemon Blueberry Twist: Swap the cherry puree for lemon juice and zest in the cake. Use a blueberry filling and a lemon cream cheese frosting. Bright and zingy!
- Chocolate-Raspberry Rhapsody: Add 1/2 cup of cocoa powder to the dry ingredients for a chocolate cake. Use raspberry puree and a raspberry-chocolate ganache filling. Pure luxury.
- Peach-Melba Symphony: Use a peach puree in the cake and a raspberry filling. Garnish with fresh peach slices and raspberries. A classic combo reimagined.
- Spiced Autumn Version: Add 1 tsp of cinnamon and 1/2 tsp of nutmeg to the cake batter. Use an apple butter filling and a brown sugar cinnamon buttercream. Perfect for fall.
- Coconut Dream Cake: Replace the buttermilk with coconut milk. Add 1 cup of toasted shredded coconut to the batter. Use a mango or passion fruit filling and a coconut cream frosting.
- Funfetti Celebration Cake: Omit the cherry puree from the cake batter and use an extra 1/2 cup of buttermilk. Fold in 1/2 cup of rainbow sprinkles before baking. Use a vanilla buttercream and the blackberry filling for a fun, colorful surprise inside.
If you’re looking for another decadent, fruit-forward dessert, you must try the stunning Chocolate Lemon Mousse Domes for an elegant, tangy treat. And for lovers of rich chocolate, our Classic Moist Chocolate Cake is a timeless winner. When you need a no-fuss dessert, this colorful No-Bake Funfetti Oreo Icebox Cake is a lifesaver. And for the ultimate indulgence, this Decadent Chocolate Peanut Butter Layer Cake is pure heaven.
Common Mistakes to Avoid
Mistake 1: Using Cold Ingredients
This is the number one reason cakes turn out dense. Cold butter doesn’t cream well with sugar, and cold eggs or buttermilk can cause the batter to curdle. It also makes your batter too cold, which affects how it rises in the oven. How to avoid it: Take your butter, eggs, and buttermilk out of the fridge at least 30-60 minutes before you start baking. Your butter should be soft enough that your finger leaves a clear indent, but not melted.
Mistake 2: Overmixing the Batter After Adding Flour
As soon as flour meets liquid and is agitated, gluten starts to form. Gluten is great for bread, but it makes cakes tough and chewy. Overmixing is a surefire way to activate too much gluten. How to avoid it: When you add the dry ingredients and buttermilk, mix on the lowest speed just until the flour disappears. A few tiny lumps are better than a overworked batter. Use a spatula to finish folding gently.
Mistake 3: Adding Warm Filling to the Cake Layers
That beautiful blackberry filling needs to be completely cool. If it’s even slightly warm, it will turn your fluffy cake layers into a soggy, sliding mess. The heat and moisture will break down the cake’s crumb. How to avoid it: Make the filling right after the cakes go in the oven. Spread it out in a shallow dish to help it cool faster on the counter. You can even pop it in the fridge for 15-20 minutes before assembling. Patience pays off!
Mistake 4: Skimping on Greasing the Pans
There’s nothing sadder than a beautiful cake that sticks and tears when you try to remove it. A quick swipe of butter isn’t always enough, especially for a moist, fruity cake like this one. How to avoid it: Use a baking spray that includes flour, or do the classic “grease and flour” method. Grease the pan thoroughly with butter or oil, then add a tablespoon of flour. Shake and tap the pan until the entire surface is coated, then dump out the excess. It creates a perfect non-stick barrier.
Frequently Asked Questions
Can I use frozen cherries and blackberries?
Absolutely! Frozen fruit is a fantastic, year-round option. For the puree, just thaw the cherries completely and blend them. No need to cook them first unless you want to reduce the puree for more flavor. For the blackberry filling, you can use frozen berries directly in the saucepan. You might need to add an extra minute or two of cooking time to thicken the filling since frozen berries release more water. Just be sure to let the filling cool completely before using it.
How do I make sure my cake layers are flat and even?
There are two great tricks for flat layers. First, use a kitchen scale to divide your batter. This is the most accurate method. Second, you can “cake strips.” These are fabric strips you soak in water and wrap around the outside of the cake pan. They insulate the edges, so the cake bakes more evenly, reducing doming. If you do get a slight dome, just use a long serrated knife to carefully slice off the rounded top once the cakes are completely cool. Save those scraps for a chef’s snack!
My frosting is too runny. What happened?
A runny frosting usually has two causes: butter that’s too soft or warm, or too much liquid from the cherry puree. To fix it, pop the whole bowl of frosting into the refrigerator for 20-30 minutes to firm up the butter. Then re-whip it. If it’s still too soft, you can gradually add a bit more powdered sugar, a quarter cup at a time, until it reaches a spreadable consistency. Next time, if your cherry puree is very watery, consider straining it or reducing it in a pan to thicken it slightly before adding it to the frosting.
Can I make this cake ahead of time?
Yes, you can! This cake is great for making ahead. You have a few options. You can bake the cake layers up to two days in advance. Let them cool completely, then wrap each layer tightly in plastic wrap and store at room temperature. You can also make the blackberry filling 2-3 days ahead and store it covered in the fridge. The frosting can be made 1-2 days ahead and stored in an airtight container in the fridge. Just let it come to room temperature and re-whip it before using. Assemble the cake the day you plan to serve it for the freshest look and texture.
What can I use instead of almond extract?
If you’re not a fan of almond extract or have an allergy, you have several easy alternatives. The simplest is to just replace it with an additional 1/2 teaspoon of pure vanilla extract. You could also use 1/4 teaspoon of lemon extract for a brighter note, which pairs beautifully with the berries. A tiny drop of amaretto or another liqueur could work too, but be aware it will contain almond flavoring. The cake will still be delicious without it!
Is there a way to make this less sweet?
You can slightly reduce the sugar, but be careful as sugar affects texture and moisture. I’d suggest reducing the sugar in the cake by 1/4 cup maximum. For the frosting, you can reduce the powdered sugar by 1/2 to 1 cup, but know that the frosting will be softer and less stable. The best way to balance sweetness is to ensure your fruit is tart. Using tart cherries and less ripe blackberries helps. Also, that pinch of salt in the frosting is crucial—it cuts the sweetness and enhances all the other flavors.
How do I get a super smooth frosting finish?
A smooth finish starts with a “crumb coat.” Apply a very thin layer of frosting all over the assembled cake. Don’t worry about crumbs getting in it—that’s the point! Chill the cake for 15-20 minutes until that thin coat is firm. This traps all the crumbs. Then, apply your final, thick layer of frosting. Use an offset spatula or a bench scraper, dip it in hot water, wipe it dry, and then gently smooth the frosting. The warm tool helps create a magically smooth surface.
Can I turn this into cupcakes?
Definitely! This batter makes wonderful cupcakes. Line your muffin tins and fill each cup about 2/3 full. Bake at 350°F for 18-22 minutes, or until a toothpick comes out clean. For the filling, you can core the center of each cooled cupcake and pipe in a little of the blackberry filling. Then, top with the cherry frosting and a fresh berry. You’ll get about 24-28 delicious cupcakes perfect for parties.
Why did my cake sink in the middle?
A sinking cake usually points to leavening or mixing issues. First, check that your baking powder and soda are fresh (they lose potency after 6 months). Second, you might have underbaked the cake. The center might look set but still be raw batter inside. Always use the toothpick test. Third, avoid opening the oven door frequently during the first 20 minutes of baking. The sudden temperature drop can cause a fragile cake structure to collapse. Bake until it’s truly done.
Are the fruit enzymes a problem for the cake structure?
It’s a smart question! Fresh fruits contain natural enzymes and acids. In large quantities, they can sometimes interfere with setting, but in this recipe, the amounts are balanced. The acidity in the fruit puree actually works well with the baking soda, helping the cake rise. For more on how natural digestive enzymes in food work, it’s fascinating science. In baking, we manage it with proper chemical leaveners (baking powder/soda) and baking time, which deactivates the enzymes. So, no need to worry here—just follow the recipe!
I hope you feel inspired to explore more amazing layer cakes and find your next favorite in our full collection of cake and cupcake recipes. There’s always a new flavor combination waiting to be discovered!
Ready to Create Your Own Symphony?
Baking this Cherry-Blackberry Symphony cake is more than just following a recipe. It’s about creating a moment of joy, a beautiful centerpiece, and a memory shared over a slice of something truly special. The combination of tender cherry cake, tangy blackberry swirl, and fluffy pink frosting is a guaranteed hit. It might look like it came from a fancy bakery, but I promise, you can absolutely make this at home. So, tie on your apron, preheat that oven, and get ready for the compliments to roll in. Your family and friends are going to ask for this recipe again and again. Happy baking!
Equipment
- Grand bol
- Fouet
- Spatule
- Plaque à pâtisserie
- Papier sulfurisé
Ingredients
- 4 œufs
- 350 g sucre
- 30 g farine tout usage
- 15 g poudre à lever
- 1 g sel
- 240 ml lait ribot
- 150 ml purée de cerises
- 300 ml fruits frais (cerises et mûres)
Instructions
- Préchauffez votre four à 175°C. Graissez et farinez trois moules ronds de 20 cm.
- Dans un bol moyen, mélangez la farine, la poudre à lever, le bicarbonate de soude et le sel.
- Dans un grand bol, créez le mélange beurre-sucre jusqu'à obtenir un mélange léger et mousseux de 3 à 5 minutes.
- Ajoutez les œufs un par un, en mélangeant bien après chaque ajout, puis incorporez les extraits de vanille et d'amande.
- Ajoutez progressivement les ingrédients secs et le lait ribot, mélangez jusqu'à ce que ce soit juste combiné. Incorporez délicatement la purée de cerises.
- Divisez la pâte également entre les moules préparés et faites cuire pendant 25-30 minutes ou jusqu'à ce qu'un cure-dent en ressorte propre.
- Laissez les gâteaux refroidir pendant 10 minutes dans les moules avant de les transférer sur une grille pour qu'ils refroidissent complètement.
- Pour la garniture aux mûres, combinez les mûres, le sucre et le jus de citron dans une casserole, faites cuire à feu moyen tout en écrasant les baies. Incorporez le mélange de maïzena et d'eau et faites cuire jusqu'à épaississement.
- Pour le glaçage à la cerise, battez le beurre ramolli jusqu'à ce qu'il soit crémeux, puis ajoutez progressivement le sucre glace et la purée de cerises, en mélangeant jusqu'à obtenir une texture légère et aérée.
- Pour assembler, étalez la moitié de la garniture aux mûres entre les deux premiers niveaux, appliquez un glaçage léger pour sceller les miettes avant de glacer entièrement le gâteau.
- Garnir de cerises et de mûres fraîches sur le dessus.