
Why This Cheesecake Is a Must-Try
There’s something magical about the first bite of a perfectly balanced dessert. I remember the first time I made this Cherry Chocolate Delight. It was for my best friend’s birthday, and she’s the kind of person who claims to “not really like sweets.” Well, one forkful of this creamy, chocolatey masterpiece topped with juicy cherries, and she was hooked! The combination of rich chocolate, tangy cream cheese, and sweet-tart cherries is pure bliss. If you’re looking for a dessert that feels indulgent yet isn’t overly complicated, this recipe is your golden ticket.
A Little History Behind the Magic
Cheesecakes have been around for centuries, dating back to ancient Greece. Back then, they were more like dense cakes without all the creamy goodness we know today. Fast forward to modern times, and cheesecakes have evolved into a versatile canvas for creativity. Adding chocolate and cherries? That’s a match made in dessert heaven. This version combines classic flavors with a twist, making it a standout at any gathering. I love how it bridges tradition and innovation—just like me trying to teach my kids the art of baking!
Why You’ll Fall in Love With This Recipe
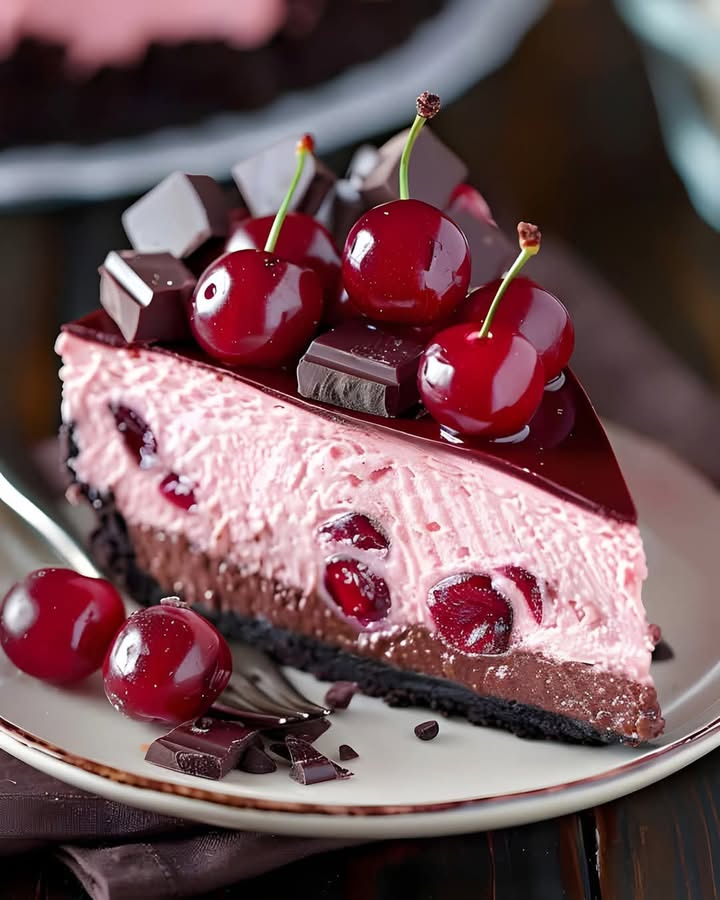
This Cherry Chocolate Delight is rich but not overwhelming, creamy yet firm enough to slice neatly. The crust adds a satisfying crunch, while the melted chocolate folded into the filling creates a velvety texture. And let’s not forget the cherry topping—it’s the cherry on top, literally! Plus, it’s surprisingly simple to make. No fancy techniques or hard-to-find ingredients here. Just good, old-fashioned baking with a touch of flair.
Perfect Occasions for This Dessert
Whether it’s a holiday dinner, a summer barbecue, or just because it’s Tuesday, this cheesecake fits the bill. It’s perfect for birthdays, anniversaries, or even as a treat to impress your book club. I once brought it to a potluck, and it disappeared faster than I could say “cheesecake.” Trust me, people will be asking for seconds—and the recipe!
What You’ll Need
- For the Crust:
- 2 cups chocolate cookie crumbs
- 1/3 cup unsalted butter, melted
- For the Filling:
- 24 oz cream cheese, softened
- 1 cup granulated sugar
- 1 cup sour cream
- 4 large eggs
- 1 tsp vanilla extract
- 1 cup semi-sweet chocolate chips, melted and slightly cooled
- For the Topping:
- 1 (21 oz) can cherry pie filling
- Optional: Fresh cherries or chocolate shavings for garnish
Substitution Options
If you’re out of certain ingredients or want to switch things up, here are some ideas:
- Swap chocolate cookie crumbs for graham cracker crumbs if you prefer a lighter crust.
- Use dark chocolate chips instead of semi-sweet for a deeper flavor.
- Replace cherry pie filling with raspberry or strawberry for a different fruity twist.
- For a dairy-free option, try vegan cream cheese and coconut oil-based butter.
Step 1: Prepare the Crust
Start by preheating your oven to 325°F (160°C). In a mixing bowl, combine the chocolate cookie crumbs with melted butter until the mixture resembles wet sand. Press it firmly into the bottom of a 9-inch springform pan. Make sure it’s evenly distributed—this will be the sturdy base for your cheesecake. Bake it for 10 minutes, then let it cool while you work on the filling. Pro tip: Use the bottom of a glass to press the crust down for a smooth finish.
Step 2: Make the Filling
In a large bowl, beat the softened cream cheese and sugar together until smooth and creamy. Add the sour cream and vanilla extract, blending until fully incorporated. Next, crack in the eggs one at a time, mixing gently after each addition to avoid over-beating. Finally, fold in the melted chocolate. The batter should be glossy and decadent, with swirls of chocolate running through it. Pro tip: Let the melted chocolate cool slightly before adding it to prevent curdling.
Step 3: Bake the Cheesecake
Pour the luscious filling over the prepared crust, smoothing the top with a spatula. Pop it into the oven and bake for 50-60 minutes. The center should be set but still slightly jiggly—it will firm up as it cools. Once done, turn off the oven, crack the door open, and let the cheesecake cool slowly inside. This helps prevent cracks, which can happen if it cools too quickly. Chef’s tip: Run a knife around the edges of the pan once it’s cool to keep it from sticking.
Step 4: Add the Cherry Topping
When the cheesecake has completely cooled, spread the cherry pie filling evenly over the top. The vibrant red cherries against the dark chocolate filling look stunning. If you’re feeling fancy, garnish with fresh cherries or chocolate shavings. Pro tip: Chill the cheesecake for at least 4 hours or overnight for the best texture.
Timing Breakdown
- Prep Time: 20 minutes
- Cooking Time: 60 minutes
- Resting/Cooling Time: 4 hours (or overnight)
- Total Time: Approximately 5 hours
Chef’s Secret
To ensure your cheesecake doesn’t crack, always let it cool gradually in the oven with the door slightly ajar. Another trick? Place a shallow pan of water on the lower rack while baking. The steam helps create a moist environment, keeping the cheesecake silky smooth.
Fun Fact About Cherries and Chocolate
Did you know that cherries and chocolate are often paired because their flavors complement each other so well? The tartness of cherries balances the richness of chocolate, creating a harmonious taste experience. It’s no wonder this combo has stood the test of time!
Necessary Equipment
You’ll need a few basic tools to whip up this beauty:
- 9-inch springform pan
- Mixing bowls
- Electric mixer or stand mixer
- Spatula
- Oven
- Measuring cups and spoons
Storage Tips
Once your Cherry Chocolate Delight is ready, store it in the refrigerator. Cover it tightly with plastic wrap or transfer it to an airtight container to keep it fresh. It can last up to 5 days if stored properly. For longer storage, freeze slices wrapped individually in parchment paper and placed in a freezer-safe bag. They’ll stay good for up to 2 months. Thaw frozen slices in the fridge overnight before serving.
If you’re transporting the cheesecake, keep it chilled in a cooler with ice packs. Avoid stacking heavy items on top to prevent squishing the delicate layers. And remember, leftovers—if there are any—are perfect for breakfast. Don’t judge; we’ve all been there!
Tips and Advice
Here are a few extra pointers to nail this recipe:
- Make sure your cream cheese is truly softened to room temperature for a lump-free filling.
- Don’t skip the step of cooling the cheesecake in the oven—it makes a huge difference.
- For a homemade cherry topping, simmer fresh cherries with sugar and cornstarch for a fresher taste.
Presentation Ideas
Impress your guests by serving slices on pretty dessert plates with a dollop of whipped cream. Sprinkle some cocoa powder or grated chocolate over the top for added elegance. Or go rustic by presenting the whole cheesecake on a wooden board surrounded by fresh cherries and mint leaves. A drizzle of chocolate sauce never hurts either!
Healthier Alternatives
If you’re looking to lighten up this dessert, here are six variations to consider:
- Low-Sugar Version: Use a sugar substitute like stevia or monk fruit in place of granulated sugar.
- Vegan Option: Swap cream cheese for cashew-based cream cheese and use coconut cream instead of sour cream.
- Gluten-Free Crust: Use gluten-free cookies or almond flour for the crust.
- Reduced-Fat Filling: Opt for low-fat cream cheese and Greek yogurt instead of sour cream.
- Fresh Fruit Topping: Replace canned cherry filling with fresh berries tossed in honey.
- Dairy-Free Chocolate: Choose dairy-free chocolate chips for the filling.
Mistake 1: Overmixing the Batter
Overmixing can incorporate too much air into the batter, causing cracks during baking. To avoid this, mix just until the ingredients are combined. Practical tip: Stop mixing as soon as you see no streaks of cream cheese or chocolate left.
Mistake 2: Skipping the Water Bath
A water bath helps maintain even heat and prevents cracking. If you don’t want to fuss with one, at least place a pan of water on the lower rack. Practical tip: Wrap the outside of the springform pan in foil to protect against leaks if using a water bath.
Mistake 3: Rushing the Cooling Process
Taking the cheesecake straight from the oven to the counter can cause cracks due to rapid temperature changes. Always cool it gradually. Practical tip: Leave the cheesecake in the turned-off oven with the door cracked for an hour.
Frequently Asked Questions
Can I use fresh cherries instead of canned?
Absolutely! Simmer pitted fresh cherries with a bit of sugar and cornstarch to thicken the juices. Let it cool before spreading it over the cheesecake.
How do I prevent my crust from getting soggy?
Bake the crust for 10 minutes before adding the filling. This sets it and prevents sogginess. You can also brush a thin layer of melted chocolate on the crust to create a barrier.
Can I freeze this cheesecake?
Yes! Wrap individual slices in parchment paper and freeze them in a sealed container. They’ll stay fresh for up to two months.
What’s the best way to cut cheesecake cleanly?
Dip your knife in hot water, wipe it dry, and then slice. Repeat between cuts for clean lines every time.
Can I make this ahead of time?
Definitely. This cheesecake actually tastes better the next day, making it ideal for advance prep.
Why did my cheesecake crack?
Cracks usually happen due to overmixing, uneven cooling, or baking at too high a temperature. Follow the steps carefully to minimize risks.
Is it okay to use milk chocolate instead of semi-sweet?
Yes, but note that milk chocolate will make the filling sweeter and less intense in flavor.
Can I add alcohol to the filling?
Of course! A splash of liqueur like Kahlúa or Amaretto pairs beautifully with the chocolate and cherries.
How do I know when the cheesecake is done?
The edges should be set, but the center should still jiggle slightly. It will continue to firm up as it cools.
What size pan works best?
A 9-inch springform pan is ideal. Using a smaller pan may result in overflow during baking.
Final Thoughts
This Cherry Chocolate Delight is more than just a dessert—it’s an experience. From the crunchy crust to the creamy filling and the burst of cherry goodness on top, every bite is a celebration. Whether you’re baking for loved ones or treating yourself, this cheesecake promises to deliver joy in every slice. So grab your apron, gather your ingredients, and get ready to wow everyone with this decadent delight!
Equipment
- Mixing bowls
- Electric mixer or stand mixer
- Spatula
- 9-inch springform pan
- Oven
Ingredients
- 2 cups chocolate cookie crumbs
- 1/3 cup unsalted butter, melted
- 24 oz cream cheese, softened
- 1 cup granulated sugar
- 1 cup sour cream
- 4 large eggs
- 1 tsp vanilla extract
- 1 cup semi-sweet chocolate chips, melted and slightly cooled
- 1 can (21 oz) cherry pie filling
- optional Fresh cherries or chocolate shavings for garnish
Instructions
- Preheat your oven to 325°F (160°C).
- Combine chocolate cookie crumbs with melted butter in a mixing bowl until resembling wet sand.
- Press the mixture firmly into the bottom of a 9-inch springform pan and bake for 10 minutes.
- In a large bowl, beat softened cream cheese and sugar until smooth and creamy.
- Add sour cream and vanilla extract, blending until incorporated.
- Crack in the eggs one at a time, mixing gently after each addition.
- Fold in the melted chocolate until the batter is glossy with swirls of chocolate.
- Pour the filling over the prepared crust and smooth the top with a spatula.
- Bake for 50-60 minutes, until the center is set but still slightly jiggly.
- Turn off the oven, crack the door, and let the cheesecake cool slowly inside.
- Once cooled, spread cherry pie filling over the top and garnish if desired.
- Chill the cheesecake for at least 4 hours or overnight for best texture.