
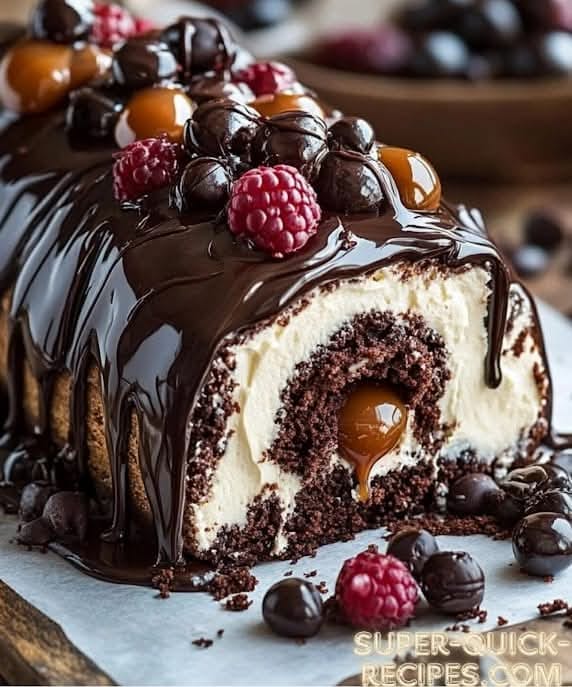
A Sweet Roll of Chocolate Dreams
Have you ever wanted a dessert that looks fancy but secretly comes together with a smile? This Chocolate Caramel Roll is that magic trick. It’s my go-to showstopper for family gatherings. The story goes that my niece called it a “chocolate log from a fairy forest.” I loved that name. It has rich chocolate cake, a dreamy caramel cream, and a shiny chocolate blanket on top. Every slice gets oohs and aahs. And the best part? It’s a fun project that fills your kitchen with the most wonderful smells.
The Story Behind the Swirl
The classic roll cake, or roulade, has been charming bakers for ages. It’s a timeless way to show off a beautiful spiral of filling. My version takes that traditional elegance and throws in a party. I swapped the usual whipped cream for a caramel and cherry-studded mascarpone mix. It’s like a modern take on a black forest cake, all rolled up! The deep cocoa flavor balances perfectly with the sweet-salty caramel. It feels both classic and brand new, making it perfect for today’s sweet tooth.
Why This Chocolate Caramel Roll Steals the Show
You will adore this recipe for so many reasons. First, the textures are a celebration. You get soft cake, creamy filling, and crisp cherries all in one bite. Second, it’s a fantastic make-ahead dessert. You can prepare it hours before your guests arrive. Third, it’s incredibly versatile. Not a cherry fan? Swap in toasted nuts. It’s a forgiving recipe that welcomes your personal touch. Finally, it just tastes incredible. It’s a rich, satisfying dessert that never fails to impress.
When to Make This Decadent Dessert
This roll cake is perfect for turning ordinary days into celebrations. Here are some ideal times to bake it:
- Holiday Dinners: It’s a festive centerpiece for Thanksgiving or Christmas.
- Birthday Parties: A unique and beautiful alternative to a layer cake.
- Potlucks and Picnics: It travels well and serves neatly.
- Just Because: Sometimes a Tuesday needs a slice of chocolate caramel joy.
Gathering Your Ingredients
Here’s everything you’ll need to create this chocolate caramel masterpiece. Measure with love!
For the Chocolate Cake:
- 1/2 cup all-purpose flour
- 1/3 cup unsweetened cocoa powder
- 1/2 teaspoon baking powder
- 1/4 teaspoon salt
- 3 large eggs
- 1/2 cup granulated sugar
- 1/2 teaspoon vanilla extract
For the Caramel Cream Filling:
- 1/2 cup heavy cream
- 1/2 cup caramel sauce
- 1/2 cup mascarpone cheese or cream cheese
- 1 tablespoon powdered sugar
- 1/2 cup chopped cherries (fresh or well-drained maraschino cherries)
For the Chocolate Ganache:
- 1/2 cup heavy cream
- 4 ounces semisweet chocolate, chopped
For Decoration:
- Extra cherries (fresh or maraschino)
- Optional: powdered sugar for dusting
Ingredient Swaps and Substitutions
No need to run to the store! You can easily adapt this recipe with what you have.
- Cocoa Powder: Use natural or Dutch-processed cocoa. Both work beautifully here.
- Mascarpone/Cream Cheese: Full-fat is best for stability, but you can use a lower-fat version if needed.
- Cherries: Use fresh pitted cherries, well-drained jarred cherries, or even dried cherries soaked in a little brandy.
- Caramel Sauce: A good-quality store-bought sauce saves time, or use your favorite homemade recipe.
- Semisweet Chocolate: Feel free to use dark chocolate chips or a chopped chocolate bar.
Crafting Your Chocolate Caramel Roll Step by Step
Follow these steps for a flawless, stunning roll cake. Take your time and enjoy the process!
Step 1: Preheat and Prepare
Start by heating your oven to 375°F (190°C). This is your first key to success. Grab a jelly roll pan or a rimmed baking sheet. Line it with parchment paper, letting the paper hang over the sides a bit. This “sling” will be your best friend later for lifting the cake out. A well-prepared pan means your delicate cake won’t stick. It makes the whole process so much smoother.
Step 2: Mix the Dry Ingredients
In a medium bowl, whisk together the flour, cocoa powder, baking powder, and salt. Whisking does two important things. It combines everything evenly. It also aerates the flour, which helps create a lighter cake. You’ll see the mix turn into a lovely, uniform brown powder. Set this bowl aside for now. Pro tip: Sift these ingredients if your cocoa tends to be lumpy for an extra-fine texture.
Step 3: Beat the Eggs and Sugar
Now, take your eggs and granulated sugar. Put them in a large bowl. Use an electric mixer to beat them. Beat until the mixture becomes thick, pale, and leaves a ribbon trail when you lift the beaters. This can take 3-5 minutes. Don’t rush it! This step builds the cake’s structure. Then, mix in the vanilla extract. The vanilla scent mixing with the eggy sweetness is a little preview of the goodness to come.
Step 4: Combine and Bake
Time to bring it all together. Gently fold the dry cocoa mixture into the fluffy egg mixture. Use a spatula and a light hand. You want to combine them without deflating all those precious air bubbles. Stop as soon as no dry streaks remain. The batter will be gloriously glossy and pourable. Pour it into your prepared pan. Spread it into an even layer with the spatula. Bake for 10-12 minutes. The cake is done when the top springs back lightly to the touch.
Step 5: Roll the Warm Cake
This is the most important step for a crack-free roll. Have a clean kitchen towel laid out. Dust it lightly with powdered sugar. As soon as the cake comes out of the oven, flip it onto the sugared towel. Carefully peel off the parchment paper. Starting at a short end, use the towel to guide you as you roll the cake up. Roll it snugly with the towel inside. Let this rolled bundle cool completely on a rack. This “trains” the cake to keep its rolled shape.
Step 6: Whip Up the Caramel Cream Filling
While the cake cools, make the dreamy filling. Pour the heavy cream into a chilled bowl. Whip it until soft peaks form. In another bowl, stir the caramel sauce, mascarpone, and powdered sugar together until smooth and creamy. Now, gently fold the whipped cream into the caramel mix. Finally, fold in those beautiful chopped cherries. The filling should be light, spreadable, and speckled with red. Chef’s tip: Chill the bowl and beaters before whipping cream. It whips faster and higher!
Step 7: Fill and Re-Roll the Cake
Unroll the cooled cake very carefully. It will be flexible and soft. You’ll see a lovely spiral pattern from the first roll. Spread the caramel cream filling evenly over the entire surface, leaving a small border at the edges. Now, roll the cake back up, this time without the towel inside. Guide it gently with your hands. Place the finished roll seam-side down on your serving plate. Take a deep breath and admire your beautiful spiral.
Step 8: Create the Silky Chocolate Ganache
This is the elegant finishing touch. Chop your chocolate finely and place it in a heatproof bowl. Heat the heavy cream in a small saucepan until you see small bubbles around the edges—it should be steaming but not boiling. Pour the hot cream over the chopped chocolate. Let it sit, untouched, for one full minute. This melts the chocolate gently. Then, stir slowly from the center out until you have a smooth, shiny, irresistible glaze.
Step 9: Glaze, Decorate, and Chill
Pour the warm ganache over the center of your cake roll. Use a spatula to nudge it gently over the sides, letting it drip down naturally. Don’t worry about perfection—the drips are part of the charm. While the ganache is still soft, place whole cherries along the top. Optionally, give it a final dusting of powdered sugar for a snowy effect. Refrigerate the cake for at least an hour. This sets the ganache and makes slicing clean and easy.
Your Chocolate Caramel Roll Timeline
Planning is key for a stress-free baking experience. Here’s a handy breakdown of the time needed.
- Prep Time: 30 minutes
- Baking Time: 12 minutes
- Cooling Time: 1 hour
- Chilling Time: 1 hour (minimum)
- Total Time: About 2 hours and 45 minutes
Remember, most of the “total time” is hands-off cooling and chilling. This makes it a great “do-ahead” dessert!
A Baker’s Secret for the Perfect Roll
My absolute best trick is to roll the cake while it’s still warm. I know it feels scary the first time. But a warm cake is flexible and pliable. It’s much more likely to roll without cracking. The dusting of powdered sugar on the towel prevents sticking. Trust the process! This one step is the difference between a cracked cake and a gorgeous, swirly masterpiece.
A Little Cherry on Top: Fun Fact
Did you know cherries and chocolate are a classic pair for a scientific reason? Our taste buds detect five basic flavors: sweet, salty, sour, bitter, and umami. Dark chocolate brings bitter and sweet notes. Cherries add a bright sourness. Together, they create a complex and satisfying flavor profile that feels complete and utterly delicious. It’s a match made in culinary heaven!
Essential Tools for the Job
You don’t need fancy equipment, but these tools will help a lot:
- Jelly roll pan (10×15 inches) or rimmed baking sheet
- Parchment paper
- Electric hand mixer or stand mixer
- Clean kitchen towel (not terry cloth)
- Spatulas (one rubber, one offset if you have it)
- Heatproof bowls and saucepans
Storing Your Masterpiece
To keep your Chocolate Caramel Roll tasting fresh, proper storage is key. Cover the cake loosely with plastic wrap or place it in a cake carrier. Store it in the refrigerator. The cool temperature keeps the filling stable and the ganache set. It will stay delicious for up to 3 days.
Can you freeze it? Absolutely! Wrap the whole roll (or individual slices) tightly in plastic wrap, then in foil. Freeze for up to one month. Thaw it overnight in the fridge before serving. The texture holds up surprisingly well.
For serving, always use a sharp, thin-bladed knife. Dip the knife in hot water and wipe it dry between each slice. This gives you those perfect, clean cuts that showcase all the beautiful layers.
Helpful Tips for Success
- Room temperature eggs whip up higher and create more volume than cold eggs.
- Don’t overbake the cake! Overbaking makes it dry and more prone to cracking.
- If your cake does develop a small crack, don’t panic. The ganache will cover it perfectly.
- Let the ganache cool slightly before pouring. If it’s too hot, it can melt the filling.
Making It Look Fabulous
Presentation is the final flourish. Here are some easy ideas:
- Add a sprinkle of flaky sea salt over the ganache for a trendy sweet-salty vibe.
- Use a variety of cherries—dark red, bright red, even Rainier cherries—for a colorful top.
- Serve each slice on a pool of extra caramel sauce or a dollop of whipped cream.
- Garnish the plate with a few fresh mint leaves for a pop of green.
Six Scrumptious Variations to Try
Love this roll cake format? Here are six delicious twists to explore.
- Peanut Butter Cup Roll: Swap the caramel filling for a mix of peanut butter and whipped cream. Top the ganache with chopped peanut butter cups.
- Pumpkin Spice Roll: Add pumpkin pie spice to the cake batter. Fill with a cinnamon-spiced cream cheese frosting. Perfect for fall!
- Berry Lemonade Roll: Use a vanilla cake base. Fill with lemon curd lightened with whipped cream and fresh raspberries or blueberries.
- Mocha Espresso Roll: Add a tablespoon of instant espresso powder to the cake batter. Fill with a coffee-infused whipped cream.
- Turtle Candy Roll: Fill with a caramel-pecan cream. Decorate the ganache-covered roll with more caramel, pecans, and a few sea salt flakes.
- Cookies & Cream Roll: Fold crushed Oreo cookies into a simple vanilla whipped cream filling. Decorate the roll with more cookie crumbs.
If you love creative, fruity desserts, you must try our Zesty Lemon Meringue Pie Cannolis. They’re a sunny, bright counterpart to this rich chocolate treat. For another amazing caramel creation, our Easy Banana Caramel Peanut Butter Cheesecake is always a crowd-pleaser. If cupcakes are more your style, these Delightful Raspberry Cheesecake Cupcakes are a gorgeous individual option. And for pure, no-bake indulgence, this No-Bake Ferrero Rocher Cheesecake is simply sublime.
Common Mistakes to Avoid
Steer clear of these common pitfalls for a perfect roll every time.
Mistake 1: Overbaking the Cake
Overbaking is the top reason cakes crack when rolling. A dry cake has lost its flexibility. It becomes brittle and will split as you try to bend it. To avoid this, set a timer and check a minute early. The cake is done when the top feels set and springs back lightly. A toothpick should come out with a few moist crumbs, not completely clean. Remember, it will continue to cook a little from residual heat after coming out of the oven.
Mistake 2: Letting the Cake Cool Before the First Roll
It’s tempting to let the cake cool in the pan, but don’t! You must roll it while it’s still warm and pliable. This is the secret to a memory that holds the shape. Rolling it warm “trains” the sponge. If you wait, the cake will cool, set, and become stiff. Trying to roll a cold cake is a recipe for a major crack. Have your sugared towel ready the moment the cake comes out of the oven.
Mistake 3: Overfilling the Roll
More filling isn’t always better. If you pile on too much caramel cream, it will squish out the ends when you roll. It can also cause the cake to bulge and split. Use a moderate, even layer of filling. Leave about a half-inch border around all edges. This gives the filling room to spread slightly when you roll, without creating a mess. A neat, contained spiral looks much more elegant.
Mistake 4: Using a Cold Filling on a Warm Cake
Patience is key. Make sure your cake roll is completely cool before you unroll it to add the filling. If the cake is even slightly warm, it will melt the creamy filling. This makes a soggy cake and a runny, hard-to-handle mess. Let the rolled cake cool on a wire rack to room temperature. You can even chill it for a bit. A cool cake and a cool filling are the perfect partners.
Frequently Asked Questions
Can I make this Chocolate Caramel Roll a day ahead?
Absolutely! In fact, I highly recommend it. Assembling the cake a day ahead allows all the flavors to meld beautifully. The cake also becomes moister as it sits. Just be sure to store it covered in the refrigerator. Take it out about 20-30 minutes before serving to let the chill come off slightly. This makes slicing easier and lets the flavors shine. It’s the ultimate make-ahead dessert for stress-free entertaining.
My cake cracked when I rolled it. Did I ruin it?
Not at all! Don’t despair. Small cracks are common and completely fixable. Once you’ve filled and re-rolled the cake, just position the final roll so the crack is on the bottom, against the plate. The ganache will cover any imperfections on the top and sides. Even if a little crack shows, it adds homemade charm. Remember, taste is what matters most, and a cracked cake tastes just as delicious.
Can I use a different fruit besides cherries?
Yes, you can customize this easily. Raspberries, chopped strawberries, or even drained canned mandarin oranges work wonderfully. If using berries, pat them dry very well. You can also skip fruit altogether and add toasted pecans or chopped toffee bits to the filling for a different crunch. The caramel cream is a versatile base. Feel free to get creative with your favorite add-ins.
Why is my ganache too runny or too thick?
Ganache consistency depends on the ratio of cream to chocolate and its temperature. For a pourable glaze like we want, a 1:2 cream-to-chocolate ratio by weight is standard. If it’s too runny, let it cool at room temperature, stirring occasionally, until it thickens slightly. If it’s too thick, you can gently reheat it for a few seconds or add a tiny splash more warm cream. The perfect glaze should coat the back of a spoon and flow slowly.
What’s the best way to slice a roll cake cleanly?
A sharp, thin-bladed knife is your best tool. For the cleanest slices, run the knife under very hot water. Wipe it completely dry with a towel. Make your cut in one confident, gentle sawing motion. The heat helps the knife glide through the ganache and filling without dragging. Wipe the blade clean and reheat it between each slice. This gives you those picture-perfect portions with neat layers.
Can I freeze the assembled cake roll?
You can, but with one important note. Freeze the cake before adding the ganache topping. Wrap the unfrosted roll very tightly in plastic wrap, then in foil. Freeze for up to a month. Thaw overnight in the fridge. Then, make your ganache fresh and pour it over the thawed cake. This ensures your glaze stays shiny and doesn’t “sweat” or become cloudy from freezing and thawing.
Is there a dairy-free alternative for the filling?
You can definitely make adaptations. For the caramel cream, use a high-fat coconut cream, chilled and whipped, instead of dairy heavy cream. Look for a dairy-free caramel sauce and use a plant-based cream cheese alternative. The cake itself is naturally dairy-free! For the ganache, use a full-fat coconut cream and dairy-free chocolate chips. It will have a slight coconut flavor, but it will be delicious.
Can I bake this in a different pan?
A standard jelly roll pan (10×15 inches) is ideal. It creates the perfect thin layer for rolling. If you only have a 9×13 inch pan, the cake will be thicker and may need 2-3 extra minutes of baking. Be extra careful rolling a thicker cake, as it’s more likely to crack. A larger sheet pan will make a thinner, larger cake that bakes faster. Watch it closely to avoid over-baking.
How do I prevent the towel from sticking to the cake?
The powdered sugar dusting on the towel is your non-stick magic. Be generous with it! Use a clean, lint-free kitchen towel (flour sack towels are perfect). Avoid terry cloth towels, as their loops can stick to the cake’s surface. The sugar creates a barrier. When you unroll the cooled cake, it should release easily. If it sticks a little, gently peel it back, using the towel to help separate.
What’s the purpose of the baking powder in the cake?
Baking powder gives the cake a little lift and a lighter, more spongy texture. This sponginess is crucial for flexibility. The eggs provide most of the structure, but the baking powder ensures the cake isn’t too dense. A dense cake is hard to roll. The small amount called for helps create the perfect tender-yet-strong crumb that can handle being rolled without falling apart.
The Final Slice
This Chocolate Caramel Roll is more than just a dessert. It’s a baking adventure with a delicious reward at the end. It combines the joy of chocolate, the comfort of caramel, and the fun of cherries in one stunning package. Don’t be intimidated by the rolling step. Embrace it! The process is part of the fun. When you bring this cake to the table, you’ll see the smiles. You’ll hear the compliments. And you’ll know it was worth every minute. For more decadent baking projects like this, explore our entire collection of cake and cupcake recipes. Happy baking!
Remember, using quality ingredients can make a real difference in flavor and nutrition. For a great overview of how the foods we eat impact our well-being, you can learn more about the basics of nutrition from trusted sources.
Equipment
- Grand bol
- Fouet
- Spatule
- Plaque à pâtisserie
- Papier sulfurisé
Ingredients
- 3 œufs
- 100 g sucre
- 30 g cacao en poudre
- 65 g farine tout usage
- 5 g poudre à lever
- 1 g sel
- 240 ml crème épaisse
- 120 ml sauce caramel
- 90 g pépites de chocolat
- q.s. sucre glace pour saupoudrer
- q.s. cacao en poudre pour saupoudrer
- q.s. sauce caramel pour le décor
Instructions
- Préchauffez votre four à 190°C. Graissez une plaque à pâtisserie de 10x15 pouces et tapissez-la de papier sulfurisé.
- Dans un grand bol, battez les œufs et le sucre jusqu'à ce que le mélange soit épais et pâle. Tamisez le cacao en poudre, la farine, la poudre à lever et le sel. Incorporez délicatement jusqu'à obtenir une pâte lisse.
- Versez la pâte dans le moule préparé et étalez-la uniformément. Faites cuire au four pendant 10-12 minutes ou jusqu'à ce que le gâteau rebondisse au toucher.
- Une fois cuite, retournez le gâteau sur un torchon saupoudré de sucre glace. Retirez soigneusement le papier sulfurisé et roulez le gâteau avec le torchon à l'intérieur. Laissez refroidir complètement.
- Dans un bol, battez la crème épaisse jusqu'à obtenir des pics souples. Dans un autre bol, mélangez la sauce caramel, le mascarpone et le sucre glace jusqu'à consistance lisse, puis incorporez délicatement la crème fouettée et les cerises hachées.
- Déroulez le gâteau refroidi et étalez la garniture de crème caramel uniformément, puis roulez à nouveau le gâteau sans le torchon, en plaçant le côté de la couture vers le bas sur une assiette de service.
- Pour le ganache, chauffez la crème épaisse jusqu'à ce qu'elle soit fumante, versez-la sur le chocolat haché et remuez jusqu'à obtenir un mélange lisse.
- Versez le ganache sur le rouleau de gâteau, en laissant égoutter sur les côtés. Décorez avec des cerises et saupoudrez éventuellement de sucre glace. Réfrigérez pendant au moins une heure avant de servir.