
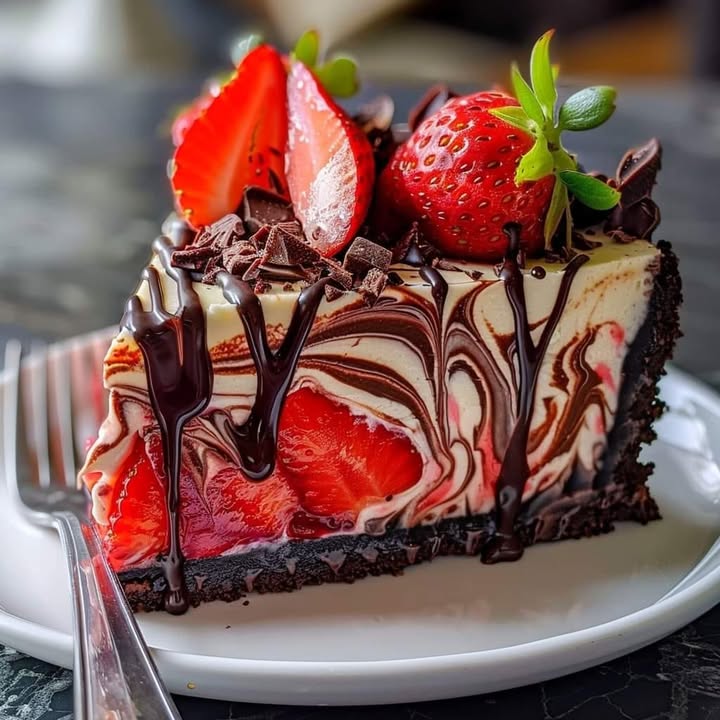
Is there anything more beautiful than slicing into a decadent cheesecake and finding a hidden ribbon of chocolate and a burst of fresh strawberry? I don’t think so! This Chocolate Strawberry Cheesecake was the star of my daughter’s graduation party. It disappeared so fast, I barely got a slice. It’s that perfect mix of rich, creamy, and fruity that makes everyone ask for the recipe.
A Sweet Tale: From New York to My Kitchen
The classic New York cheesecake is a legend for a reason. It’s all about that dense, creamy texture. My version takes that classic and gives it a romantic twist. By swirling in chocolate and folding in fresh strawberries, I’ve created a dessert that feels both timeless and special. It’s like the fancy dessert from a great restaurant, but you can make it right at home. I love how the bright red berries peek through the dark chocolate swirls—it’s almost too pretty to eat! (But trust me, you’ll get over that quickly.)
Why You’ll Fall in Love With This Chocolate Strawberry Cheesecake
You’ll love this recipe because it’s a true showstopper that’s surprisingly simple. The chocolate cookie crust is a no-bake dream. The filling is silky smooth with little pockets of juicy berry. Every bite is a perfect balance. It’s rich but not too heavy, sweet but with a tangy kick from the cream cheese and sour cream. Plus, making it feels like a fun project. The moment you swirl that chocolate sauce into the white filling, you’ll feel like a pastry chef!
When to Whip Up This Dreamy Dessert
This cheesecake is your secret weapon for celebrations. It’s perfect for Valentine’s Day, Mother’s Day, or a birthday dinner. I love bringing it to summer potlucks because the strawberries feel so seasonal. It’s also amazing for a “just because” weekend treat. Sometimes, after a long week, my family and I just need a special dessert to reconnect. This cheesecake, with a cup of coffee, turns any ordinary Friday into a mini-celebration.
Gathering Your Ingredients
Using quality ingredients makes all the difference here. Make sure your cream cheese is truly softened for a lump-free filling.
- For the Crust:
- 2 cups chocolate cookie crumbs (about 20 cookies): The foundation of this cheesecake, providing a rich chocolatey crunch. A quick tip: use a food processor to crush the cookies finely for the perfect texture.
- 6 tablespoons unsalted butter, melted: Helps bind the crumbs together for a sturdy crust.
- For the Cheesecake Filling:
- 3 (8-ounce) blocks of cream cheese, softened: The star of any cheesecake, providing that classic creamy texture. Bring it to room temperature for easy mixing.
- 1 cup granulated sugar: Sweetens the cheesecake and balances the tanginess of the cream cheese.
- 3 large eggs: Helps bind the filling and creates a silky texture.
- 1 teaspoon vanilla extract: Enhances the flavor of the filling.
- 1/2 cup sour cream: Adds a hint of tanginess and makes the filling extra creamy.
- 1/2 cup chocolate sauce or melted chocolate chips: Swirled into the filling for a rich chocolate ribbon.
- 1 cup fresh strawberries, sliced: Adds bursts of fruity freshness throughout the cheesecake.
- For the Topping:
- 1/2 cup chocolate ganache: Drizzled over the top for that indulgent finish.
- Fresh strawberries (about 8-10, whole or halved): For garnishing and an extra pop of color.
Easy Swaps and Substitutions
Don’t panic if you’re missing an item! Here are some simple swaps:
- Cookie Crumbs: Use graham crackers or Oreos (with the filling) instead of plain chocolate cookies.
- Sour Cream: Plain Greek yogurt works beautifully for a similar tang.
- Chocolate Sauce: Melt down any chocolate bar you have! Dark, milk, or semi-sweet all work.
- Strawberries: Try raspberries, blueberries, or a mix of your favorite berries.
Making Your Chocolate Strawberry Cheesecake
Follow these steps for a perfectly creamy, crack-free cheesecake. Take your time and enjoy the process!
Step 1: Build the Chocolate Crust
Start by preheating your oven to 325°F (163°C). Take your finely crushed chocolate cookie crumbs and pour them into a medium bowl. The smell is already amazing! Pour the warm, melted butter over the crumbs. Use a fork to mix it all together. You’ll see the crumbs start to darken and clump together beautifully. Press this mixture firmly into the bottom of a 9-inch springform pan. A flat-bottomed glass or measuring cup helps you press it down evenly. This compact layer is what will hold your glorious filling. Bake it for just 10 minutes, then let it cool on a rack.
Step 2: Create the Creamy Filling
Now for the magic! In a large bowl, beat your softened cream cheese until it’s completely smooth and creamy. No lumps allowed! This should take 2-3 minutes with an electric mixer. Gradually add the sugar and beat again until it’s fully combined. The mixture will become pale and fluffy. Next, add the eggs one at a time. Mix just until each egg disappears into the batter. Over-mixing at this stage can add too much air and cause cracks later. Finally, beat in the vanilla and sour cream until the whole mixture is silky and uniform.
Step 3: Add the Swirls and Berries
This is the fun part. Gently fold your sliced strawberries into the cream cheese batter. Be careful not to crush them. Pour about two-thirds of this pink-speckled batter over your cooled crust. Now, drizzle half of your chocolate sauce or melted chocolate over the batter. Use a knife or a skewer to gently swirl the chocolate into the cream cheese, creating beautiful marbled patterns. Pour the rest of the batter on top and repeat with the remaining chocolate. Don’t over-swirl, or the colors will muddle. Pro tip: Tap the pan firmly on the counter a few times to pop any large air bubbles.
Step 4: Bake and Chill to Perfection
Place your springform pan on a baking sheet (this catches any butter drips) and bake for 50-60 minutes. The cheesecake is done when the edges look set but the center still has a slight jiggle, like Jell-O. Turn off the oven, crack the door open with a wooden spoon, and let the cheesecake cool inside for one hour. This slow cooling is the chef’s secret to preventing cracks! After that, let it cool completely at room temperature. Then, cover it and refrigerate for at least 4 hours, but overnight is best. This long chill sets the texture perfectly.
Step 5: The Grand Finale Topping
Once your cheesecake is gloriously chilled and firm, run a thin knife around the edge of the springform pan and release the clamp. Carefully transfer the cake to a serving plate. Warm your chocolate ganache slightly so it’s pourable. Drizzle it artfully over the top, letting some drip down the sides. Now, arrange your fresh, whole or halved strawberries on top. This final touch makes it look like it came from a professional bakery. Slice with a hot, clean knife for perfect pieces.
Time You’ll Need From Start to Finish
- Prep Time: 30 minutes
- Cook Time: 1 hour
- Cooling/Chilling Time: 5 hours (minimum)
- Total Time: 6 hours 30 minutes
Chef’s Secret: Patience is the Best Ingredient
My number one secret is patience. Rushing the softening of the cream cheese leads to lumps. Rushing the cooling leads to cracks. Rushing the chilling leads to a slice that oozes instead of holding its shape. Treat this recipe like a relaxing weekend project. Enjoy the smells, enjoy the process of swirling the chocolate, and look forward to the amazing dessert waiting for you after its proper rest.
A Berry Interesting Fact
Did you know the strawberry is not actually a berry? Botanically, it’s an “aggregate accessory fruit.” The tiny seeds on the outside are the real fruits! Using them in baking not only adds fantastic flavor and color but also a little nutrition. Foods like strawberries are known for containing dietary antioxidants, which is a lovely bonus in a treat this indulgent.
Your Cheesecake Toolbox
Having the right tools makes this recipe a breeze. You’ll need:
- 9-inch springform pan
- Electric mixer (hand or stand)
- Food processor or zip-top bag for crushing cookies
- Mixing bowls (various sizes)
- Rubber spatula
- Measuring cups and spoons
- Baking sheet
Storing Your Chocolate Strawberry Cheesecake
This cheesecake stores wonderfully. Once decorated, you can keep it covered in the refrigerator for up to 5 days. The flavors actually meld and get even better after a day or two.
For longer storage, you can freeze it. Do this before adding the ganache and fresh berry garnish. Wrap the chilled, whole cheesecake tightly in plastic wrap, then in aluminum foil. It will keep for up to 2 months.
To serve a frozen cheesecake, thaw it overnight in the refrigerator. Then, add your fresh ganache drizzle and strawberries just before serving. This keeps the berries fresh and the ganache shiny.
Tips for Cheesecake Success
- Room Temperature is Key: Cold cream cheese will never become smooth. Let it sit out for at least 2 hours.
- Don’t Over-mix: Once you add the eggs, mix on low speed and only until combined. Too much air causes rising and falling, which leads to cracks.
- Use a Water Bath for Ultimate Creaminess: For an extra-silky texture, wrap the bottom of your springform pan in heavy-duty foil and place it in a roasting pan. Pour hot water into the roasting pan until it comes halfway up the side of the springform pan, then bake as directed.
Presentation Ideas to Impress Your Guests
- Serve each slice with a dollop of fresh whipped cream and a mint leaf.
- Create a strawberry “fan” by thinly slicing a berry almost to the stem and fanning it out on the plate.
- Dust the plate with a little powdered sugar or cocoa powder before placing the slice.
- Serve with a small pitcher of extra chocolate sauce or a pureed strawberry sauce for dipping.
Love This Recipe? Try These Variations!
Once you master this base, the world of cheesecake is your oyster! Here are six delicious twists:
- Blackberry Bliss: Swap the strawberries for blackberries and the chocolate swirl for a blackberry sauce swirled in. It’s a gorgeous, deep purple masterpiece.
- Jello Light and Fruity Pie: For a lighter, no-bake option, try a creamy Jell-O pie with a cream cheese layer. It’s refreshing and perfect for summer.
- Lavander Blueberry Dream: Infuse your cheesecake filling with a teaspoon of culinary lavender and use blueberries instead of strawberries. The floral note is divine. You’ll love the unique flavor profile of this lavender and blueberry chocolate cake for inspiration.
- Triple Chocolate: Use chocolate cream cheese, add cocoa powder to the filling, and keep the chocolate swirls. Top with chocolate shavings for the ultimate chocolate fix.
- Citrus Burst: Fold in the zest of a lemon and an orange. Use a citrus curd instead of chocolate for the swirl. It’s bright, tangy, and delicious.
- Cookies and Cream: Fold crushed Oreo cookies into the plain filling. Use a chocolate cookie crust. It’s a cookies and cream lover’s dream.
Common Mistakes to Avoid
Avoid these common pitfalls for a flawless cheesecake every single time.
Mistake 1: Using Cold Cream Cheese
This is the biggest mistake! Cold cream cheese will never blend smoothly with the sugar and eggs. You’ll end up with a lumpy batter, no matter how long you mix. Your cheesecake will bake with little bits of cream cheese throughout. To avoid this, take the blocks out of the fridge at least 2 hours before you plan to bake. The cheese should feel very soft to the touch. Practical tip: In a pinch, you can microwave the unwrapped blocks on 50% power for 15-second intervals, but be very careful not to melt them.
Mistake 2: Over-baking the Cheesecake
A dry, cracked cheesecake is almost always over-baked. Unlike a cake, a cheesecake should not be completely firm when it comes out of the oven. It continues to set as it cools. If you bake it until the center is solid, it will be overcooked by the time it chills. Pull it out when the edges are puffed and set, but the center (about a 3-inch circle) still jiggles slightly when you gently shake the pan. Remember, it will finish cooking in the turned-off oven with the door cracked.
Mistake 3: Skipping the Long Chill Time
I know it’s tempting to slice into your beautiful creation right away. But cutting into a warm cheesecake is a disaster. The texture will be loose and almost runny, and the slice won’t hold its shape. It needs that long, slow chill in the refrigerator to fully set up and develop its signature dense, creamy texture. Plan ahead and make your cheesecake the day before you need it. Your patience will be rewarded with the perfect slice.
Mistake 4: Not Tapping Out Air Bubbles
After you pour the filling into the crust, air bubbles get trapped inside. If you don’t get them out, they will rise to the surface during baking and create little holes or an uneven texture on top of your finished cheesecake. It’s easy to fix! Simply lift the pan a few inches off the counter and drop it down firmly. Do this 3-4 times. You’ll see tiny bubbles rise to the surface and pop. This ensures a beautifully smooth top for your ganache.
Frequently Asked Questions
Can I use frozen strawberries instead of fresh?
You can, but you need to handle them carefully. Do not thaw frozen strawberries and add them directly to the batter. The extra water will make your filling soggy and can prevent it from setting. If you must use frozen, thaw them completely in a colander over a bowl. Then, pat them extremely dry with paper towels. You might even want to chop them slightly smaller. Fresh is always best for texture and flavor, but properly dried frozen berries will work in a pinch.
Why did my cheesecake crack in the middle?
Cracks are usually caused by two things: sudden temperature changes or over-mixing. If you cool the cheesecake too quickly after baking (like putting it straight in the fridge), the drastic drop in temperature makes the center contract and pull apart. That’s why we cool it slowly in the turned-off oven first. Over-mixing the batter after adding the eggs incorporates too much air. The air expands during baking, then collapses as it cools, causing a crack. Mix just until ingredients are combined for a smooth, crack-free top.
How do I know when the cheesecake is done baking?
Use the “jiggle test.” At around the 50-minute mark, gently shake the oven rack. The edges of the cheesecake should look puffed and set. The center (about the size of a lemon) should have a slight, soft jiggle, similar to set Jell-O. It should not look liquid or sloshy. The cheesecake will also start to pull away slightly from the sides of the pan. Remember, it will continue to cook from residual heat as it cools in the oven, so this slight under-doneness is perfect.
Can I make this recipe without a springform pan?
A springform pan is highly recommended because it has a removable side, making it easy to get the tall, delicate cheesecake out without damaging it. If you don’t have one, you can use a deep 9-inch pie dish. Your crust and filling will be a bit thinner, so reduce the baking time by about 10-15 minutes. Getting clean slices out will be more challenging. You can also line a regular cake pan with parchment paper with overhanging edges to use as “handles” to lift it out, but this is tricky.
How far in advance can I make this cheesecake?
This cheesecake is a fantastic make-ahead dessert. You can bake and chill it completely up to 2 days before you plan to serve it. Keep it covered in the refrigerator. I recommend adding the chocolate ganache drizzle and fresh strawberry garnish on the day you plan to serve it. This keeps the berries looking fresh and prevents the ganache from getting sticky. The flavors actually improve after a day in the fridge.
What’s the best way to slice a cheesecake cleanly?
Use a long, thin, sharp knife. For the cleanest cuts, run the knife under very hot water and wipe it dry with a towel before each slice. The heat helps the knife glide smoothly through the dense filling and the chocolate layers without dragging. Some people also use unflavored dental floss, holding it taut and pressing it down through the cake. This method works well for getting through sticky ganache toppings.
Can I freeze the leftovers?
Absolutely! Cheesecake freezes beautifully. For best results, freeze individual slices. Place them on a baking sheet until solid, then wrap each slice tightly in plastic wrap and place them in a freezer bag. You can also freeze the whole cheesecake (without the fresh berry garnish). Thaw slices or the whole cake overnight in the refrigerator. The texture may be slightly denser but still delicious.
My crust is too crumbly and falls apart. What went wrong?
A crumbly crust usually means there wasn’t enough butter to bind the crumbs, or it wasn’t pressed firmly enough into the pan. Make sure you’re using the full 6 tablespoons of melted butter and mixing until the crumbs look like wet sand. When pressing into the pan, use something flat and solid, like the bottom of a glass or measuring cup. Press very firmly, going up the sides a little if your recipe allows. This compacts the crumbs so they bake into a solid, sliceable base.
Is there a way to make a lighter or lower-sugar version?
You can make some adjustments, but know that it will change the classic texture. You can use reduced-fat cream cheese and sour cream. For the sugar, a granulated sugar substitute made for baking (like erythritol or monk fruit blend) can work, but follow the package’s conversion guide. The texture might be slightly less creamy. The strawberries add natural sweetness, so you could potentially reduce the sugar in the filling by 1/4 cup. Experiment in small batches first!
What can I do with leftover cheesecake batter?
First, make sure you haven’t just underestimated your pan! A 9-inch springform should hold this amount. If you truly have extra, don’t bake it in the same pan as it will overflow. Grease a ramekin or a muffin tin lined with paper liners. Pour the extra batter in, reduce the baking time (start checking at 20 minutes), and you’ll have adorable mini cheesecake bites! They’re perfect for tasting or for kids.
If you adored making this showstopper, you’re going to love exploring our entire collection of creamy, dreamy desserts. Find more inspiration in our full guide to the best cheesecake recipes, where classics meet creative twists. There’s always a new flavor combination to fall in love with.
Your New Go-To Celebration Dessert
This Chocolate Strawberry Cheesecake is more than just a recipe. It’s a memory maker. It’s the dessert you’ll be proud to bring to every gathering. It has the wow factor of a bakery cake with the heart of a homemade treat. With its silky texture, rich chocolate, and fresh berry bursts, every single slice feels like a celebration. So preheat that oven, soften that cream cheese, and get ready for the compliments. You’ve got this! Happy baking!
Equipment
- Grand bol
- Fouet
- Spatule
- Plaque à pâtisserie
- Papier sulfurisé
Ingredients
- 2 tasses miettes de biscuits au chocolat environ 20 biscuits
- 6 cuil. à soupe beurre non salé, fondu
- 3 paquets fromage à la crème, ramolli
- 1 tasse sucre cristallisé
- 3 grands œufs
- 1 cuil. à café extrait de vanille
- 1/2 tasse crème aigre
- 1/2 tasse sauce au chocolat ou pépites de chocolat fondues
- 1 tasse fraises fraîches, tranchées
- 1/2 tasse ganache au chocolat
- 8-10 fraises fraîches entières ou coupées en deux
Instructions
- Préchauffez votre four à 163°C.
- Mélangez les miettes de biscuits au chocolat et le beurre fondu dans un grand bol, puis pressez au fond d'un moule à charnière de 23 cm et faites cuire pendant 10 minutes.
- Battez le fromage à la crème ramolli jusqu'à ce qu'il soit lisse; ajoutez progressivement le sucre, puis ajoutez les œufs un par un, en mélangeant jusqu'à ce qu'ils soient combinés. Ajoutez l'extrait de vanille et la crème aigre, et mélangez jusqu'à obtenir un mélange homogène.
- Incorporez les fraises tranchées dans le mélange de fromage à la crème, puis versez les deux tiers sur la croûte. Versez la moitié de la sauce au chocolat sur la pâte et tourbillonnez avec un couteau.
- Versez le reste de la pâte, répétez le versement de chocolat et tourbillonnez doucement.
- Faites cuire pendant 50-60 minutes jusqu'à ce que les bords soient pris mais que le centre tremble. Éteignez le four, entrouvrez la porte, et laissez refroidir pendant une heure.
- Réfrigérez pendant au moins 4 heures, de préférence toute la nuit.
- Démoulez le cheesecake, réchauffez la ganache et nappez le dessus, en garnissant de fraises fraîches.