
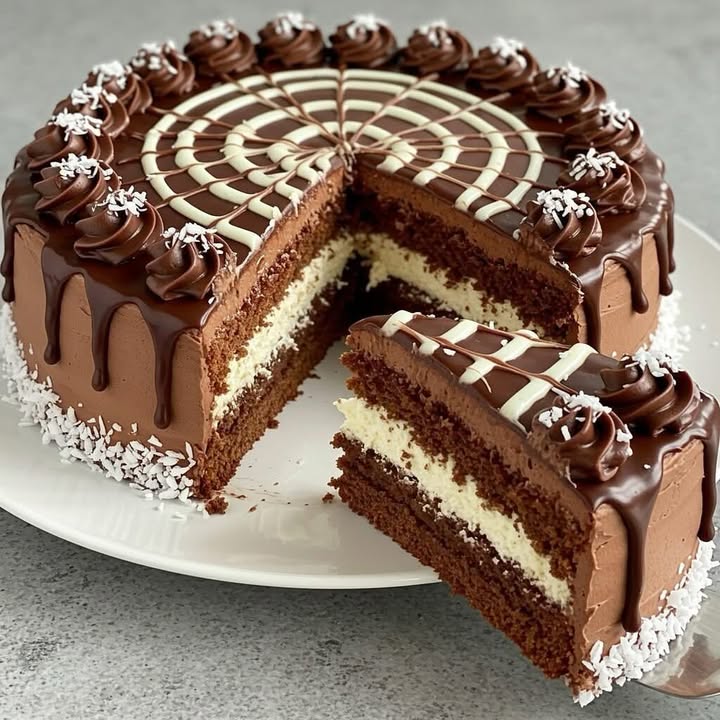
Why This Coconut Chocolate Delight is a Must-Try
There’s something magical about biting into a cake that feels like a warm hug. That’s exactly what this Coconut Chocolate Delight does for me. The first time I made it, my kitchen smelled like a tropical paradise mixed with rich cocoa dreams. It was love at first bite, and my family couldn’t stop raving about it. This cake is soft, creamy, and bursting with coconut flavor, making it perfect for anyone who loves the combo of chocolate and coconut. Trust me, once you try it, it’ll become your go-to dessert.
A Little History Behind This Sweet Treat
I stumbled upon this recipe while visiting a friend in Brazil. She called it “Prestige Cake,” and it’s a popular dessert at birthday parties and family gatherings. The combination of coconut and chocolate has always been a hit in tropical regions where coconuts grow abundantly. Over time, bakers have added their own twists, but the heart of the recipe remains the same: a simple cake paired with a rich coconut filling. When I brought this recipe home, I tweaked it slightly to suit my taste, and now it’s a staple at our family dinners.
Why You’ll Love This Coconut Chocolate Delight
This cake is a dream come true for anyone who loves easy yet impressive desserts. The cake itself is light and airy, while the coconut filling adds a creamy, tropical touch. Plus, the entire process is straightforward, even for beginner bakers. Another reason to love it? It’s versatile. Whether you’re celebrating a special occasion or just craving something sweet, this Coconut Chocolate Delight fits the bill perfectly.
Perfect Occasions to Whip Up This Dessert
Think birthdays, holidays, or even casual weekend get-togethers. This cake shines at potlucks because it’s easy to transport and always gets compliments. I’ve also served it at baby showers and bridal parties, where its elegant presentation wows guests. Honestly, though, you don’t need a special reason to bake it. Sometimes, a regular Tuesday night calls for a slice of this deliciousness!
Ingredients You’ll Need
- For the cake:
- 4 eggs
- 1 cup of sugar
- 1 cup of wheat flour
- 1 teaspoon baking powder
- 1/2 cup of milk
- 1/2 cup of vegetable oil
- 1 teaspoon vanilla extract
- 1/2 cup of cocoa powder without sugar
- For the coverage and filling:
- 1 cup of whipping cream
- 1 cup condensed milk
- 1 cup of grated coconut
- 1/2 cup coconut milk
- 1/4 cup of sugar
- 1 teaspoon vanilla extract
Substitution Options
If you’re out of certain ingredients, don’t worry! You can swap vegetable oil with melted butter for a richer flavor. For a dairy-free version, use almond milk instead of regular milk. If you prefer a less sweet filling, reduce the sugar by half or skip it entirely. Coconut milk can be replaced with heavy cream if needed, though it won’t have the same tropical flair.
Step 1: Preheat and Prepare
Start by preheating your oven to 180°C (350°F). Grease and flour a cake mold to prevent sticking. I always use a round mold because it makes layering easier later on. Pro tip: Dust the mold with cocoa powder instead of flour for an extra chocolatey touch.
Step 2: Mix the Wet Ingredients
In a large bowl, beat the eggs with sugar until the mixture turns smooth and foamy. This step is crucial—it traps air into the batter, giving the cake its soft texture. As you whisk, imagine the smell of vanilla wafting through your kitchen. Add the vanilla extract here for that signature aroma.
Step 3: Combine Dry Ingredients
In another bowl, mix the flour, baking powder, and cocoa powder. Sifting these dry ingredients ensures there are no lumps, which is key for a velvety cake. Picture the deep brown color of the cocoa blending beautifully with the white flour—it’s almost hypnotic!
Step 4: Alternate Wet and Dry Ingredients
Add the dry ingredients to the egg mixture in three parts, alternating with the milk and oil. Start and end with the dry mix. This method keeps the batter balanced and prevents overmixing, which could make the cake dense. Stir gently until everything comes together.
Step 5: Bake to Perfection
Pour the batter into the prepared mold and pop it into the oven for 30 minutes. While it bakes, your house will fill with the irresistible scent of chocolate. To check if it’s done, insert a toothpick into the center—if it comes out clean, you’re golden!
Step 6: Cool and Prepare Layers
Let the cake cool in the mold for 10 minutes, then transfer it to a wire rack to cool completely. Once cooled, slice it horizontally into two layers. This part always feels like unwrapping a gift—you’re one step closer to assembling your masterpiece.
Step 7: Make the Coconut Filling
Beat the whipping cream until soft peaks form. Then, fold in the condensed milk, grated coconut, coconut milk, sugar, and vanilla extract. The result is a thick, creamy mixture that smells like a tropical vacation. Spread this generously between the cake layers and over the top.
Cooking Times
| Preparation Time | Cooking Time | Resting Time | Total Time |
|---|---|---|---|
| 20 minutes | 30 minutes | 1 hour (cooling) | 2 hours |
Chef’s Secret
For an extra burst of flavor, toast the grated coconut before adding it to the filling. Simply spread it on a baking sheet and bake at 180°C (350°F) for 5-7 minutes until golden. This small step elevates the entire dish.
An Interesting Fact About Coconuts
Did you know coconuts are often called the “tree of life”? Every part of the coconut tree can be used, from its water to its husk. No wonder it plays such a big role in desserts worldwide!
Necessary Equipment
- Mixing bowls
- Whisk or electric mixer
- Cake mold
- Spatula
- Wire rack
- Toothpick or skewer
Storage Tips
To keep your Coconut Chocolate Delight fresh, store it in the refrigerator. Cover it tightly with plastic wrap or place it in an airtight container. This prevents the coconut filling from drying out. It stays good for up to 5 days, though it rarely lasts that long in my house!
If you live in a hot climate, chilling the cake is essential. Otherwise, the filling might soften too much. On the flip side, let it sit at room temperature for 15 minutes before serving to bring out the flavors.
For longer storage, freeze individual slices wrapped in parchment paper and aluminum foil. They thaw quickly and taste just as amazing.
Tips and Advice
- Use room-temperature eggs for a smoother batter.
- Don’t rush the cooling process—warm cake layers can cause the filling to slide.
- Toast the coconut lightly for added depth of flavor.
Presentation Ideas
- Sprinkle extra grated coconut on top for a snowy look.
- Garnish with chocolate shavings or curls.
- Serve with a dollop of whipped cream on the side.
Healthier Alternatives
Here are six ways to tweak this recipe for a healthier twist:
- Gluten-Free Option: Use almond flour instead of wheat flour.
- Low-Sugar Version: Substitute condensed milk with sugar-free sweetened condensed milk.
- Vegan Adaptation: Replace eggs with flaxseed gel and use plant-based whipping cream.
- Less Fat: Swap vegetable oil with applesauce.
- Dairy-Free: Use coconut cream instead of whipping cream.
- Protein Boost: Add a scoop of protein powder to the batter.
Mistake 1: Skipping the Cooling Step
Rushing to assemble the cake before it’s fully cooled can lead to disaster. The heat melts the filling, causing it to ooze out and ruin the structure. Patience pays off—let the cake cool completely before proceeding.
Mistake 2: Overmixing the Batter
Overmixing results in a tough, dense cake. Mix just until the ingredients are combined. Think of it as folding laundry—gentle hands yield better results.
Mistake 3: Not Greasing the Mold Properly
If your cake sticks to the pan, all your hard work goes down the drain. Always grease and flour the mold thoroughly, or line it with parchment paper for insurance.
Frequently Asked Questions
Can I use store-bought whipped cream?
Absolutely! While homemade whipped cream tastes fresher, store-bought works fine in a pinch. Just ensure it’s stable enough to hold the filling together.
How do I know when the cake is done?
Insert a toothpick into the center. If it comes out clean or with a few crumbs, it’s ready. Avoid opening the oven door too often, as this can cause uneven baking.
Can I freeze this cake?
Yes, freezing is a great option. Wrap individual slices tightly and label them with the date. They’ll stay fresh for up to 3 months.
What if I don’t have coconut milk?
You can substitute heavy cream, but the flavor won’t be as authentic. Coconut milk gives the filling its distinct taste.
Is this cake kid-friendly?
Kids adore it! The creamy texture and sweet coconut-chocolate combo are irresistible. Plus, it’s fun to decorate.
Can I make this ahead of time?
Definitely. In fact, making it a day in advance allows the flavors to meld. Just refrigerate until ready to serve.
How can I make the cake moister?
Brush each layer with a little coconut milk before adding the filling. This trick locks in moisture and enhances the flavor.
What tools do I need?
A basic set of mixing bowls, a whisk, and a spatula will suffice. A stand mixer makes things faster but isn’t mandatory.
Can I add nuts to the filling?
Of course! Chopped almonds or pecans pair beautifully with coconut and chocolate. Just sprinkle them evenly in the filling.
How do I prevent the cake from sinking?
Avoid opening the oven door during baking, and don’t overbeat the batter. These steps help maintain the cake’s structure.
Final Thoughts
This Coconut Chocolate Delight is more than just a cake—it’s a celebration of flavors and textures. Whether you’re a seasoned baker or a newbie, this recipe is sure to impress. So grab your apron, gather your ingredients, and let’s create something truly unforgettable. Your taste buds will thank you!
Equipment
- Mixing bowls
- Whisk or electric mixer
- Spatula
- Cake mold
- Wire rack
Ingredients
- 4 eggs
- 1 cup sugar
- 1 cup wheat flour
- 1 teaspoon baking powder
- 1/2 cup milk
- 1/2 cup vegetable oil
- 1 teaspoon vanilla extract
- 1/2 cup cocoa powder without sugar
Instructions
- Preheat your oven to 180°C (350°F) and grease and flour a round cake mold.
- In a large bowl, beat the eggs with sugar until smooth and foamy; add the vanilla extract.
- In another bowl, mix the flour, baking powder, and cocoa powder, and sift to remove lumps.
- Add the dry ingredients to the egg mixture in three parts, alternating with milk and oil.
- Pour the batter into the prepared mold and bake for 30 minutes; check with a toothpick for doneness.
- Let the cake cool in the mold for 10 minutes, then transfer to a wire rack to cool completely and slice into two layers.
- Beat the whipping cream until soft peaks form, then fold in condensed milk, grated coconut, coconut milk, sugar, and vanilla extract. Spread between cake layers and over the top.