
A Burst of Joy in a Bowl: The Colorful Fruit Trifle
Imagine digging a spoon into a tall glass bowl. You hit soft cake. Then comes cool, vanilla custard. Next, you find a layer of sweet bananas and zingy kiwis. Creamy whipped topping finishes it off. That is the magic of a Colorful Fruit Trifle. It’s not just a dessert. It’s a happy celebration in a dish. It’s the one dessert I make when I want to see big smiles around my table, every single time. It never fails.
A Peek Into the Trifle’s Story
This dessert has history. Its name, “trifle,” hints at it being a light affair. But it’s a layered masterpiece. It started in England centuries ago. They used what they had: sponge cake, custard, fruit, and a splash of something spirited. My version is a modern, family-friendly twist. It skips the alcohol but keeps all the fun. The layers are meant to be seen. Using a clear glass bowl is part of the tradition. It shows off those beautiful colors and makes it the centerpiece of any meal.
Why You’ll Fall in Love With This Trifle Recipe
You’ll adore this recipe for so many reasons. First, it’s incredibly easy. There’s no baking involved if you use a store-bought pound cake. It’s also the most forgiving dessert ever. No layers look exactly the same, and that’s the charm! Most importantly, it’s a total crowd-pleaser. It looks like you spent hours, but your secret is safe with me. The mix of textures from soft fruit to airy cream is simply magical.
The Perfect Moments for a Trifle
This dessert is a social butterfly. It loves a party! It’s perfect for summer barbecues, where its cool sweetness cuts through grilled flavors. Bring it to a potluck, and you’ll leave with an empty bowl and recipe requests. It’s a star on holiday tables like Easter and Christmas, adding bright color. For a simple family dinner, it turns a Tuesday into a treat. It’s my go-to for birthdays when I need a cake alternative. Honestly, any day feels special with a colorful fruit trifle on the menu.
Gathering Your Trifle Ingredients
Let’s get everything ready! The beauty here is in the variety. Here’s what you need to build your masterpiece:
- 1 large store-bought pound cake, cubed (or angel food cake)
- 2 cups vanilla pudding or custard (store-bought or homemade)
- 1 cup whipped topping or freshly whipped cream
- 2 bananas, sliced
- 2 kiwis, sliced
- 1 cup fresh raspberries
- 1 cup canned mandarin oranges, drained well
- 1 cup canned peach slices, drained well
- 1 cup fresh strawberries, sliced
- Optional: Extra whipped cream for the top garnish
Handy Substitutions for Your Trifle
No worries if you’re missing something! This recipe is all about flexibility. Here are some easy swaps:
- Cake: Angel food cake, sponge cake, or even leftover brownies work!
- Pudding: Use lemon pudding for a citrus kick, chocolate for a decadent twist, or cheesecake-flavored pudding.
- Fruit: Use what’s in season! Blueberries, blackberries, mango, pineapple, or grapes are all fantastic. Canned fruit cocktail (drained) is a quick pantry fix.
- Cream: Greek yogurt sweetened with a little honey makes a lighter, tangier layer.
Building Your Colorful Masterpiece: Step-by-Step
Step 1: The Foundation
Grab your most beautiful, clear glass bowl or trifle dish. The visual effect is key! Take one-third of your cubed cake and scatter it evenly across the bottom. Gently press it down. These cake pieces will soak up the flavors and juices, becoming tender and delicious. A clear bowl lets everyone admire your work from the very first layer.
Step 2: The Creamy Blanket
Now, spoon a generous layer of your vanilla pudding or custard over the cake cubes. Use about a third of your total pudding. Spread it carefully to cover all the cake. This creamy layer is what melds everything together. Pro tip: If your pudding is very thick, you can thin it with a tablespoon of milk for easier spreading.
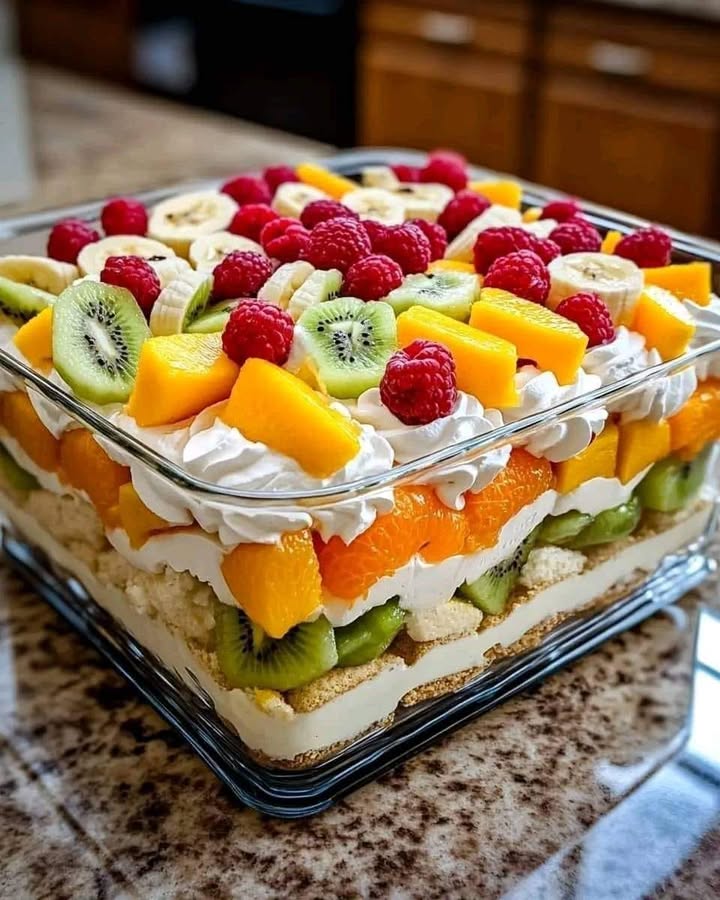
Step 3: The Rainbow of Fruit
This is the fun part! Arrange a beautiful, colorful assortment of your fresh and canned fruits over the pudding. Think like an artist. Place banana and kiwi slices around the edge against the glass for a stunning view. Scatter raspberries, mandarin segments, and peach slices in the center. The juicy fruits will begin to mingle with the pudding and cake.
Step 4: The Cloud of Cream
Spoon a fluffy layer of your whipped topping or fresh whipped cream over the fruit. Be gentle to avoid squishing the beautiful fruit you just arranged. This layer adds a light, airy texture and a delightful sweetness that cuts through the tartness of berries. It’s the perfect palate refresher before the next set of layers.
Step 5: Repeat and Conquer
Simply repeat the layers! Add another third of the cake cubes, followed by pudding, another gorgeous medley of fruit, and another cloud of whipped cream. Continue until you’ve used up your ingredients. Plan to end with a final, beautiful layer of whipped cream on the very top. This will be your canvas for the final garnish.
Step 6: The Grand Finale
Garnish the top of your trifle with extra fruit. Create a pretty pattern with peach slices and raspberries. A few mint leaves add a fresh pop of green. This final touch makes it look like it came from a professional baker’s kitchen. Chef’s tip: For an elegant finish, pipe the final whipped cream layer with a star tip and place a single, perfect strawberry in the center.
Planning Your Time: Quick Prep, Patient Waiting
The best part? The active work is super fast. You can assemble this whole beautiful dessert in just about 20 minutes. The real magic happens in the fridge. Let it chill for at least 1 hour, though 2-3 hours is even better. This resting time allows all the lovely textures and flavors to meld and become one incredible bite.
- Prep Time: 20 minutes
- Chill Time: 1 hour (minimum)
- Total Time: 1 hour 20 minutes
- Servings: 8
- Calories per serving: Approximately 220
A Little Secret From My Kitchen
Want to add a subtle, grown-up depth of flavor? Lightly brush your cake cubes with a simple syrup infused with a teaspoon of orange juice or a drop of almond extract before you layer them. It keeps the cake incredibly moist and adds a whisper of sophistication that people will notice but can’t quite place. It’s my little secret weapon.
A Fun Fact About Your Dessert
Did you know the traditional British trifle often includes a layer of raspberry jam and sometimes even a sprinkling of sherry-soaked cake? While our colorful fruit trifle is a brighter, fresher take, it carries on the spirit of using sweet, creamy, and fruity layers to create pure comfort in a bowl. It’s a dessert with a passport!
What You’ll Need to Make It
You don’t need fancy gear for this one. The most important tool is a large, clear glass bowl or trifle dish (a big glass salad bowl works perfectly). You’ll also need:
- A sharp knife and cutting board for the fruit and cake
- Measuring cups and spoons
- A few mixing bowls for prepping fruit
- A spatula or large spoon for spreading layers
- Plastic wrap or a lid for the bowl
Storing Your Leftover Trifle
Cover the trifle bowl tightly with plastic wrap or its lid. It will keep happily in the refrigerator for 2-3 days. The flavors will continue to blend, making it even more delicious on day two.
The cake will soften more over time, which is part of its charm. However, fresh fruits like bananas and kiwi may brown slightly. They’ll still taste great, but for the freshest look, enjoy within 48 hours.
This dessert does not freeze well, as the creamy layers and fresh fruit can become watery and separate when thawed. It’s best enjoyed fresh from the fridge.
My Best Tips for Trifle Success
- Drain Canned Fruit Well: Pat canned fruit dry with a paper towel. Extra liquid can make the bottom layers soggy.
- Prep Fruit Last: Slice bananas and kiwis right before assembling to prevent browning.
- Go Thick on Cream: If whipping your own cream, whip it to stiff peaks so it holds its shape in the layers.
- Let Kids Help: This is a fantastic recipe to make with children. They love arranging the fruit layers!
Serving Ideas That Wow
- Serve it in individual glasses or mason jars for a personal, party-friendly touch.
- Garnish with a light dusting of graham cracker crumbs or toasted coconut on top.
- Add a sprig of fresh mint for a vibrant color contrast.
- For a Fourth of July theme, use blueberries, strawberries, and bananas for a red, white, and blue look.
If you love the ease of no-bake desserts like this, you’ll find so many more fantastic ideas in our full collection of easy no-bake desserts.
Six Fun Ways to Mix Up Your Trifle
- Tropical Trifle: Use cubed pineapple upside-down cake, coconut pudding, mango, pineapple, kiwi, and toasted coconut flakes.
- Berry Bliss Trifle: Layer lemon pound cake, vanilla pudding, and a mix of all berries (strawberries, blueberries, raspberries, blackberries). Top with a lemon zest.
- Chocolate Berry Trifle: Use chocolate brownies or cake, chocolate pudding, raspberries, strawberries, and chocolate shavings between layers.
- Pumpkin Spice Trifle: Perfect for fall! Layer ginger snaps or spice cake, pumpkin mousse (made from canned pumpkin and cream cheese), and candied pecans.
- Lemon Blueberry Trifle: A classic combo. Use lemon cake or angel food cake, lemon curd mixed with whipped cream, and fresh blueberries.
- Tres Leches Trifle: Use cubed Tres Leches cake, dulce de leche pudding, sliced strawberries, and a sprinkle of cinnamon.
Common Mistakes to Avoid
Mistake 1: Using Watery or Undrained Fruit
This is the top trifle saboteur! Putting wet fruit straight from the can into the layers adds too much liquid. It makes the bottom cake layer a soggy, unappetizing mess. The pudding can also become thin and runny. Always drain canned fruit thoroughly in a colander. Then, pat it gently with a paper towel to remove the last bits of moisture. Your trifle will hold its beautiful structure much better.
Mistake 2: Over-Softening the Cake
Some recipes call for brushing cake with juice or syrup. That’s great, but don’t overdo it! You want the cake to be moist and flavorful, not mushy. The cake should still have some body to it when you layer it. A light brushing or a quick drizzle is plenty. Remember, the fruit and pudding will also add moisture as it chills.
Mistake 3: Not Chilling Long Enough
Resist the urge to serve your trifle right away! That hour (or more) in the fridge is not optional. This is when the magic happens. The cake soaks up the creamy goodness, the flavors marry, and the whole dessert sets into perfect, sliceable layers. Cutting this time short means you’ll have distinct, separate components instead of one harmonious dessert. Patience is key.
Mistake 4: Using Runny Whipped Cream
If your whipped cream or whipped topping isn’t stable, your layers will slump and blend together. If you’re whipping your own cream, make sure it’s very cold and whip it until you see stiff peaks. If using a tub of whipped topping, let it thaw slightly in the fridge, not on the counter. A soft but stable cream creates those beautiful, defined white layers that make a trifle so stunning.
Your Colorful Fruit Trifle Questions, Answered!
Can I make this trifle the night before?
You absolutely can, and it often tastes even better! The flavors have more time to blend. To keep it looking fresh, you might want to assemble everything except the final garnish of fresh, delicate fruit like banana slices. Add those right before serving. Cover the assembled trifle tightly and refrigerate overnight. This makes it a perfect stress-free dessert for holidays or dinner parties.
What’s the best cake to use for a trifle?
Pound cake and angel food cake are the top choices. They are sturdy enough to hold the weight of the layers without disintegrating but still absorb flavors beautifully. A plain sponge cake or a store-bought unfrosted butter cake also works well. For a creative twist, try using leftover slices of my Rainbow Cheesecake Delight cut into cubes for an unforgettable flavor and color explosion.
How can I keep the bananas from turning brown?
Toss your freshly sliced banana pieces in a little bit of lemon or orange juice. The citric acid slows down the browning process. You only need a light coating—too much juice will add unwanted sourness. You can also simply place the banana slices strategically in the middle of the trifle, not touching the glass, if you’re worried. They’ll still brown a little over time but will be hidden.
Can I use fresh fruit instead of canned?
Yes, and it’s a wonderful way to make the trifle even fresher! Just make sure to use ripe, seasonal fruit. For peaches or pineapple, if using fresh, you might want to give them a very light maceration with a sprinkle of sugar to draw out their juices. Remember, fresh fruit may release more natural liquid than canned, so your trifle might be a bit juicier, which is delicious. I love using fresh berries for a beautiful mix of antioxidants.
Is there a way to make this dessert healthier?
Absolutely. You can make several smart swaps. Use a whole-wheat or low-sugar angel food cake. Choose sugar-free vanilla pudding made with skim milk. Swap the whipped topping for freshly whipped cream with just a touch of honey or vanilla—you control the sugar. Load up on the fresh fruit! For more on the nutritional benefits of fruit, the National Institutes of Health provides excellent dietary information on fruits and vegetables. It’s a great resource for making informed choices in the kitchen.
My trifle looks soupy. What went wrong?
Sogginess usually comes from excess liquid. The most common culprits are: 1) undrained canned fruit, 2) very watery fresh fruit (like overripe berries), or 3) not letting the trifle set in the fridge long enough before serving. Next time, be extra thorough with draining, and ensure your chill time is at least 2 hours. A soupy trifle still tastes fantastic—just serve it in bowls with a spoon!
Can I use yogurt instead of pudding?
Yes, Greek yogurt is a fantastic, protein-rich alternative. To avoid it being too tangy, sweeten it first. Mix 2 cups of plain Greek yogurt with 1-2 tablespoons of honey or maple syrup and 1 teaspoon of vanilla extract until smooth. Use it just like you would the pudding layer. It creates a lovely, lighter texture and tangy flavor that pairs beautifully with sweet fruit.
How do I transport a trifle to a party?
Transportation can be tricky! First, make sure your bowl has a secure, tight-fitting lid. If it doesn’t, use several layers of plastic wrap, pressing it directly onto the surface of the cream to prevent a skin from forming. Place the bowl on a flat, non-slip surface in your car (like the floor in front of a seat). Drive carefully! Once you arrive, you can re-fluff the top cream layer with a spoon and add your final fruit garnish.
What can I do with leftover trifle?
Leftover trifle is a treat! It will keep for 2-3 days in the fridge. The cake and fruit will soften further, creating a delicious, almost mousse-like texture. You can also repurpose it for breakfast—spoon some into a parfait glass with a dollop of yogurt. For another easy no-bake treat that also uses simple ingredients, check out our recipe for melt-in-your-mouth Butterfinger Chocolate Caramel Crunch Truffles.
Can I make individual trifles?
Individual trifles are my favorite way to serve this for parties! They look adorable and are so easy for guests to grab. Use clear glasses, mason jars, or even wine glasses. Simply build the layers in each glass on a smaller scale. It’s a fun activity to do with kids or a creative way to let guests customize their own if you set out bowls of different fruits and toppings. They’re a guaranteed hit!
The Final Scoop
This Colorful Fruit Trifle is more than a recipe. It’s a template for joy. It’s forgiving, flexible, and always impressive. Whether you stick to the classic version or try the tropical twist like a No-Bake Pineapple Heaven Cheesecake, the result is a dessert that brings people together. So grab your bowl, pick your prettiest fruits, and prepare for the compliments. Don’t be surprised when someone asks, “Can you make this again?” Happy layering!
Equipment
- Bol en verre
- Couteau bien aiguisé
- Planche à découper
- Cuillères à mesurer
- Couvercle pour le bol
Ingredients
- 1 gâteau au pound (ou gâteau éponge) coupé en dés
- 2 tasses crème vanille ou crème pâtissière achetée ou faite maison
- 1 tasse garniture fouettée ou crème fouettée fraîche
- 2 bananes tranchées
- 2 kiwis tranchés
- 1 tasse framboises fraîches
- 1 tasse oranges mandarines en conserve bien égouttées
- 1 tasse tranches de pêches en conserve bien égouttées
- 1 tasse fraîches fraises tranchées
- q.s. crème fouettée supplémentaire pour garnir le dessus
Instructions
- Prendre un bol en verre clair ou un plat à trifle et étaler un tiers du gâteau coupé en dés uniformément au fond, en le pressant doucement.
- Déposer une généreuse couche de crème vanille ou de crème pâtissière sur les cubes de gâteau, en utilisant environ un tiers de la crème au total.
- Disposer une assiette colorée de fruits frais et en conserve sur la crème, plaçant les tranches de banane et de kiwi autour du bord pour un effet éblouissant.
- Étendre une couche de garniture fouettée ou de crème fouettée fraîche sur le fruit, en étant doux pour préserver l'arrangement.
- Répéter les couches avec un autre tiers des cubes de gâteau, de la crème, des fruits et de la crème fouettée jusqu'à épuisement des ingrédients. Terminer par une dernière couche de crème fouettée.
- Garnir le dessus du trifle avec des fruits supplémentaires, créant un motif avec des tranches de pêches et des framboises, et en ajoutant quelques feuilles de menthe pour la fraîcheur.