
Is there anything more exciting in the world of desserts than cracking into a warm chocolate cake and watching a river of rich, molten chocolate flow out? I don’t think so! The first time I made a Molten Chocolate Cake for a dinner party, my friends went absolutely silent—followed by a chorus of happy sighs. That moment of pure, gooey joy is what baking is all about for me. It’s like a little chocolate surprise waiting just for you.
A Little Slice of Chocolate History
Every great recipe has a story. This decadent dessert, sometimes called a chocolate lava cake, has a fun bit of foodie lore. Many believe it was the happy accident of a chef who underbaked a chocolate cake. Instead of a disaster, he discovered a masterpiece with a warm, liquid center. It quickly became a star on restaurant menus everywhere. It’s the perfect blend of a sophisticated dessert and simple, homey comfort. It reminds me that sometimes the best things come from a little “mistake” in the kitchen!
Why You’ll Fall in Love With This Chocolate Lava Cake
This recipe is a total winner, and here’s why. First, it’s surprisingly simple for such a fancy-looking dessert. You can whip it up with basic ingredients. Second, that magical contrast gets me every time. You get a warm, slightly crisp outer cake hugging a pool of soft, intense chocolate. It’s a textural dream. Finally, it’s incredibly versatile. Dress it up for a date night or keep it casual for a Tuesday treat. It’s a guaranteed smile-maker.
Your Perfect Molten Chocolate Cake Occasion
This cake is your secret weapon for so many events! It’s a classic for romantic dinners—light some candles and you’re set. It’s also a fantastic way to end a family celebration or holiday meal. I love making individual ramekins for dinner parties because everyone gets their own personal chocolate wonder. Honestly, any day that needs a little extra sweetness is the right day for this decadent dessert.
Gathering Your Ingredients
Let’s get everything on the counter. Quality matters here, especially for the star of the show: the chocolate!
- 2 large eggs: They help create the structure.
- 1 3/4 cups all-purpose flour: The backbone of our cake.
- 1 cup granulated sugar: For the perfect sweetness.
- 6 ounces high-quality bittersweet or dark chocolate: Please splurge a little here! It makes all the difference.
- 1/2 cup unsalted butter, at room temperature: For incredible richness.
- 1 teaspoon pure vanilla extract: A flavor enhancer.
- 1/4 teaspoon salt: This makes the chocolate flavor pop.
Easy Ingredient Swaps
No need to panic if you’re missing something. Here are some easy fixes:
- Chocolate: You can use a high-quality semi-sweet chocolate if you prefer a slightly sweeter gooey chocolate center.
- Dairy-Free: Use a plant-based butter stick and ensure your chocolate is dairy-free.
- Gluten-Free: A 1-to-1 gluten-free flour blend works wonderfully in this recipe.
Creating Your Chocolate Masterpiece
Ready to make some magic? Let’s walk through each step together. I’ve included all my little tips so yours turn out perfectly.
Step 1: Preheat and Prep
Start by preheating your oven to 425°F (220°C). This high heat is key for setting the edges while leaving the center lovely and liquid. While it heats, take your six 6-ounce ramekins and give them a good coating of butter. Then, dust them with a little sugar, tapping out the excess. This creates a beautiful, slightly crisp shell and makes sure your cakes release like a dream.
Step 2: Melt the Chocolate
Break your chocolate into small pieces. Melt it gently in a double boiler or a heatproof bowl set over a pot of simmering water. The steam will melt it slowly and evenly. Watch as the glossy chunks soften into a dark, silky pool. Pro tip: Never let the bottom of the bowl touch the water, and don’t rush this step. We don’t want any seized chocolate!
Step 3: Whisk the Dry Mix
In a separate bowl, grab your whisk. Combine the flour and salt. Whisking them together now ensures the salt is evenly distributed, so every bite is perfectly balanced. You’ll see the fine flour puff up a little as you whisk. It’s quick, but an important step for a uniform texture.
Step 4: Combine Eggs and Chocolate
Take your slightly cooled, melted chocolate. Whisk the eggs right into the chocolate mixture. You’ll see it thicken and become shiny. This is the base of your luxurious warm chocolate cake. The color is deep and inviting.
Step 5: Bring It All Together
Now, add your flour and salt mixture to the chocolate and eggs. Gently whisk just until you no longer see dry streaks of flour. A few small lumps are okay—we don’t want to overmix. Then, pour in the soft butter and that lovely vanilla extract. Whisk again until the batter is smooth, thick, and gloriously chocolatey.
Step 6: Fill and Bake
Divide the rich, dark batter evenly among your prepared ramekins. Place them on a baking sheet for easy handling. Slide them into your hot oven. Now, the hardest part: waiting! Bake for 12 to 15 minutes. The tops will look set and the edges will pull slightly away from the ramekin, but the centers will still have a gentle jiggle. That jiggle is your molten gold.
Step 7: The Grand Reveal
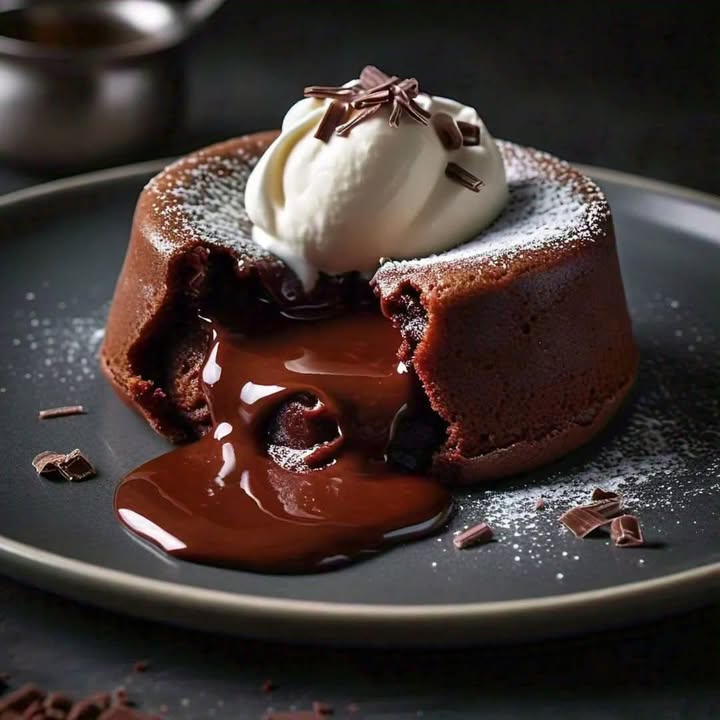
Take the ramekins out and let them rest on a rack for exactly 1 minute—no more, no less. This lets the cake settle just enough. Then, take a small knife and run it around the edge of each cake. Place a serving plate on top, and with confidence (and an oven mitt!), flip it over. Give the ramekin a little tap and lift it off. There it is: your perfect Molten Chocolate Cake. Chef’s tip: For an extra flourish, dust the top with powdered sugar or cocoa powder just before serving.
Timing is Everything
This is a wonderfully fast dessert from bowl to table.
- Prep Time: 15 minutes
- Cook Time: 13 minutes (on average)
- Resting Time: 1 minute
- Total Time: Under 30 minutes
My Chef’s Secret for the Best Molten Cake
My absolute best trick is to chill the batter. If you have time, pop the filled ramekins in the fridge for 20-30 minutes before baking. This helps the outside set faster in the oven, protecting that precious liquid center. It’s a foolproof way to get that perfect flow every single time.
A Fun Chocolate Fact
Did you know the type of chocolate you use is called “couverture”? It’s a fancy word for chocolate with a higher cocoa butter content. This extra cocoa butter is what gives professional desserts their amazing snap and melt-in-your-mouth quality. Using good chocolate in your home baking makes you feel like a pro!
What You’ll Need to Make It
- Six 6-ounce ramekins
- Mixing bowls (medium and large)
- Whisk
- Double boiler (or a heatproof bowl and a saucepan)
- Rubber spatula
- Baking sheet
Storing Your Chocolate Molten Cakes
Before Baking: This is the best way to get ahead! You can prepare the batter, fill the ramekins, cover them tightly with plastic wrap, and refrigerate for up to 24 hours. When you’re ready, just bake them straight from the fridge. You may need to add a minute or two to the baking time.
After Baking: Sadly, molten cakes are meant to be eaten immediately. The magic is in the warm, flowing center. If you have leftovers, they will still taste delicious as a dense, fudgy cake, but the “molten” effect will be gone.
Freezing: For a great make-ahead option, freeze the unbaked, filled ramekins. Wrap each one well in plastic wrap and then foil. They can be frozen for up to a month. Bake from frozen, adding about 3-5 extra minutes to the bake time.
Tips & Advice for Success
- Quality Counts: Use the best chocolate you can find. It’s the main flavor, so make it a good one.
- Watch the Clock: Set a timer. Overbaking is the enemy of the gooey center. When the edges look set and the top is just firm, they’re done.
- Serve Immediately: Have your plates ready and your ice cream scooped. The show is best when the cake is hot.
- Don’t skip greasing and sugaring the ramekins. It’s essential for a clean release.
Presentation Ideas to Impress
- Place the cake on a white plate for stunning contrast. Add a scoop of vanilla ice cream and a fresh mint leaf.
- Drizzle a little raspberry or caramel sauce around the plate for a restaurant-style look.
- Add texture with a sprinkle of toasted nuts, like hazelnuts or almonds, or some crunchy cocoa nibs.
- For a simple, elegant finish, just a light dusting of powdered sugar is perfect.
Healthier Chocolate Cake Twists
Love the idea but want to lighten it up? Try these variations:
- Flourless Molten Cake: Swap the flour for ground almonds or hazelnuts for a rich, gluten-free option with a nutty flavor.
- Sweetener Swap: You can replace the granulated sugar with coconut sugar for a deeper, caramel-like taste.
- Zesty Orange: Add a tablespoon of orange zest to the batter and serve with fresh orange segments for a bright, fruity twist.
- Espresso Kick: Stir a teaspoon of instant espresso powder into the melted chocolate. It won’t make it taste like coffee, but it will make the chocolate flavor even deeper and more complex.
- Peanut Butter Center: For a fun surprise, place a small dollop (about a teaspoon) of natural peanut butter in the center of the batter in each ramekin before baking.
- Mint Chocolate: Add 1/4 teaspoon of pure peppermint extract to the batter and serve with a dark chocolate sauce for a refreshing take.
Common Mistakes to Avoid
Mistake 1: Overbaking the Cakes
This is the most common error. It happens because we’re used to baking cakes until a toothpick comes out clean. With a molten cake, that clean toothpick means you’ve baked away the lovely liquid center. Your cake will still be tasty, but it will be solid. How to avoid it: Trust the jiggle! At the 12-minute mark, gently shake the baking sheet. The tops should look set and dry, but the center should jiggle like soft pudding. It will continue to cook a bit in the hot ramekin after you take it out.
Mistake 2: Using the Wrong Chocolate
Using chocolate chips or low-quality baking chocolate can lead to a grainy texture and a weak flavor. Chips have stabilizers to help them keep their shape, which is not what we want here. How to avoid it: Buy a bar of good bittersweet or dark eating chocolate (around 60-70% cocoa). Chop it up yourself. The better the chocolate, the richer and smoother your molten chocolate center will be.
Mistake 3: Not Preparing the Ramekins Properly
If you just butter the ramekins, the cakes might still stick. If you only use a cooking spray, you won’t get that delightful sugary crust. How to avoid it: Do both steps. First, use softened butter and a pastry brush to coat every nook, including the rim. Then, add a spoonful of sugar and tilt the ramekin to coat all the butter. Tap out the excess. This buttery, sugary layer is your insurance policy for a perfect unmolding.
Mistake 4: Skipping the Rest Time After Baking
It’s so tempting to flip the cake out the second it leaves the oven. If you do, it might fall apart because it’s too soft. How to avoid it: Be patient for that one single minute. This short rest allows the outer structure of the cake to firm up just enough to hold its shape when you turn it over onto the plate. Set a timer so you don’t forget!
Frequently Asked Questions
Can I make molten cakes ahead of time?
Yes, absolutely! This is a great party trick. You can prepare the batter and fill the ramekins up to a day in advance. Just cover them tightly with plastic wrap and keep them in the refrigerator. When your guests arrive, simply pop them in the preheated oven and bake. You might need to add 1-2 extra minutes since they are starting from cold. You can also freeze them for longer storage.
What if I don’t have ramekins?
No problem! You can use a standard muffin tin in a pinch. Just be sure to grease and sugar the cups very well. The baking time will be shorter—start checking at around 9-10 minutes. The cakes will be smaller, but just as delicious. For a real showstopper, you can bake one large cake in a 7-inch springform pan, but you’ll have to adjust the time and won’t get individual servings.
Why did my molten cake turn out fully baked inside?
This almost always means it was in the oven too long. Oven temperatures can vary, so your 13 minutes might be my 11 minutes. Use the visual and physical cues, not just the timer. Look for set edges and a jiggly center. Also, make sure your oven is fully preheated. A hot oven is crucial for the quick bake that sets the outside while leaving the middle soft.
Can I reheat a molten cake?
You can reheat a baked cake, but it won’t be molten again. The heat will cook the center through. For the best experience, it’s designed to be eaten fresh. If you do have leftovers, warming them for 10-15 seconds in the microwave will make them soft and fudgy, which is still delightful with ice cream.
What’s the best chocolate to use?
Choose a chocolate you would enjoy eating on its own. A bittersweet chocolate bar with 60-70% cocoa solids is ideal. It provides a deep, rich chocolate flavor that isn’t too sweet. Brands like Ghirardelli, Lindt, or Valrhona are widely available and work beautifully. Avoid unsweetened chocolate, as the cake will be too bitter.
Is it safe to eat the liquid center?
Yes, it’s perfectly safe. The center is not raw batter; it’s a combination of cooked eggs, melted chocolate, and butter that simply hasn’t solidified. It reaches a temperature that makes it safe to eat. The texture is meant to be soft, creamy, and luxurious.
How can I tell if my eggs are fresh?
Place your egg in a bowl of water. A very fresh egg will lie flat on the bottom. An older but still good egg will stand up on one end. If the egg floats, it’s best not to use it. Fresh eggs give better structure to your baked goods. You can learn more about the importance of quality ingredients, like eggs, for your overall micronutrient intake from trusted health sources.
Can I add liqueur to the recipe?
Definitely! A tablespoon of Grand Marnier, Chambord, or coffee liqueur can add a wonderful grown-up flavor. Stir it into the melted chocolate after you take it off the heat. The alcohol will mostly bake off, leaving behind a lovely aroma and taste. Just be mindful of serving it to guests who may avoid alcohol.
My cake stuck to the ramekin. What went wrong?
This usually means the ramekins weren’t greased and sugared well enough. Next time, be very thorough with the butter, getting into every crevice. The sugar coating creates a non-stick layer. Also, don’t let the baked cakes sit for more than a minute or two before inverting, as they can start to steam and stick.
What should I serve with molten chocolate cake?
The classic pairing is a simple scoop of vanilla ice cream. The cold, creamy ice cream melting into the warm cake is heavenly. Whipped cream, fresh berries (like raspberries or strawberries), or a dollop of crème fraîche are also fantastic. The tartness of berries cuts through the richness beautifully. For more incredible dessert recipes that pair well with chocolate, like a stunning Chocolate Strawberry Cheesecake, there are plenty of ideas to explore.
If you’re looking for more baking inspiration, be sure to browse our entire collection of delicious cake and cupcake recipes for your next sweet project.
Ready to Bake Some Joy?
There you have it—my best tips and tricks for creating the ultimate Molten Chocolate Cake. It’s a recipe that looks impressive but is truly within everyone’s reach. The joy of seeing that warm chocolate flow is worth every minute. I hope this recipe becomes a special treat in your home, just like it is in mine. Now, go preheat that oven and get ready for some serious chocolate happiness. Don’t forget to share your creations! Happy baking!
Equipment
- Ramequins (6 oz)
- Mélangeur
- Spatule en caoutchouc
- Plaque de cuisson
- Bol résistant à la chaleur
Ingredients
- 2 grands œufs
- 1.75 tasses farine tout usage
- 1 tasse sucre granulé
- 6 oz chocolat noir de haute qualité
- 0.5 tasse beurre non salé à température ambiante
- 1 cuil. à café extrait de vanille pur
- 0.25 cuil. à café sel
Instructions
- Préchauffez votre four à 220°C et graissez les ramequins avec du beurre et du sucre.
- Faites fondre le chocolat dans un bain-marie ou un bol résistant à la chaleur placé au-dessus d'une casserole d'eau frémissante.
- Dans un autre bol, fouettez ensemble la farine et le sel.
- Incorporez les œufs dans le chocolat fondu légèrement refroidi jusqu'à ce que le mélange épaississe et brille.
- Ajoutez graduellement le mélange de farine au chocolat et aux œufs, en remuant jusqu'à ce que tout soit juste combiné, puis incorporez le beurre et la vanille jusqu'à obtenir un mélange homogène.
- Répartissez la pâte uniformément dans les ramequins préparés, placez-les sur une plaque de cuisson, et faites cuire pendant 12 à 15 minutes.
- Laissez les gâteaux reposer pendant 1 minute, passez un couteau autour des bords, et renversez sur des assiettes de service.