
Beat the Heat with This No-Bake Banana Cheesecake!
Have you ever had one of those summer days so hot, you’d swear you could fry an egg on the sidewalk? I had one last July, and my oven was definitely on strike. But my family was craving something spectacular for dessert. That’s when I dreamed up this Refreshing No Bake Banana Split Cheesecake. It’s like your favorite ice cream parlor treat decided to dress up as a creamy, dreamy cheesecake. The best part? You can make the whole gorgeous thing without turning on a single heating element. It’s my go-to hero recipe when I need a crowd-pleaser that keeps us all cool.
A Sweet Slice of Fun: The Banana Split Story
The classic banana split, with its glorious pile of ice cream, fruit, and toppings, is a beloved American treat said to have been invented in 1904. My version pays playful homage to that soda fountain favorite but reimagines it for the cheesecake lover. Instead of a bowl of ice cream, we have a lush, no-bake cheesecake filling. We keep the classic banana split toppings—pineapple, strawberry, banana, and chocolate—but layer them right into the dessert. It’s a fun twist that combines tradition with modern, easy preparation. Every bite is a little celebration of that nostalgic, joyful flavor combination.
Why This No-Bake Banana Cheesecake Steals the Show
You are going to adore this recipe! First, it’s incredibly simple. No water baths, no fussy baking times, and no worrying about cracks. The crust comes together in minutes. The filling is just a matter of whipping and folding. It’s a fantastic recipe for new bakers but impressive enough for experts. The flavor is pure happiness. You get the tangy cream cheese, the sweet fruit, the rich chocolate, and that fantastic buttery crust all in one forkful. It’s cool, creamy, and absolutely irresistible. It’s the kind of dessert that makes people ask for the recipe before they’ve even finished their slice.
When to Whip Up This Creamy Dream
This cheesecake is the ultimate party dessert. It’s perfect for potlucks because it travels so well right in its dish. It’s a superstar at birthday parties, especially for kids who love the banana split theme. I love making it for Fourth of July barbecues—the red strawberries, white cream, and chocolate drizzle are so festive! It’s also my secret weapon for busy weeknights when I want a special treat without the hassle. Honestly, any day that needs a little extra sweetness is the right day for this no-bake banana split dessert.
Gathering Your Banana Split Cheesecake Ingredients
Here’s everything you’ll need to create this masterpiece. Make sure your cream cheese is fully softened to room temperature for the smoothest filling!
- 1 ½ cups graham cracker crumbs
- ½ cup melted butter
- 2 cups cream cheese, softened
- 1 cup granulated sugar
- 1 teaspoon vanilla extract
- 2 cups heavy whipping cream
- ½ cup powdered sugar
- 1 cup crushed pineapple, drained
- 1 cup sliced strawberries
- 2 bananas, sliced
- ½ cup maraschino cherries, halved
- ½ cup chocolate shavings
- Whipped cream for topping
- Chocolate syrup for drizzle
- Extra banana slices, cherries, and chocolate pieces for garnish
Easy Ingredient Swaps for Your No-Bake Cheesecake
Don’t have something on hand? No problem! Cooking should be fun and flexible.
- Graham Cracker Crumbs: Use crushed vanilla wafers, chocolate cookies, or even pretzels for a salty-sweet twist.
- Fruit: Swap the pineapple and strawberries for other berries, mandarin oranges, or even a berry medley.
- Chocolate Shavings: Chocolate chips, chopped chocolate bars, or even a sprinkle of cocoa powder work great.
- Heavy Cream: For a lighter option, you can use an extra 8 oz of whipped topping (like Cool Whip) folded into the cream cheese mixture instead of whipping your own cream.
Creating Your No-Bake Banana Split Masterpiece
Let’s get mixing! This process is as fun as it is easy. I’ll walk you through each step to ensure your banana split cheesecake is perfect.
Step 1: Building the Buttery Base
Grab a medium bowl and pour in your graham cracker crumbs. Drizzle that glorious melted butter right over the top. The smell is already heavenly! Use a fork to mix them together until every crumb is coated and the mixture looks like wet sand. Press this firmly and evenly into the bottom of your 9×13-inch dish. I like to use the bottom of a measuring cup to get it really smooth and compact. Pop this crust into the fridge to chill and set. This gives us a solid foundation that won’t get soggy.
Step 2: Whipping Up the Cloud-Like Filling
In a large bowl, beat the softened cream cheese, granulated sugar, and vanilla with a mixer until it’s completely smooth and creamy. No lumps allowed! In a separate, clean bowl, pour in the cold heavy cream and powdered sugar. Whip this on high speed until you see beautiful, stiff peaks form. The cream will be thick and hold its shape. Now, gently fold this fluffy whipped cream into the cream cheese mixture. Use a big spatula and fold slowly in a figure-eight motion to keep all that air in the cream. The result is a light, mousse-like filling that’s simply dreamy.
Pro tip: Make sure your cream cheese is truly at room temperature. Cold cream cheese will leave little lumps no matter how long you beat it!
Step 3: Assembling the Layers of Joy
Take your chilled crust from the fridge. Spread the creamy cheesecake filling evenly over the top with a spatula. Now, for the colorful part! Evenly scatter the well-drained crushed pineapple over the filling. Next, artfully arrange the bright red strawberry slices. Finally, add your fresh banana slices. I like to press them in slightly so they stay put. The mix of yellow, red, and cream is already so pretty. This is the heart of your easy no-bake cheesecake.
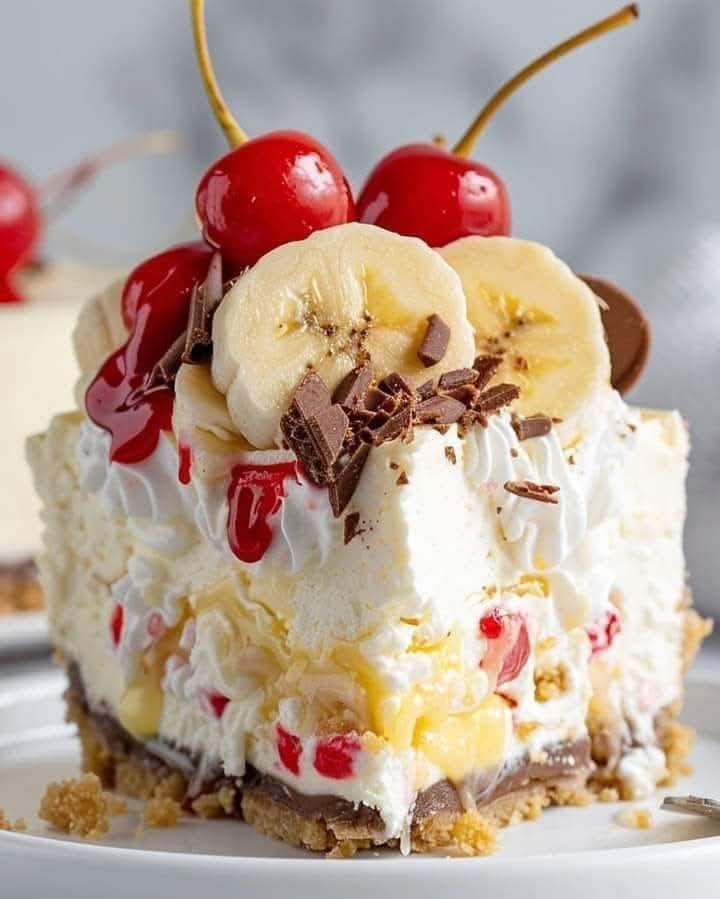
Step 4: The Grand Finale of Toppings
This is where it all comes together! Drop generous dollops of extra whipped cream all over the top of your fruit. Don’t be shy! Now, take your bottle of chocolate syrup and drizzle it artistically back and forth across the entire dessert. Scatter the halved cherries, extra banana slices, and chocolate shavings over everything. It should look like a festive, delicious party on a plate.
Chef’s tip: To prevent the bananas from browning, you can toss the slices in a tiny bit of lemon or pineapple juice before adding them. This keeps them looking fresh for hours!
Your No-Bake Cheesecake Timeline
Patience is the final ingredient! This dessert needs time to set properly so you get clean slices.
- Prep Time: A quick 20 minutes of active kitchen fun.
- Chill Time: At least 4 hours in the refrigerator. For the absolute best texture, I often let it set overnight.
- Total Time: 4 hours and 20 minutes from start to perfect slice.
- Servings: This makes about 12 generous servings. Perfect for a gathering!
The Secret to Silky-Smooth Success
My absolute best trick is all about the cream. Make sure your heavy whipping cream is ice cold before you start whipping. I sometimes even chill my mixing bowl and beaters in the freezer for 15 minutes beforehand. Cold cream whips up faster and holds those stiff peaks much better, giving your cheesecake filling an incredibly light and stable texture that won’t weep or deflate.
A Fun Fact About Your Ingredients
Did you know the maraschino cherry was originally a luxury item? They were made from a sour, dark cherry called the Marasca and preserved in a liqueur. The bright red, sweet cherries we use today became popular in the early 1900s, making them a perfect contemporary for the banana split’s invention! They add that iconic pop of color and sweetness that just says “celebration.”
Kitchen Tools You’ll Need
You likely have everything already! Here’s your checklist:
- 9×13-inch baking dish (glass or ceramic is perfect)
- Mixing bowls (one medium, two large)
- Electric hand mixer or stand mixer
- Rubber spatula
- Measuring cups and spoons
- Knife and cutting board for fruit
How to Store Your No-Bake Banana Cheesecake
This dessert stores beautifully, making it great for making ahead. Always keep it covered in the refrigerator. I press a layer of plastic wrap directly onto the surface of the cheesecake to prevent it from absorbing any other fridge odors and to keep the top from drying out.
For optimal quality and food safety, plan to enjoy your cheesecake within 3-4 days. The bananas will start to soften and brown a bit after the first day, but the flavor will still be wonderful. You can find more great tips on refrigerator safety and food storage times from trusted sources to keep all your creations fresh.
I do not recommend freezing this particular recipe. The high moisture content in the fresh fruit can cause the texture to become watery and the layers to separate when thawed.
My Best Tips for a Flawless Dessert
- Drain Your Pineapple Well: Press the crushed pineapple in a fine-mesh strainer or squeeze it in a paper towel. Extra juice can make your filling runny.
- Slice Fruit Evenly: Try to cut your strawberries and bananas to a similar thickness. This gives every bite a perfect mix of flavors.
- Chill Your Dish: If you have time, pop your empty baking dish in the freezer for 10 minutes before making the crust. This helps the butter in the crust firm up even faster.
Presentation Ideas to Wow Your Guests
- Serve it right from the dish for a casual, shareable feel.
- For individual servings, use a large round cookie cutter to press out neat circles of the set cheesecake and plate them separately.
- Garnish each slice with a whole maraschino cherry and a tiny paper umbrella for a tropical vibe.
- Drizzle the plates with extra chocolate and caramel syrup before placing the slice on top.
Lighter & Creative Recipe Variations
Love this concept? Try these fun spins on the classic!
- Tropical Twist: Use a coconut cookie crust, add diced mango and kiwi, and garnish with toasted coconut flakes.
- Berry Blast Cheesecake: Skip the pineapple and bananas. Use a mix of blueberries, raspberries, and blackberries for a gorgeous red, white, and blue look.
- Chocolate Lover’s Dream: Use a chocolate cookie crust, mix cocoa powder into the cheesecake filling, and top with chocolate chips and a chocolate ganache drizzle.
- Peanut Butter Cup: Swirl creamy peanut butter into the cheesecake filling and top with chopped peanut butter cups instead of fruit. If you’re a PB fanatic, you must try this incredibly rich no-bake peanut butter pie for your next fix.
- Mini Cheesecake Parfaits: Layer the crust, filling, and fruit in clear glasses for adorable individual desserts.
- Pumpkin Spice Version: In the fall, mix pumpkin puree and pumpkin pie spice into the filling, and top with pecans and a caramel drizzle.
For more inspiration that doesn’t require an oven, browse our entire collection of simple and delicious no-bake recipes. You’ll find everything from other cheesecakes to bars and pies!
Common Mistakes to Avoid
Avoid these simple pitfalls for the best no-bake banana cheesecake every single time.
Mistake 1: Using Cold Cream Cheese
This is the number one reason for a lumpy filling. Cold cream cheese doesn’t blend smoothly with the sugar or the whipped cream. You’ll end up with tiny bits of cream cheese throughout, ruining that silky texture. Always plan ahead! Take the cream cheese out of the fridge at least an hour before you start. Let it sit on the counter until it’s soft to the touch. You should be able to press a finger into it easily.
Mistake 2: Not Draining the Canned Fruit
Pouring canned pineapple with all its juice straight onto the filling is a recipe for a soggy, wet mess. The extra liquid will seep into the creamy layer and make it loose and difficult to slice. Always drain the fruit thoroughly in a colander. For extra security, I like to spread it on a few layers of paper towel and gently press to absorb the last bits of moisture. Your cheesecake layers will stay distinct and beautiful.
Mistake 3: Not Letting it Chill Long Enough
I know it’s tempting to dig in after just an hour or two. But rushing this step means your cheesecake won’t be set. You’ll try to slice it, and it will ooze and look messy. The four-hour minimum is crucial for the fats in the cream cheese and whipped cream to firm up properly. For the absolute cleanest slices and best texture, chilling overnight is magic. Trust me, the wait is worth it!
Mistake 4: Overmixing or Undermixing the Whipped Cream
Whipped cream has a sweet spot. If you don’t whip it enough (soft peaks), it will be too loose and make the filling runny. If you whip it too much, it becomes grainy and starts to turn into butter! Stop when the beaters leave distinct, firm peaks that hold their shape when you lift them. The cream should look smooth and thick, not curdled. Fold it gently into the cream cheese to keep all that air inside for a light filling.
Frequently Asked Questions
Can I make this no-bake banana cheesecake ahead of time?
Absolutely! This is one of its best features. You can make the entire cheesecake up to 24 hours in advance. Just prepare it as directed, cover it tightly, and let it set in the refrigerator overnight. In fact, I think it tastes even better the next day because all the flavors have more time to meld together. Add the final garnishes of whipped cream, syrup, and fresh banana slices right before serving so they look their best. It’s the perfect stress-free dessert for a party.
How do I prevent the banana slices from turning brown?
Bananas brown because of oxidation when they’re exposed to air. To stop this, you have a couple of easy options. First, you can toss the freshly sliced bananas in a little bit of lemon juice, lime juice, or even some of the juice from the canned pineapple. The acid slows down the browning. Second, you can simply wait to slice and add the bananas until you are ready to assemble the very top layer, just before the final chill. This minimizes their exposure time. Even if they brown a little, the dessert will still taste delicious.
Can I use a different type of pan?
Yes, you can adapt this to different pans, but the setting time and serving size will change. A 9×13-inch dish is standard for this recipe. You could use a 9-inch springform pan for a taller, more traditional round cheesecake shape. Just press the crust up the sides a bit. The setting time might be slightly longer due to the thicker layer of filling. For individual servings, consider using a muffin tin lined with cupcake liners. Just reduce the chill time to about 2 hours. Whatever pan you use, make sure it can hold all the layers.
Is it okay to use frozen fruit instead of fresh?
I do not recommend using frozen fruit directly in this recipe. Frozen fruit releases a tremendous amount of water as it thaws, which will make your creamy filling watery and prevent it from setting properly. If you only have frozen fruit, you must thaw it completely first and then drain it extremely well. Press it in a colander and then on multiple layers of paper towels to remove every drop of excess moisture. Even then, fresh fruit is preferred for the best texture and flavor in this particular no-bake dessert.
My filling seems too runny. What did I do wrong and can I fix it?
A runny filling usually happens for one of three reasons: the cream cheese was too cold and didn’t incorporate smoothly, the heavy cream wasn’t whipped to stiff peaks, or the fruit added too much liquid. Unfortunately, once assembled, you can’t fix it by adding more ingredients. Your best bet is to give it much more time to chill. Pop it in the fridge for 6-8 hours or overnight. The cold will firm up the fats. Next time, ensure your cream cheese is soft, whip that cream until stiff, and drain all fruit thoroughly.
Can I make this dessert healthier or lower in sugar?
You can make a few swaps for a lighter version, but remember that texture and flavor will change slightly. You could use a reduced-fat or Neufchâtel cream cheese. For the crust, try using less butter or mixing the crumbs with a little unsweetened applesauce. In the filling, you can reduce the granulated sugar by a quarter cup or use a sugar substitute made for baking. For the whipped cream, simply whip the heavy cream without added powdered sugar. It will be less sweet but still fluffy. The fruit will provide natural sweetness.
What’s the best way to cut clean slices?
For picture-perfect slices, use a long, thin knife. Run the knife under very hot water for a minute, then wipe it dry with a towel. The hot knife will glide through the cold, creamy layers cleanly. Make your cut in one smooth motion. Wipe the knife clean and reheat it under hot water for each new slice. This method prevents the chocolate drizzle and toppings from smearing and gives you those beautiful, restaurant-style layers in every piece.
Do I have to use maraschino cherries?
Not at all! While they add classic banana split color and flavor, they are optional. If you prefer, you can use fresh sweet cherries (pitted) when they are in season. You could also skip them entirely and use other garnishes like chopped nuts (walnuts or pecans are great), toffee bits, or even rainbow sprinkles for a fun, kid-friendly look. The beauty of this recipe is its flexibility. Make it your own with toppings your family loves most.
Can I use homemade whipped cream for the topping?
Yes, and I highly recommend it! Homemade whipped cream is so much fresher and tastier than the stuff from a can. Simply take about 1 cup of cold heavy whipping cream, 2 tablespoons of powdered sugar, and 1/2 teaspoon of vanilla extract. Whip it until soft peaks form just like you did for the filling. It will be light, not too sweet, and the perfect fluffy cloud on top of your cheesecake. Add it right before serving for the best texture.
I don’t like pineapple. What can I use instead?
No problem! The pineapple adds a nice tangy sweetness, but you can easily swap it out. Mandarin orange segments (well-drained) would be a fantastic substitute. You could also double up on the strawberries or add another berry like blueberries or raspberries. For a different direction, you could add a layer of sliced peaches or nectarines. The goal is to have that bright, fruity flavor contrast with the rich creaminess of the cheesecake filling, so choose a fruit you enjoy.
Ready, Set, Chill!
And there you have it! Your guide to making the most delightful, fuss-free, and impressive dessert. This Refreshing No Bake Banana Split Cheesecake is more than just a recipe; it’s a guaranteed smile on a plate. It brings together the joy of a classic treat with the ease of a no-bake method. So gather your ingredients, put on some fun music, and get ready to create a cool, creamy masterpiece that everyone will love. Happy no-baking
Equipment
- Plat de cuisson 9x13 pouces
- Grand bol
- Fouet électrique ou mixeur sur socle
- Spatule en caoutchouc
- Couteau et planche à découper
Ingredients
- 1 et ½ tasse chapelure de biscuit Graham
- ½ tasse beurre fondu
- 2 tasse fromage à la crème, ramolli
- 1 tasse sucre granulé
- 1 cuillère à café extrait de vanille
- 2 tasse crème épaisse
- ½ tasse sucre glace
- 1 tasse ananas écrasé, égoutté
- 1 tasse fraises tranchées
- 2 bananes, tranchées
- ½ tasse cerises Maraschino, coupées en deux
- ½ tasse copeaux de chocolat
- crème fouettée pour la garniture
- sirop de chocolat pour le filet
- tranches de banane supplémentaires, cerises et morceaux de chocolat pour la garniture
Instructions
- Mélangez la chapelure de biscuit Graham avec le beurre fondu jusqu'à ce qu'elle soit enrobée, puis pressez-la dans un plat de 9x13 pouces et mettez au réfrigérateur.
- Battez le fromage à la crème ramolli, le sucre granulé et l'extrait de vanille dans un grand bol jusqu'à l'obtention d'un mélange homogène.
- Dans un autre bol, fouettez la crème épaisse froide et le sucre glace jusqu'à ce qu'ils forment des pics fermes, puis incorporez délicatement le mélange de fromage à la crème.
- Étalez la garniture au fromage à la crème sur la croûte refroidie et ajoutez les ananas écrasés, les fraises et les tranches de banane par-dessus.
- Garnissez de crème fouettée, de sirop de chocolat, de cerises coupées en deux, de tranches de banane supplémentaires et de copeaux de chocolat.