
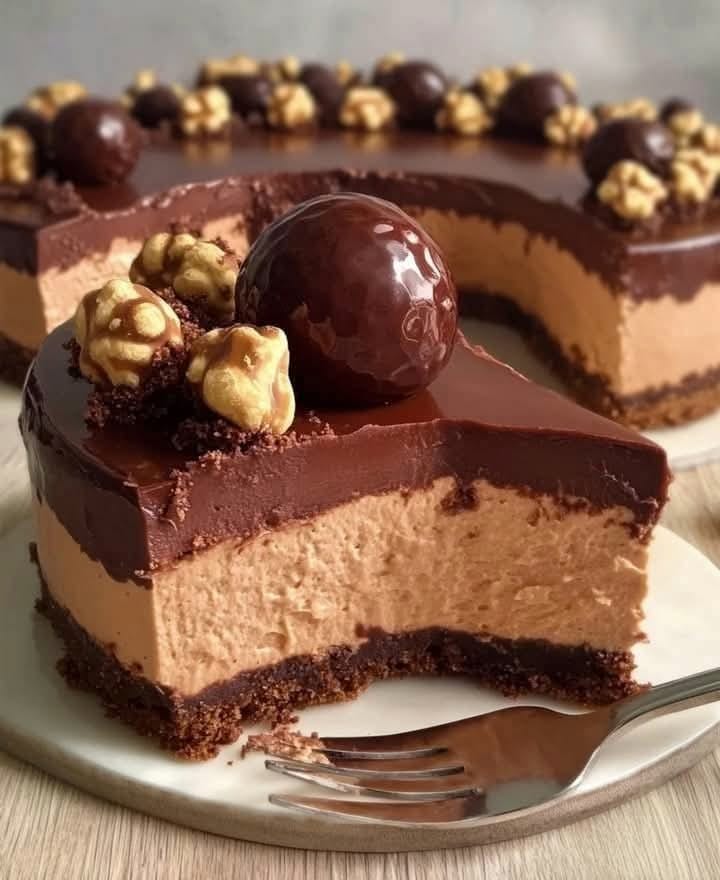
The Ultimate No-Bake Ferrero Cheesecake: A Chocolate Lover’s Dream
Okay, I have to confess something. My family has a serious Nutella addiction. We go through jars of it like it’s our job. One rainy afternoon, I was staring at a half-empty jar and a full pack of cream cheese, and a crazy idea hit me: what if I combined them into a dessert so rich, so chocolaty, so decadent, that it would satisfy even our deepest cravings? That’s how this No-Bake Ferrero Cheesecake was born. It’s the dessert I make when I want to hear a collective “WOW!” from the dinner table. It’s ridiculously easy, requires zero baking, and tastes like your favorite chocolate truffle in cheesecake form.
From a Sweet Spread to a Showstopper Dessert
While cheesecake itself has ancient roots, and Nutella became a pantry staple decades ago, no-bake cheesecakes like this are a modern miracle for busy home cooks. They skip the oven, the water bath, and the stress of cracks. This particular recipe takes inspiration from the beloved Ferrero Rocher chocolate—that perfect trio of hazelnut, chocolate, and wafer. We’re bringing that same magic into a creamy, sliceable masterpiece. It’s a delightful twist where classic Italian *gianduja* meets the convenience of American fridge-cake culture.
Why You’ll Fall in Love With This No-Bake Cheesecake
Let me count the ways! First, it’s foolproof. No baking means no worrying about over-mixing, over-baking, or sinking centers. Second, the flavor is just incredible. It’s like eating a cloud of Nutella that’s been hugged by cream cheese. Third, it’s a make-ahead superstar. You can prepare it the day before a party, leaving you free to enjoy your guests. Honestly, the hardest part is waiting for it to chill!
When This Dessert Steals the Show
- Birthday Celebrations: A stunning, crowd-pleasing alternative to a traditional cake.
- Holiday Gatherings: Its festive, gold-wrapped truffle decoration screams Christmas or New Year’s Eve.
- Potluck Dinners: It travels well and always, always gets people talking.
- Just Because: Sometimes a Tuesday deserves a slice of pure joy.
Gathering Your No-Bake Cheesecake Ingredients
You won’t believe how simple the ingredient list is. Here’s what you need for this triple-layered delight:
For the Base:
- 350g Digestive biscuits (or Graham crackers), crushed
- 180g salted butter, melted
For the Nutella Cheesecake Filling:
- 300ml double cream (or heavy whipping cream), cold
- 500g full-fat cream cheese, room temperature
- 100g icing sugar (confectioner’s sugar)
- 250g Nutella
For the Chocolate Ganache & Decoration:
- 100g good-quality dark chocolate, finely chopped
- 100ml double cream (or heavy cream)
- 25g toasted hazelnuts, chopped
- 8 Ferrero Rocher truffles (optional, but highly recommended!)
Handy Ingredient Substitutions
No stress if you’re missing something! Here are some easy swaps:
- Digestive Biscuits: Graham cracker crumbs work perfectly.
- Salted Butter: Unsalted butter plus a pinch of salt.
- Double Cream: Heavy whipping cream (minimum 36% fat).
- Dark Chocolate: Use semi-sweet or milk chocolate for a sweeter ganache.
- Nutella: Any other chocolate-hazelnut spread will do.
Your Step-by-Step Guide to a Perfect No-Bake Cheesecake
Follow these simple steps for a guaranteed perfect result every single time.
Step 1: Create the Crunchy Biscuit Base
First, get your 8-inch springform pan ready. Crush those digestive biscuits into fine crumbs—a food processor is quick, but putting them in a zip-top bag and rolling with a rolling pin is strangely therapeutic! In a bowl, mix the golden crumbs with the melted butter until it looks like wet sand. The smell is already heavenly. Press this mixture firmly and evenly into the bottom of your pan. I use the bottom of a glass to get it nice and compact. Pop this into the fridge to set. A firm base is key for clean slices later.
Step 2: Whip Up the Dreamy Nutella Filling
Now for the magic. In a large, cold bowl, whip your double cream to soft peaks. You want it billowy and thick, but not grainy. In another bowl, beat the room-temperature cream cheese until smooth—no lumps allowed! Add the icing sugar and that whole jar of Nutella. Beat it all together until it’s a gorgeous, uniform, creamy brown. Pro tip: Let your cream cheese sit out for an hour. Cold cream cheese will make your filling lumpy. Now, gently fold the whipped cream into the Nutella mixture. Be patient and use a big spatula, folding until no white streaks remain.
Step 3: Assemble and Let the Magic Happen
Take your chilled base from the fridge. Spoon the luxurious Nutella cheesecake filling on top. Spread it out with a spatula, getting it as smooth as you can. Give the pan a gentle tap on the counter to release any air bubbles. Now, the hardest part: patience. Cover the pan with cling film and chill it in the fridge for at least 6 hours, but overnight is truly best. This allows the filling to set firmly so you get that perfect, clean slice.
Step 4: Craft the Luscious Chocolate Ganache Topping
Once your cheesecake is rock-solid, make the ganache. Chop your dark chocolate finely and place it in a heatproof bowl. Heat the double cream in a small saucepan until it’s just starting to simmer—little bubbles will appear around the edge. Pour the hot cream over the chocolate, let it sit for a full 2 minutes to melt, then stir slowly from the center outwards until you have a glossy, velvety pool of chocolate heaven.
Step 5: The Grand Finale: Decoration!
Pour the slightly cooled ganache over the set cheesecake, tilting the pan to let it spread evenly. Immediately sprinkle the chopped toasted hazelnuts over the top. The contrast of textures is wonderful. Finally, unwrap your Ferrero Rocher truffles and place them strategically around the edge. This is your moment to be an artist! Chef’s tip: For a real “wow” factor, lightly warm a sharp knife under hot water, dry it, and slice. You’ll get perfect, clean-cut slices every time.
Timeline for Your No-Bake Dessert
Here’s a quick breakdown of your time investment:
- Active Prep Time: 30 minutes
- Chilling Time: 6 hours (ideally overnight)
- Total Time: 6 hours 30 minutes
- Servings: Makes 10-12 generous slices
The Golden Rule for a Perfect Set
Chef’s Secret: The single most important thing for a no-bake cheesecake is using full-fat ingredients. Low-fat cream cheese and cream simply won’t set as firmly. That high fat content is what gives you that luxurious, sliceable texture we all crave. Trust me, it’s worth every calorie!
A Fun Fact About Your Key Ingredient
Did you know that during World War II, cocoa was rationed in Italy? A pastry maker named Pietro Ferrero started mixing hazelnuts, which were plentiful in the Piedmont region, with a little cocoa to stretch his supply. This clever and ethical food choice in a time of scarcity eventually evolved into the creamy Nutella we know and love today!
Equipment You’ll Need
- 8-inch springform pan (non-negotiable for easy removal)
- Food processor or zip-top bag & rolling pin (for crushing biscuits)
- Two mixing bowls (one large)
- Electric hand mixer or stand mixer
- Spatula
- Small saucepan
Storing Your Hazelnut Chocolate Cheesecake
This cheesecake is a dream to store. Once assembled and decorated, keep it covered in the refrigerator. It will stay perfectly fresh and delicious for up to 4 days. The flavors actually deepen a little on day two!
Can you freeze it? Absolutely! For best results, freeze the cheesecake without the ganache topping. Wrap the chilled, set cheesecake (just the biscuit base and filling) tightly in a double layer of cling film and then foil. It will keep for up to 2 months. Thaw it overnight in the fridge before adding your fresh ganache and decorations.
If you have leftovers (a rare occurrence in my house!), simply cover the sliced edges with some parchment paper and keep it in the pan or transfer to an airtight container. The ganache might dull slightly, but the taste will be just as amazing.
Expert Tips for a Flawless Cheesecake
- Cold Cream, Warm Cheese: Whip your cream when it’s icy cold for maximum volume. Your cream cheese must be room temperature to blend smoothly.
- Fold Gently: When combining the whipped cream and Nutella mixture, fold gently with a spatula to keep all that lovely air in.
- Patience is a Virtue: Don’t rush the chilling time. Overnight chilling guarantees perfect, clean slices.
- Clean Cuts: For stunning slices, dip your knife in very hot water, wipe it dry, and cut in one smooth motion. Clean the knife between each cut.
Presentation Ideas to Impress Your Guests
- Drizzle extra melted chocolate in zig-zags over the ganache before adding the hazelnuts.
- Add edible gold leaf flakes for a truly luxurious touch.
- Serve each slice with a small scoop of vanilla bean ice cream on the side.
- Swap Ferrero Rochers for a sprinkle of sea salt flakes over the ganache for a sweet-salty twist.
Love This Recipe? Try These Other No-Bake Ideas!
If you enjoyed the simplicity and payoff of this no-bake dessert, you’ll adore exploring other chilled treats. For a fruity, tropical escape, the Mango Tango Cheesecake Cake layers bright mango flavor with creamy cheesecake in a showstopping cake form. Looking for something zesty and handheld? These Zesty Lemon Meringue Pie Cannolis are a fun, sunshiny project. Banana and peanut butter fans, this one’s for you: the Easy Banana Caramel Peanut Butter Cheesecake is pure comfort in a slice. And for individual servings perfect for parties, these Delightful Raspberry Cheesecake Cupcakes are as pretty as they are tasty.
Healthier Twists on the No-Bake Cheesecake
Craving the flavor but want a lighter option? Here are six simple variations:
- Lighter Filling: Use reduced-fat cream cheese and light whipping cream. The texture will be slightly softer but still delicious.
- Natural Sweetener: Swap icing sugar for powdered erythritol or monk fruit sweetener in the filling for a sugar-free version.
- Nut-Free Base: Use gluten-free oat cookies or crushed pretzels for a nut-free, salty-sweet base.
- Dairy-Free Delight: Use coconut cream (the thick part from a can) instead of double cream, and a dairy-free cream cheese alternative.
- Fruit Swirl: Before chilling, swirl in some raspberry puree or chopped strawberries into the filling for a fruity-chocolate combination.
- Mini Cheesecakes: Make individual portions in a muffin tin lined with paper liners. They set faster and are perfect for portion control.
Common Mistakes to Avoid With Your No-Bake Cheesecake
Mistake 1: Using Cold Cream Cheese
This is the number one reason for a lumpy filling. Straight-from-the-fridge cream cheese doesn’t blend well with the sugar and Nutella. It stays grainy no matter how long you beat it. Always plan ahead and let your cream cheese sit on the counter for about an hour until it’s soft to the touch. You should be able to press your finger into it easily. This ensures a silky-smooth, flawless filling.
Mistake 2: Over-Whipping the Cream
Whipping the cream past soft peaks into stiff peaks might seem like a good idea, but it can backfire. Over-whipped cream becomes grainy and is much harder to fold smoothly into the Nutella mixture. It can make your final cheesecake filling a bit stiff and less creamy. Stop whipping when the cream holds its shape on the whisk but the peaks gently flop over when you lift the beaters.
Mistake 3: Not Chilling Long Enough
I know the wait is torture! But slicing into a no-bake cheesecake before it’s fully set is a recipe for a soupy, messy slice. The filling needs that full 6-8 hours (or overnight) in the fridge to firm up properly. The fats in the cream and cheese need time to re-solidify. If you’re short on time, you can place it in the freezer for 2-3 hours to speed up the process, but the fridge is best for the perfect texture.
Mistake 4: A Soggy Biscuit Base
A base that crumbles or feels wet is often due to not using enough butter or not pressing it firmly enough. The melted butter is the glue. Make sure every crumb is coated, and then really press it down hard and evenly into the pan. Use the bottom of a glass or a measuring cup to compact it. A well-pressed base holds together beautifully when you slice and serve.
Mistake 5: Pouring Hot Ganache
If your chocolate ganache is too hot when you pour it over the chilled cheesecake, it can melt the top layer of the filling and create a messy blend. Let the ganache cool for 5-10 minutes after mixing. It should still be pourable but not steaming hot. This keeps those beautiful, distinct layers intact for a professional look.
Frequently Asked Questions
Can I make this no-bake cheesecake ahead of time?
Absolutely, and I highly recommend it! This is the perfect make-ahead dessert. You can prepare the entire cheesecake, complete with ganache and decorations, up to two days in advance. Just keep it covered in the refrigerator. The flavors meld and improve, and it gives you one less thing to worry about on the day of your event. In fact, I think it tastes even better on the second day.
What can I use instead of Digestive biscuits?
No problem at all. Graham cracker crumbs are the most common and perfect substitute. You’ll need about 2 ½ cups of crumbs. Other great options include crushed Oreos (for a chocolate-cookie base), shortbread biscuits, or even ginger snaps for a spicy twist. Just keep the butter-to-crumb ratio the same for the right consistency.
My cream cheese filling is runny. Can I fix it?
If your filling seems too soft after mixing, don’t panic. First, make sure you used full-fat, cold cream and room-temperature cream cheese. If it’s still runny, the mixture likely just needs more time to set. Pop the whole assembled cheesecake into the freezer for about 2 hours instead of the fridge. This should firm it up significantly. Next time, ensure your whipped cream is properly whipped to soft peaks.
Can I freeze the cheesecake for longer storage?
Yes, you can freeze it beautifully for up to 2 months. For the best results, freeze it without the ganache topping. Wrap the chilled, set cheesecake (base and filling only) very tightly in several layers of plastic wrap and then aluminum foil to prevent freezer burn. Thaw it overnight in the refrigerator and then add your fresh ganache and decorations before serving.
Is it necessary to use a springform pan?
While not 100% impossible, a springform pan is highly recommended. The removable sides make it easy to release the cheesecake without damaging the sides or the beautiful crust. If you only have a regular cake pan, line the bottom and sides with parchment paper with an overhang to use as “handles” to lift the cheesecake out.
Can I use milk chocolate for the ganache?
You definitely can! Using milk chocolate will create a sweeter, milder ganache topping. Just follow the same 1:1 ratio by weight of chocolate to cream. Since milk chocolate is softer, you might find the ganache sets a bit softer as well. If you prefer a firmer set, you can reduce the cream slightly, to about 80ml for every 100g of milk chocolate.
Why did my ganache turn out grainy or separate?
A grainy or separated ganache usually happens if the cream was too hot and “seized” the chocolate, or if water got into the mix. Always ensure your bowl and utensils are completely dry. Heat the cream just until it’s steaming around the edges, not boiling. If it does separate, try adding a teaspoon of room-temperature cream and whisking vigorously to bring it back together.
How do I get perfectly clean slices?
The secret weapon is a hot, dry knife. Run a long, sharp knife under very hot tap water, wipe it completely dry with a towel, and then make a smooth, confident cut straight down. Wipe the knife clean and reheat it between every single slice. This cuts through the firm ganache and creamy filling without dragging or making a mess.
Can I make this recipe without Nutella?
Of course! You can substitute any chocolate-hazelnut spread. For a different flavor profile, try using a good-quality salted caramel spread, biscoff cookie butter, or even a smooth peanut butter. Just keep the quantity the same (250g) for the correct filling consistency.
Is there a way to decorate it without Ferrero Rochers?
Absolutely. The Ferrero Rochers are a fun, festive garnish, but you can easily decorate without them. Try a simple sprinkle of crushed, toasted hazelnuts and a dusting of cocoa powder. You could also use chocolate curls, fresh raspberries, or a simple whipped cream border piped around the edge for an elegant look.
And there you have it! This No-Bake Ferrero Cheesecake is more than just a recipe; it’s a guaranteed path to becoming a dessert hero. It combines pantry-friendly ingredients with stunning results, proving that the most impressive desserts don’t require an oven. For more incredible no-fuss ideas like this, be sure to browse our entire collection of no-bake cheesecake recipes.
So, grab your mixer, crush those biscuits, and get ready for the compliments to roll in. This rich, creamy, hazelnut-studded masterpiece is waiting to become your new signature dessert. Go on, treat yourself and your loved ones. You’ve earned a slice of this pure chocolate heaven!
Equipment
- Grand bol
- Fouet
- Spatule
- Moule à charnière de 20 cm
- Papier sulfurisé
Ingredients
- 350 g biscuits Digestive écrasés
- 180 g beurre salé, fondu
- 300 ml crème double, froide
- 500 g fromage à la crème entier, à température ambiante
- 100 g sucre glace
- 250 g Nutella
- 100 g chocolat noir de bonne qualité, haché finement
- 100 ml crème double pour la ganache
- 25 g noisettes grillées, hachées
- 8 truffes Ferrero Rocher (facultatif)
Instructions
- Préparez un moule à charnière de 20 cm et écrasez les biscuits Digestive en miettes fines.
- Dans un bol, mélangez les miettes de biscuits avec le beurre fondu jusqu'à obtenir une texture semblable à du sable humide, puis pressez au fond du moule et réfrigérez pour faire prendre.
- Dans un grand bol, battez la crème double froide jusqu'à obtenir des pics souples.
- Dans un autre bol, battez le fromage à la crème à température ambiante jusqu'à ce qu'il soit lisse, puis ajoutez le sucre glace et le Nutella, en mélangeant jusqu'à ce que tout soit bien combiné.
- Incorporez délicatement la crème fouettée dans le mélange de Nutella jusqu'à ce qu'il n'y ait plus de stries blanches.
- Versez la garniture sur la base de biscuits réfrigérée, lissez le dessus et tapez pour libérer les bulles d'air, puis couvrez et réfrigérez pendant au moins 6 heures ou toute la nuit.
- Pour la ganache, hachez le chocolat noir et placez-le dans un bol. Chauffez la crème double jusqu'à frémissement, versez sur le chocolat, laissez reposer, puis remuez jusqu'à obtenir une texture lisse et soyeuse.
- Une fois le cheesecake bien pris, versez la ganache sur le dessus et saupoudrez de noisettes hachées. Décorez éventuellement avec les truffes Ferrero Rocher.