
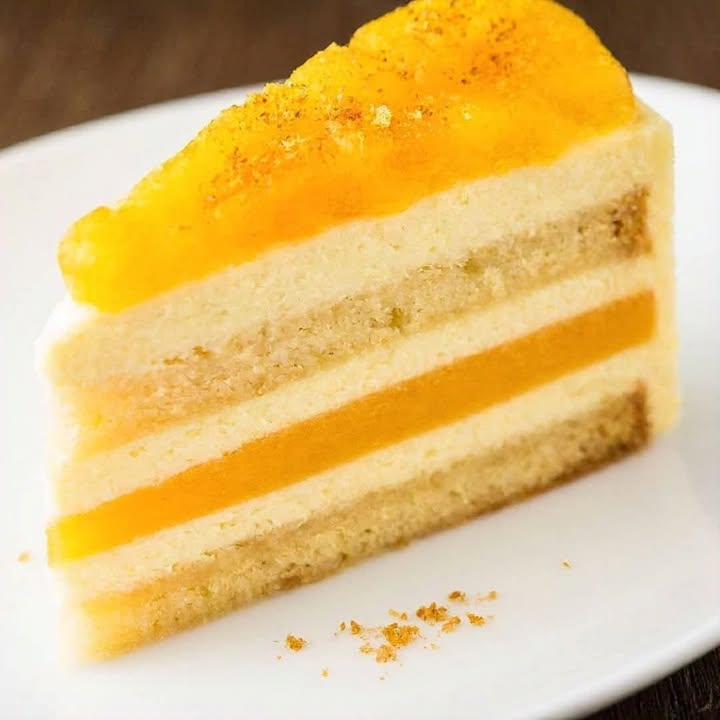
Your New Favorite Summer Treat
Is there anything better than a slice of cake that tastes like pure sunshine? I was searching for the perfect dessert for a family barbecue last year when I imagined combining two of my favorite fruits. The result was this Pineapple Mango Heavenly Cake. It’s not overly sweet, and the tropical flavors make everyone feel like they’re on vacation. This cake has become my most-requested recipe for birthdays and casual get-togethers alike.
The Story of a Tropical Dream
This recipe didn’t come from a fancy cookbook. It was born in my kitchen on a rainy day when I was craving summer. I love classic pineapple upside-down cake, and I’m always looking for ways to use ripe, fragrant mangoes. I thought, why not put them together? After a few experiments (some better than others!), I landed on this perfect balance. The cake is moist from the crushed pineapple, while the mango buttercream is so silky and fresh. It’s a modern twist on those beloved tropical flavors my grandma used to love.
Why You’ll Love This Pineapple Mango Cake
You will adore this recipe because it’s surprisingly simple but looks and tastes spectacular. The fruits keep the cake incredibly moist for days. The mango buttercream is a revelation—it’s light, fruity, and not at all like a heavy, sugary frosting. It’s a dessert that feels special but doesn’t require advanced baking skills. Plus, the vibrant yellow color just makes people happy!
Perfect Occasions for This Heavenly Cake
This cake is incredibly versatile. I’ve served it at everything from a casual Sunday lunch to a baby shower. It’s a total hit at summer potlucks and Fourth of July parties. The tropical vibe makes it perfect for graduation parties that signal the start of summer. It also makes a wonderful Mother’s Day treat—it’s a beautiful, bright dessert that says “you’re special.”
What You’ll Need: Ingredients
For the Cake:
- 2 1/4 cups all-purpose flour
- 1 1/2 cups granulated sugar
- 3 teaspoons baking powder
- 1 teaspoon salt
- 1/2 cup unsalted butter, softened
- 1 cup whole milk
- 2 large eggs
- 1 teaspoon vanilla extract
- 1 cup crushed pineapple (with a little juice is fine)
- 1 cup diced mango
For the Mango Buttercream:
- 1 cup unsalted butter, softened
- 2 cups powdered sugar
- 1/2 cup mango puree (blend fresh mango until smooth)
- 1 teaspoon vanilla extract
Smart Swaps: Substitution Options
Don’t stress if you’re missing an item! Here are easy swaps:
- All-purpose flour: A 1-to-1 gluten-free baking blend works well.
- Whole milk: Any milk you have—2%, almond, or oat milk—will do.
- Fresh mango: Thawed frozen mango chunks are perfect for both the cake and puree.
- Canned pineapple: Use canned crushed pineapple in its own juice. Just drain it slightly.
- Butter: For a dairy-free version, use a high-quality plant-based butter stick.
How to Make Pineapple Mango Heavenly Cake
Timing: Prep: 25 min | Cook: 35 min | Cool: 1 hr | Total: 2 hrs
Step 1: Prep and Preheat
Start by preheating your oven to 350°F (175°C). Grease and line two 9-inch round cake pans with parchment paper. The gentle heat of the oven will soon transform your simple batter into a golden, fragrant masterpiece. Taking this moment to prepare your pans ensures your beautiful cakes will release perfectly later. There’s nothing worse than a cake that sticks!
Step 2: Make the Cake Batter
In a large bowl, whisk together the flour, sugar, baking powder, and salt. In another bowl, beat the softened butter until creamy. Add the milk, eggs, and vanilla to the butter and mix until just combined. Pour the wet ingredients into the dry ingredients. Gently fold everything together with a spatula until you no longer see streaks of flour. The batter will be thick and luscious. Now, fold in the crushed pineapple and diced mango until they’re just distributed. Watch as the bright yellow mango pieces and golden pineapple create a confetti-like swirl in the batter.
Pro tip: Don’t overmix! Overworking the batter is the main cause of a tough, dense cake. A few small lumps are absolutely fine.
Step 3: Bake to Perfection
Divide the batter evenly between your two prepared pans. Smooth the tops with your spatula. Place them in the center of your preheated oven. Bake for 30-35 minutes. You’ll know it’s done when the top is springy to the touch and a toothpick inserted into the center comes out clean. Your kitchen will smell incredible—like a tropical bakery!
Step 4: Cool the Cakes
Once baked, let the cakes cool in their pans for about 15 minutes. This allows them to set so they don’t fall apart. Then, run a knife around the edge of each pan and carefully turn the cakes out onto a wire rack. Peel off the parchment paper and let them cool completely. Patience is key here. Frosting a warm cake is a recipe for a melty, sliding mess.
Step 5: Whip Up the Mango Buttercream
While the cakes cool, make your frosting. In a medium bowl, beat the softened butter for 2-3 minutes until it’s very pale and fluffy. Gradually add the powdered sugar, about a half cup at a time, beating well after each addition. Once it’s all incorporated, pour in the fresh mango puree and vanilla extract. Beat for another 2-3 minutes until the frosting is light, airy, and a beautiful soft sunset yellow.
Chef’s secret: For an ultra-smooth buttercream, sift your powdered sugar first. It prevents any little lumps and creates a silkier texture.
Step 6: Assemble Your Masterpiece
Place one cooled cake layer on your serving plate. Spread a generous, even layer of mango buttercream over the top. Carefully place the second cake layer on top. Now, cover the entire cake with the remaining frosting. Use a spoon or offset spatula to create pretty swirls. For a stunning finish, decorate the top with a few extra pieces of diced mango or a sprinkle of toasted coconut.
Chef’s Secret for the Best Texture
The single best thing you can do for this cake is to use room temperature ingredients. Take your eggs, milk, and butter out of the fridge about an hour before you start. Room-temperature ingredients emulsify better, creating a smoother, more uniform batter that rises evenly in the oven. This simple step guarantees a supremely tender crumb.
A Sweet Bit of History
Combining pineapple and mango in baking is a nod to the classic “tropical fruit cake” tradition, popular in places like Hawaii and the Caribbean. These cakes often use what’s plentiful and ripe. My version modernizes the idea by using fresh fruit in the batter and a fruit-based buttercream instead of a heavy, overly sweet glaze. It’s a celebration of simple, sun-ripened flavors.
What You’ll Need to Bake It
- Two 9-inch round cake pans
- Parchment paper
- Mixing bowls (large and medium)
- Electric hand mixer or stand mixer
- Wire cooling rack
- Spatula
- Measuring cups and spoons
Keeping Your Cake Fresh
Because of the fresh fruit, this cake is best stored in the refrigerator. Cover it well with a cake dome or plastic wrap. It will stay moist and delicious for up to 4 days. The buttercream will firm up when cold. For the best texture and flavor, let slices sit at room temperature for about 15 minutes before serving. This allows the frosting to soften and the flavors to fully bloom.
You can also freeze the unfrosted cake layers. Wrap them tightly in plastic wrap and then in foil. They’ll keep for up to 2 months. Thaw overnight in the refrigerator before frosting and serving.
Tips for a Flawless Cake Every Time
- Use ripe fruit: The flavor of your cake depends on sweet, ripe mango and pineapple. A ripe mango will give slightly when gently squeezed.
- Drain the pineapple: If using canned pineapple, give it a light squeeze in a strainer to remove excess liquid. Too much juice can make the batter runny.
- Chill before slicing: For the cleanest slices, pop the frosted cake in the fridge for 30 minutes. The frosting will set, and your knife will glide through easily.
Make It Your Own: Presentation Ideas
- Top with a ring of fresh raspberries or strawberries for a pop of red.
- Press toasted coconut flakes onto the sides of the frosted cake for an elegant look.
- Add edible flowers for a stunning centerpiece at a bridal shower or garden party.
- Serve each slice with a dollop of freshly whipped cream.
Delicious Variations to Try
This recipe is a wonderful canvas for creativity. Here are six ways to mix it up:
- Coconut Mango Dream: Add 1/2 cup of shredded sweetened coconut to the cake batter. Use coconut milk instead of regular milk and sprinkle toasted coconut on top.
- Pineapple Upside-Down Style: Before adding batter, sprinkle brown sugar and arrange pineapple rings and maraschino cherries in the bottom of your greased pans. Bake as directed, then flip while warm.
- Tropical Fruit Medley: Swap half of the mango for diced papaya or kiwi. The colors and flavors will be amazing.
- Ginger Spice: Add 1 teaspoon of ground ginger to the dry ingredients for a warm, zesty kick that pairs beautifully with the fruit.
- Lime Zest Frosting: Add the zest of one lime to the mango buttercream for a bright, citrusy note that cuts the sweetness.
- Rum Soaked: Brush the cooled cake layers with a little bit of rum or pineapple juice mixed with a tablespoon of sugar before frosting for an extra moist bite.
If you love exploring unique flavor combinations, you might be inspired by other creative bakes like this enchanting lavender, blueberry, and chocolate cake that balances floral notes with rich cocoa. For the ultimate chocolate fix, this decadent chocolate cake is a crowd-pleaser. Cheesecake fans should try this chocolate strawberry cheesecake, and for an easy slow-cooker treat, these chocolate pecan turtles are irresistible.
Common Mistakes to Avoid
Mistake 1: Using Cold Ingredients
This is the most common error. Butter, eggs, and milk straight from the fridge don’t blend well. You get a chunky, curdled-looking batter that won’t rise properly. Always plan ahead to let your ingredients warm up on the counter. Your final cake will be taller, lighter, and have a much better texture.
Mistake 2: Overmixing the Batter
We all want a smooth batter, but mixing too much is a problem. Overmixing develops the gluten in the flour, leading to a tough, chewy cake instead of a soft, tender one. Mix just until you no longer see dry flour. It’s okay if there are a few small lumps—they will bake out.
Mistake 3: Frosting a Warm Cake
The excitement to finish your cake is real! But if the layers are even slightly warm, the buttercream will melt, slide right off, and become a greasy mess. Be patient. Let the cakes cool completely on a wire rack. This can take a full hour. Your beautiful frosting job depends on it.
Mistake 4: Not Draining Canned Pineapple
If you’re using canned crushed pineapple, pouring it in straight from the can adds too much extra liquid. This can throw off the balance of your batter, making it soupy and causing the cake to sink in the middle. Simply place the pineapple in a fine-mesh strainer and press gently with a spoon to remove the excess juice.
While this cake is a treat, using fresh fruit does contribute some nutritional value. For instance, mangoes provide vitamin C and fiber. It’s worth noting that using butter does add saturated fat. For more information on balancing different types of fats in your diet, you can read about unsaturated fats from trusted sources.
Your Pineapple Mango Cake Questions, Answered
Can I use frozen mango?
Absolutely! Frozen mango is a fantastic option and often picked at peak ripeness. Thaw the mango chunks completely and pat them dry with a paper towel before dicing for the cake. For the puree, you can blend the frozen chunks directly—they will thaw quickly in the blender and create a smooth, cold puree that’s perfect for the frosting.
How do I know when my cake is done baking?
There are three reliable signs. First, the edges of the cake will pull slightly away from the sides of the pan. Second, the top will be golden and spring back when you gently press it. Finally, and most importantly, insert a toothpick or thin skewer into the center of the cake. It should come out clean, with no wet batter clinging to it. A few moist crumbs are okay.
Can I make this cake ahead of time?
Yes, you can! Bake the cake layers up to two days in advance. Let them cool completely, then wrap each layer tightly in plastic wrap and store them at room temperature. You can also make the frosting a day ahead; keep it covered in the refrigerator. Let it come to room temperature and give it a quick re-whip with your mixer before frosting the cake.
My buttercream looks runny. What happened?
This usually happens if your butter was too soft or your mango puree had a lot of liquid. To fix it, pop the bowl of frosting into the refrigerator for 20-30 minutes to firm up the butter. Then, beat it again with your mixer. You can also add a little more sifted powdered sugar, a quarter cup at a time, until it reaches a spreadable consistency.
Can I make this into cupcakes?
You sure can! This batter will make about 24 standard cupcakes. Line your muffin tins with paper liners and fill each one about two-thirds full. Bake at the same temperature (350°F) for 18-22 minutes, or until a toothpick comes out clean. Let them cool completely before frosting.
What’s the best way to store leftovers?
Because of the fresh fruit and dairy-based frosting, store your finished cake in the refrigerator. Use a cake carrier or place it on a plate and cover it loosely with plastic wrap or a domed lid. It will stay fresh for 3-4 days. For the best taste and texture, let individual slices sit out for 10-15 minutes before eating to take the chill off.
Can I use a different type of pan?
Of course. A 9×13-inch rectangular pan works well for a simpler sheet cake. Just be sure to adjust the baking time—it may need an extra 5-10 minutes. You can also use three 8-inch round pans for a taller, more layered cake; the baking time will be slightly shorter, so start checking at 25 minutes.
Is there a way to make this less sweet?
The fruit does provide natural sweetness. You can reduce the sugar in the cake by 1/4 cup without major issues. For the frosting, try using just 1 1/2 cups of powdered sugar, and make sure your mango puree is from a very ripe, sweet mango. The flavor will still be wonderful.
My cake didn’t rise much. Why?
This could be due to a few things: old baking powder that’s lost its potency, overmixing the batter, or opening the oven door too often during the first 25 minutes of baking. Always check your baking powder’s expiration date, and try to mix just until combined. Trust the oven light to peek, not the door!
Can I leave out the eggs for an egg-free version?
For an egg-free cake, you can try using a commercial egg replacer or a flax egg (1 tablespoon ground flaxseed mixed with 3 tablespoons water per egg, let sit for 5 minutes). The texture might be slightly denser, but it should still work. I recommend checking out more dedicated cake and cupcake recipes for other inspiration that might suit your dietary needs.
Ready to Taste Heaven?
This Pineapple Mango Heavenly Cake is more than just a dessert. It’s a bite of summer, a burst of joy, and a surefire way to impress the people you love. The process is straightforward, and the reward is huge—a stunning, moist cake that tastes as good as it looks. I promise, once you make it, it will earn a permanent spot in your recipe box. So preheat that oven, grab some ripe fruit, and get ready for the compliments to roll in. Happy baking!
Equipment
- Grand bol
- Fouet
- Spatule
- Plaque à pâtisserie
- Papier sulfurisé
Ingredients
- 2 1/4 tasses farine tout usage
- 1 1/2 tasses sucre granulé
- 3 cuil. à café poudre à lever
- 1 cuil. à café sel
- 1/2 tasse beurre non salé, ramolli
- 1 tasse lait entier
- 2 grands œufs
- 1 cuil. à café extrait de vanille
- 1 tasse ananas écrasé (avec un peu de jus)
- 1 tasse mangue en dés
- 1 tasse beurre non salé (pour le glaçage, ramolli)
- 2 tasses sucre glace
- 1/2 tasse purée de mangue
- 1 cuil. à café extrait de vanille (pour le glaçage)
Instructions
- Préchauffez votre four à 175°C et préparez deux moules à gâteau ronds de 23 cm avec du papier sulfurisé.
- Dans un grand bol, mélangez la farine, le sucre, la poudre à lever et le sel.
- Dans un autre bol, battez le beurre ramolli jusqu'à ce qu'il soit crémeux, puis ajoutez le lait, les œufs et la vanille jusqu'à ce que le mélange soit à peine combiné.
- Versez le mélange humide dans les ingrédients secs et incorporez doucement à l'aide d'une spatule jusqu'à ce qu'il n'y ait plus de traces de farine.
- Incorporez doucement l'ananas écrasé et la mangue en dés.
- Divisez la pâte uniformément entre les moules préparés et lissez le dessus.
- Faites cuire dans le four préchauffé pendant 30 à 35 minutes, jusqu'à ce que les dessus soient rebondis et qu'un cure-dent inséré en ressorte propre.
- Laissez les gâteaux refroidir dans les moules pendant 15 minutes avant de les transférer sur une grille.
- Dans un bol moyen, battez le beurre ramolli pour le glaçage jusqu'à ce qu'il soit pâle et mousseux, puis ajoutez progressivement le sucre glace, en battant bien.
- Incorporez la purée de mangue et l'extrait de vanille, en battant jusqu'à ce que le mélange soit léger et aéré.
- Placez une couche de gâteau sur un plat de service, étalez le beurre crémeux à la mangue, puis ajoutez la seconde couche et glacez l'ensemble du gâteau.
- Décorez avec des dés de mangue supplémentaires ou de la noix de coco rôtie si désiré.