
Have you ever wanted to capture that magical taste of a classic bakery treat, but in a perfectly personal, adorable package? Let me tell you, the moment I pulled my first batch of Pineapple Upside-Down Minis out of the oven, the smell of caramelized pineapple and warm cake filled my kitchen with pure joy. They are not just cupcakes; they are individual servings of tropical sunshine, flipped over to reveal a jewel-like topping that makes everyone at the table smile. This recipe is my go-to for turning an ordinary day into a mini celebration, and I can’t wait for you to try it.
The Sweet History of a Turned-Around Treat
The story of pineapple upside-down cake is a cozy slice of American baking history. It became super popular in the early 1900s after pineapple became more widely available in cans. Home cooks, being the clever gems they are, found that by putting the fruit and sugar in the bottom of a cast-iron skillet, they could create a stunning, caramel-glazed top once the cake was flipped. My Mini Pineapple Upside-Down Cakes are a fun, modern twist on that tradition. They take the same beloved flavors and make them perfectly portable for parties, potlucks, or just for making sure everyone gets their own cherry!
Why You’ll Fall in Love with These Mini Cakes
First, they are incredibly forgiving and simple to make, even if you’re not a baking pro. Using a boxed cake mix as a base is my little secret for guaranteed fluffy success every single time. Second, the “wow” factor is 100% real. That moment when you flip the pan and the glossy, golden pineapple and cherry pattern is revealed? It’s pure magic. Finally, they are the ultimate shareable treat. No slicing, no messing—just hand out these personal upside-down pineapple cupcakes and watch them disappear.
When to Whip Up These Tropical Bites
These minis are the life of any party! I love making them for summer barbecues, where their tropical vibe fits right in. They’re also perfect for baby showers, book club meetings, or just as a sweet “thinking of you” gift for a neighbor. Honestly, a Tuesday afternoon is a perfect occasion too. If you’re looking for more stunning cakes for an event, you should explore our show-stopping lemon strawberry cheesecake, which is another guaranteed crowd-pleaser.
Gathering Your Ingredients for Mini Pineapple Upside-Down Cakes
Here’s everything you’ll need to create these little delights. It’s a beautiful blend of pantry basics and a few special stars.
- 2 boxes of pineapple-flavored cake mix
- 6 large eggs
- 1 cup of vegetable or canola oil
- 2 cups of pineapple juice (reserved from the canned fruit!)
- 2 sticks (1 cup) of unsalted butter
- 2 cups of brown sugar
- 2 (20 oz) cans of pineapple slices
- 1 small jar of maraschino cherries
Easy Ingredient Swaps and Substitutions
No worries if you need to make a change! Here are some simple swaps:
- Cake Mix: If you can’t find pineapple flavor, a classic yellow or vanilla cake mix works beautifully.
- Butter: Salted butter is fine in the caramel; just omit any extra salt.
- Oil: You can use an equal amount of applesauce for a slightly lighter cake.
- Cherries: No maraschinos? Use fresh or frozen pitted cherries, or even cranberries for a tart twist.
Your Step-by-Step Guide to Perfect Minis
Let’s get baking! Follow these steps for a foolproof result.
Step 1: Creating the Golden Caramel Base
We start by making the magic glue that holds our topping together. In a saucepan over medium heat, melt the two sticks of butter. Once it’s foamy and fragrant, stir in the two cups of brown sugar. Keep stirring for about 3-5 minutes as it melts into a smooth, luscious caramel sauce. You’ll see it bubble and smell deeply sweet. Pro tip: Don’t walk away! Caramel can go from perfect to burnt quickly. Once it’s smooth, take it off the heat right away.
Step 2: Prepping the Molds for Easy Release
Now, grab your muffin or cupcake pans. It’s crucial to prepare them well so our beautiful cakes pop out cleanly. Take a paper towel, dab a little oil on it, and gently rub it inside every single cup. This creates a super-slick surface. Pro tip: For extra insurance, you can line the cups with parchment paper liners after greasing, but greasing alone works wonders if you’re careful.
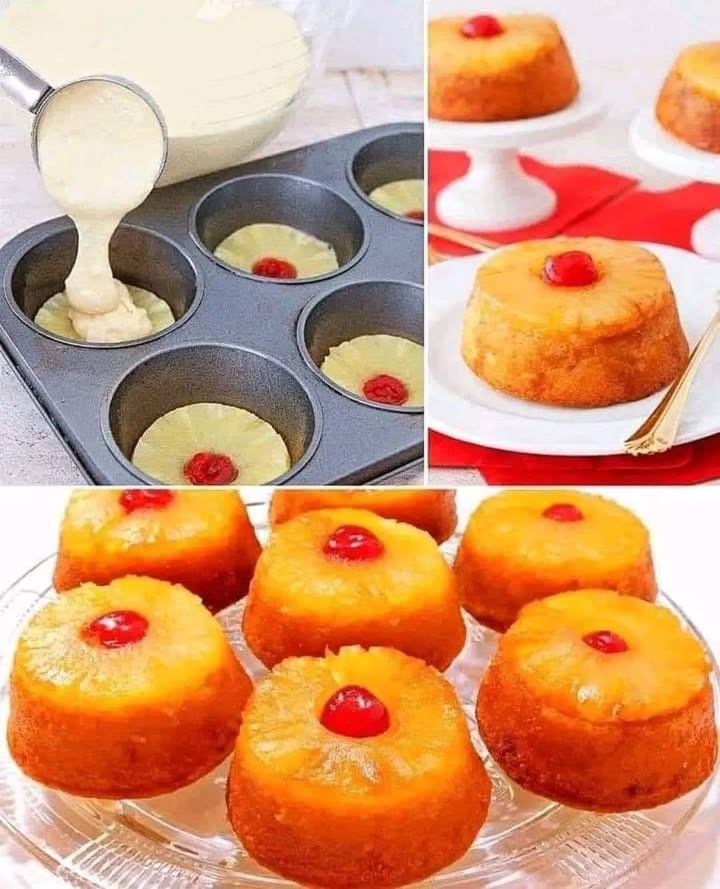
Step 3: Building the Jeweled Topping
This is the creative part! Open your cans of pineapple slices, but save that juice—we’ll use it in the batter. Drain the slices well. For each slice, cut it into 8 little wedges. Now, spoon about one teaspoon of your warm caramel into the bottom of each greased muffin cup. Next, place 3 pineapple wedges in a little sunburst pattern in each cup. Pat your maraschino cherries dry with a paper towel, cut them in half, and nestle one half right in the center. It already looks like edible art!
Step 4: Mixing the Fluffy Cake Batter
Preheat your oven to 350°F (175°C). In a large mixing bowl, combine the two boxes of cake mix, 6 eggs, 1 cup of oil, and those 2 cups of reserved pineapple juice. Using a hand mixer, blend everything on medium speed for about 2 minutes, scraping the bowl down once. You’re looking for a smooth, thick, and pale batter. The smell of pineapple will be incredible. This batter is the cloud that will rise around our fruity topping.
Step 5: Filling and Baking to Perfection
Carefully spoon or pour the batter over the pineapple and caramel in each muffin cup. Fill them only about 2/3 of the way full to leave room for the cake to rise without overflowing. Place the pans in your preheated oven and bake for 18-22 minutes. The cakes are done when the tops are golden and spring back when lightly touched, and a toothpick inserted into the cake part (avoid the fruit) comes out clean.
Step 6: The Grand Reveal (The Flip!)
This is the moment! Take the pans out of the oven and let them cool on a wire rack for exactly 10 minutes. This is the sweet spot—cool enough to handle, but still warm so the caramel hasn’t fully set and glued the cakes to the pan. Place a large baking sheet or wire rack over the top of the muffin pan. With confidence (and oven mitts!), flip the whole thing over. Give it a gentle tap, then lift the pan away. You’ll be greeted with a stunning tray of glossy, golden Mini Pineapple Upside-Down Cakes.
Timing is Everything
Here’s a quick look at how your time will be spent:
- Prep Time: 20 minutes
- Cook Time: 20 minutes
- Cooling Time: 10 minutes
- Total Time: 50 minutes
My Secret for a Perfect Glaze Every Time
Chef’s Secret: For an extra professional touch, while the cakes are still warm from the oven, use a pastry brush to gently dab any excess caramel that pooled around the edges back onto the tops of the cakes. This gives them an even glossier, more professional finish that really makes the pineapple shine.
A Fun Fact About Pineapples
Did you know the pineapple has been a symbol of hospitality and welcome for centuries? In colonial America, hosts would place a fresh pineapple in the center of their dining table when guests arrived. So, by serving these Pineapple Upside-Down Minis, you’re not just offering dessert—you’re offering a warm, historical welcome to your friends and family!
What You’ll Need in Your Kitchen
- 2 standard 12-cup muffin pans
- Paper towels for greasing
- Medium saucepan and wooden spoon
- Large mixing bowl and hand mixer
- Measuring cups and spoons
- Wire cooling rack
- Can opener and knife
Storing Your Mini Masterpieces
Once completely cool, you can store these cakes right-side up in a single layer in an airtight container. They will keep well at room temperature for up to 2 days. The moisture from the fruit keeps them beautifully tender.
For longer storage, you can refrigerate them for up to 5 days. Let them come to room temperature for about 30 minutes before serving for the best texture and flavor. The caramel will firm up in the fridge but will soften again as they warm up.
These cakes also freeze beautifully! Wrap each cooled mini cake tightly in plastic wrap, then place them all in a freezer-safe bag. They can be frozen for up to 2 months. Thaw overnight in the refrigerator or for a few hours on the counter.
Tips for Absolute Success
- Drain Well: Make sure your pineapple slices and cherries are patted dry. Extra liquid can make the caramel runny and cause sticking.
- Don’t Overmix: Once you combine your wet and dry ingredients, mix just until the batter is smooth. Overmixing can make the cake tough.
- The 10-Minute Rule: Do not skip the 10-minute cooling time before flipping! It’s the key to a clean release.
- For another no-bake tropical treat that’s always a hit, check out our easy No-Bake Pineapple Heaven Cheesecake Dessert.
Presentation Ideas That Impress
- Serve them on a tiered cake stand for a party.
- Place each mini cake in a colorful cupcake liner after baking for easy handling.
- Add a tiny dollop of whipped cream or a scoop of vanilla ice cream on the side.
- For a brunch spread, they pair wonderfully with other fruity dishes like a vibrant colorful fresh fruit trifle.
Healthier & Creative Variations to Try
Love the idea but want to mix it up? Here are six delicious spins on the classic:
- Whole Wheat & Honey: Substitute one box of cake mix with whole wheat cake mix and use honey in the caramel instead of some brown sugar.
- Tropical Coconut: Add 1 cup of shredded coconut to the batter and use coconut oil instead of vegetable oil.
- Apple Cinnamon Minis: Swap pineapple slices for thin apple slices and add a teaspoon of cinnamon to the caramel.
- Berry Medley: Use a mix of fresh raspberries, blueberries, and blackberries instead of pineapple for a summer berry version.
- Chocolate Dipped: After cooling, dip half of each mini cake in melted dark chocolate for a decadent twist.
- Mini Cheesecake Style: Use a cheesecake filling over the caramel and fruit for a rich, creamy center. It’s as fun as making Butterfinger Chocolate Caramel Crunch Truffles but in cake form!
Common Mistakes to Avoid
Mistake 1: Letting the Cakes Cool Completely in the Pan
This is the number one reason for mini-cake disaster! If you wait too long, the caramel hardens and acts like superglue, welding the fruit and cake directly to the pan. You’ll end up with a crumbly mess when you try to pry them out. How to avoid it: Set a timer for 10 minutes as soon as they come out of the oven. When it goes off, they are ready for their grand flip.
Mistake 2: Using Undrained or Wet Fruit
That extra syrup in the can of pineapple and the liquid in the cherry jar is tasty, but it’s the enemy of a good caramel seal. Adding wet fruit dilutes the caramel, making it thin and runny. This can cause the topping to slide off and creates a soggy bottom. How to avoid it: Always drain the pineapple well in a colander, and pat both the pineapple pieces and cherries thoroughly with a few paper towels.
Mistake 3: Overfilling the Muffin Cups
It’s tempting to use all that delicious batter, but an overfilled cup means the cake will rise and spill over the sides. This creates a sticky, baked-on mess on your pan and makes the cakes hard to remove cleanly. They can also bake unevenly. How to avoid it: A simple rule of thumb is to fill each cup only 2/3 to 3/4 full after adding the fruit and batter. It leaves the perfect amount of room for a nice dome.
Mistake 4: Not Testing for Doneness
Baking times can vary based on your oven and even the material of your muffin pan. Pulling them out too early leads to a gummy, undercooked center that can collapse. Baking too long dries them out. How to avoid it: Start checking at 18 minutes. Use the toothpick test, but make sure you insert it into the cakey part, not straight through a piece of juicy pineapple, which will always make it look wet.
Your Pineapple Upside-Down Minis Questions, Answered
Can I make this recipe in one big pan instead of minis?
Absolutely! You can make a classic 9×13 inch cake. Simply pour all the caramel into the bottom of a well-greased pan, arrange the pineapple slices and cherries, and pour all the batter over the top. The baking time will be longer, around 35-45 minutes. Always use the toothpick test in the center to check for doneness. The beauty of the minis is the individual serving and faster bake time, but a large cake is just as delicious.
My caramel hardened in the pan before I could spoon it. What do I do?
Don’t panic! This happens if the caramel cools down too much. Gently reheat it on the stove over low heat, stirring constantly, until it becomes fluid again. You can also add a tiny splash (like a teaspoon) of pineapple juice or water to help loosen it up as it warms. Just be careful, as adding liquid to hot caramel can cause it to sputter.
Can I use fresh pineapple instead of canned?
Yes, you can, but there’s a trick. Canned pineapple is softer and more consistent in sweetness. Fresh pineapple contains an enzyme that can break down protein, potentially making your cake texture a bit mushy if used raw. For best results with fresh pineapple, briefly cook the slices in the caramel sauce for 2-3 minutes before placing them in the pan. This deactivates the enzyme and infuses them with caramel flavor.
Why did my cakes sink in the middle after baking?
A sunken center usually points to a few issues: 1) The cakes were underbaked, so the structure didn’t set. 2) The oven door was opened too early or frequently during baking, causing a temperature crash. 3) There might have been too much leavening agent, though using boxed mix prevents this. Ensure your oven is fully preheated, avoid opening the door for the first 15 minutes, and verify doneness with a toothpick.
How can I make these mini cakes ahead of time for a party?
They are perfect for making ahead! Bake and cool the cakes completely. Wrap the whole tray tightly in plastic wrap (once cooled) and store at room temperature for one day, or freeze them as described earlier. On the day of the party, let them thaw (if frozen) and arrange them on your serving platter. You can even gently warm them in a 250°F oven for 5-10 minutes before serving to refresh the caramel.
Is there a way to reduce the sugar in this recipe?
You can experiment slightly, but sugar plays a key structural and textural role, especially in the caramel. You could try reducing the brown sugar in the caramel by 1/4 cup, but the topping may be less syrupy. For the cake itself, using a “less sugar” variety of cake mix is an option. For more detailed information on balancing sweetness and understanding food components, a great resource is the FDA’s guide on nutrient labeling.
My cakes stuck to the pan even after 10 minutes. How do I save them?
First, don’t force them! Place the pan back on a warm (but off) stove burner or dip the bottom of the pan in a bowl of warm water for 30 seconds. This will gently re-melt the caramel just enough to help release them. You can also try running a thin knife or small offset spatula around the very edge of each cake to break the seal before flipping again.
Can I use a different type of cake mix flavor?
Of course! While pineapple mix is perfect, vanilla, yellow, coconut, or even butter pecan cake mix would be delightful. The pineapple flavor will come primarily from the fruit topping and juice in the batter. Using a different mix is a fun way to create a new flavor profile while keeping the same stunning presentation.
What’s the best way to clean the muffin pans afterward?
That caramel can be sticky! Fill the dirty pans with hot, soapy water and let them soak for at least 30 minutes, or even overnight. The caramel will dissolve. For stubborn bits, gentle heating on the stove with water in the pan can help loosen everything. Avoid using abrasive scrubbers on non-stick surfaces.
Can I add other flavors to the batter, like rum or spices?
Yes, feel free to personalize it! Adding 1-2 teaspoons of rum extract or a tablespoon of real dark rum to the batter adds a lovely depth. A half teaspoon of cinnamon or nutmeg also pairs wonderfully with the pineapple. Just add these extras when you’re mixing the wet ingredients. For more inspiration on creating unique baked goods, our cakes and cupcakes category is full of creative ideas to explore.
And there you have it! From a simple box mix and a can of pineapple, you can create a dessert that looks and tastes like it came from a fancy bakery. These Pineapple Upside-Down Minis are about more than just a sweet treat; they’re about creating a little moment of magic in your kitchen. The flip, the reveal, the smiles—that’s the real joy of baking. So go ahead, preheat that oven, and get ready to make something wonderfully delicious. Happy baking!
Equipment
- Grand bol
- Fouet
- Spatule
- Plaque à pâtisserie
- Papier sulfurisé
Ingredients
- 12 tranches d'ananas
- 6 oeufs
- 1 tasse huile végétale
- 2 tasses jus d'ananas
- 1 tasse beurre non salé
- 2 tasses sucre brun
- 6 verres cerises maraschino
Instructions
- Dans une casserole à feu moyen, faites fondre deux bâtons de beurre.
- Incorporez les deux tasses de sucre brun et continuez à remuer pendant environ 3-5 minutes jusqu'à obtenir une sauce caramel lisse.
- Graissez les moules à muffins avec de l'huile à l'aide d'un essuie-tout.
- Coupez les tranches d'ananas égouttées en 8 petits quartiers chacune.
- Mettez environ une cuillère à café de caramel chaud dans chaque moule à muffin graissé.
- Placez 3 quartiers d'ananas en motif de soleil dans chaque moule et ajoutez une cerise maraschino coupée en deux au centre.
- Préchauffez le four à 175°C.
- Dans un grand bol, mélangez le mélange à gâteau, les œufs, l'huile et le jus d'ananas réservé. Mélangez à vitesse moyenne pendant environ 2 minutes.
- Versez la pâte sur l'ananas et le caramel dans chaque moule jusqu'à environ 2/3 plein.
- Faites cuire dans le four préchauffé pendant 18-22 minutes jusqu'à ce qu'ils soient dorés et qu'un cure-dent en ressorte propre.
- Laissez les gâteaux refroidir dans le moule pendant 10 minutes avant de les retourner sur une grande plaque à pâtisserie ou une grille.