
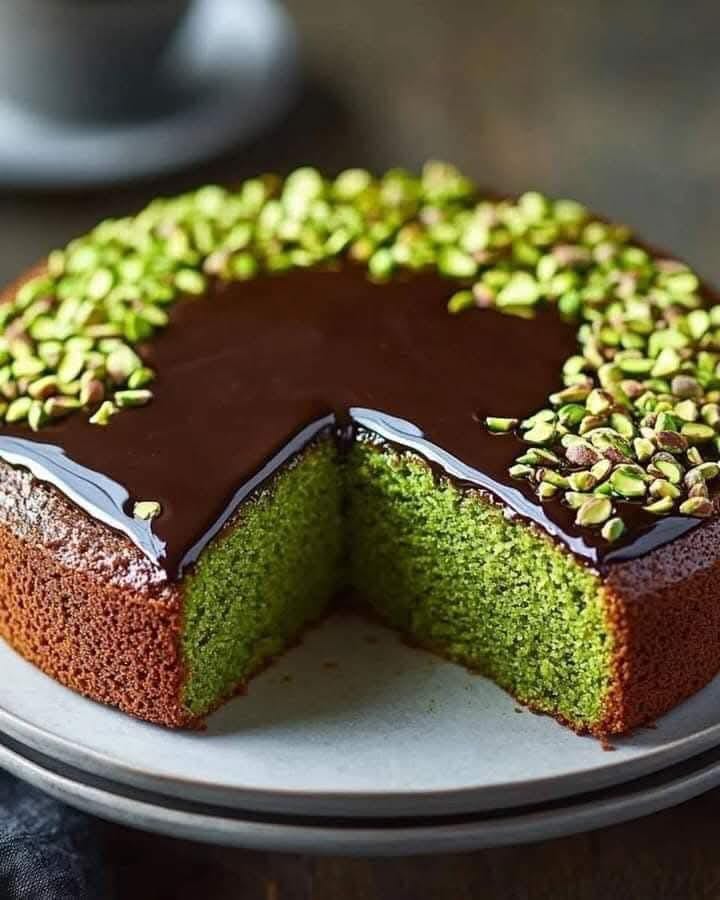
Picture this: you’re looking for a dessert that feels fancy but isn’t fussy, sounds impressive but secretly simple. The answer is this Flourless Pistachio Cake. It’s a little slice of joy that I make for my book club, because it always gets everyone talking. That beautiful green hue, the rich nutty flavor, and that glossy chocolate ganache? It’s pure magic. I call it my Pistachio Chocolate Delight, and once you try it, you’ll know exactly why.
The Story of This Pistachio Chocolate Delight
This isn’t an old family recipe passed down in a tattered book. No, I discovered it on a quest to make a truly special birthday cake for my gluten-free friend. I wanted something elegant, not crumbly or dry. After a few (okay, several!) kitchen experiments, this version was born. It’s inspired by traditional Middle Eastern sweets that honor the pistachio, but with a modern, easy-to-make twist. The chocolate ganache is my own happy addition – because who doesn’t love that combination?
Why You’ll Fall in Love With This Recipe
First off, it’s flourless. That means it’s naturally dense, moist, and incredibly tender. It’s a fantastic option if you’re cooking for someone with dietary restrictions, but honestly, you’d never miss the flour. The flavors are bold and sophisticated. You get the earthy, almost buttery taste of pistachios paired with the deep, bittersweet hug of dark chocolate. Plus, it comes together in one bowl and looks like it came from a professional bakery. Win-win!
The Perfect Moments for This Cake
This cake dresses up or down perfectly. It’s my go-to for:
- Dinner parties: It announces “I made an effort” without you having to sweat all day.
- Spring holidays like Easter or Mother’s Day – that gorgeous green feels so festive.
- A thoughtful gift for a neighbor or new parents. It travels well and feels so personal.
- Just because! A Wednesday afternoon deserves a little Pistachio Chocolate Delight too.
Gathering Your Ingredients
Simple ingredients make something spectacular. Here’s what you need:
- 1 cup pistachios (shelled, unsalted)
- 1 cup powdered sugar
- 4 large eggs
- 1 teaspoon vanilla extract
- ½ teaspoon baking powder
- A pinch of salt
- For the Ganache: 1 cup dark chocolate chips, ½ cup heavy cream, 1 tablespoon unsalted butter
Easy Swaps and Substitutions
Out of something? No problem. Here’s how to adapt:
- Pistachios: You can use roasted, unsalted almonds or hazelnuts for a different, but equally delicious, nut cake.
- Powdered Sugar: For a less refined option, try blitzing coconut sugar in a blender until fine.
- Dark Chocolate: Milk or semi-sweet chocolate chips work if you prefer a sweeter ganache.
- Heavy Cream: Full-fat coconut cream is a great dairy-free alternative for the ganache.
Creating Your Pistachio Chocolate Delight: A Step-by-Step Journey
Step 1: Prepping Your Pistachios and Pan
First, let’s get our stage ready. Preheat your oven to 350°F (175°C). Grab an 8-inch round cake pan and give it a good coat of butter or non-stick spray. Lining the bottom with a circle of parchment paper is my non-negotiable pro tip – it guarantees a clean release every single time. Now, pour your pistachios into the food processor. Pulse them until they look like fine, bright green sand. You’ll start to smell their wonderful fragrance. Be careful not to go too far and make pistachio butter!
Step 2: Mixing the Magical Batter
In a large mixing bowl, combine your vibrant green pistachio powder with the powdered sugar. Give it a whisk to break up any lumps. Next, crack in the eggs, add the vanilla, baking powder, and that pinch of salt. Using a hand mixer or a strong whisk, beat everything together for about 1-2 minutes. Watch as it transforms into a thick, pale green, and beautifully smooth batter. It should fall off the whisk in a lovely ribbon. Chef’s tip: Room temperature eggs incorporate much more easily, giving you a smoother batter faster.
Step 3: Baking to Perfection
Pour your lovely green batter into the waiting pan. Tilt the pan gently to spread it evenly. Slide it into the middle of your preheated oven. Now, the hard part: patience! Bake for 25-30 minutes. You’ll know it’s done when the top is golden and springs back lightly to the touch, and a toothpick poked in the center comes out clean. Let the cake cool in the pan for just 10 minutes. Then, run a knife around the edge and carefully turn it out onto a wire rack to cool completely. A warm cake will melt your ganache, so let it be.
Step 4: Crafting the Silky Chocolate Ganache
While the cake cools, make your shiny crown. In a small saucepan, heat the heavy cream over medium heat. You want it just barely simmering – little bubbles will form around the edges. Please don’t let it boil! Pour the hot cream over your dark chocolate chips and butter in a heatproof bowl. Let it sit undisturbed for 3 minutes. This melts the chocolate gently. Then, starting in the center, stir slowly until you have a dark, glossy, and unbelievably smooth mixture. This is ganache magic.
Step 5: The Grand Finale – Assembly
Place your completely cooled cake on a serving plate or a wire rack with a tray underneath. Pour the slightly cooled, but still pourable, ganache right onto the center of the cake. Use a spoon or offset spatula to gently guide it to the edges, letting it cascade down the sides in artistic drips. Don’t fuss too much – its natural flow is beautiful. Let it set for at least 30 minutes before slicing. This wait is the final test of your willpower!
Your Baking Timeline
This beauty comes together faster than you think:
- Prep Time: 15 minutes (including pistachio grinding)
- Cook Time: 30 minutes
- Cooling Time: 1 hour (crucial for clean slicing!)
- Total Time (hands-on): 45 minutes
- Servings: 8 generous slices
- Kcal: Approximately 300 per serving
The One Secret You Need to Know
Grind your nuts with care. This is the most important step. Pulse your pistachios in the food processor until they are fine, but stop before they become oily or pasty. If you grind them too much, you’ll release their natural oils and end up with a greasy cake instead of a fine, moist crumb. A few coarse bits are totally fine – they add lovely texture!
A Little Extra Sweet Knowledge
Did you know pistachios are actually fruits? Technically, they’re the seed of a drupe. They get their signature green color from chlorophyll, the same pigment found in plants. That beautiful color is a sign of freshness and quality, which is why this cake tastes so wonderfully of spring.
Your Trusty Kitchen Tools
You don’t need fancy gear. Just gather:
- 8-inch round cake pan
- Parchment paper
- Food processor or high-powered blender
- Mixing bowls (large and small)
- Whisk and spatula
- Small saucepan
- Wire cooling rack
Storing Your Masterpiece
Because this cake is so moist, storage is easy. Cover it with a cake dome or loosely with plastic wrap and keep it at room temperature for up to 2 days. The ganache will stay perfectly set and shiny.
If you need to keep it longer, you can refrigerate it for up to 5 days. Let it come to room temperature for about an hour before serving. The chill makes the cake even more dense and fudgy, which some people (like me!) actually prefer.
You can also freeze this cake, tightly wrapped, for up to 2 months. Thaw it overnight in the refrigerator. I don’t recommend freezing slices with ganache already on, as it can dull the shine. Instead, freeze the plain cake and make fresh ganache when you’re ready to serve.
Pro Tips for Flawless Results
- Use a kitchen scale to measure your pistachios for perfect accuracy. One cup shelled pistachios weighs about 125 grams.
- For an extra flavor boost, toast your pistachios lightly before grinding. Let them cool completely first.
- If your ganache splits or looks grainy, add a teaspoon of hot cream and whisk vigorously. It should come right back together.
- Dress it up! Sprinkle a handful of chopped pistachios and a flaky sea salt over the wet ganache for a gorgeous finish.
Making It Look Like a Million Bucks
Presentation is the fun part!
- Serve each slice with a dollop of barely sweetened whipped cream and a fresh raspberry.
- Dust the plate with a little cocoa powder or edible gold dust for serious drama.
- Use a vegetable peeler to make large chocolate curls from a bar of chocolate for a stunning garnish.
- Slice with a hot, clean knife for perfectly clean cuts through the ganache.
Love This? Try These Healthier Twists!
Feel like mixing it up? Here are six delicious variations on our Pistachio Chocolate Delight:
- Orange Blossom Delight: Add 1 tablespoon of orange blossom water to the batter and sprinkle orange zest into the ganache for a Middle Eastern flair.
- Dairy-Free Dream: Use coconut cream in the ganache and a dairy-free butter substitute. It’s just as rich and decadent.
- Espresso Kick: Add 1 teaspoon of instant espresso powder to the cake batter to deepen the chocolate flavor without tasting like coffee.
- Berry Swirl: Before baking, swirl ¼ cup of raspberry jam into the batter for a pretty marbled effect and a tart surprise.
- Cardamom Spice: Add ½ teaspoon of ground cardamom to the dry ingredients. It pairs amazingly well with pistachio.
- Mini Cakes: Bake the batter in a greased muffin tin for about 18-20 minutes. Perfect for individual portions!
More Amazing Cakes to Explore
If you’re as obsessed with simple, stunning cakes as I am, you have to explore our collection. For a classic with cozy flavors, my Walnut and Honey Cake is a family favorite. When summer hits, nothing beats a Cold Pineapple Cake for its creamy, refreshing ease. For a true show-stopper, the layers in this Double Layer Raspberry Truffle Cake are unbelievable. And if you love fruit, this Tropical Strawberry Pineapple Shortcake is like a vacation on a plate. You can find all these and more in our full archive of easy cake recipes for every occasion.
Common Mistakes to Avoid
Mistake 1: Over-Grinding the Pistachios
This is the number one way this cake can go wrong. If you process the pistachios for too long, they release their oils and turn into a sticky, clumpy paste. This paste won’t mix well into the batter and can make your final cake greasy and dense. The key is to use the pulse function and stop as soon as you have a fine, powdery crumb with a bit of texture. A few small pieces are perfectly fine and actually nice!
Mistake 2: Pouring Ganache on a Warm Cake
I know it’s tempting to finish the cake as fast as possible. But if you pour that beautiful, silky ganache onto a warm or even slightly warm cake, disaster will strike. The heat will cause the ganache to melt, thin out, and soak into the cake instead of forming a lovely glossy layer on top. It will become a messy, sticky puddle. Let the cake cool completely on a wire rack. This can take a full hour, but it’s non-negotiable for a perfect finish.
Mistake 3: Overbaking the Cake
Because it’s flourless, this cake bakes fast and can go from perfectly moist to dry and crumbly in just a few extra minutes. The center should be just set. Rely on the toothpick test: it should come out with a few moist crumbs attached, not completely clean. The cake will also continue to cook a little from residual heat as it cools in the pan. When in doubt, take it out a minute early.
Mistake 4: Using a Blender Instead of a Food Processor
It might seem like a good swap, but a blender is designed for liquids. It will struggle to grind dry pistachios evenly. You’ll likely end up with a layer of butter at the bottom and chunks on top. A food processor is the right tool for the job as it’s made to chop and grind dry ingredients evenly. If you only have a blender, grind the nuts in very small batches, shaking the carafe often.
Understanding Balance in Sweet Treats
Desserts like this are a wonderful part of a joyful life. I believe in using quality ingredients and enjoying every bite. It’s all about balance. For general guidance on incorporating all foods into a healthy pattern, the dietary guidelines offer great advice on making choices that nourish both your body and your soul.
Your Flourless Pistachio Cake Questions, Answered
Can I use salted pistachios?
It’s best to use unsalted, raw, or roasted pistachios. Salted nuts can make your cake too salty because the salt is concentrated in the grinding process. If salted is all you have, give them a quick rinse in water, pat them very dry with paper towels, and then toast them lightly in a dry pan to remove any moisture before grinding.
My ganache is too runny. How can I fix it?
Don’t worry! This happens if the cream was too hot or the ratio was off. Just let it sit at room temperature for 10-15 minutes. It will thicken as it cools. If it’s still too thin, you can add a few more chocolate chips and stir until melted. For future batches, ensure you are using the correct measurements by volume or weight, and make sure your chocolate is properly chopped or using standard chips.
Can I make this cake ahead of time?
Absolutely, and it might even taste better! You can bake the cake layer up to two days in advance. Wrap it tightly in plastic wrap once completely cool and store it at room temperature. Make the ganache the day you plan to serve it for the shiniest finish. You can assemble the fully ganached cake up to 8 hours before your event, keeping it covered at cool room temperature.
Why did my cake sink in the middle?
A slight sink is normal for a dense, flourless cake, but a major dip usually means it was underbaked in the center. The structure couldn’t set before cooling. Next time, ensure your oven is fully preheated and use an oven thermometer to check the temperature. Also, avoid opening the oven door during the first 20 minutes of baking, as a rush of cool air can cause it to fall.
Is this cake gluten-free and dairy-free?
It is naturally gluten-free since there is no flour. As written, it is not dairy-free because of the butter in the ganache. To make it dairy-free, simply use a high-quality dairy-free dark chocolate and substitute the butter in the ganache with a dairy-free margarine or coconut oil. The cake itself contains no dairy.
Can I use a different type of nut?
Yes, you can! Almonds or hazelnuts work beautifully in this recipe. Follow the same process: grind one cup of your chosen nut into a fine meal. The flavor will change, but the texture will be similarly wonderful. You could even try a mix of half pistachio and half almond for a different twist.
How do I get a super smooth top on my cake?
For a perfectly smooth surface to pour your ganache onto, you can level the cake. Once it’s completely cool, use a long serrated bread knife to gently slice off any dome that formed on top. This creates a flat canvas. Save the crumbs for a tasty yogurt or ice cream topping!
My cake is very green inside. Is that normal?
Yes! That’s the best part. The natural chlorophyll in the pistachios gives the cake its gorgeous green color. The shade can vary depending on the type and freshness of your pistachios. Some browning on the crust from baking is also completely normal and delicious.
Can I double this recipe?
You can, but don’t just double and bake in one pan. Double the ingredients and divide the batter between two 8-inch pans. Your baking time may increase by 5-10 minutes. You’ll have two lovely layers. You can stack them with a layer of ganache in between for an extra-special layer cake!
What’s the best way to slice this cake cleanly?
For picture-perfect slices, use a long, thin knife. Run it under very hot water, wipe it completely dry, and then make your cut. The heat helps the knife glide smoothly through the ganache and dense cake without sticking. Wipe the knife clean and re-heat it between each slice for the cleanest results.
Ready to Bake Some Joy?
So there you have it – my secret to a stunning, delicious, and surprisingly simple dessert. This Flourless Pistachio Cake is more than just a recipe; it’s a little act of kitchen love that never fails to impress. The combination of nutty cake and smooth chocolate is simply timeless. I hope it becomes a treasured recipe in your home, just like it is in mine. Now, go preheat that oven and get ready for the compliments to roll in. Happy baking!
Equipment
- Moule à gâteau rond de 20 cm
- Fouet
- Grand bol
- Spatule
- Papier sulfurisé
Ingredients
- 1 tasse pistaches décortiquées et non salées
- 1 tasse sucre glace
- 4 œufs
- 1 cuil. à café extrait de vanille
- 1/2 cuil. à café poudre à lever
- pincée sel
- 1 tasse pépites de chocolat noir
- 1/2 tasse crème épaisse
- 1 cuil. à soupe beurre non salé
Instructions
- Préchauffez votre four à 175°C et préparez un moule à gâteau de 20 cm avec du beurre et du papier sulfurisé au fond.
- Pulez les pistaches dans un robot culinaire jusqu'à obtenir une poudre fine, en veillant à ne pas créer du beurre de pistache.
- Dans un grand bol, combinez la poudre de pistache et le sucre glace ; fouettez pour briser les grumeaux.
- Ajoutez les œufs, l'extrait de vanille, la poudre à lever et le sel dans le bol ; mélangez avec un mixeur à main ou un fouet jusqu'à obtenir une texture lisse et épaisse.
- Versez la pâte dans le moule préparé et étalez-la uniformément ; faites cuire pendant 25-30 minutes jusqu'à ce qu'elle soit dorée et ferme.
- Laissez refroidir le gâteau dans le moule pendant 10 minutes, puis transférez-le sur une grille pour le refroidir complètement.
- Pour la ganache, chauffez la crème épaisse dans une petite casserole jusqu'à frémissement, puis versez-la sur les pépites de chocolat noir et le beurre. Laissez reposer pendant 3 minutes.
- Mélangez le tout jusqu'à obtenir une consistance lisse et brillante ; laissez refroidir légèrement.
- Versez la ganache sur le gâteau refroidi, en laissant couler sur les bords ; laissez prendre pendant au moins 30 minutes avant de trancher.