
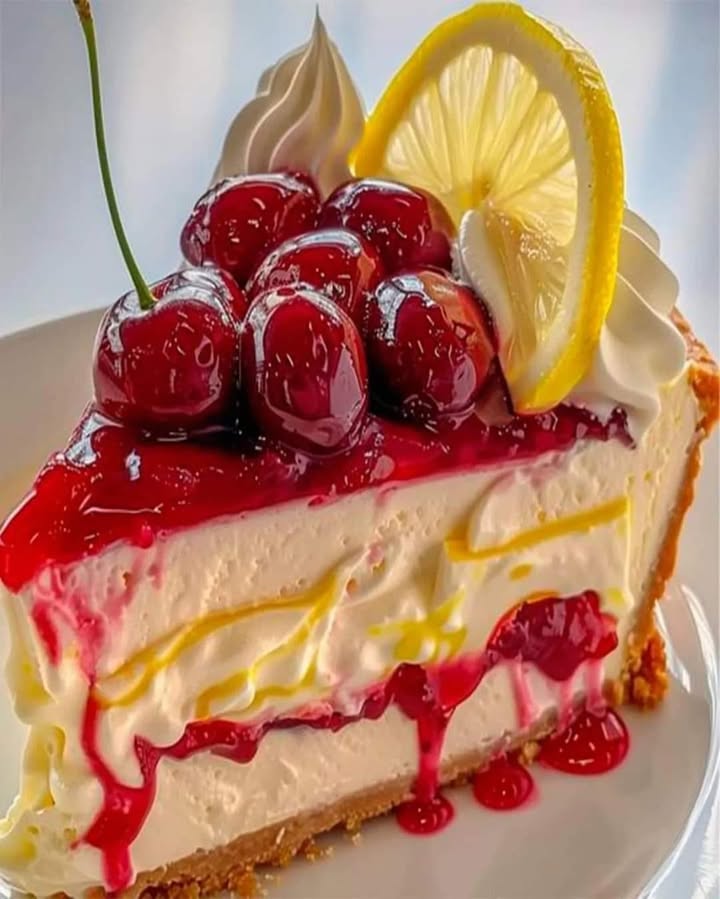
Refreshing Cherry Lemon Delight Cheesecake: A Taste of Sunshine
Have you ever had a dessert that instantly transports you to a perfect summer day? You know, the kind where the sun is warm, the laughter is easy, and every bite just feels like happiness. That’s exactly what happened to me the first time I made this Cherry Lemon Cheesecake. My family, usually a tough crowd to impress, went completely silent. Then came the chorus of “Oh my goodness” and “Can I have another slice, please?” That’s how I knew this refreshing Cherry Lemon Delight Cheesecake was a total winner.
A Sweet Slice of History
Cheesecake has a long, delicious history, dating all the way back to ancient Greece! Of course, it looked a lot different back then. Our modern, creamy version really took off in America, especially in New York. I love taking that classic, rich base and giving it a bright, fruity twist. The combination of zesty lemon and sweet cherries isn’t just a modern invention—it’s a pairing that sings of summer picnics and family gatherings. This Cherry Lemon Cheesecake slice is my personal homage to those sunny, joyful flavors.
Why Your Family Will Beg for This Lemon Cherry Cheesecake
You’re going to adore this easy lemon cheesecake recipe for so many reasons! First, the flavor is pure magic. The bright, citrusy lemon perfectly balances the sweet, jammy cherry layer. It’s refreshing, not overly heavy. Second, while it looks like you slaved away, it’s surprisingly simple to make. No fancy techniques needed! Finally, it’s incredibly versatile. I’ve served it at fancy dinners and casual backyard BBQs, and it’s always the star.
The Perfect Occasion for a Cherry Lemon Delight
This isn’t just a dessert; it’s the guest of honor! It’s perfect for:
- Summer potlucks and barbecues: It’s cool, refreshing, and feeds a crowd.
- Mother’s Day or birthday brunches: It feels special and celebratory.
- Just because: Honestly, making a lemon cheesecake with cherry swirl is a wonderful way to turn an ordinary Tuesday into something sweet.
Gathering Your Ingredients for Lemon Cheesecake
Here’s your shopping list for this delicious cherry delight:
- 1 1/2 cups graham cracker crumbs
- 1/3 cup melted butter
- 1/4 cup sugar
- 3 (8 oz) packages cream cheese, softened
- 1 cup sugar
- 3 large eggs
- 1 teaspoon vanilla extract
- 1/2 cup sour cream
- 1 tablespoon lemon zest
- 1 cup cherry pie filling
- Lemon slices & whipped cream for garnish
Easy Ingredient Swaps
No worries if you’re missing something! Here are some simple swaps:
- Graham Cracker Crumbs: You can use digestive biscuits or even vanilla wafers for a different crust flavor.
- Sour Cream: Plain, full-fat Greek yogurt works beautifully here too.
- Cherry Pie Filling: Feel free to use homemade cherry compote or even a different fruit filling like blueberry or raspberry.
Let’s Make Cherry Lemon Cheesecake!
Ready to create some magic? Follow these simple steps for the perfect refreshing cheesecake.
Step 1: Creating the Buttery Crust
First, let’s make that irresistible base. Preheat your oven to 325°F (163°C). Grab a medium bowl and mix your graham cracker crumbs, melted butter, and that first 1/4 cup of sugar. The mix will look like wet sand and smell wonderfully buttery. Now, firmly press it into the bottom of your 9-inch springform pan. I like to use the bottom of a flat glass to press it down evenly. This creates a solid, delicious foundation for our creamy filling.
Step 2: Mixing the Dreamy Lemon Filling
Now for the star of the show! In a large bowl, beat the softened cream cheese and 1 cup of sugar together until it’s completely smooth and lump-free. This is key for a silky texture. Add the eggs, one at a time, beating well after each one. Then, stir in the vanilla, sour cream, and that beautiful, fragrant lemon zest. The zest brings the most amazing bright lemon aroma. The mixture will be thick, creamy, and pale yellow.
Step 3: Building the Beautiful Cherry Layer
Here comes the fun part! Pour about half of your luscious cream cheese mixture over the prepared crust. Use a spatula to spread it out evenly. Now, gently spoon your cherry pie filling over this layer. Try to spread it almost to the edges for a gorgeous marbled effect when sliced. It looks like a pool of red jewels nestled in the creamy filling.
Step 4: The Final Pour and Bake
Carefully pour the rest of the cream cheese batter over the cherry layer. Gently tap the pan on the counter to release any air bubbles. Pro tip: To prevent cracks, you can place a pan of hot water on the lower oven rack while baking. This creates a steamy environment. Bake for 55-60 minutes. The edges will be set, but the center should still have a slight jiggle. This means it’s perfectly done!
Step 5: The All-Important Chill Time
Patience is a virtue here! Let the baked cheesecake cool completely at room temperature. Then, it must go into the fridge. Cover it loosely and chill for at least 4 hours, but overnight is truly best. This slow, cold setting is what gives you that firm, sliceable texture and allows all the flavors to marry beautifully.
Timing is Everything
Let’s break down the clock for this easy lemon cheesecake recipe:
- Prep Time: A quick 20 minutes.
- Cooking Time: About 60 minutes in the oven.
- Chilling Time: A crucial 4+ hours (overnight recommended).
- Total Time: About 5 hours, mostly hands-off chilling.
- Servings: 12 generous slices.
- Calories: Approximately 425 kcal per serving.
Chef’s Secret for the Ultimate Cherry Lemon Delight
My absolute best trick? Room temperature ingredients are non-negotiable. Take your cream cheese, eggs, and sour cream out of the fridge at least an hour before baking. This ensures everything blends smoothly without overmixing. Overmixing incorporates too much air, which can lead to cracks and a less dense, creamy texture. Trust me, this one small step makes a huge difference!
A Little Zesty Fact
Did you know that lemon zest holds most of the fruit’s essential oils? That’s where the powerful, bright flavor and aroma come from! When zesting, use a fine grater and only take the bright yellow outer layer. The white pith underneath is bitter. That tablespoon of zest is truly the fragrance of sunshine in this cherry lemon cheesecake.
Your Kitchen Toolbox
You don’t need fancy gadgets! Just gather:
- 9-inch springform pan (the hero for easy release!)
- Electric mixer (hand or stand)
- Mixing bowls (medium and large)
- Spatula
- Measuring cups and spoons
- Zester or fine grater
Keeping Your Cheesecake Fresh
This cherry lemon cheesecake slice stores beautifully. Once set, cover the springform pan tightly with plastic wrap or transfer individual slices to an airtight container. It will keep happily in the refrigerator for up to 4-5 days.
You can also freeze this refreshing cheesecake for longer storage. Wrap the whole cheesecake or individual slices tightly in plastic wrap, then a layer of aluminum foil. It will keep in the freezer for 1-2 months. Thaw it overnight in the refrigerator before serving.
For the best texture and flavor, always serve your easy lemon cheesecake chilled straight from the fridge. The cool temperature makes it incredibly refreshing and helps it hold its perfect shape when you slice it.
My Best Tips for Success
- Don’t rush the softening: Soft cream cheese blends seamlessly.
- Mix with care: Once you add the eggs, mix just until combined to avoid excess air.
- Chill, chill, chill: I can’t say it enough—overnight chilling is the secret to perfect texture.
Use a water bath: For the absolute smoothest, crack-free top, bake your cheesecake in a water bath. Wrap the springform pan bottom in foil and place it in a larger pan filled with hot water.
Make it Magazine-Worthy
Presentation is the final touch of love! Before serving, run a thin knife under hot water, dry it, and slice for clean cuts. Garnish each slice with a dollop of fresh whipped cream, a thin lemon slice, and maybe even a single cherry on top. You can drizzle a little extra cherry pie filling on the plate for a restaurant-style look.
Love This Recipe? Try These Variations!
Once you’ve mastered this classic, the fun begins! Here are six delicious twists on the cherry lemon delight cheesecake:
- Blueberry Lemon Bliss: Swap the cherry filling for blueberry pie filling. The purple and yellow combo is stunning and just as tasty.
- No-Bake Cherry Lemon: Swap the baked filling for a no-bake version using gelatin and whipped cream for a lighter, mousse-like treat on hot days.
- Mini Cheesecakes: Use a muffin tin with liners! Press crust into the bottom, add filling, and bake for only 20-25 minutes. Perfect for parties.
- Chocolate Crust Twist: Add 2 tablespoons of cocoa powder to your graham cracker crust mix for a chocolatey base that pairs wonderfully with the cherry.
- Lemon Curd Swirl: Instead of a cherry center layer, dollop and swirl homemade or store-bought lemon curd into the top of the batter before baking.
- Mixed Berry Bonanza: Use a mixed berry pie filling for a vibrant, complex fruit flavor that’s bursting with color.
Dive Into More Baking Adventures!
If you loved the fruity vibe of this dessert, you simply must try my Heavenly Cherry Cupcakes for a handheld treat. For something savory that’s just as crowd-pleasing, my Cheese Stuffed Potato Cakes are pure comfort food. When you need a quick and satisfying dinner, these Cheesy Garlic Chicken Wraps are my family’s go-to. And on a cozy night, nothing beats a bowl of my rich and creamy Seafood Chowder.
Common Mistakes to Avoid
Mistake 1: Using Cold Ingredients Straight From The Fridge
This is the biggest culprit for a lumpy filling! Cold cream cheese does not blend smoothly with sugar. It forces you to overmix, which adds too much air. That air expands in the oven and then collapses, leading to cracks and a dense texture. Always plan ahead and let your dairy ingredients sit on the counter for about an hour. They should feel cool but not cold to the touch.
Mistake 2: Overmixing the Batter After Adding Eggs
Once you add the eggs, your mixing goal changes. Beating for too long incorporates excess air and can over-develop the proteins in the eggs. Think of it like making a cake—you want it creamy, not fluffy. After each egg is added, mix just until it disappears into the batter. Use a low speed on your mixer for the final combining steps.
Mistake 3: Skipping the Long Chill Time
I know it’s tempting to slice into that beautiful cherry lemon dessert right away! But cheesecake is a custard that needs time to set properly in the fridge. Slicing it warm or even just cooled will result in a gooey, messy center that won’t hold its shape. The chilling firms up the structure and intensifies the flavors. Patience truly delivers the perfect slice.
Mistake 4: Not Testing for Doneness Correctly
Unlike a cake, you don’t insert a toothpick to check if it’s clean. A fully set center in the oven means an overbaked, dry cheesecake. The key is the “jiggle test.” At 55 minutes, gently shake the oven rack. The outer 2-3 inches should look set, but the center (about the size of a lemon) should have a slight, gentle jiggle. It will firm up perfectly as it cools.
A Note on Smart Cooking
Getting your ingredients to room temperature quickly isn’t just about this recipe—it’s a great habit for better baking results overall. For more great tips on improving your cooking efficiency and food quality, there are some fantastic, science-backed resources available that can help in all your kitchen adventures.
This Cherry Lemon Cheesecake is now one of my most-requested family desserts, and I’m so happy to share it with you. If you’re looking for more creamy, dreamy inspiration, explore all our other creations on the cheesecake recipe page—there’s a flavor for every season!
Your Cherry Lemon Cheesecake Questions, Answered
Can I use fresh cherries instead of pie filling?
Absolutely! You can make a simple cherry compote. Pit and halve about 2 cups of fresh cherries. Cook them in a small saucepan with 1/4 cup sugar and a tablespoon of lemon juice over medium heat until they break down and thicken slightly, about 10-15 minutes. Let it cool completely before using it as your cherry layer. This gives you a brighter, less sweet, and more tart cherry flavor that’s wonderful.
Why did my cheesecake crack on top?
Don’t worry, it still tastes amazing! Cracks usually happen from a sudden temperature change or overmixing. To prevent them, avoid opening the oven door during the first 45 minutes of baking. Always cool the cheesecake gradually in the turned-off oven with the door slightly ajar for an hour before moving it to the counter. Also, ensure you’re not over-beating the batter after adding the eggs, as this adds too much air that expands and cracks the surface.
How do I know when the cheesecake is done baking?
Forget the toothpick test! The best method is the “jiggle test.” Gently shake the oven rack at the 55-minute mark. The edges of the cheesecake should look puffed and set. The center (an area about the size of a lemon) should have a slight, gentle jiggle—like Jell-O. It will not look liquid, but it will move slightly. The residual heat will continue to cook this center as it cools, giving you a perfectly creamy texture without overbaking.
Can I make this cheesecake gluten-free?
Yes, very easily! Simply swap the graham cracker crumbs for the same amount of your favorite gluten-free cookie crumbs. Gluten-free graham-style crackers, ginger snaps, or even almond flour mixed with a little sugar and butter work great. Ensure all your other ingredients (like vanilla extract) are certified gluten-free. The filling is naturally gluten-free, so this simple crust switch creates a delicious gluten-free cherry lemon delight.
Do I have to use a springform pan?
A springform pan is highly recommended because the removable sides make it easy to get the cheesecake out without damaging it. If you don’t have one, you can use a regular 9-inch cake pan. Line the bottom with parchment paper, leaving an overhang on two sides to use as “handles” to lift the chilled cheesecake out. Be very gentle when removing it, as you cannot run a knife around the edges to loosen it first.
How far in advance can I make this?
This cheesecake is a fantastic make-ahead dessert! You can bake it up to 2 days before you plan to serve it. Just keep it covered tightly in the refrigerator. The flavors actually improve and meld together over time. You can also freeze the fully chilled and set cheesecake (without garnishes) for 1-2 months. Thaw it overnight in the fridge before adding your whipped cream and lemon slices.
My cream cheese mixture is lumpy. What can I do?
This happens if the cream cheese was too cold. Don’t panic! You can try to fix it. First, make sure your other ingredients (sour cream, eggs) are at room temperature. Then, beat the cream cheese and sugar on low speed for a longer time until the lumps smooth out before adding anything else. As a last resort, you can press the finished batter through a fine-mesh sieve to remove lumps, but this adds air, so do it gently.
Can I use bottled lemon juice instead of fresh zest?
For the best flavor, I strongly recommend fresh lemon zest. The zest holds the fragrant essential oils that give that true, bright lemon aroma. Bottled juice adds tartness but not the same complex, sunny flavor. If you’re in a pinch, you can add a teaspoon of fresh lemon juice to the batter along with the extract, but try not to skip the zest. It truly makes the lemon flavor “pop.”
What’s the best way to cut clean slices?
Use a long, thin-bladed knife. Run the blade under very hot water, wipe it completely dry with a towel, and then make your slice. Clean and reheat the knife between each cut. The hot blade glides through the cold, firm cheesecake and cherry layer smoothly, giving you picture-perfect slices without sticking or smearing the layers together.
Is there a lighter version of this recipe?
You can make some adjustments for a slightly lighter cherry lemon cheesecake. Use reduced-fat (Neufchâtel) cream cheese and light sour cream. Be aware that the texture may be a bit softer and less rich. You can also reduce the sugar in the filling by 1/4 cup, but don’t reduce it more as sugar contributes to the structure. The crust is harder to lighten significantly, as the butter is needed to hold it together.
Go Ahead, Make Someone’s Day
There you have it—everything you need to create this stunning, refreshing Cherry Lemon Delight Cheesecake. It’s more than just a dessert. It’s a homemade hug, a celebration on a plate, and a guaranteed way to create happy memories around your table. So preheat that oven, zest that lemon, and get ready for the compliments. You’ve got this! Now, who’s ready for a slice?
Equipment
- Grand bol
- Fouet
- Spatule
- Moule à charnière de 9 pouces
- Râpe fine
Ingredients
- 1.5 tasses chapelure de gâteau Graham
- 1/3 tasse beurre fondu
- 1/4 tasse sucre pour croûte
- 3 paquets de 8 oz fromage à la crème, ramolli
- 1 tasse sucre pour garniture
- 3 grands œufs
- 1 cuillère à café extrait de vanille
- 1/2 tasse crème aigre
- 1 cuillère à soupe zeste de citron
- 1 tasse garniture de tarte cerise
- tranches de citron et crème fouettée pour garnir
Instructions
- Préchauffez votre four à 163°C.
- Dans un bol moyen, mélangez la chapelure de gâteau Graham, le beurre fondu et 1/4 tasse de sucre jusqu'à obtenir une consistance semblable à du sable humide.
- Pressez le mélange au fond d'un moule à charnière de 9 pouces.
- Dans un grand bol, battez le fromage à la crème ramolli et 1 tasse de sucre jusqu'à ce que le mélange soit lisse et sans grumeaux.
- Ajoutez les œufs un par un, en battant bien après chaque ajout.
- Incorporez l'extrait de vanille, la crème aigre et le zeste de citron jusqu'à ce que le tout soit bien mélangé.
- Versez la moitié du mélange de fromage à la crème sur la croûte et étalez uniformément.
- Déposez la garniture de tarte cerise sur la couche de fromage à la crème.
- Versez délicatement le reste du mélange de fromage à la crème sur la couche de cerise.
- Tapotez le moule sur le comptoir pour libérer les bulles d'air.
- Faites cuire au four pendant 55-60 minutes, jusqu'à ce que les bords soient pris et que le centre ait un léger tremblement.
- Laissez refroidir complètement à température ambiante, puis réfrigérez pendant au moins 4 heures (idéalement toute la nuit).
Notes
Nutrition

Hi, I’m Olivia Parker, the founder of BakingSecret.com and a lifelong lover of all things sweet and homemade. I grew up in a small town in Oregon, where the smell of fresh cookies in my family’s kitchen sparked my passion for baking. Over the years, I turned that passion into a mission: to help home bakers feel confident, inspired, and creative.
After studying food science and working in several artisan bakeries across the U.S., I decided to create a space where everyone from beginners to seasoned bakers can find reliable recipes, expert tips, and a warm, welcoming community. BakingSecret.com is my way of sharing the magic of baking with the world. When I’m not testing new recipes, you’ll find me exploring farmers’ markets, collecting vintage cookbooks, or perfecting my sourdough technique.