

Okay, I have to confess something. Ever since that viral Dubai chocolate bar exploded online, I’ve been obsessed. The combination of rich, dark chocolate and that luxurious, creamy pistachio filling? Pure magic. But flying to Dubai for a snack isn’t exactly practical. So, I got busy in my kitchen, determined to capture that magic in a cookie. After a few hilarious failures (think pistachio lava explosions), I perfected these Dubai Chocolate Bar Pistachio Cookies. They’re everything you love about the bar, wrapped in a warm, gooey cookie. Trust me, your friends will think you’re a culinary genius.
The Story Behind Dubai Pistachio Chocolate Cookies
That famous chocolate bar is more than a sweet treat; it’s a symbol of luxury and ingenious flavor pairing. Middle Eastern desserts have long celebrated pistachios, prized for their buttery richness and vibrant color. Modern chefs took this tradition and elevated it, creating that stunning chocolate bar. My cookie version brings that lavish experience home. It mixes a nostalgic, chocolatey cookie dough with a sophisticated pistachio and crispy filo center. It’s a beautiful blend of tradition and trendy innovation, perfect for any home baker wanting to impress.
Why You’ll Absolutely Love This Recipe
First, the taste is unbelievable. The deep, fudgy chocolate cookie melts into a crunchy, nutty pistachio heart. It’s a textural party in your mouth. Second, they look spectacular. The drizzle of pistachio cream makes them look like they came from a fancy bakery. Finally, they’re fun to make! Stuffing the cookies feels like a little craft project. It’s a guaranteed conversation starter at any gathering. Plus, you can freeze the dough balls, meaning you can have show-stopping Dubai Pistachio Chocolate Cookies ready to bake anytime a craving (or a guest) strikes.
Perfect Occasions for These Show-Stopping Cookies
- Dessert Party Centerpiece: Serve them as the grand finale to a meal. They pair wonderfully with coffee.
- Thoughtful Gift: Package a few in a nice box. It’s a homemade gift that feels incredibly special.
- Afternoon Pick-Me-Up: That rich chocolate and protein from pistachios is a fantastic energy boost.
- Holiday Baking: Move beyond gingerbread! These luxurious cookies are perfect for Christmas or Eid.
Ingredients for Dubai Pistachio Chocolate Cookies
Gathering the right components is key to the perfect flavor and texture. Here’s what you need:
For the Chocolate Cookie Dough:
- 200g (about ¾ cup + 2 tbsp) unsalted butter, softened
- 125g (about ½ cup + 2 tbsp) light brown sugar
- 100g (about ½ cup) white caster or granulated sugar
- 2 large eggs, room temperature
- 250g (about 2 cups) self-raising flour
- 100g (about ¾ cup) plain flour (all-purpose)
- 50g (about ½ cup) cocoa powder
- ½ teaspoon salt
- 100g (about ½ cup) milk chocolate chips
For the Pistachio Filling & Decoration:
- 1 teaspoon unsalted butter
- 2 sheets filo pastry (about 75g)
- 200g pistachio cream, plus 2 tbsp reserved for decorating
Handy Substitution Options
Don’t worry if you don’t have every item. You can still make amazing cookies.
- Self-raising flour: Combine 250g plain flour with 2 ½ teaspoons baking powder.
- Pistachio cream: Blend 200g shelled pistachios with 3-4 tbsp mild oil (like sunflower) and 2 tbsp sugar or honey until creamy.
- Filo pastry: Use 75g of panko breadcrumbs or crushed plain crackers. Toast them in the butter for crunch.
- Milk chocolate chips: Dark or semi-sweet chips work beautifully for a more intense chocolate flavor.
Crafting Your Dubai Pistachio Chocolate Cookies: Step-by-Step
Step 1: Prepare the Pistachio Filling
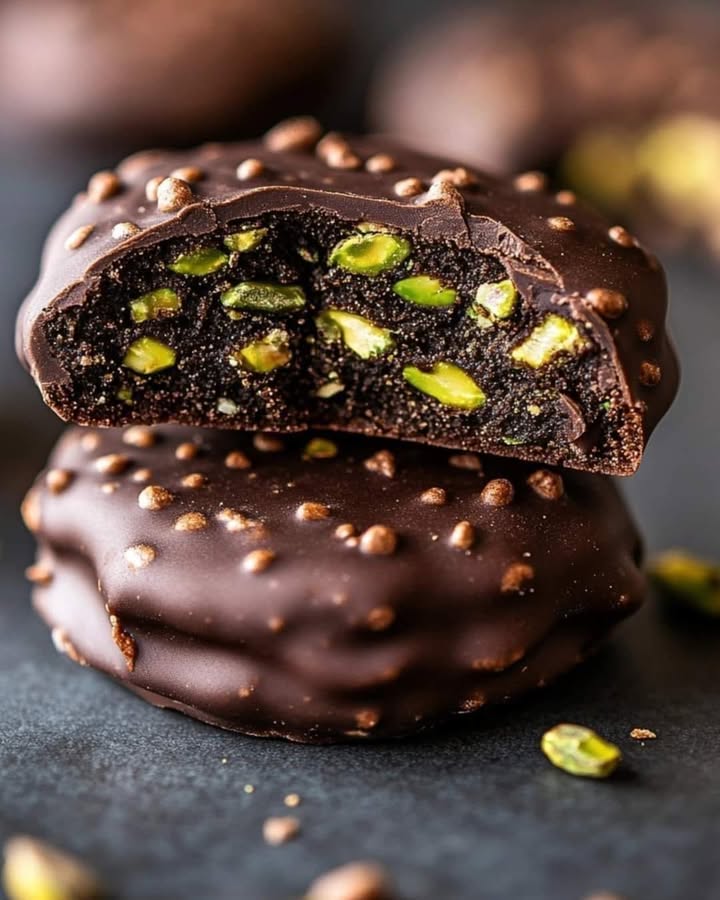
Let’s start with the star: the pistachio center. Melt the teaspoon of butter in a small saucepan over low heat. Tear your filo sheets into little, crispy-confetti pieces and add them to the pan. Turn the heat to medium and stir constantly. You’ll watch them transform from pale, flaky strips to golden, crunchy nuggets in about 5 minutes. The sound alone is satisfying! Set them aside to cool. Now, gently warm your pistachio cream in the microwave for just 10-20 seconds until it’s smooth and pourable. Pour this gorgeous green cream over the toasted filo and mix until every piece is coated in that nutty glory. The mix will thicken as it cools, making it perfect for stuffing.
Pro tip: Don’t rush the toasting. Golden brown filo adds a deep, caramelized crunch. If it’s pale, it’ll be soggy.
Step 2: Make the Chocolate Cookie Dough
Now for the chocolate hug that will wrap around the filling. In a large bowl, beat your softened butter until it’s creamy and welcoming. Add both the brown and white sugars. Mix until it looks like wet, clumpy sand – this means the sugars are properly absorbed. Crack in your eggs, one at a time, mixing well after each. In a separate bowl, whisk together your flours, cocoa powder, and salt. The cocoa will smell so rich and deep. Gradually add this dry mix to your butter mixture. A thick, fudgy dough will come together. Finally, fold in the milk chocolate chips. They’ll dot the dark dough with sweet, melty promises.
Pro tip: Room temperature eggs are crucial! Cold eggs can make the butter seize up, creating a lumpy dough.
Step 3: Fill and Shape the Cookies
This is the fun part! Line a baking tray with parchment paper. Scoop a large tablespoon of dough – it should feel substantial. Flatten it a bit in your palm. Now, take a teaspoon of your cooled pistachio filling and place it right in the center. Imagine you’re tucking a precious green jewel into a chocolate bed. Gently wrap the dough around the filling, pinching it closed to form a smooth ball. Ensure the filling is completely sealed inside to prevent leaks. Place each dough ball on your tray. Once all are shaped, cover the tray and pop it into the freezer for 90 minutes. This firm-up step is essential for that perfect, thick cookie texture.
Chef’s tip: If the dough feels sticky, lightly wet your hands. It makes shaping the balls much easier without sticking.
Step 4: Bake the Cookies to Perfection
Time for the magic oven transformation. Preheat your oven to 200°C fan (220°C conventional/gas mark 7). Here’s a secret for a crispy bottom: place a clean baking tray in the oven to heat up as it preheats. After the freeze, arrange 4-5 frozen cookie balls on the HOT tray, leaving good space between them. They’ll sizzle a bit on contact – that’s good! Bake for 12-15 minutes. The edges will firm up, but the centers should stay soft and puffed. They might look a little underdone, but that’s what creates the gooey heart. Let them cool on the baking sheet for 15 minutes. This finishing cool-down sets their structure.
Pro tip: Baking on a preheated tray mimics a professional pizza oven effect, giving you that irresistible crispy-edged, soft-centered cookie.
Step 5: Decorate and Serve
The final flourish! Take your reserved 2 tablespoons of pistachio cream and warm it slightly until it’s runny. Using a spoon or a small piping bag, drizzle the gorgeous green cream artistically over your cooled cookies. This not only adds a burst of extra pistachio flavor but makes them look utterly professional. Now, grab a cookie, feel its slightly crisp exterior, and bite into the soft, chocolatey dough and crunchy, nutty center. Pure Dubai-inspired bliss, right from your kitchen.
Timing Your Dubai Pistachio Cookie Creation
Good baking is about patience and planning. Here’s your timeline:
- Prep Time: 10 minutes (measuring, mixing)
- Cook Time: 15 minutes (toasting filo & baking cookies)
- Freezer Time: 1 hour 30 minutes (essential for setting shape)
- Total Time: About 1 hour 55 minutes
Remember, the freezer time isn’t optional. It ensures your stuffed cookies bake up tall and beautiful instead of spreading into a flat puddle.
Chef’s Secret for Ultimate Cookie Success
The secret is in the freeze. Chilling the stuffed dough balls solidifies the butter. When they hit the hot oven, the outside bakes quickly, setting the shape, while the inside takes longer to melt, creating that dreamy contrast of crisp edge and soft, gooey middle. Never skip the freeze!
A Little Extra Info: Pistachio Power!
Pistachios aren’t just delicious; they’re nutritious too. They’re packed with protein, fiber, and good fats. Using pistachio cream is a fantastic way to get that flavor while also adding a nutrient boost to your dessert. For anyone looking to enjoy decadent treats while being mindful of ingredients, choosing recipes with nuts is a great start. You can learn more about the benefits of using nuts and reducing added fat in desserts from trusted nutrition resources.
Necessary Equipment
- Large and small mixing bowls
- Electric hand mixer or stand mixer
- Whisk
- Saucepan
- Measuring cups and spoons
- Baking trays
- Parchment paper
How to Store Your Pistachio Chocolate Cookies
Once cooled completely, store your Dubai Pistachio Chocolate Cookies in an airtight container at room temperature. They will stay fresh and delicious for up to 3 days. The texture is best enjoyed within 48 hours.
For longer storage, you can freeze the baked and cooled cookies. Place them in a single layer in a freezer-safe container or bag. They can be frozen for up to 2 months. Thaw at room temperature for an hour before serving.
You can also freeze the un-baked, stuffed dough balls for future instant treats. After shaping, freeze them on the tray, then transfer to a freezer bag. Bake straight from frozen, adding a minute or two to the baking time. This is perfect for having ready for unexpected guests or a sudden craving.
Tips and Advice for the Best Results
- Measure flour correctly: Spoon flour into your measuring cup and level it off. Don’t scoop directly from the bag, as this packs too much flour in and leads to dry cookies.
- Don’t overmix the dough: Once the dry ingredients are incorporated, stop mixing. Overworking the dough develops the gluten too much, resulting in tough cookies.
- Use a hot tray for baking: That preheated tray is a game-changer for texture. It gives the cookies a quick “sear” on the bottom, locking in their shape.
- Let them cool on the tray: They are fragile when hot. Cooling on the baking sheet lets them set properly without collapsing.
Presentation Tips to Wow Your Guests
- Drizzle not only pistachio cream but also melted dark chocolate for a double-chocolate effect.
- Serve on a beautiful platter with a sprinkle of crushed pistachios and gold leaf for ultra-luxury.
- Pair each cookie with a small cup of strong Arabic coffee or a glass of cold milk.
- For a gift, stack them in a clear box tied with a ribbon. It looks like a boutique purchase!
Healthier & Fun Alternative Recipes
If you love the idea of these stuffed cookies but want to try different flavors, here are six fantastic variations.
- Almond & Rose: Replace pistachio cream with almond butter mixed with a drop of rose water. It’s fragrant and elegant.
- Dark Chocolate Orange: Add the zest of one orange to the dough and use a dark chocolate ganache center. Bright and sophisticated.
- Salted Carella: Use a salted caramel center instead of pistachio. Toffee-like and irresistibly sweet.
- Hawiian: Add ½ cup shredded coconut to the dough and use a pineapple jam center. Tropical and sunny.
- Peanut Butter Cup: Swap the pistachio filling for a spoonful of creamy peanut butter. A classic combo everyone loves.
- Double Chocolate Espresso: Add 1 tsp instant espresso powder to the dough and use a chocolate truffle center. Deep and intense.
Common Mistakes to Avoid
Mistake 1: Using Cold Ingredients
This is a big one. If your butter and eggs are cold, they won’t blend smoothly into the sugars and flour. The result is a grainy, lumpy dough that spreads unevenly when baked. Always take the time to soften your butter at room temperature and use room-temperature eggs. It makes the creaming process effortless and leads to a uniform, pliable dough that wraps perfectly around the filling.
Mistake 2: Skipping the Freezing Step
I know, an hour and a half seems long. But it’s the most important step! If you bake the stuffed dough balls right away, the butter is too soft. The cookies will spread flat on the tray, the filling might leak out, and you’ll get a thin, crispy cookie instead of a thick, soft-centered one. The freezer time solidifies the butter, guaranteeing a tall, beautiful cookie with a perfect texture. Patience pays off here.
Mistake 3: Overbaking the Cookies
These cookies should look a little underdone when you take them out. The edges are firm, but the center should still be soft and puffy. If you wait for them to look fully “set” like a cake, you’ve overbaked them. They’ll become dry and hard as they cool. Remember, they continue to cook on the hot tray outside the oven. Trust the timing, and let them cool completely to achieve that dreamy, fudgy center.
Mistake 4: Not Sealing the Filling Properly
When you wrap the dough around the pistachio filling, you must completely enclose it. If there’s a small crack or thin spot, the hot filling can bubble out during baking. This creates leaks and can even burn on the tray. Take a moment to pinch the dough closed smoothly, ensuring the filling is fully covered. A well-sealed cookie means all that lovely pistachio crunch stays inside, waiting for your bite.
Frequently Asked Questions (FAQ)
Can I make these Dubai Pistachio Cookies without pistachio cream?
Absolutely! If you can’t find pistachio cream, you can make a very good substitute at home. Simply take about 200g of shelled, unsalted pistachios and blend them in a high-powered food processor until they form a paste. You may need to add a tiny amount of a neutral oil (like sunflower or avocado oil) to help it come together, and a tablespoon of honey or sugar for sweetness. The flavor will be fantastic, though the color might be less vibrant than commercial cream. You can also experiment with other nut butters like almond or cashew for a different, but still delicious, twist on the recipe.
What is filo pastry, and why is it in the filling?
Filo pastry (also spelled phyllo) is a very thin, unleavened dough used in many Middle Eastern and Mediterranean pastries, like baklava. In this recipe, it’s not used in sheets but torn into pieces and toasted in butter. This process transforms it into incredible, light, golden-brown crunchy bits. When mixed with the pistachio cream, it adds a contrasting texture that mimics the “crunch” layer found in the original Dubai chocolate bar. If you don’t have filo, you can use panko breadcrumbs or even crushed plain crackers toasted in butter for a similar crunchy effect.
Cookie spread usually points to two issues. First, your dough might have been too warm when you baked it. Remember, the 90-minute freeze is crucial to solidify the butter and prevent spreading. Second, you might have measured your flour incorrectly. If you scoop flour directly from the bag with your measuring cup, you pack in too much flour, leading to a drier dough that actually spreads more. Always spoon flour into the cup and level it off. Also, ensure your oven is properly preheated and you’re using the preheated tray trick, which sets the bottom quickly.
Can I use regular flour instead of self-raising flour?
You can, but you need to add a leavening agent. Self-raising flour already contains baking powder. To substitute, use 250g of plain (all-purpose) flour and add 2 and ½ teaspoons of baking powder. Whisk them together thoroughly before adding to your wet ingredients. This will ensure your cookies rise properly and have that perfect soft, thick texture. Using plain flour alone will result in dense, flat cookies.
When stored correctly in an airtight container at room temperature, these Dubai Pistachio Chocolate Cookies are best enjoyed within 3 days. Their texture is peak on day one and two. After that, they might start to soften a bit more but will still be tasty. If you want to keep them longer, freezing is your best option. Both baked cookies and unbaked dough balls freeze beautifully for up to 2 months. This makes them a wonderful treat to have on standby for any occasion.
The sweetness comes mainly from the sugars in the dough and the pistachio cream. For a less sweet version, you could reduce the white caster sugar in the dough by 25g. You could also seek out or make a pistachio cream with no added sugar, though this might be harder to find. Using a dark chocolate chip (70% cocoa) instead of milk chocolate will also introduce a more bitter, less sweet chocolate note that balances the overall sweetness. The cookies will still be decadent but with a more sophisticated, adult flavor profile.
Can I add other things to the chocolate dough?
Certainly! The chocolate dough is a wonderful base for experimentation. You could add ½ teaspoon of cinnamon or a pinch of chili powder for a warm spice kick. Adding 50g of chopped toasted walnuts or pecans would give extra texture and nuttiness. A teaspoon of instant espresso powder would deepen the chocolate flavor beautifully. Just remember that any large additions might affect the dough’s ability to wrap neatly around the filling, so keep add-ins small or finely chopped.
Why do I need to bake on a preheated tray?
This trick is borrowed from professional pizza baking. Putting your frozen cookie dough balls onto a tray that’s already hot gives them an instant “sear” on the bottom. This rapid heat application sets the structure of the cookie base immediately, preventing it from spreading outwards. It allows the cookie to rise upwards instead, creating that desirable thick, soft center with a slightly crisp edge. It’s a simple step that dramatically improves the final texture and appearance of your cookies.
What’s the best way to drizzle the pistachio cream for decoration?
For a neat, professional drizzle, warm the reserved pistachio cream slightly so it’s runny but not hot. You can then use a small spoon and flick it back and forth over the cookies. For more control, put the warmed cream into a small piping bag (or a Ziploc bag with a tiny corner snipped off) and pipe thin lines over the cookies. You can do straight lines, zig-zags, or swirls. Let your creativity flow! If the cream thickens too much as you work, just warm it for another few seconds.
You can adjust the size, but timing will change. For smaller cookies, use a tablespoon scoop for the dough and a smaller amount of filling. They may only need 10-12 minutes in the oven. For larger, bakery-style cookies, use a heaped ice cream scoop of dough and more filling. You might need to increase the bake time to 16-18 minutes and ensure you only bake 2-3 at a time on the tray so they have space to expand. Regardless of size, the freezing step is still essential for texture.
Making these luxurious cookies is just the start of your baking adventure. For more inspiring ideas and classic treats, explore our entire collection of cookie and biscuit recipes. You might love to try our Heavenly Cherry Cupcakes for a fruity twist, or perhaps a savory option like our Cheesy Garlic Chicken Wraps. If you’re into stuffed delights, our Cheese Stuffed Potato Cakes are a must-try. And for a no-bake, refreshing dessert, our Cherry Lemon Cheesecake Slice is perfect for summer.
Your Ticket to a Luxurious Home-Baked Treat
So, there you have it! You don’t need a passport to experience that famous Dubai chocolate bar magic. With a little time and these simple steps, you can create your own show-stopping Dubai Chocolate Bar Pistachio Cookies. They bring the excitement of a viral trend right into your kitchen. The rich chocolate, the crunchy pistachio heart, and that beautiful green drizzle make them unforgettable. Whether you make them for a special party, as a gift, or just for a very fancy Tuesday afternoon, they are guaranteed to delight. Happy baking!
Equipment
- Grand bol
- Fouet
- Spatule
- Plaque à pâtisserie
- Papier sulfurisé
Ingredients
- 200 g beurre non salé ramolli
- 125 g sucre brun
- 100 g sucre blanc
- 2 œufs à température ambiante
- 250 g farine auto-levante
- 100 g farine tout usage
- 50 g cacao en poudre
- 0.5 cuil sel
- 100 g pépites de chocolat au lait
- 1 cuil beurre non salé pour la garniture
- 2 feuilles pâte filo environ
- 200 g crème de pistache
- 2 cuil crème de pistache réservée pour décorer
Instructions
- Faites fondre la cuillère de beurre dans une casserole et faites griller les morceaux de pâte filo jusqu'à ce qu'ils soient dorés et croustillants; laissez refroidir.
- Réchauffez la crème de pistache jusqu'à obtenir une consistance lisse et mélangez avec les morceaux de pâte filo grillés.
- Dans un grand bol, battez le beurre ramolli, puis ajoutez les deux sucres jusqu'à ce qu'ils soient bien mélangés.
- Ajoutez les œufs un à un au mélange de beurre et de sucre, en mélangeant bien après chaque ajout.
- Dans un bol séparé, fouettez ensemble la farine auto-levante, la farine tout usage, le cacao en poudre et le sel.
- Combinez progressivement les ingrédients secs au mélange humide pour former une pâte.
- Incorporez les pépites de chocolat au lait dans la pâte à biscuit.
- Prélevez une grande cuillère de pâte, aplatissez-la légèrement et placez une cuillère de garniture à la pistache au centre.
- Enveloppez la pâte autour de la garniture pour former une boule et assurez-vous qu'elle est complètement scellée.
- Placez les boules de pâte à cookies formées au congélateur pendant 90 minutes.
- Préchauffez le four et faites cuire les boules de pâte congelées sur une plaque chaude pendant 12-15 minutes.
- Laissez les cookies refroidir pendant 15 minutes sur la plaque de cuisson.
- Arrosez les cookies refroidis de crème de pistache réservée pour décorer.
Notes
Nutrition

Hi, I’m Olivia Parker, the founder of BakingSecret.com and a lifelong lover of all things sweet and homemade. I grew up in a small town in Oregon, where the smell of fresh cookies in my family’s kitchen sparked my passion for baking. Over the years, I turned that passion into a mission: to help home bakers feel confident, inspired, and creative.
After studying food science and working in several artisan bakeries across the U.S., I decided to create a space where everyone from beginners to seasoned bakers can find reliable recipes, expert tips, and a warm, welcoming community. BakingSecret.com is my way of sharing the magic of baking with the world. When I’m not testing new recipes, you’ll find me exploring farmers’ markets, collecting vintage cookbooks, or perfecting my sourdough technique.