
Why I Love Making Strawberry Cheesecake Without Baking
Last summer, my oven broke down right before my daughter’s birthday party. I had promised her a strawberry cheesecake, and panic hit me hard. That’s when I discovered the magic of no-bake desserts. I made my first strawberry cheesecake without baking that day, and honestly, it turned out even better than my usual baked version. The texture was creamier, the flavor was brighter, and best of all, my kitchen stayed cool on that hot July afternoon.
No-bake cheesecakes have become my secret weapon in the kitchen. They’re perfect for anyone who feels nervous around ovens or lives in a tiny apartment without proper baking equipment. You don’t need to worry about cracks forming on top or accidentally overbaking your dessert. The process is actually quite forgiving, which makes it ideal for beginners.
This guide will walk you through everything you need to know about creating a stunning strawberry cheesecake without baking. I’ll share the exact ingredients you need, step-by-step instructions for each layer, and plenty of tips I’ve learned through trial and error. By the end, you’ll have a restaurant-quality dessert that looks impressive but requires minimal effort.
Ingredients You’ll Need for Your No-Bake Strawberry Cheesecake
The beauty of a no-bake strawberry cheesecake lies in its simplicity. You don’t need fancy equipment or hard-to-find ingredients. Most items are probably already sitting in your pantry and fridge right now.
For the Crust:
- 2 cups graham cracker crumbs (about 16 crackers)
- 1/3 cup melted butter
- 3 tablespoons granulated sugar
- Pinch of salt
For the Cheesecake Filling:
- 16 ounces cream cheese, softened to room temperature
- 1 cup powdered sugar
- 1 teaspoon vanilla extract
- 1 cup heavy whipping cream
- 2 tablespoons fresh lemon juice
For the Strawberry Topping:
- 2 cups fresh strawberries, hulled and sliced
- 1/4 cup granulated sugar
- 1 tablespoon lemon juice
- 1 tablespoon cornstarch mixed with 2 tablespoons water
Quality matters more than you might think when making a no-bake dessert. Since you’re not applying heat to blend flavors together, each ingredient needs to shine on its own. I always splurge on full-fat cream cheese from a trusted brand. The cheap stuff tends to be watery and doesn’t set properly.
Use real butter for your crust, not margarine. The flavor difference is huge. Fresh strawberries beat frozen ones every time for the topping. Look for berries that smell sweet and have a deep red color without white shoulders.
Your heavy cream should have at least 36% fat content. This ensures it whips up thick and stable. I learned this the hard way when I once used light cream and ended up with a runny mess.
Need to make substitutions? Here are some options that work well:
- Gluten-free: Swap graham crackers for gluten-free cookies or almond flour mixed with coconut oil
- Dairy-free: Use vegan cream cheese and coconut cream instead of dairy products
- Lower sugar: Replace powdered sugar with a sugar substitute designed for baking
- Nut options: Add 1/4 cup finely chopped pecans or almonds to the crust for extra crunch
I’ve tested most of these substitutions myself. The vegan version using coconut cream is surprisingly good, though it has a slight coconut flavor that some people love and others don’t prefer.
Preparing the Crust
The crust is your foundation, and getting it right sets you up for success. A good crust should be firm enough to hold its shape but tender enough to cut easily with a fork.
Start by crushing your graham crackers into fine crumbs. I usually put them in a sealed plastic bag and roll over them with a rolling pin. This method gives me a good arm workout and prevents crumbs from flying everywhere. You can also use a food processor if you have one.
Pour the crumbs into a medium mixing bowl. Add your melted butter, sugar, and a pinch of salt. The salt might seem weird, but it balances the sweetness and makes all the flavors pop.
Mix everything together with a fork until the mixture looks like wet sand. Every crumb should be coated with butter. Press a small amount between your fingers. It should stick together easily. If it feels too dry and crumbly, add another tablespoon of melted butter.
Now comes the pressing part. Dump your mixture into a 9-inch springform pan. Use the bottom of a measuring cup or glass to press the crumbs down firmly. Start in the center and work your way out to the edges.
Here’s a trick I picked up from a pastry chef friend: press the crust up the sides about one inch. This creates a little wall that holds the filling better and looks more professional. Apply firm, even pressure. You want the crust packed tight so it doesn’t fall apart when you slice it later.
Pop your crust in the refrigerator for at least 30 minutes. This chilling time helps the butter solidify, which makes the crust hold together much better. I usually make my crust the night before and let it chill overnight.
Tips for the perfect crust texture:
- Don’t skimp on the butter. Too little makes a dry, crumbly crust that falls apart
- Press firmly and evenly. Weak spots will crack when you cut the cheesecake
- Chill for the full time. Rushing this step ruins everything
- Use a flat-bottomed glass for even pressure across the surface
Want to get creative with your crust? I love experimenting with different bases. Chocolate graham crackers create a rich, darker crust that pairs beautifully with strawberries. Vanilla wafers give you a lighter, more delicate flavor.
For special occasions, I sometimes add 1/4 cup of finely chopped toasted pecans to the crust mixture. The nuts add a wonderful texture and nutty flavor that complements the creamy filling. Just pulse them in a food processor until they’re about the size of coarse sand.
Oreo cookies (cream filling and all) make an incredible chocolate crust. Use about 24 cookies and reduce the butter to 5 tablespoons since Oreos already contain fat. This version is a huge hit with kids.
You can also try gingersnap cookies for a spicy kick, or even shortbread cookies for a buttery, melt-in-your-mouth base. Each variation brings its own personality to your strawberry cheesecake without baking.

Making the Creamy Cheesecake Filling
With your crust perfectly chilled and firm, it’s time to tackle the star of the show—the silky, dreamy filling that makes this strawberry cheesecake without baking absolutely irresistible.
First things first: your cream cheese absolutely must be at room temperature. I can’t stress this enough. Cold cream cheese creates lumps that no amount of mixing will fix. I’ve ruined more than one cheesecake by getting impatient with this step. Take your cream cheese out of the fridge at least two hours before you plan to start. If you forget, you can cut it into small cubes and let it sit for about 30 minutes. That speeds things up considerably.
Grab a large mixing bowl—and I mean large, because this mixture increases in volume quite a bit. Drop in your softened cream cheese and start beating it with an electric mixer on medium speed. Beat it for about three minutes until it looks fluffy and smooth. You want zero lumps at this stage. Scrape down the sides of the bowl frequently with a spatula.
Now add your powdered sugar gradually, maybe a third at a time. Keep beating on medium speed between each addition. The mixture should start looking lighter in color and super creamy. This process usually takes about five minutes total. My arm used to get tired doing this with a hand mixer, so I eventually invested in a stand mixer that changed my life.
Here’s where things get interesting. Pour in your vanilla extract and lemon juice. The lemon juice might seem like a small detail, but it brightens the entire flavor profile and cuts through the richness of the cream cheese. Beat for another minute until everything blends together smoothly.
In a separate bowl, whip your heavy cream until stiff peaks form. This usually takes three to five minutes with an electric mixer. You’ll know you’ve reached stiff peaks when you lift the beaters and the cream stands straight up without drooping. Be careful not to overwhip—you’re making whipped cream, not butter. I watch it closely toward the end because the window between perfect and overdone is pretty narrow.
Now for the gentle part. Add about a third of your whipped cream to the cream cheese mixture. Use a spatula to fold it in gently. Folding means you’re cutting down through the center, scraping across the bottom, and bringing the spatula up along the side. Rotate the bowl and repeat. This technique keeps air in the mixture, which gives you that light, mousse-like texture.
Once that first third is incorporated, add the remaining whipped cream and fold until you see no white streaks. Don’t stir aggressively or you’ll deflate all those beautiful air bubbles you worked so hard to create. The whole folding process takes me about two minutes. The mixture should look pale, fluffy, and absolutely gorgeous.
Pour this heavenly filling into your chilled crust. Use a spatula to spread it evenly, making sure to reach all the edges. Tap the pan gently on the counter a few times to release any air bubbles trapped inside. Smooth the top with an offset spatula or the back of a spoon. I like to create gentle swirls on the surface, which adds visual interest.
By the way, if you’ve enjoyed making no-bake cheesecakes, you might also love trying a mini pumpkin cheesecake for individual servings that work great at parties. They follow a similar technique but in adorable portion sizes.
Some recipes call for gelatin to help set the filling more firmly. I don’t always use it for this particular strawberry cheesecake without baking because the combination of cream cheese and whipped cream sets up nicely on its own. However, if you’re making this dessert in a hot climate or serving it outdoors, gelatin provides extra insurance against melting.
To use gelatin properly, sprinkle one packet of unflavored gelatin over two tablespoons of cold water in a small bowl. Let it sit for five minutes until it blooms and looks spongy. Then microwave it for about 10 seconds until it becomes liquid. Let it cool slightly before adding it to your cream cheese mixture before you fold in the whipped cream. This creates a firmer set similar to what you’d find in pecan pie cheesecake bars, which need that extra stability for clean cutting.
Adding the Fresh Strawberry Topping
The strawberry topping transforms this dessert from simple to spectacular. You’ve got two main approaches here: fresh sliced berries or a cooked compote. Both are fantastic, just different.
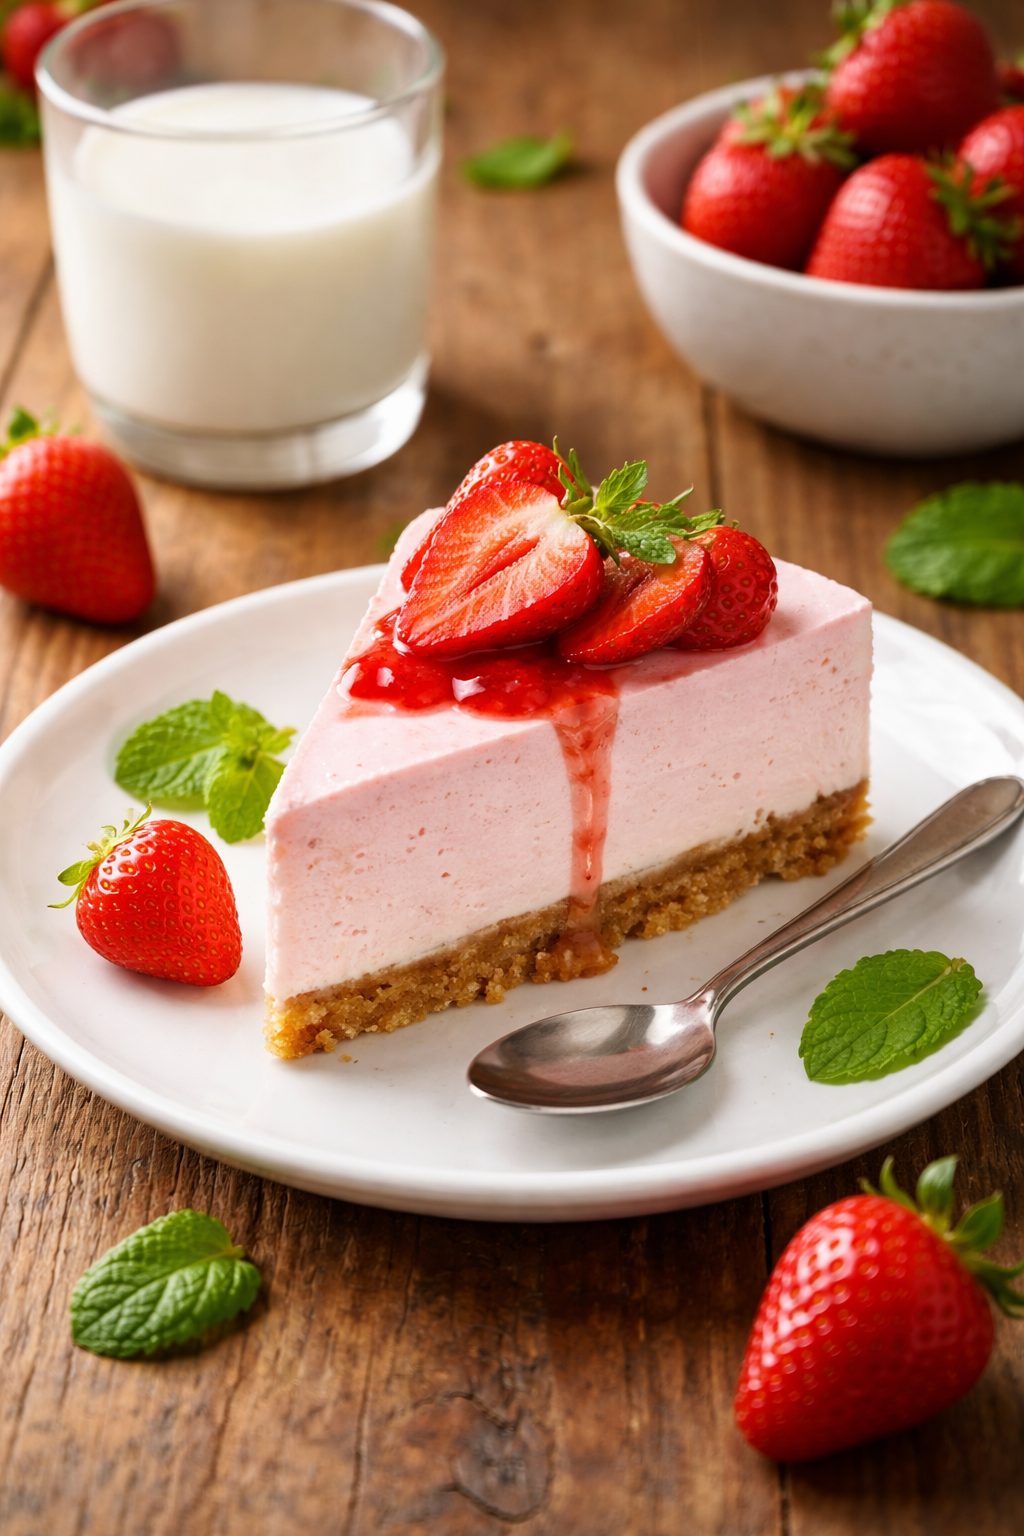
For fresh strawberries, wait until your cheesecake has fully set before adding them. Wash your strawberries gently under cool water and pat them completely dry with paper towels. Any water droplets will make your topping slide around. Remove the green tops and slice them about a quarter-inch thick.
Starting from the outer edge, arrange strawberry slices in a circular pattern, overlapping them slightly like roof shingles. Work your way toward the center. I usually stand the slices on their sides so you see the beautiful interior. For the very center, place one perfect strawberry half with the point facing up as a crown jewel.
Funny enough, my first attempt at arranging strawberries looked like a crime scene. The berries were all different sizes and angles. Now I know to sort them by size before I start and use the largest slices for the outer ring.
For a glazed compote topping, combine your sliced strawberries with sugar and lemon juice in a medium saucepan. Cook over medium heat, stirring occasionally, until the berries start releasing their juice—about five minutes. The mixture will look soupy and smell incredible.
Mix your cornstarch with water in a small cup until smooth. Pour this slurry into your strawberry mixture while stirring constantly. Keep cooking for another two minutes until the liquid thickens and turns glossy. It should coat the back of a spoon. Remove from heat and let it cool to room temperature before spooning it over your set cheesecake.
The compote method reminds me of techniques used in pumpkin pie cheesecake recipe preparations, where layering flavors creates depth. The cooked strawberries develop a more intense, concentrated flavor compared to fresh ones.
Don’t limit yourself to just strawberries, though. Blueberries arranged in tight concentric circles create a stunning deep purple top. Fresh raspberries give you that elegant, upscale restaurant look. Mixed berries arranged in sections like a pie chart make for a colorful, playful presentation.
Sliced peaches work beautifully during summer months. Kiwi slices add a bright green color that contrasts nicely with the white filling. I’ve even used pomegranate seeds scattered across the top for a jewel-like effect during winter holidays. The possibilities are honestly endless, so use whatever looks fresh and appealing at your local market.
Chilling and Serving Your No-Bake Cheesecake
Here’s the thing—patience during the chilling phase makes or breaks your strawberry cheesecake without baking. This dessert needs proper time to firm up.
Once you’ve assembled everything, cover your springform pan loosely with plastic wrap. Don’t let the wrap touch the surface of the filling or you’ll mess up your beautiful smooth top. Slide the whole thing into your refrigerator.
The minimum chilling time is four hours, but overnight is genuinely better. I always make mine the day before I plan to serve it. This gives the flavors time to meld together and the filling time to set completely. Rushing this step results in a filling that’s too soft and might collapse when you try to slice it.
Your cheesecake is ready when you can gently press the center with your finger and it feels firm, not jiggly. It should spring back slightly under pressure. If it still seems wobbly, give it more time. An extra hour never hurts.
Removing the cheesecake from the pan cleanly requires a little technique. First, run a thin knife around the inside edge of the pan. Dip the knife in hot water and wipe it dry between passes. This prevents the filling from sticking to the blade.
Unlatch the springform pan and slowly lift the ring straight up. If any spots stick, slide your knife around those areas again. The cheesecake should stand beautifully on the base. You can serve it right on the springform base, or carefully slide it onto a serving plate using two large spatulas.
To transfer it to a plate, I slide one wide spatula underneath from one side and another from the opposite side. Lift gently and quickly move it to your serving platter. This maneuver makes me nervous every single time, but it gets easier with practice.
For serving, dip your knife in hot water and wipe it clean between each slice. This technique gives you those perfect, clean cuts with smooth edges that look professionally done. Each slice should release easily and stand up on its own without the filling oozing out.
Serving suggestions can elevate your presentation even further. A dollop of fresh whipped cream alongside each slice adds extra indulgence. Drizzle warm chocolate sauce in a zigzag pattern across each plate for a restaurant-style touch. A light dusting of powdered sugar through a fine-mesh sieve creates an elegant finish.
Fresh mint leaves make excellent garnishes that add a pop of green color. A few whole strawberries on the side of each plate look beautiful and give people extra fruit to enjoy. Sometimes I add a small scoop of vanilla ice cream, which creates a wonderful temperature contrast against the chilled cheesecake.
If you’re inspired by layered desserts, techniques similar to those used in pumpkin swirl cheesecake can add even more visual drama. Consider creating a marbled effect with strawberry puree swirled through the filling before it sets.
This no-bake strawberry cheesecake stays fresh in the refrigerator for up to five days when covered properly. The flavors actually deepen over time, making day-two slices somehow even better than day-one. Just keep it covered with plastic wrap or store it in an airtight container to prevent it from absorbing other fridge odors.
Variations and Creative Ideas for Your No-Bake Strawberry Cheesecake
Once you’ve mastered the basic strawberry cheesecake without baking, a whole world of creative possibilities opens up. I’ve spent countless weekends experimenting with different presentations and flavors, and honestly, that’s where the real fun begins.
Mini cheesecakes have become my go-to for parties and gatherings. Instead of one large pan, I use a muffin tin lined with cupcake papers. Press about two tablespoons of crust mixture into each cup, then divide your filling among them. Top each mini cheesecake with a single perfect strawberry slice or a small dollop of compote. These individual portions eliminate the stress of cutting and serving, plus they look adorable arranged on a platter. My niece’s baby shower featured two dozen of these little beauties, and they disappeared within minutes.
Layered parfaits offer another stunning variation that works brilliantly for brunch gatherings. Use clear glasses or mason jars to show off the layers. Start with a spoonful of crushed graham cracker crust on the bottom, add a layer of cheesecake filling, then strawberry compote, and repeat. Top with whipped cream and a fresh berry. These parfaits can be made a day ahead and stored in the fridge, making them incredibly practical for entertaining. I usually make about eight parfaits with the same ingredient amounts from the original recipe.
Speaking of experimentation, swapping out strawberries for other fruits creates entirely different desserts. Blueberry lemon cheesecake is fantastic—just replace strawberries with blueberries and add an extra tablespoon of lemon zest to the filling. The tartness balances beautifully with the creamy base.
Mango passion fruit cheesecake sounds exotic but requires zero special skills. Puree fresh mango with a bit of passion fruit pulp and layer it between your filling. The tropical flavors transport you straight to a beach vacation. I made this version for my husband’s birthday last year because he’s not a huge strawberry fan, and even my traditional-dessert-loving mother-in-law asked for the recipe.
Cherry cheesecake hits different during winter months when strawberries aren’t at their peak. A can of cherry pie filling works in a pinch, though I prefer making my own with frozen cherries, sugar, and cornstarch. The deep red color looks festive and holiday-appropriate.
Here’s the thing—chocolate lovers shouldn’t feel left out. Add half a cup of melted and cooled dark chocolate to your cream cheese mixture before folding in the whipped cream. This creates a chocolate strawberry combination that rivals any fancy bakery creation. You could also drizzle melted chocolate over the finished cheesecake in thin lines for visual drama.
For special occasions, decoration transforms a simple dessert into a showstopper. Valentine’s Day calls for heart-shaped strawberry slices arranged in a pattern across the top. Dust the edges with edible gold shimmer for an elegant touch that catches the light. I’ve done this for anniversary dinners, and the wow factor is unmatched.
During summer barbecues, I make a red, white, and blue version using strawberries, whipped cream dollops, and fresh blueberries arranged in sections. It’s become a Fourth of July tradition in our family. My kids actually argue over who gets to help arrange the berries now.
Christmas celebrations deserve something extra special. I press crushed candy canes into the crust along with the graham crackers for a peppermint twist. Top with strawberries and white chocolate shavings. The flavor combination might sound odd, but peppermint and strawberry work surprisingly well together. Plus, the red and white colors fit the holiday theme perfectly.
Birthday parties call for over-the-top presentations. I sometimes pipe additional whipped cream around the edges using a star tip, then stick fresh strawberry halves into each rosette. Colorful sprinkles scattered across the top make kids absolutely lose their minds with excitement. Last month, my daughter requested this exact setup for her sleepover party, and her friends took approximately three hundred photos before anyone took a bite.
Texture variations add another dimension to explore. Folding mini chocolate chips into the filling creates little pockets of chocolate surprise. Crushed freeze-dried strawberries mixed into the crust provide an unexpected burst of concentrated strawberry flavor. I discovered freeze-dried fruit by accident at a farmers market, and now I keep several varieties in my pantry specifically for baking experiments.
Layering different flavored fillings creates visual interest when you slice the cheesecake. Make half your filling plain and mix strawberry puree into the other half. Pour the plain layer first, let it chill for thirty minutes, then carefully add the pink layer on top. When you cut into it, you get gorgeous two-toned slices that look way more complicated than they actually are.
By the way, considering the overall food balance of your dessert spread can help you create a more rounded menu. I often serve this rich cheesecake alongside lighter options like fresh fruit salad or simple cookies, giving guests choices that suit different preferences and dietary needs.
Mason jar cheesecakes make fantastic gifts for neighbors or teachers. Layer your ingredients in wide-mouth jars, seal them with decorative lids, and add a ribbon. Include a small spoon tied to the ribbon with twine. These portable desserts travel well and feel incredibly personal. I made a dozen for my son’s teachers during appreciation week, and apparently they were the hit of the staff room.
Breakfast-inspired versions work beautifully for brunch events. Add a thin layer of granola between the crust and filling for extra crunch. Top with sliced strawberries and a drizzle of honey. This version feels lighter and more appropriate for morning gatherings while still delivering that creamy cheesecake satisfaction.
For those watching their portions, creating cheesecake bites offers built-in portion control. Use a small cookie scoop to form balls of the crust mixture, flatten them slightly, and press them into mini muffin tins. Add a dollop of filling and top with a tiny strawberry piece. These one-bite wonders satisfy dessert cravings without the guilt of a full slice.
Experimenting with different extracts changes the flavor profile entirely. Almond extract instead of vanilla creates a more sophisticated, bakery-style taste. Coconut extract paired with toasted coconut in the crust transports you to a tropical paradise. I keep several extracts in my pantry specifically for these flavor adventures. Just remember that extracts are concentrated—start with half the amount you’d use for vanilla and adjust from there.
Creating an ombre effect with your strawberry topping looks incredibly professional but takes minimal effort. Make three small batches of strawberry topping using different amounts of berries—one heavily loaded with fruit, one medium, and one mostly glaze. Spread them in rings from dark in the center to light at the edges. The gradient effect photographs beautifully and always impresses guests.
If you’ve enjoyed exploring these variations, you might want to check out other cheesecake possibilities that use similar no-bake techniques but with completely different flavor profiles. Each recipe builds on the same fundamental skills while creating unique results.
Seriously, don’t be afraid to get creative and make this recipe your own. The no-bake method is so forgiving that your experiments rarely result in complete disasters. Worst case scenario, you end up with a dessert that tastes amazing but doesn’t look exactly as planned. Trust me, nobody complains about delicious cheesecake, regardless of appearance.
Frequently Asked Questions About No-Bake Strawberry Cheesecake
Can I use frozen strawberries for the topping?
Yes, frozen strawberries work fine, especially for the cooked compote version. Thaw them completely and drain excess liquid before cooking. Fresh strawberries look prettier for arrangements, but frozen ones actually release more juice, which creates a thicker, more flavorful compote. I use frozen strawberries all winter long when fresh ones cost a fortune and taste like cardboard. Just avoid using them as fresh sliced toppings since they turn mushy and watery when thawed.
How long does the cheesecake need to chill before serving?
Your strawberry cheesecake without baking needs a minimum of four hours to set properly, but overnight is genuinely better. The filling needs time to firm up completely so it holds its shape when sliced. I’ve tried rushing this with only two hours of chilling, and the slices fell apart into a creamy puddle on the plate. Plan ahead and make your cheesecake the day before you need it. This also gives the flavors time to meld together, which actually improves the taste.
Is there a way to make this cheesecake vegan?
Absolutely, and it turns out surprisingly well. Replace cream cheese with vegan cream cheese from brands like Kite Hill or Tofutti. Swap heavy cream with full-fat coconut cream that’s been refrigerated overnight—use only the thick cream that separates to the top. Use coconut oil instead of butter in the crust. The texture will be slightly different but still creamy and delicious. I’ve served the vegan version at mixed gatherings, and non-vegan guests couldn’t tell the difference. Just be aware there’s a subtle coconut flavor that some people love.
What can I do if my cheesecake doesn’t set properly?
If your cheesecake stays too soft after proper chilling time, you probably didn’t whip the cream to stiff peaks or your cream cheese was too warm. Pop it back in the fridge for a few more hours. If it’s still too soft, you can salvage it by serving it as a parfait dessert in glasses rather than sliced portions. Alternatively, freeze it for about two hours—the filling will firm up significantly. I once saved a runny cheesecake by rebranding it as “frozen cheesecake” and serving it semi-frozen like ice cream cake. Everyone loved it.
Can I make this cheesecake ahead of time?
Yes, this dessert is actually better when made ahead. You can prepare the entire strawberry cheesecake without baking up to three days in advance. Keep it covered in the refrigerator until you’re ready to serve. The crust stays crisp, and the filling continues to develop flavor over time. I wouldn’t add fresh strawberry slices more than six hours before serving since they release juice and can make things soggy. The cooked compote can go on top a full day ahead without any issues.
How should I store leftover cheesecake?
Cover your leftover cheesecake tightly with plastic wrap or transfer slices to an airtight container. It stays fresh in the refrigerator for up to five days. Don’t leave it at room temperature for more than two hours since the dairy can spoil. You can freeze individual slices wrapped in plastic wrap and then aluminum foil for up to two months. Thaw frozen slices overnight in the fridge before serving. The texture changes slightly after freezing—it becomes a bit denser—but it’s still delicious and works great for last-minute dessert emergencies.
Are there any non-dairy alternatives for the cream cheese?
Several excellent dairy-free cream cheese brands work beautifully in no-bake cheesecakes. Kite Hill almond milk cream cheese has the closest texture to regular cream cheese. Tofutti and Daiya also make decent versions, though they’re slightly softer. Cashew-based cream cheese creates an incredibly rich, smooth filling if you can find it at health food stores. I’ve tested most of these alternatives, and Kite Hill consistently gives me the best results. Whatever brand you choose, make sure it’s full-fat, not a reduced-fat version, or your filling won’t set properly.
Can I add other fruits to the cheesecake?
Absolutely, and I encourage you to experiment with whatever’s in season. Raspberries, blackberries, blueberries, peaches, mangoes, and cherries all work wonderfully. Mixed berry combinations create beautiful color contrasts. Tropical fruits like pineapple and kiwi add interesting flavors but release more juice, so you might want to cook them into a compote rather than using them fresh. I’ve even made a successful fig and honey version that tasted incredibly sophisticated. Just avoid fruits with extremely high water content like watermelon, which make things too soggy.
Do I need special equipment to make this dessert?
Not really—this is one of the most equipment-friendly desserts you can make. You need a springform pan, mixing bowls, and an electric mixer. A hand mixer works fine, though a stand mixer makes things easier. If you don’t have a springform pan, you can use a regular cake pan lined with parchment paper with long overhangs that help you lift the cheesecake out. I’ve even made this in a glass baking dish when all my springform pans were dirty. You won’t get the same clean sides, but it tastes just as good and you can serve it directly from the dish.
Why did my crust come out soggy instead of crisp?
A soggy crust usually happens when there’s too much moisture somewhere in the process. Make sure you press the crust firmly and chill it adequately before adding the filling. If your strawberries release a lot of juice onto the filling, that liquid can eventually seep down into the crust. Using a cooked compote with cornstarch helps control excess moisture. Also check that you used enough butter to bind the crumbs—too little butter creates a dry crust that doesn’t hold together, while too much makes it greasy. The texture should feel like damp sand before you press it into the pan.
Making a strawberry cheesecake without baking really has changed how I approach desserts. There’s something liberating about creating something this impressive without turning on the oven, especially during hot summer months. Give it a try this weekend and see how this technique can become your own secret weapon for stress-free entertaining and satisfying your sweet tooth.
Equipment
- Mixing Bowl
- Whisk
- Spatula
- Springform Pan
- Parchment Paper
Ingredients
- 2 cups graham cracker crumbs about 16 crackers
- 1/3 cup melted butter
- 3 tablespoons granulated sugar
- 1 pinch of salt
- 16 ounces cream cheese softened to room temperature
- 1 cup powdered sugar
- 1 teaspoon vanilla extract
- 1 cup heavy whipping cream
- 2 tablespoons fresh lemon juice
- 2 cups fresh strawberries hulled and sliced
- 1/4 cup granulated sugar (for topping)
- 1 tablespoon lemon juice (for topping)
- 1 tablespoon cornstarch mixed with 2 tablespoons water for topping
Instructions
- Crush graham crackers into fine crumbs and mix with melted butter, sugar, and salt until it resembles wet sand.
- Press the mixture into a 9-inch springform pan, creating a solid crust; chill for at least 30 minutes.
- Beat softened cream cheese in a large bowl until fluffy and smooth; gradually add powdered sugar.
- Mix in vanilla extract and lemon juice until combined.
- Whip heavy cream in a separate bowl until stiff peaks form.
- Fold one-third of whipped cream into the cream cheese mixture, then fold in the remaining whipped cream gently.
- Pour the mixture into the chilled crust and smooth the top; refrigerate for a minimum of 4 hours or overnight.
- For the topping, combine sliced strawberries with sugar and lemon juice, or cook with cornstarch slurry for a compote.
- Once set, top the cheesecake with fresh strawberries or the cooled compote.
- Chill again before serving, then slice and serve with optional garnishes.
Notes
Nutrition

Hello! I’m Sarah Mitchell, and I’m passionate about bringing creativity and innovation to baking. My love for baking started in high school when I first tried my hand at decorating cupcakes for a class project. What began as a fun hobby quickly became a full-time passion. I’ve spent the past decade working in bakeries and dessert shops, honing my skills in everything from simple cookies to intricate wedding cakes.
After working in some of the top bakeries across the country, I realized that baking was about more than just following recipes — it was about infusing your personality into each creation. At BakingSecret.com, I love creating recipes that push boundaries while staying true to the heart of classic baking. I specialize in creating delicious and visually stunning pastries that will wow your guests.
When I’m not baking, I enjoy teaching baking classes, trying out new cake decoration techniques, and traveling to find inspiration in global dessert traditions. I’m so excited to share my tips and tricks with you to help elevate your baking game!