
You know that feeling when you take a bite of something and you’re instantly on vacation? That’s this cake, my friends. The first time I made this Tropical Coconut Cake, my kitchen smelled like a sun-drenched beach. My kids wandered in, asking if we could pack our bags! This isn’t just a dessert; it’s a one-way ticket to paradise, no flight required.
The Story Behind Our Beloved Coconut Cake
While coconut cakes pop up in many tropical regions, this recipe is my own happy creation. It was born on a gloomy winter day when I desperately needed a taste of sunshine. I combined the rich, moist texture of a classic pound cake with the exotic flair of coconut. The result? A cake that’s both comforting and exciting. It’s the modern version of a classic, made for sharing joy at any table.
You’ll Adore This Coconut Cake Recipe
Why will you fall in love with it? First, the flavor is pure bliss. The double hit of coconut extract and real coconut milk makes it incredibly aromatic. It’s also surprisingly simple to make. You don’t need fancy skills, just a good mixer and a happy heart. Every slice is dense, tender, and packed with sweet coconut flakes. It’s the kind of cake that makes people ask for the recipe before they’ve even swallowed.
Perfect Occasions for Your Tropical Cake
This cake shines at so many events! It’s a superstar at summer barbecues and pool parties. I love bringing it to potlucks—it always disappears first. It’s also perfect for birthdays (who needs vanilla when you have coconut?), bridal showers with a tropical theme, or just a sunny Sunday treat. Honestly, any day you need a little celebration is the right day for this cake.
Ingredients for Your Tropical Coconut Cake
Let’s gather our island ingredients! Using quality items makes all the difference.
For the Pound Cake:
- 2 cups all-purpose flour
- 2 teaspoons baking powder
- 1/2 teaspoon salt
- 1 1/2 cups granulated sugar
- 3/4 cup unsalted butter (1 1/2 sticks), softened
- 3 eggs, room temperature
- 1 teaspoon pure vanilla extract
- 1 tablespoon pure coconut extract
- 1/2 cup canned coconut milk, unsweetened
- 1/2 cup whole milk
- 1/2 cup shredded coconut flakes
For the Frosting & Topping:
- 2 cups powdered sugar
- 1/4 cup whole milk
- Pinch of salt
- 1 teaspoon coconut extract
- 1/2 teaspoon vanilla extract
- 1 cup shredded coconut flakes for topping
Easy Ingredient Swaps (No Stress!)
Don’t have everything? No problem! Here are some easy switches:
- Dairy-Free? Use plant-based butter and replace the whole milk with more canned coconut milk. It’ll be even more tropical!
- Out of Coconut Milk? Full-fat canned cream of coconut can work, but reduce the sugar slightly as it’s sweeter.
- Flour Variety: For a slightly denser texture, you can use cake flour. Just make sure to spoon and level it.
- Coconut Flakes: You can use sweetened or unsweetened flakes. I prefer unsweetened in the batter to control sugar.
How to Make Your Dreamy Coconut Cake
Ready to bake some sunshine? Follow these simple steps. I’ll walk you through it like you’re in my kitchen with me.
Step 1: Get Your Pan Ready
First, preheat your oven to 325°F (163°C). This lower temperature is key for a slow, even bake. Grab your 9×5-inch loaf pan. Grease it generously with butter or baking spray, then dust it with a little flour. Tap out the excess. This creates a non-stick barrier so your beautiful cake slides out perfectly later.
Step 2: Mix the Dry Goods
In a large bowl, whisk together the all-purpose flour, baking powder, and salt. See those little clouds of flour? You’re aerating the mix, which helps the cake rise. Set this bowl aside. We want everything ready to go for a smooth batter.
Step 3: Cream the Butter and Sugar
In your mixer’s bowl, beat the softened butter and granulated sugar. Beat it on medium-high until it’s pale, fluffy, and looks almost like yellow frosting. This should take 3-5 minutes. Pro tip: Scrape down the bowl halfway through. Now, add the eggs one at a time, letting each blend in fully before adding the next. Then, mix in the vanilla and glorious coconut extract. Your kitchen will already start to smell amazing.
Step 4: Combine Wet and Dry
Now, with the mixer on low, add about a third of your flour mixture. Mix until just combined. Pour in half of the coconut milk and milk. Mix. Repeat with another third of flour, the rest of the milks, and finally the last of the flour. Stop mixing as soon as you see no dry streaks. Overmixing makes a tough cake.
Step 5: Fold in the Coconut
Take your shredded coconut flakes and sprinkle them into the batter. Use a flexible spatula to gently fold them in. You want those little flecks of coconut spread throughout every future slice. The batter will be thick, creamy, and dreamy.
Step 6: Bake to Golden Perfection
Pour the batter into your prepared pan. Smooth the top with your spatula. Place it in the center of your preheated oven. Bake for 1 hour and 15-20 minutes. If the top gets too brown too fast, loosely tent it with a piece of parchment paper. The cake is done when a toothpick poked in the center comes out clean or with a few moist crumbs. Chef’s tip: Don’t open the oven door before the first hour is up! It can cause the cake to fall.
Step 7: Cool and Frost
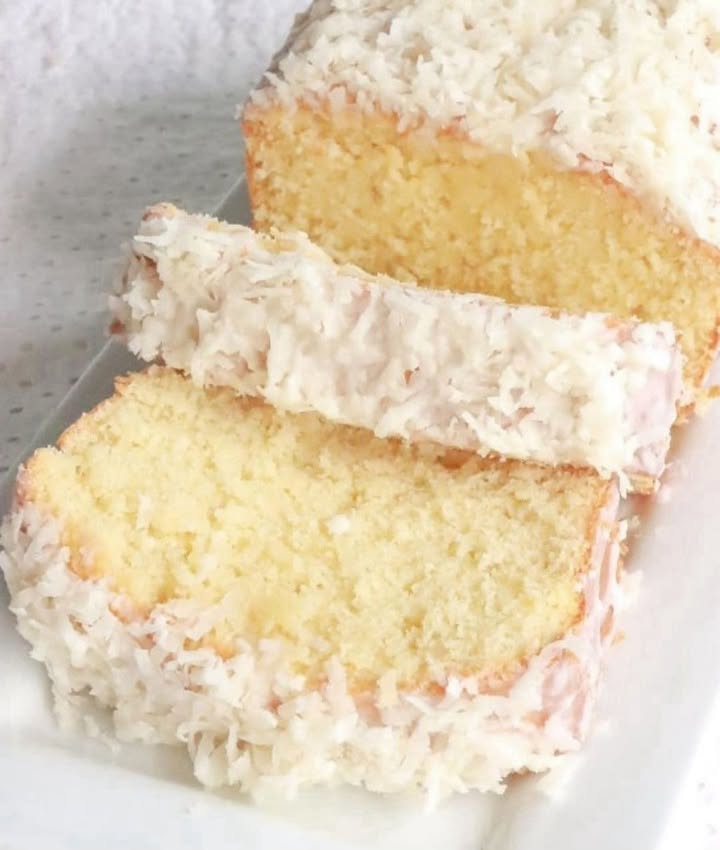
Let the cake cool in the pan on a wire rack for about 15 minutes. Then, run a knife around the edges and carefully turn it out. Let it cool completely before frosting. For the glaze, simply whisk powdered sugar, milk, salt, and the extracts until smooth. Pour half over the cake, sprinkle with coconut flakes, let it set for 10 minutes, then pour the rest over for a beautiful layered look.
Your Tropical Cake Timeline
- Prep Time: 20 minutes
- Cook Time: 1 hour 20 minutes
- Cooling Time: 1 hour 30 minutes
- Total Time: About 3 hours 10 minutes
Most of the time is hands-off for baking and cooling. Perfect for doing other things!
My Secret Weapon for the Best Coconut Cake
My absolute secret is to toast the coconut flakes used for the topping. Spread the cup of flakes on a baking sheet and bake at 350°F for 5-8 minutes, watching closely until golden. Let them cool before sprinkling. This adds a nutty, deep flavor and a gorgeous color that makes the cake look and taste professional.
A Little Coconut Fun Fact
Did you know the coconut isn’t actually a nut? It’s a drupe, a type of fruit with a hard stone inside! That stone is the brown shell we see. Every part of it is useful, which is why it’s called the “tree of life.” In our cake, it’s definitely the “ingredient of joy.”
What You Need to Make It
- 9×5-inch loaf pan
- Hand mixer or stand mixer
- Large mixing bowls (at least 2)
- Whisk and spatula
- Measuring cups and spoons
- Wire cooling rack
- Toothpick or cake tester
Storing Your Coconut Cake Masterpiece
Once your cake is completely cool and frosted, you can store it at room temperature. Just cover it loosely with a cake dome or in an airtight container. It will stay fresh and moist for up to 3 days. The glaze helps seal in the moisture.
If you need to keep it longer, you can refrigerate it. Wrap it well in plastic wrap or store it in an airtight container. It will last for up to a week in the fridge. Let it sit at room temperature for about 30 minutes before serving to soften the butter and bring back the best texture.
This cake also freezes beautifully! Wrap the unfrosted, cooled cake tightly in plastic wrap, then in aluminum foil. Freeze for up to 3 months. Thaw overnight in the refrigerator, then bring to room temperature before frosting and serving. You can also freeze individual slices for a quick treat.
My Best Tips for Success
- Room Temperature is Key: Your eggs, butter, and milks should be at room temp. This helps everything emulsify into a smooth, unified batter.
- Measure Flour Correctly: Spoon flour into your measuring cup and level it off. Scooping packs it down and can lead to a dry cake.
- Don’t Overmix: Once you add the flour, mix just until you no longer see white streaks. A few small lumps are okay.
- Test for Doneness: Use a toothpick, but also look for the cake pulling away slightly from the pan’s edges.
Make It Look as Good as It Tastes
- Serve slices on a white or bright blue plate to make the cake pop.
- Add a little edible flower or a thin slice of dried pineapple on the side.
- For a party, cut it into thicker slices and serve with a dollop of whipped cream and a sprinkle of toasted coconut.
- Dust the plate with a tiny bit of powdered sugar for a snowy, elegant touch.
Try These Other Delicious Variations
Love this base recipe? It’s a fantastic canvas for creativity! Check out these six tasty spins:
- Pina Colada Cake: Fold in 1 cup of crushed, well-drained pineapple into the batter. The tart pineapple pairs perfectly with the sweet coconut.
- Chocolate-Dipped Coconut Cake: Drizzle the frosted cake with melted dark chocolate. It’s a decadent twist on a classic flavor combo.
- Lemon Coconut Cake: Add the zest of two lemons to the batter and use lemon juice in the glaze instead of some milk. It’s wonderfully bright and zesty.
- Toasted Almond Coconut Cake: Fold in 1/2 cup of chopped toasted almonds for a marvelous crunch and nutty flavor.
- Gluten-Free Coconut Cake: Replace the all-purpose flour with a 1:1 gluten-free baking blend. Ensure your extracts and other ingredients are gluten-free certified.
- Mini Coconut Bundt Cakes: Bake the batter in a greased mini Bundt pan. Reduce baking time to about 25-30 minutes. They’re adorable for individual servings.
Common Mistakes to Avoid
Avoid these simple pitfalls for a perfect cake every single time.
Mistake 1: Using Cold Ingredients
Butter and eggs straight from the fridge don’t blend well. This leads to a curdled-looking batter and a dense final cake. Cold butter also won’t cream properly with the sugar. How to avoid it: Take your butter, eggs, and milks out about an hour before you start baking. The butter should be soft to the touch but not melted. This simple step guarantees a smooth, voluminous batter.
Mistake 2: Overmixing the Batter
Once you add flour, gluten starts to develop. The more you mix, the tougher your cake becomes. We want a tender crumb, not bread! How to avoid it: When adding the dry ingredients, mix on the lowest setting. Stop as soon as you see the last of the flour disappear into the batter. It’s okay if there are a few tiny lumps. They will bake out.
Mistake 3: Opening the Oven Door Too Early
We all want to peek! But opening the door before the cake is set causes a sudden drop in temperature. This can make your beautiful cake sink in the middle. How to avoid it: Trust the process and the timer. Don’t open the oven door until at least the 1-hour mark has passed. Use the oven light to check on the color instead.
Mistake 4: Frosting a Warm Cake
If the cake is even slightly warm, that thin, beautiful glaze will melt right off. It will become a sticky, soggy mess that soaks into the cake. How to avoid it: Patience is key. Let the cake cool in the pan, then on a rack until it is completely cool to the touch. You can even pop it in the fridge for 30 minutes to speed things up and ensure it’s firm.
Mistake 5: Not Toasting the Topping Coconut
Using raw coconut flakes for the topping is fine, but toasting them is a game-changer. Raw flakes can be a bit chewy and lack depth. Toasting brings out their natural oils and nutty sweetness. How to avoid it: Take 5 extra minutes to spread the flakes on a sheet and toast them in the oven until golden brown. Let them cool before sprinkling. It makes your cake look and taste gourmet.
Frequently Asked Questions
Can I use light coconut milk instead of full-fat?
You can, but I really recommend full-fat canned coconut milk. It has a richer flavor and higher fat content, which adds incredible moisture and tenderness to the cake. Light coconut milk is more watery and won’t give you the same luxurious texture. That richness is part of what makes this tropical cake so special and memorable. Think of it as the secret ingredient for a truly indulgent bite.
Why did my cake turn out dry?
A dry cake usually has a couple of common causes. First, you might have measured the flour incorrectly by scooping the cup directly into the bag. This packs it down. Always spoon and level. Second, you may have overbaked it. Ovens can run hot, so start checking at the 1 hour and 10 minute mark. Finally, overmixing the batter develops too much gluten, which also leads to a tougher, drier crumb. Follow the mixing times closely for a perfect result.
Can I make this cake into cupcakes or a layered cake?
Absolutely! For cupcakes, line a muffin tin and fill cups 2/3 full. Bake at 350°F for 18-22 minutes. This recipe should make about 18-24 cupcakes. For a layer cake, double the recipe and divide between two 9-inch round pans greased and lined with parchment paper. Bake at 325°F for 30-40 minutes. You’ll have a stunning layer cake perfect for a special celebration. Just adjust the frosting amount accordingly.
My cake is browning too fast on top. What do I do?
Don’t panic! This happens, especially in older ovens where the heat might not be even. Simply take a large piece of aluminum foil or parchment paper and loosely tent it over the top of the cake pan. You don’t want it touching the cake, just shielding it. This will slow down the browning while allowing the inside to continue baking perfectly. It’s a baker’s best trick for long-bake items.
How can I tell if the cake is truly done baking?
The best test is the toothpick test. Insert a clean toothpick, wooden skewer, or thin knife into the very center of the cake. Pull it out. If it comes out clean or with just a few moist crumbs clinging to it, it’s done. If you see wet batter, it needs more time. Also, look at the edges. They should be pulling away slightly from the sides of the pan, and the top should spring back lightly when touched.
Can I make this cake a day ahead?
Yes, and it’s often even better the next day! The flavors have more time to meld and settle. Bake and cool the cake completely. Wrap it tightly in plastic wrap and store it at room temperature overnight. Prepare the glaze and toast the coconut topping the next day, then assemble. This makes it a stress-free dessert for parties. The cake stays incredibly moist when wrapped well.
What’s the best way to get clean slices?
For the cleanest slices, use a sharp, thin-bladed knife. Run the knife under very hot water for a few seconds, wipe it dry, and then make your cut. The heat helps the knife glide through the glaze and dense cake without tearing. Wipe the knife clean and re-heat it between each slice. It takes an extra minute, but it makes your cake look professionally cut and beautiful on the plate.
Is the coconut extract really necessary?
While the coconut milk and flakes add flavor, the coconut extract is what gives that powerful, unmistakable “coconut” aroma and taste. It intensifies the tropical vibe. If you absolutely must skip it, increase the vanilla extract to 2 teaspoons. But know that the cake will have a much milder coconut flavor. I highly recommend using it for the full experience.
Can I use fresh coconut instead of packaged flakes?
You certainly can for a truly special touch! Crack open a fresh coconut, remove the meat, and grate it. It will be less sweet and have a more delicate texture than dried flakes. Be aware that fresh coconut contains more moisture. You might want to pat it dry with a paper towel before folding it into the batter to avoid adding extra liquid. It’s a bit of work, but the flavor is wonderful.
Why did my glaze turn out runny or too thick?
Glaze consistency depends on humidity and exact measurements. If it’s too runny, simply add more powdered sugar, a tablespoon at a time, until it thickens. If it’s too thick and won’t pour, add more milk just a teaspoon at a time until it reaches a pourable, but still opaque, consistency. You want it to be like thick honey. Remember, it will firm up as it sets on the cool cake.
Final Slice of Advice
Baking this Tropical Coconut Cake is more than following a recipe. It’s about creating a little moment of joy. The scent alone is worth the effort. I love how versatile it is—fancy enough for a party, simple enough for a Tuesday. Whether you stick to the classic version or try one of the fun twists, you’re in for a treat. For more inspiration, you can always explore our full collection of delicious cake and cupcake recipes.
Remember, good ingredients and a pinch of love are the real secrets. And don’t forget that quality protein from ingredients like eggs is important not just for baking, but for overall muscle maintenance and health—so you can enjoy your cake and feel good too! Now, go preheat that oven, and get ready for the compliments. Happy baking!
Equipment
- Grand bol
- Fouet
- Spatule
- Plaque à pâtisserie
- Papier sulfurisé
Ingredients
- 2 tasses farine tout usage
- 2 cuillères à café poudre à lever
- 1/2 cuillère à café sel
- 1 1/2 tasses sucre granulé
- 3/4 tasse beurre non salé, ramolli
- 1 cuillère à café extrait de vanille pur
- 1 cuillère à soupe extrait de noix de coco pur
- 1/2 tasse lait de coco en conserve, non sucré
- 1/2 tasse lait entier
- 1/2 tasse flocons de noix de coco râpés
Instructions
- Préchauffez votre four à 163°C et préparez un moule à pain de 23x13 cm en le beurrant et en le farcissant.
- Dans un grand bol, fouettez ensemble la farine, la poudre à lever et le sel ; réservez.
- Dans un bol, crémez le beurre ramolli avec le sucre jusqu'à ce qu'il devienne pâle et mousseux, environ 3-5 minutes.
- Ajoutez les œufs un par un, en mélangeant bien après chaque ajout ; puis ajoutez l'extrait de vanille et de noix de coco.
- En gardant le mélangeur au minimum, ajoutez alternativement le mélange de farine et les deux laits, en mélangeant jusqu'à ce que ce soit à peine combiné.
- Incorporez délicatement les flocons de noix de coco jusqu'à ce qu'ils soient bien répartis.
- Versez la pâte dans le moule préparé et lissez le dessus ; faites cuire pendant 1 heure et 15-20 minutes ou jusqu'à ce qu'un cure-dent en ressorte propre.
- Laissez le gâteau refroidir dans le moule pendant 15 minutes, puis transférez-le sur une grille pour qu'il refroidisse complètement.
- Pour le glaçage, fouettez ensemble le sucre en poudre, le lait, le sel et les extraits ; versez sur le gâteau refroidi et parsemez de flocons de noix de coco.
Notes
Nutrition

Hi, I’m Olivia Parker, the founder of BakingSecret.com and a lifelong lover of all things sweet and homemade. I grew up in a small town in Oregon, where the smell of fresh cookies in my family’s kitchen sparked my passion for baking. Over the years, I turned that passion into a mission: to help home bakers feel confident, inspired, and creative.
After studying food science and working in several artisan bakeries across the U.S., I decided to create a space where everyone from beginners to seasoned bakers can find reliable recipes, expert tips, and a warm, welcoming community. BakingSecret.com is my way of sharing the magic of baking with the world. When I’m not testing new recipes, you’ll find me exploring farmers’ markets, collecting vintage cookbooks, or perfecting my sourdough technique.