
My Love Affair with No-Bake Cherry Cheesecake
Last summer, my oven broke right before my daughter’s birthday party. I had promised her a cheesecake, and panic set in. That’s when I discovered the magic of a cherry cheesecake recipe no bake style. Not only did it save the day, but it actually turned out better than any baked version I’d made before. The filling was creamier, the crust stayed perfectly crisp, and I didn’t have to heat up my already sweltering kitchen.
Welcome to my kitchen, where we’re going to make a delightful no-bake cherry cheesecake recipe that’s perfect for any occasion. Whether you’re a beginner or an experienced baker, this easy-to-follow guide will help you create a dessert that everyone will love. I promise you won’t miss the oven one bit.
This recipe has become my go-to dessert for family gatherings, potlucks, and even quiet Sunday dinners. I’ve made it so many times that I can practically do it with my eyes closed. The best part? My friends always ask for the recipe, and they’re shocked when I tell them how simple it really is.
Why Choose a No-Bake Cherry Cheesecake?
Let me tell you why this no-bake cherry cheesecake has completely replaced traditional baked versions in my recipe box. First off, you can make this dessert in about 20 minutes of actual work. That’s right—20 minutes. The rest is just chilling time, which means you can prep it in the morning and have it ready for dinner.
The simplicity of this recipe makes it perfect for anyone. You don’t need fancy equipment or advanced baking skills. A mixing bowl, a spoon, and a pie dish are basically all you need. I’ve taught this recipe to my 12-year-old niece, and she nailed it on her first try.
Hot summer days are when this dessert really shines. Nobody wants to turn on the oven when it’s 90 degrees outside. This easy no-bake cheesecake keeps your kitchen cool while still giving you that rich, creamy dessert everyone craves. I make it constantly from June through September.
Here’s something else I love: you can make this dessert ahead of time. In fact, it actually tastes better after sitting in the fridge overnight. The flavors blend together, and the texture becomes even more velvety. This makes it perfect for parties and gatherings when you need to prep things in advance.
For people who don’t own an oven or live in small apartments with limited kitchen space, this recipe is a lifesaver. My sister lives in a tiny studio with just a mini fridge and a hot plate. She makes this cheesecake all the time because it doesn’t require any special appliances.
The Beauty of Cherry Topping
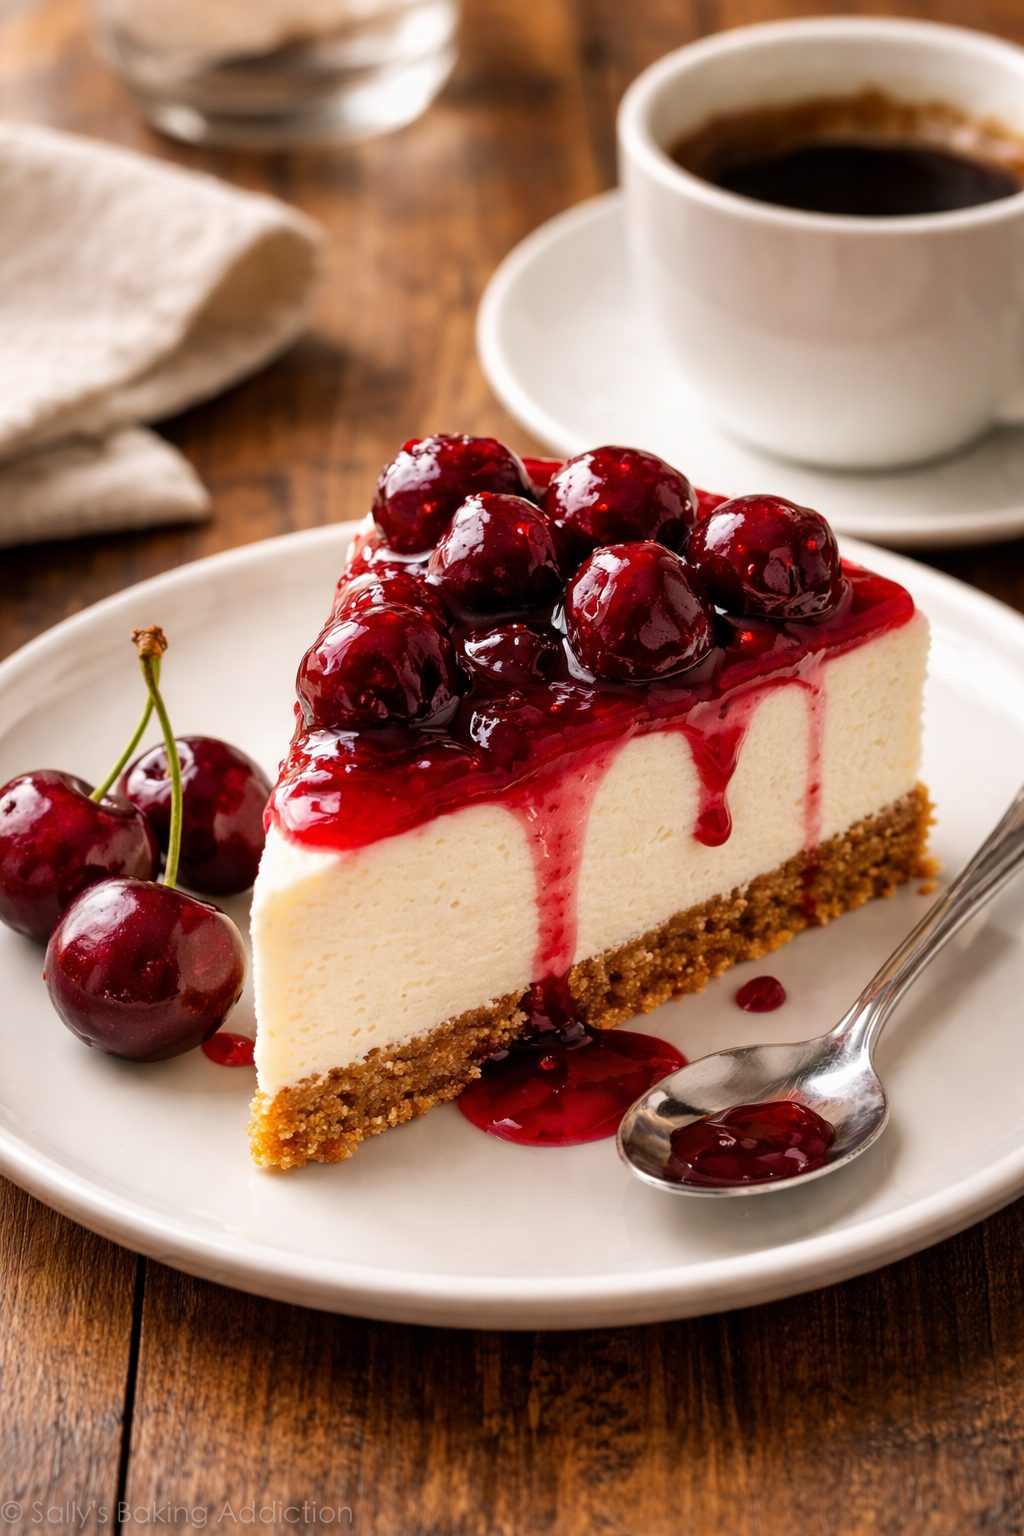
The cherry topping for cheesecake adds the perfect sweet and tangy contrast to the rich cream cheese filling. I’ve tried this recipe with other fruit toppings, but cherries always win. There’s something about that bright red color and the way the cherry sauce drips down the sides that makes this dessert look professionally made.
You have options when it comes to the cherry layer. Store-bought cherry pie filling works great and saves time. But if you want to make homemade cherry topping, it only takes about 10 extra minutes. Both versions taste amazing, so don’t feel pressured to go homemade if you’re short on time.
The cherry layer also adds moisture without making the cheesecake soggy. This was something I worried about when I first started making no-bake desserts. But the cream cheese layer is firm enough to hold up beautifully under that fruity topping.
Perfect for Every Skill Level
I remember the first time I tried to make a traditional baked cheesecake. It cracked on top, the edges were overdone, and the center was still jiggly. I felt like a failure. That’s why I’m so passionate about this no-bake version—it eliminates all those common baking problems.
There’s no water bath to worry about. No checking if the center is set just right. No stress about cracks forming on top. The process is straightforward and foolproof. Mix, spread, chill, and serve. That’s it.
Beginners appreciate how forgiving this recipe is. If you overmix slightly, it’s fine. If you take an extra five minutes to smooth the top, no problem. The dessert will still turn out perfectly. There’s no precise timing or temperature control required.
Even experienced bakers love this recipe because it delivers professional results without the fuss. I have friends who are amazing bakers, and they still choose this no-bake option for busy weeks or summer parties. It’s just easier.
A Crowd-Pleasing Dessert
This cherry cheesecake recipe no bake style wins over every crowd. Kids love it because it’s sweet and creamy. Adults appreciate the tangy cream cheese balanced with sweet cherries. Picky eaters find it approachable because the flavors are familiar and comforting.
I’ve served this at countless gatherings, and the pie dish always comes back empty. People scrape their plates clean and ask for seconds. The combination of the buttery graham cracker crust, smooth cream cheese filling, and bright cherry topping creates layers of flavor and texture that keep you coming back for more.
The presentation is another bonus. This dessert looks impressive. When you bring it to the table with those glossy cherries on top, people think you spent hours in the kitchen. Let them believe it—I won’t tell if you won’t.
You can easily double this recipe for larger gatherings. I often make two at once because one is never enough. They stack nicely in the fridge, and having a backup is always smart when you’re feeding a crowd.
Budget-Friendly and Accessible
The ingredients for this recipe are simple and affordable. You probably have half of them in your pantry already. Cream cheese, graham crackers, sugar, butter, and cherries—nothing exotic or expensive. I can make this entire dessert for under ten dollars.
This makes it a great option for regular family dinners, not just special occasions. When I want to treat my family to something sweet without breaking the bank, this is my answer. It feels fancy but costs less than buying a store-bought dessert.
Every ingredient is available at any grocery store. You won’t need to hunt down specialty items or visit multiple stores. One quick shopping trip and you’re ready to go.

Gathering Your Ingredients for the Perfect No-Bake Cherry Cheesecake
Now that you know why this dessert is worth making, let’s talk about what you actually need to have on hand. I’m going to walk you through each ingredient and tell you exactly why it matters.
For the crust, you’ll need about 1 and ½ cups of graham cracker crumbs. I usually buy the ready-made crumbs to save time, but if you want to crush whole crackers yourself, go for it. You’ll also need ⅓ cup of melted butter and 3 tablespoons of sugar to bind everything together. The butter is what makes that crust hold its shape and taste rich and golden.
The filling is where the magic happens. You’ll need two 8-ounce blocks of cream cheese, softened to room temperature. This is crucial—cold cream cheese will give you lumps, and nobody wants that. I usually take mine out of the fridge about an hour before I start. You’ll also need 1 cup of powdered sugar, which dissolves more smoothly than granulated sugar. Trust me on this one.
Here’s where it gets even easier: you’ll need one 8-ounce container of whipped topping. I use Cool Whip because it’s convenient and gives you that light, fluffy texture. Some people prefer making homemade whipped cream, and that works too. If you go the homemade route, you’ll want 2 cups of heavy cream whipped with ¼ cup of sugar.
For the cherry layer, grab one 21-ounce can of cherry pie filling. The canned stuff works beautifully and honestly tastes amazing. If you’re feeling ambitious and want to make homemade cherry topping, you’ll need 2 cups of fresh or frozen cherries, ½ cup of sugar, 2 tablespoons of cornstarch, and a splash of lemon juice.
One thing I’ve learned over the years: quality matters. Don’t buy the cheapest cream cheese you can find. Get a name brand like Philadelphia. The difference in texture and flavor is noticeable. Same goes for the butter—real butter, not margarine. Your taste buds will thank you.
By the way, I always keep an extra can of cherry pie filling in my pantry. Sometimes I get halfway through the recipe and realize I want more cherries on top. Better to have it and not need it than the other way around.
One more ingredient that’s optional but I highly recommend: a teaspoon of vanilla extract for the filling. It adds depth and makes everything taste more homemade. I add it to nearly everything I make.
Making Your No-Bake Cherry Cheesecake: Step by Step
Alright, let’s get into the actual process. I’m going to break this down into simple steps that anyone can follow.
Preparing the Graham Cracker Crust
Start by mixing your graham cracker crumbs, melted butter, and sugar in a medium bowl. Use a fork to stir everything together until it looks like wet sand. You’ll know it’s ready when you can squeeze a handful and it holds together.
Press this mixture firmly into the bottom of a 9-inch pie pan or springform pan. I use the bottom of a measuring cup to really pack it down. You want it tight and even, especially around the edges. Then pop it in the fridge while you make the filling. This helps it firm up so it doesn’t crumble when you slice the cheesecake later.
Here’s a trick I learned from my grandmother: if you want an even sturdier crust, freeze it for 15 minutes instead of just refrigerating it. Makes a huge difference.
Creating the Cream Cheese Filling
This is where your easy no bake cheesecake really comes together. In a large bowl, beat the softened cream cheese with an electric mixer until it’s smooth and fluffy. This takes about 2 minutes. Don’t rush this step—you want zero lumps.
Gradually add the powdered sugar and keep beating until everything is well combined. Then add your vanilla extract if you’re using it. The mixture should look pale and creamy at this point.
Now fold in the whipped topping gently with a spatula. Don’t use the electric mixer for this part because you’ll deflate all those beautiful air bubbles. Use a folding motion—scoop from the bottom and fold over the top. Keep going until you don’t see any white streaks. The whole thing should be one uniform, light color.
Funny enough, my husband tried to help me make this once and used the mixer for the whipped topping. The filling turned out dense and heavy. We still ate it, but it wasn’t the same fluffy texture I’m used to.
Assembling Your Cheesecake Layers
Take your chilled crust out of the fridge. Spoon the cream cheese mixture onto the crust and spread it evenly with a spatula. I like to smooth the top really well because it makes the finished product look professional. Take your time with this—it’s worth it.
Once your filling is smooth and even, spoon the cherry pie filling over the top. You can spread it to the edges or leave a border of cream cheese showing. I usually do a border because I think it looks prettier, but that’s just personal preference.
If you’re making homemade cherry topping instead of using canned filling, combine your cherries, sugar, and cornstarch in a saucepan. Cook over medium heat, stirring constantly, until it thickens. This takes about 5 to 7 minutes. Let it cool completely before adding it to your cheesecake. Hot topping will melt your cream cheese layer, and that’s not what we want.
For those of you who enjoy experimenting with different fruit flavors, you might also like my strawberry cheesecake without baking, which follows a similar method but with a bright berry twist.
The Chilling Process
Cover your assembled cheesecake with plastic wrap or aluminum foil. Make sure the covering doesn’t touch the cherry topping—I usually tent it a bit. Then refrigerate for at least 4 hours, but overnight is better. This is when all the layers set up and the flavors blend together.
I know waiting is hard. I’ve been tempted so many times to cut into it early. But patience really pays off here. An under-chilled cheesecake will be too soft and won’t slice cleanly.
During holiday season when my fridge is packed, I sometimes clear out a whole shelf just for cheesecakes. It’s that important to give them proper space to chill without getting bumped or tilted.
Serving Ideas to Elevate Your Dessert
When it’s finally time to serve your cherry cheesecake recipe no bake, there are so many ways to make it even more special. I always add a dollop of extra whipped cream on each slice. It adds visual appeal and gives you even more of that light, creamy texture.
A light dusting of cinnamon on top is something I discovered by accident. I was making this dessert and my spice rack tipped over, leaving cinnamon on the counter. I figured why not try it on the cheesecake? It was incredible. The warm spice plays beautifully with the sweet cherries.
Chocolate lovers should try drizzling some chocolate sauce over individual slices. The combination of cherry and chocolate is classic for a reason. I melt chocolate chips with a tiny bit of cream to make a smooth sauce that’s easy to drizzle.
Sometimes I’ll toast some sliced almonds and sprinkle them on top for crunch. The texture contrast is wonderful—creamy cheesecake, soft cherries, and crispy nuts. If you’re a fan of layered flavors and textures, you might enjoy my pumpkin swirl cheesecake which plays with similar contrast.
For special occasions, I’ll arrange fresh cherries around the edge of the pie. It makes the whole thing look like it came from a fancy bakery. You can use cherries with stems still attached for an extra elegant touch.
Here’s the thing about this dessert: it’s incredibly versatile. You can swap the cherry topping for blueberry, strawberry, or even peach. Last Thanksgiving, I made a version with a pumpkin pie cheesecake recipe twist by adding pumpkin puree and spices to the filling. It was a huge hit.
If you’re serving this at a party, cut it into smaller slices than you normally would. It’s rich and filling, so a little goes a long way. I can usually get 10 to 12 slices from one pie.
For a more sophisticated presentation, try making individual servings in small mason jars or dessert cups. Layer the crust, filling, and cherries in clear containers so everyone can see all the pretty layers. These also travel better than a whole pie if you’re bringing dessert to someone else’s house.
One more serving tip: let the cheesecake sit at room temperature for about 10 minutes before slicing. This makes it easier to cut clean slices. I use a sharp knife dipped in hot water and wiped clean between each cut. Professional bakeries do this, and it really works.
Speaking of impressive presentations, if you want to try something with a caramelized top layer, check out my cheesecake brulee recipe. It adds that restaurant-quality finishing touch.
Tips for Storing and Serving Your No-Bake Cherry Cheesecake
Let me tell you about the time I made three of these cheesecakes for a family reunion and ended up with leftovers. I had no idea how to store them properly, and I was terrified they’d go bad. After some trial and error, I’ve figured out exactly how to keep this dessert fresh and delicious.
First things first: this no-bake cherry cheesecake needs to stay refrigerated at all times. The cream cheese filling is dairy-based, which means it can’t sit out at room temperature for long periods. I never leave mine out for more than two hours, especially during summer months when things spoil faster.
For storage, I cover the entire pie with plastic wrap, making sure it’s sealed tight around the edges. You can also use aluminum foil, but I find that plastic wrap clings better and keeps the cheesecake from absorbing other flavors in your fridge. Nobody wants their dessert tasting like last night’s garlic chicken. If you’re using a springform pan, you can leave the cheesecake in the pan and just cover the top.
Here’s something important: this dessert will stay fresh in the refrigerator for up to five days. I’ve tested this multiple times, and day five is really the limit before the crust starts getting soft and the filling loses its perfect texture. Honestly though, it rarely lasts that long in my house. My kids devour it within 48 hours.
If you’ve already sliced the cheesecake, store individual pieces in airtight containers. This actually works better than covering the whole pie because each slice stays fresher longer. I stack them carefully with small pieces of parchment paper between layers so they don’t stick together.
When you’re ready to serve your cheesecake at a party, presentation matters more than you might think. I learned this from my aunt who used to cater events. She always said that people eat with their eyes first. Take your cheesecake out of the fridge about fifteen minutes before serving time. This slight warming makes the flavors more pronounced and the texture creamier.
For casual family dinners, I just bring the whole pie to the table and let everyone help themselves. But for fancier gatherings, I pre-slice the cheesecake in the kitchen and plate each piece individually. A simple white plate makes the red cherries pop beautifully. Sometimes I’ll add a sprig of fresh mint on the side for color.
The cutting technique really matters if you want clean slices. Fill a tall glass with hot water and keep it next to your cutting board. Dip your knife in the hot water, wipe it completely dry with a clean towel, then make one smooth cut through the cheesecake. Repeat this process for every single slice. It seems tedious, but the results are worth it. Your slices will look bakery-perfect instead of messy.
By the way, if you’re bringing this dessert to someone else’s house, transport it carefully. Keep it level in your car and bring along a cooler with ice packs if you’re driving more than twenty minutes. I once hit a pothole and watched my beautiful cheesecake slide across the backseat. Not my finest moment.
For parties where guests will be serving themselves, provide a pie server or cake knife right next to the dessert. Include small dessert plates and forks nearby so everything flows smoothly. I also put out napkins because that cherry topping can drip.
Speaking of parties, portion control is real with this dessert. It’s incredibly rich, so smaller slices work better. I usually cut my 9-inch pie into twelve pieces for gatherings. People can always come back for seconds, but starting small prevents waste.
Something else I’ve discovered: this cheesecake pairs wonderfully with coffee or hot tea. The bitterness of coffee balances the sweetness perfectly. At dinner parties, I often serve it alongside a coffee station where people can make their own drinks. It creates a nice social atmosphere.
For summer barbecues, serve this cheesecake ice-cold straight from the fridge. The contrast between the chilled dessert and warm weather is refreshing. During winter holidays, I let it sit at room temperature slightly longer so it’s not too cold. These small adjustments make a difference.
One trick that impresses guests every time: garnish each slice right before serving rather than decorating the whole pie in advance. Fresh whipped cream, a drizzle of chocolate, or a few fresh cherries added at the last minute look intentional and professional. It takes seconds but elevates the entire presentation.
Freezing Your No-Bake Cheesecake for Longer Storage
Now let’s talk about freezing because this is a game-changer for make-ahead desserts. Yes, you absolutely can freeze this cherry cheesecake recipe no bake style, and it works beautifully. I do this all the time when I’m planning for big events or just want a backup dessert in my freezer.
The key to successful freezing is doing it before you add the cherry topping. The cherries don’t freeze and thaw as well as the cream cheese filling, so I always freeze just the crust and filling together. Once you’re ready to serve, thaw the cheesecake and add fresh cherry topping. This method gives you the best texture and flavor.
Wrap your cheesecake tightly in plastic wrap, then add a layer of aluminum foil over that. Double wrapping prevents freezer burn, which can ruin the taste. I also write the date on the foil with a permanent marker so I know how long it’s been frozen. A properly wrapped cheesecake can stay frozen for up to two months.
When you’re ready to use your frozen cheesecake, move it from the freezer to the refrigerator and let it thaw slowly overnight. Never thaw it at room temperature because that can make the texture weird and potentially unsafe. Slow thawing in the fridge maintains that perfect creamy consistency.
Here’s something interesting: some people actually prefer eating this cheesecake partially frozen. My nephew discovered this by accident when he couldn’t wait for it to fully thaw. It’s like a creamy, cheesecake-flavored ice cream. Not traditional, but surprisingly good on hot days.
If you’re making individual portions in mason jars or cups, these freeze even better than whole pies. They thaw faster too, which is convenient when you want dessert but forgot to plan ahead. I keep several in my freezer for unexpected guests or random dessert cravings.
Troubleshooting Common Issues
Every cook runs into problems sometimes, and I’m no exception. Let me share some solutions to issues I’ve encountered over the years making this recipe.
Soggy crust is probably the most common complaint. This happens when the crust isn’t pressed firmly enough or when moisture from the filling seeps down. My solution? Press that crust down hard, really pack it in there. Also, make sure it’s completely chilled and firm before adding the filling. That creates a barrier.
Some people find their filling turns out too soft. This usually means the cheesecake didn’t chill long enough or the cream cheese wasn’t at the right temperature when mixed. Room temperature cream cheese is crucial—not cold, not warm, but truly room temperature. And don’t skip the chilling time. Four hours minimum, but overnight is better.
If your filling has lumps, you didn’t beat the cream cheese long enough before adding other ingredients. Those lumps won’t magically disappear later. Take your time in the beginning and beat that cream cheese until it’s completely smooth and fluffy. Two full minutes with an electric mixer does the trick.
Sometimes the whipped topping deflates when you fold it in, making the filling dense instead of light. This happens when you’re too aggressive with your folding or if you use a mixer instead of a spatula. Gentle folding motions preserve those air bubbles that make the texture perfect.
Funny enough, I once had someone tell me their cheesecake tasted bland. Turns out they forgot the vanilla extract and used less sugar than the recipe called for. Measurements matter in baking and dessert making. Follow the recipe as written the first time, then adjust to your taste in future batches.
For those concerned about nutrition and making informed choices about ingredients, resources like the CDC’s guidance on eating well can help you understand how to balance treats like this with everyday healthy habits. I’m not saying cheesecake is a health food, but understanding nutrition helps you enjoy desserts mindfully.
Making This Recipe Your Own
After you’ve made this easy cherry cheesecake a few times, you’ll probably want to experiment. I encourage that. This recipe is incredibly forgiving and adaptable.
Try different cookie crusts. Oreos make an incredible chocolate crust that pairs beautifully with cherries. Vanilla wafers create a more delicate flavor. Shortbread cookies add richness. I’ve even used graham crackers mixed with a tablespoon of cocoa powder for a chocolate-graham hybrid crust.
The filling can be flavored in countless ways. Add a tablespoon of lemon zest for brightness. Mix in some almond extract instead of vanilla for an amaretto-like flavor. Swirl in melted chocolate for a cherry-chocolate version. The possibilities are endless.
Toppings beyond cherries work wonderfully too. Fresh strawberries, blueberry compote, caramel sauce, or even just plain with extra whipped cream. Last Easter, I made a version topped with lemon curd that disappeared in minutes.
For anyone interested in exploring more variations and getting inspired by other creative takes on this classic, browse through my collection of cheesecake recipes where you’ll find everything from traditional styles to modern twists.
What makes this recipe special isn’t just how easy it is or how delicious it tastes. It’s how this dessert brings people together. Every time I make it, someone asks for the recipe, and I love sharing it. Now you have all my secrets, tips, and tricks. Make this cheesecake your own, enjoy it with the people you love, and don’t stress about perfection. The best desserts are made with confidence and shared with joy.
Frequently Asked Questions
How do I make a no-bake cherry cheesecake without gelatin?
The recipe I’ve shared doesn’t use gelatin at all, and it sets perfectly in the refrigerator. The cream cheese and whipped topping combination creates enough structure on its own. The key is using full-fat cream cheese and allowing adequate chilling time—at least four hours but preferably overnight. Some recipes call for gelatin, but it’s completely unnecessary for achieving the right texture. I’ve made this dozens of times without gelatin and it’s always perfectly firm and sliceable.
Can I use fresh cherries instead of canned cherry pie filling?
Absolutely! Fresh cherries make a wonderful topping. You’ll need about two cups of pitted cherries, half a cup of sugar, two tablespoons of cornstarch, and a tablespoon of lemon juice. Cook everything together in a saucepan over medium heat, stirring constantly until it thickens into a sauce consistency. This takes about seven minutes. Let it cool completely before spreading it on your cheesecake because hot topping will melt the cream cheese layer. Frozen cherries work great too if fresh aren’t available.
Is it possible to make this recipe vegan?
Yes, with some substitutions you can create a vegan version. Use vegan cream cheese like Kite Hill or Tofutti, which work surprisingly well. Replace the butter in the crust with coconut oil or vegan butter. Instead of Cool Whip, use coconut whipped cream or another dairy-free whipped topping. The texture won’t be identical to the traditional version, but it’s still delicious. I made a vegan version for my daughter’s friend who’s lactose intolerant, and everyone enjoyed it. Just make sure all your ingredients are labeled vegan.
How far in advance can I make this no-bake cherry cheesecake?
You can make this dessert up to three days before you plan to serve it, and it actually tastes better after sitting in the fridge for a day or two. The flavors blend together beautifully and the texture becomes even more velvety. I often make mine two days ahead for parties, which takes pressure off the day of the event. Just keep it covered tightly in the refrigerator. If you’re planning even further ahead, make and freeze the crust and filling without the cherry topping for up to two months.
What are some variations of the no-bake cherry cheesecake recipe?
The variations are endless and fun to explore. Try a chocolate version by adding melted chocolate to the filling and using an Oreo crust. Make a lemon cherry cheesecake by adding lemon zest and juice to the filling. Create a layered look by adding a middle layer of crushed cookies or nuts. You can also swap cherries for other fruits like strawberries, blueberries, peaches, or mixed berries. Some people add a layer of chocolate ganache between the filling and fruit topping for extra richness.
Can I freeze the no-bake cherry cheesecake?
Yes, this cheesecake freezes beautifully for up to two months. The trick is to freeze it before adding the cherry topping since fruit toppings don’t freeze and thaw as well. Wrap the cheesecake tightly in plastic wrap, then add a layer of aluminum foil to prevent freezer burn. When you’re ready to serve, thaw it slowly in the refrigerator overnight, then add fresh cherry topping. Individual portions in mason jars freeze especially well and thaw faster. I always keep a backup in my freezer for unexpected occasions.
How do I prevent the crust from getting soggy?
The key to a crisp crust is pressing it down very firmly and chilling it thoroughly before adding the filling. Pack it tightly using the bottom of a measuring cup or glass. I also recommend freezing the crust for fifteen minutes instead of just refrigerating it—this creates a firmer barrier against moisture. Make sure your filling isn’t too warm when you add it. Some people brush a thin layer of melted white chocolate over the crust before adding the filling, which creates a waterproof seal, though I’ve never found this necessary if the crust is properly pressed and chilled.
What are some alternatives to graham crackers for the crust?
There are so many delicious options beyond traditional graham crackers. Oreo cookies make a rich chocolate crust—just scrape out the filling and crush the cookies. Vanilla wafers create a lighter, more delicate base. Shortbread cookies add buttery richness. Gingersnaps give a spicy kick that pairs surprisingly well with cherries. Digestive biscuits work great if you’re in the UK or prefer that flavor. Even pretzels can make an interesting sweet-and-salty crust. Whatever you choose, you’ll need about one and a half cups of crumbs mixed with melted butter and a bit of sugar.
Why is my no-bake cheesecake filling runny?
A runny filling usually means either the cream cheese wasn’t at room temperature, the ingredients weren’t mixed properly, or the cheesecake didn’t chill long enough. Cold cream cheese doesn’t incorporate smoothly and can leave your filling loose. Always let cream cheese sit out for about an hour before using. Also, make sure you’re using full-fat cream cheese, not a low-fat version which has more water content. The cheesecake needs at least four hours to set, but overnight is truly better. If your filling seems too soft, pop it back in the fridge for several more hours.
Can I make mini versions of this no-bake cherry cheesecake?
Mini cheesecakes are adorable and perfect for parties. Use a muffin tin lined with paper cups, or make individual servings in small mason jars or dessert cups. For muffin tins, press about a tablespoon of crust mixture into the bottom of each cup, then add the filling, and top with cherries. These chill faster than a full-sized pie—usually about two hours is enough. They’re also easier to serve at gatherings since each person gets their own portion. I made these for my son’s school party and they were a huge hit because kids love having their own individual dessert.
Equipment
- Mixing bowl
- Electric mixer
- Spatula
- Pie pan or springform pan
- Measuring cups and spoons
Ingredients
- 1.5 cups graham cracker crumbs
- ⅓ cup melted butter
- 3 tablespoons sugar
- 16 oz cream cheese, softened
- 1 cup powdered sugar
- 1 teaspoon vanilla extract (optional)
- 8 oz whipped topping (like Cool Whip)
- 21 oz cherry pie filling
Instructions
- Mix the graham cracker crumbs, melted butter, and sugar in a medium bowl until it resembles wet sand.
- Press the mixture firmly into the bottom of a 9-inch pie pan or springform pan.
- Chill the crust in the fridge while preparing the filling.
- In a large bowl, beat the softened cream cheese until smooth and fluffy.
- Gradually add powdered sugar and mix until well combined.
- Add the vanilla extract if using, and mix until creamy.
- Gently fold in the whipped topping until no white streaks remain.
- Spoon the cream cheese mixture onto the chilled crust and spread evenly.
- Top with cherry pie filling (or cooled homemade cherry topping).
- Cover and refrigerate for at least 4 hours, preferably overnight.
Notes
Nutrition

Hello! I’m Sarah Mitchell, and I’m passionate about bringing creativity and innovation to baking. My love for baking started in high school when I first tried my hand at decorating cupcakes for a class project. What began as a fun hobby quickly became a full-time passion. I’ve spent the past decade working in bakeries and dessert shops, honing my skills in everything from simple cookies to intricate wedding cakes.
After working in some of the top bakeries across the country, I realized that baking was about more than just following recipes — it was about infusing your personality into each creation. At BakingSecret.com, I love creating recipes that push boundaries while staying true to the heart of classic baking. I specialize in creating delicious and visually stunning pastries that will wow your guests.
When I’m not baking, I enjoy teaching baking classes, trying out new cake decoration techniques, and traveling to find inspiration in global dessert traditions. I’m so excited to share my tips and tricks with you to help elevate your baking game!