
Whip Up a Little Magic: Butterbeer Cupcakes!
You know that cozy, happy feeling you get from your favorite book? That’s exactly what I was chasing in my kitchen. I wanted a treat that tasted like pure, joyful magic. After many happy (and messy) experiments, these Butterbeer Cupcakes were born. They’re not just cupcakes. They’re a warm hug in dessert form, with a fluffy, buttery cake and a cloud of creamy, dreamy frosting. One bite, and you’ll be absolutely spellbound.
The Story Behind the Butterbeer Fantasy
Butterbeer, of course, comes from a world of wizards and wonder. But bringing that famous flavor into a real, bakeable treat was my own little kitchen quest. For me, the magic isn’t just in the reference. It’s in the familiar, comforting taste of butterscotch. It tastes like old-fashioned candy shops and my grandma’s kitchen. This recipe is my version: a simple homemade cupcake that captures that sweet, buttery, slightly caramel essence without needing a magic wand. It’s a modern classic for anyone who loves a good story and a great dessert.
Why You’ll Fall in Love With This Recipe
Let me count the ways! First, the flavor is incredible. It’s rich, buttery, and just sweet enough. Second, it’s simpler than it looks. You probably have most ingredients already. Third, that frosting is a game-changer. Whipping cream with butterscotch sauce? It’s light, not too heavy, and downright delicious. Finally, these cupcakes make people smile instantly. They’re a guaranteed hit, whether you’re baking for kids or a book club full of adults.
Perfect Occasions for These Magical Treats
These cupcakes are perfect for turning an ordinary day into a celebration. I love making them for movie marathons, especially the magical ones. They’re a must for themed birthday parties. Imagine a platter of these as the centerpiece! They also make a wonderful bake sale item that always sells out first. Honestly, a quiet Tuesday afternoon with a cupcake and a cup of tea is a pretty perfect occasion, too.
Gathering Your Ingredients
Here’s your grocery list for this butterscotch fantasy. Having everything at room temperature (eggs, butter, milk) is the first little secret to a perfect bake.
For the Cupcakes:
- 1 ½ cups all-purpose flour
- 1 ½ teaspoons baking powder
- ½ teaspoon baking soda
- ½ teaspoon salt
- ½ cup unsalted butter, softened
- ½ cup packed brown sugar
- ½ cup granulated sugar
- 2 large eggs
- 1 teaspoon vanilla extract
- ½ teaspoon butter extract (optional but highly recommended!)
- ½ cup butterscotch sauce (store-bought or homemade)
- ½ cup milk
For the Frosting & Garnish:
- 1 ½ cups heavy whipping cream, very cold
- ⅓ cup powdered sugar
- ⅓ cup butterscotch sauce, plus extra for drizzling
- ½ teaspoon vanilla extract
- Butterscotch chips for topping (optional)
Ingredient Swaps (No Magic Required!)
Don’t stress if you’re missing something! Here are easy fixes: Butter Extract: Use all vanilla extract if you don’t have it. The flavor will be slightly different but still great. Butterscotch Sauce: A good quality caramel sauce can work in a pinch. Milk: Any kind you have—whole, 2%, or even a plain non-dairy milk—will work fine. Heavy Cream: For a stable frosting, this is key. Don’t substitute with a lighter cream.
Creating Your Butterbeer Cupcakes, Step-by-Step
Step 1: Prep Your Pan and Preheat
Start by preheating your oven to 350°F (175°C). This gives it time to get perfectly hot. Line your muffin tin with pretty paper liners. I love using gold or parchment ones—they make the cupcakes look extra special. This simple prep step makes cleanup a breeze later. Trust me, you’ll thank yourself!
Step 2: Mix the Dry Ingredients
Grab a medium bowl and a whisk. Add the flour, baking powder, baking soda, and salt. Whisk them all together until they’re completely combined. You’ll see little specks of brown from the baking soda disappear into the flour. This step ensures your leaveners are evenly distributed. That’s what gives our cupcakes their lovely, even rise. Pro tip: For extra-light cupcakes, you can sift these ingredients together instead of whisking.
Step 3: Cream the Butter and Sugars
In a large mixing bowl, add the softened butter, brown sugar, and white sugar. Beat them together with an electric mixer on medium speed. You’re looking for a mixture that turns pale, fluffy, and light. It should look almost like a creamy caramel cloud. This usually takes about 2-3 minutes. Creaming adds air, which is the foundation of a tender crumb.
Step 4: Add Eggs and Extracts
Now, crack in the eggs one at a time. Beat well after each addition until the yolk is fully blended in. Then, pour in the vanilla and the magical butter extract. The butter extract is my secret weapon. It gives that authentic, rich “butterbeer” flavor that vanilla alone can’t. Your kitchen will already start to smell amazing.
Step 5: Bring in the Butterscotch and Milk
Measure out your butterscotch sauce. Drizzle it into the butter mixture and mix on low until just combined. The batter will turn a beautiful golden caramel color. Now, we’ll add the dry ingredients and milk. Add about one-third of the flour mix, then half the milk. Repeat, ending with the last of the flour. Mix on low speed only until the last streaks of flour disappear. Overmixing is the enemy of a soft cupcake!
Step 6: Bake to Golden Perfection
Use a cookie scoop or a spoon to divide the batter evenly among the 12 liners. Fill them each about ⅔ full. Slide the pan into your preheated oven. Bake for 18-20 minutes. You’ll know they’re done when the tops spring back lightly at your touch and a toothpick poked in the center comes out clean. The smell will be absolutely intoxicating. Let them cool in the pan for 5 minutes, then move them to a wire rack to cool completely.
Step 7: Whip the Dreamy Frosting
For this step, make sure your bowl and beaters are clean and cold. Pour the very cold heavy cream into the bowl. Beat on medium-high speed until soft peaks form. This means the cream holds a gentle peak that flops over. Now, add the powdered sugar, butterscotch sauce, and vanilla. Continue beating until you get stiff, luscious peaks. The frosting will be a lovely light tan color and hold its shape beautifully on a spoon.
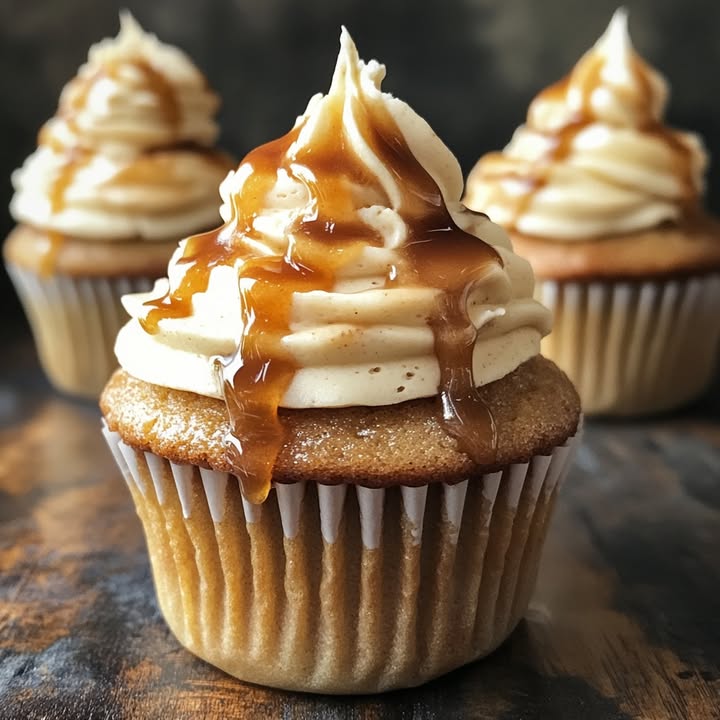
Step 8: Frost, Drizzle, and Devour!
Once the cupcakes are completely cool, it’s time for the fun part! Pile the fluffy frosting generously on top of each cupcake. I like to use a piping bag with a large star tip for a fancy look, or just a big spoon for a rustic swirl. Finally, take your extra butterscotch sauce and drizzle it artfully over each frosted cupcake. A sprinkle of butterscotch chips adds a nice little crunch. Chef’s Tip: For the prettiest drizzle, warm the butterscotch sauce for just 5-10 seconds to make it runny.
Your Baking Timeline
This recipe is wonderfully quick from bowl to bliss! Prep Time: 20 minutes of active kitchen time. Cooking Time: Just 20 minutes in the oven. Cooling Time: Allow 1 hour for cupcakes to cool completely before frosting—this is important! Total Time: About 1 hour 40 minutes, start to beautiful finish. Servings: Makes 12 perfect cupcakes. Kcal: Approximately 340 per frosted cupcake.
A Secret for Super-Moist Cupcakes
Here’s my little trick: brush the tops of the cooled cupcakes with a tiny bit of extra butterscotch sauce before you frost them. It adds an extra layer of flavor and keeps the crumb incredibly moist. Just a light brush is all you need—don’t soak them!
A Sweet Note on Butterscotch
Did you know traditional butterscotch is defined by its use of brown sugar and butter? The “scotch” might come from the word “scorch,” referring to the cooking of the sugar. It’s a classic flavor that’s been loved for generations, long before it became associated with magic. Using a good-quality sauce makes all the difference in this recipe.
Necessary Kitchen Tools
- Standard 12-cup muffin tin
- Paper cupcake liners
- Two mixing bowls (one medium, one large)
- Electric hand mixer or stand mixer
- Whisk and spatula
- Cookie scoop or spoon for filling
- Wire cooling rack
- Piping bag and tip (optional, for fancy frosting)
Storing Your Magical Creations
Because of the whipped cream frosting, these cupcakes need to be stored in the refrigerator. Place them in a single layer in an airtight container. They will stay fresh and delicious for up to 3 days. The cupcakes themselves may become a bit denser when cold, but the flavor remains fantastic.
If you need to store them longer, you can freeze the unfrosted cupcakes very successfully. Wrap each cooled cupcake individually in plastic wrap, then place them all in a freezer bag. They’ll keep for up to 2 months. Thaw at room temperature before frosting.
The frosting is best made fresh, but you can prepare the components ahead. The cupcake bases can be baked a day in advance. Store them covered at room temperature. The butterscotch sauce can be ready in the fridge. Then, simply whip the frosting and assemble on the day you plan to serve them for the best texture.
Pro Tips for Guaranteed Success
- Room Temperature is Key: Using room temp eggs, butter, and milk helps the batter blend smoothly and rise evenly.
- Don’t Overfill: Filling liners ⅔ full prevents messy overflow and gives you a perfect dome.
- Cool Completely: Frosting a warm cupcake is a recipe for a melty, sad puddle. Patience pays off!
- Chill Your Bowl: For the fastest, fluffiest whipped cream, pop your mixing bowl and beaters in the freezer for 10 minutes before starting.
Presentation Ideas to Wow Your Guests
- Arrange them on a tiered cake stand for a dramatic effect.
- Dust a little gold edible glitter over the frosting for real wizard sparkle.
- Serve with small mugs of warm apple cider or coffee for a cozy pairing.
- Place a tiny pretzel stick or a chocolate wand on top for a playful touch.
Explore More Delicious Baking Twists
If you love the sweet, fudgy contrast in these cupcakes, you have to try my Blueberry Brownies with a fruit surprise. It’s another fantastic flavor combo! For a truly showstopping dessert, my Kentucky Derby Pecan Pie Cheesecake is a rich, Southern-inspired dream. When you need a no-bake option, these adorable Easter Mini Swirl Cheesecakes are so fun to make with kids. And of course, you can never go wrong with the timeless perfection of a Classic New York Cheesecake.
Common Mistakes to Avoid
Mistake 1: Using Cold Ingredients
Starting with cold butter and eggs straight from the fridge is a common pitfall. Cold butter won’t cream properly with the sugar, leading to a dense, heavy cake. Cold ingredients can also cause the batter to curdle or look separated. Always plan ahead. Take your butter, eggs, and milk out about an hour before you start baking. You’ll be rewarded with a smooth, fluffy batter every single time.
Mistake 2: Overmixing the Batter
It’s tempting to keep mixing until the batter is ultra-smooth. Resist! Once you add the flour, gluten development begins. Mixing too much creates more gluten, which makes cupcakes tough and chewy instead of tender and light. Mix the dry ingredients in on low speed, and stop the moment you no longer see dry streaks of flour. A few small lumps are absolutely fine; they will bake out.
Mistake 3: Overbaking the Cupcakes
Dry cupcakes are a sad thing. Overbaking happens easily because ovens can run hot, and we often wait for a deep golden brown color. For perfect moisture, bake just until a toothpick inserted comes out with a few moist crumbs, not completely clean. The tops should spring back when lightly pressed. Remember, they continue to cook a little from residual heat as they cool in the pan.
Mistake 4: Frosting Warm Cupcakes
Impatience leads to melted frosting! That beautiful whipped butterscotch frosting is made with cream. If you spread it on a cupcake that’s even slightly warm, it will immediately start to soften, slide off, and lose its shape. Let your cupcakes cool in the pan for 5 minutes, then transfer them to a wire rack. Wait a full hour, or until they are completely room temperature, before you get out your piping bag.
Mistake 5: Not Chilling the Cream or Bowl for Frosting
Whipped cream needs to stay cold to hold air and form peaks. If your kitchen is warm or your bowl and beaters are at room temp, the cream can turn grainy or even become butter instead of fluffy frosting. For foolproof frosting, place your metal mixing bowl and beaters in the freezer for 10-15 minutes before you start. Also, make sure your heavy cream is fresh and has been stored very cold in the fridge.
Using quality ingredients always makes a difference in baking. For instance, understanding the nutrient reference values for dairy products can help you make informed choices about the butter and cream you use, ensuring the best flavor and texture in your desserts.
Frequently Asked Questions
Can I make these Butterbeer Cupcakes without the butter extract?
Absolutely, you can! The cupcakes will still be delicious using just vanilla extract. The butter extract, however, is what gives that distinct, rich buttery flavor that mimics the classic drink so well. If you can find it near the vanilla extract in the baking aisle, I highly recommend adding it. It’s a small bottle that lasts a long time and really makes the flavor pop. Without it, you’ll have a wonderful butterscotch cupcake that’s just missing that one special note.
What’s the best butterscotch sauce to use? Can I make my own?
A good-quality store-bought sauce works perfectly and saves time. Look for one in the ice cream topping aisle. If you’re feeling ambitious, homemade sauce is fantastic! A simple recipe combines brown sugar, butter, cream, and a pinch of salt cooked until thickened. Making your own lets you control the sweetness and thickness. Just be sure to cool it completely before adding it to the cupcake batter, or you might accidentally cook the eggs.
My frosting turned out runny. What did I do wrong, and can I fix it?
A runny frosting usually has two common causes: the cream wasn’t cold enough, or it was over-whipped past stiff peaks into butter. Always start with cream right from the fridge and a chilled bowl. If it’s slightly soft, you can try placing the whole bowl in the freezer for 10-15 minutes, then re-whipping. If it’s started to separate and look grainy (turning to butter), it’s hard to salvage for frosting, but you haven’t wasted it! Keep whipping, drain the liquid, and you’ve made sweet butterscotch butter—delicious on toast.
Can I turn this recipe into a layer cake?
Yes, you can adapt it for a cake! Double the cupcake recipe to make three 6-inch cake layers or two 8-inch layers. Bake the layers at the same temperature, but start checking for doneness around 25-30 minutes. For the frosting, I’d recommend a more stable buttercream if the cake needs to sit out. You could make a Swiss meringue buttercream and flavor it with butterscotch sauce, or use a cream cheese frosting. The whipped cream frosting in this recipe is best for cakes served immediately and kept refrigerated.
Are there any nut-free or allergy-friendly substitutions?
This recipe is naturally nut-free as written. Just double-check your butterscotch sauce label to ensure it wasn’t made in a facility with nuts if you have a severe allergy. For a dairy-free version, use a plant-based butter and milk. For the frosting, full-fat coconut cream (chilled) can be whipped, though it will impart a coconut flavor. Egg substitutes like flax eggs can work in the cake, though the texture may be slightly denser. Always test a small batch first with substitutions.
How far in advance can I assemble these cupcakes?
For the absolute best quality, assemble the cupcakes the day you plan to serve them. You can bake the cupcakes a day ahead. Store them unfrosted, covered at room temperature. Make the frosting and drizzle the assembly the next day. Once frosted, they will hold well in the fridge for up to 8 hours. The whipped cream may start to soften and weep slightly after that. I don’t recommend assembling them more than a full day ahead.
Can I use a different kind of frosting?
Of course! While the whipped butterscotch frosting is light and magical, you have options. A butterscotch-flavored American buttercream (butter, powdered sugar, butterscotch sauce) is much sweeter and more stable. A cream cheese frosting would add a lovely tangy contrast to the sweet cake. Even a simple vanilla Swiss meringue buttercream drizzled with butterscotch would be divine. Choose based on your preference for sweetness and stability.
Why did my cupcakes sink in the middle after baking?
Sinking usually means there was too much leavener (baking powder/soda), the batter was over-mixed, or the oven door was opened too early. Ensure you’re using measuring spoons, not kitchen utensils, for your leaveners. Mix just until combined. And try not to open the oven door until at least the 15-minute mark. The rush of cold air can cause a rising cake to collapse. If your oven has a light, use that to check progress instead.
What can I do with leftover butterscotch sauce?
Leftover butterscotch sauce is a blessing! Warm it up and pour it over ice cream, pancakes, or bread pudding. Stir a spoonful into your morning oatmeal or yogurt. Use it as a dip for apple slices or pretzels. You can even swirl it into brownie batter before baking for a marbled effect. Store it in a sealed jar in the fridge for up to two weeks. Just gently reheat it to make it pourable again.
Where can I find more amazing cupcake ideas like this?
I’m so glad you asked! For more inspiration on all things baked and beautiful, you should definitely explore the wonderful collection of ideas in our main cakes and cupcakes category. It’s packed with classic recipes, seasonal twists, and all the pro tips you need to build your baking confidence.
And there you have it—my recipe for pure, unadulterated baking joy. These Butterbeer Cupcakes are more than just a treat. They’re a conversation starter, a smile-maker, and a testament to the fact that a little bit of simple kitchen magic is within everyone’s reach. Don’t be surprised if they disappear as quickly as you can say “Accio cupcake!” So preheat that oven, put on your favorite apron, and get ready to bake up some happiness. I’d love to hear how yours turn out. Happy baking!
Equipment
- Grand bol
- Fouet
- Spatule
- Plaque à pâtisserie
- Papier sulfurisé
Ingredients
- 2 tasse farine tout usage
- 1.5 c. à café poudre à lever
- 0.5 c. à café bicarbonate de soude
- 0.5 c. à café sel
- 0.5 tasse beurre non salé, ramolli
- 0.5 tasse sucre brun compacté
- 0.5 tasse sucre granulé
- 2 œufs
- 1 c. à café extrait de vanille
- 0.5 c. à café extrait de beurre (facultatif mais fortement recommandé)
- 0.5 tasse sauce caramel beurre achats ou fait maison
- 0.5 tasse lait
Instructions
- Préchauffez votre four à 175°C (350°F) et tapissez un moule à muffins de caissettes en papier.
- Dans un bol moyen, fouettez ensemble la farine, la poudre à lever, le bicarbonate de soude et le sel.
- Dans un grand bol de mélange, crémez ensemble le beurre, le sucre brun et le sucre granulé jusqu'à ce qu'il soit léger et mousseux.
- Ajoutez les œufs un par un, en battant bien après chaque ajout, puis incorporez l'extrait de vanille et l'extrait de beurre.
- Ajoutez la sauce caramel beurre et mélangez à basse vitesse jusqu'à ce que le tout soit combiné.
- Ajoutez progressivement les ingrédients secs et le lait en alternance, en mélangeant jusqu'à ce que le tout soit juste combiné.
- Répartissez la pâte entre les caissettes à muffins, en remplissant chaque tasse aux deux tiers, puis faites cuire au four pendant 18-20 minutes jusqu'à ce qu'un cure-dent en ressorte propre.
- Laissez refroidir les cupcakes dans le moule pendant 5 minutes, puis transférez-les sur une grille pour refroidir complètement.
- Pour le glaçage, fouettez la crème épaisse très froide jusqu'à ce que des pics mous se forment, puis ajoutez le sucre glace, la sauce caramel et l'extrait de vanille. Battez jusqu'à ce que des pics fermes se forment.
- Une fois que les cupcakes sont refroidis, glacez-les généreusement et arrosez de sauce caramel supplémentaire.
Notes
Nutrition

Hi, I’m Olivia Parker, the founder of BakingSecret.com and a lifelong lover of all things sweet and homemade. I grew up in a small town in Oregon, where the smell of fresh cookies in my family’s kitchen sparked my passion for baking. Over the years, I turned that passion into a mission: to help home bakers feel confident, inspired, and creative.
After studying food science and working in several artisan bakeries across the U.S., I decided to create a space where everyone from beginners to seasoned bakers can find reliable recipes, expert tips, and a warm, welcoming community. BakingSecret.com is my way of sharing the magic of baking with the world. When I’m not testing new recipes, you’ll find me exploring farmers’ markets, collecting vintage cookbooks, or perfecting my sourdough technique.