
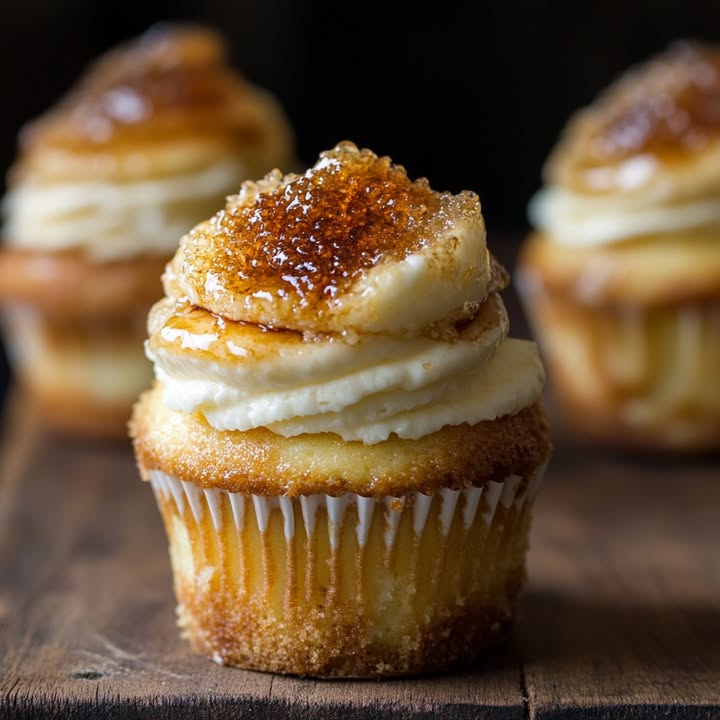
Let’s Make Something Magical: Vanilla Bean Crème Brûlée Cheesecake Cupcakes
Have you ever wanted to make a dessert that makes everyone go completely quiet? You know, that moment where the only sound is the “crack” of a spoon hitting caramelized sugar? That’s the magic of these Vanilla Bean Crème Brûlée Cheesecake Cupcakes. I first made them for my book club, and let me tell you, I got more texts about these little cups of joy than about the actual book! They combine the creamy dreaminess of cheesecake with the fancy, fun-to-crack top of crème brûlée. It’s a party trick you can eat, and I’m so excited to share it with you.
A Sweet Tale: From French Classic to Fun-Sized Treat
Crème brûlée, which literally means “burnt cream,” has been a fancy restaurant staple for centuries. The story goes that it was a happy accident in 17th-century France. Cheesecake, on the other hand, dates back to ancient Greece! My version is a modern mash-up. It takes the elegant soul of the French dessert and the comforting heart of cheesecake, then shrinks it down into a perfect, personal portion. No need for fancy ramekins or a water bath—just a simple muffin tin and a whole lot of love. It’s tradition, but make it easy and shareable.
Why You’ll Adore This Fancy Dessert Recipe
You will love this recipe because it looks incredibly impressive but is secretly simple. The vanilla bean paste gives it those beautiful little black specks and an aromatic flavor that vanilla extract just can’t match. They are the ultimate make-ahead dessert. You can bake them two days before your event, and the final torch step takes less than five minutes. It’s the perfect recipe for when you want to feel like a pastry chef without the stress. Plus, who doesn’t love having their very own mini cheesecake to crack into?
Perfect Occasions for Mini Cheesecakes
These little gems are unbelievably versatile. They’re elegant enough for a dinner party or bridal shower. They’re also portable enough to bring to a potluck (just torch them right before serving!). I love making them for birthdays because everyone gets their own “cake.” They’re also a fantastic holiday dessert, especially during the festive season when we all crave something special. Honestly, any Tuesday is a good enough reason to make these Vanilla Crème Brûlée Cupcakes.
What You’ll Need: The Ingredients List
Gather these simple ingredients. Using full-fat items is key for that creamy, luxurious texture we’re after.
- 1 cup graham cracker crumbs
- 2 tablespoons sugar
- 3 tablespoons melted butter
- 16 ounces cream cheese, softened
- 1/2 cup sugar
- 1 vanilla bean, seeds scraped or 2 teaspoons vanilla bean paste
- 2 large eggs
- 1/4 cup sour cream
- 1 tablespoon all-purpose flour
- 2 tablespoons granulated sugar (for the brûlée topping)
Handy Substitutions for Your Cupcakes
Don’t stress if you’re missing something. Here are some easy swaps:
- Graham Cracker Crumbs: Digestive biscuits or vanilla wafer crumbs work great.
- Vanilla Bean Paste: You can use 2 teaspoons of pure vanilla extract. The flavor is still wonderful, though you’ll miss the lovely specks.
- Sour Cream: Plain, full-fat Greek yogurt is a perfect substitute.
- Regular Sugar for Topping: For a deeper flavor, use turbinado or raw sugar. It caramelizes beautifully.
Your Step-by-Step Guide to Vanilla Crème Brûlée Cupcakes
Follow these steps for perfect, crackly-topped mini cheesecakes every single time.
Step 1: Prep Your Pan and Make the Crust
First, preheat your oven to 325°F. Line a muffin tin with 12 cupcake liners. I like using parchment paper liners; they peel off easily. In a small bowl, mix the graham cracker crumbs, the 2 tablespoons of sugar, and the melted butter. It should feel like wet sand and hold together when you pinch it. Press about one tablespoon firmly into the bottom of each liner. A small glass or a measuring spoon works perfectly to tamp it down flat and even.
Step 2: Create the Luxurious Filling
Now, for the star of the show. In a large bowl, beat the softened cream cheese with an electric mixer until it’s completely smooth and no lumps remain. This is crucial for a silky texture. Add the 1/2 cup of sugar and your precious vanilla bean seeds or paste. Beat again until it’s fully combined and smells heavenly. Pro tip: Make sure your cream cheese is truly at room temperature. Cold cream cheese will leave you with a lumpy batter, and we don’t want that.
Step 3: Incorporate the Remaining Ingredients
Add the eggs, one at a time, beating well after each addition. Scrape down the sides of the bowl to ensure everything is mixing evenly. Finally, beat in the sour cream and the tablespoon of flour. The flour helps stabilize the cheesecakes so they don’t crack. Mix just until the batter is gloriously smooth, creamy, and uniform in color. Try not to overmix once the flour is in.
Step 4: Bake to Perfection
Carefully pour or spoon the filling over your crusts, filling each liner about 3/4 of the way full. Slide the tray into your preheated oven. Bake for 18 to 22 minutes. The centers should look just set, with a slight jiggle when you gently shake the pan. They will firm up as they cool. Overbaking is the enemy of a creamy cheesecake! Let them cool completely in the pan on a wire rack, then transfer them to the fridge for at least 2 hours, or even overnight.
Step 5: The Grand Finale: The Brûlée Topping
Just before serving, sprinkle about 1/2 teaspoon of granulated sugar evenly over the top of each chilled cupcake. Gently tilt and tap them to spread the sugar into a thin, even layer. Now for the fun part! Use a kitchen torch, holding it a few inches away, to slowly melt and caramelize the sugar. Move the flame in small circles until the sugar is a deep, golden amber and bubbly. Let them sit for a minute so the sugar hardens into that signature crisp shell. Chef’s tip: If you don’t have a torch, you can carefully place them under a broiler for 1-2 minutes, but watch them like a hawk!
Timing Your Fancy Dessert
Good things take a little time, but most of it is hands-off.
- Prep Time: 20 minutes
- Cooking Time: 20 minutes
- Chilling Time: At least 2 hours
- Total Time: 2 hours 40 minutes
- Servings: 12 delicious cupcakes
- Calories: Approximately 290 per cupcake
My Secret for the Best Cheesecake Cupcakes
My absolute secret is patience. Do not skip the chilling time. A fully chilled cheesecake is not only firmer and easier to top with sugar, but the flavors also have time to meld and deepen. That wait makes the first creamy bite with the crunchy caramel top completely worth it.
A Fun Fact About Vanilla
Vanilla beans come from orchids! They are the second most expensive spice in the world (after saffron) because they are so labor-intensive to grow and cure. Using the real bean or paste in these Vanilla Bean Crème Brûlée Cheesecakes truly honors that incredible process and gives you an unmatched, pure flavor.
Gear You’ll Need to Make This Recipe
- Standard 12-cup muffin tin
- Cupcake liners (parchment recommended)
- Electric hand mixer or stand mixer
- Mixing bowls (small and large)
- Measuring cups and spoons
- Kitchen torch (the star of the show!)
- Spatula for scraping
Storing Your Mini Cheesecake Creations
Before the Brûlée: The chilled, untorched cheesecake cupcakes can be stored in an airtight container in the refrigerator for up to 4 days. They are fantastic for making ahead. You can also freeze them for up to 2 months. Thaw overnight in the fridge before topping and serving.
After the Brûlée: The caramelized sugar topping is best enjoyed immediately. It will start to soften and dissolve after a few hours in the fridge because of moisture. So, for the perfect texture and that satisfying crack, always torch them right before you plan to serve.
For general food safety and understanding shelf life for dairy-based desserts, it’s always good to follow trusted guidelines on storage times to ensure quality and safety.
Pro Tips for Foolproof Fancy Desserts
- Bring all cold ingredients (cream cheese, eggs, sour cream) to room temperature. This prevents lumps and helps the batter come together smoothly.
- Don’t overfill the liners. Filling them 3/4 full prevents overflow and gives you a nice, flat surface for the sugar.
- If you see cracks forming on top while baking, don’t panic! The brûlée sugar topping will hide them perfectly.
- For easy cleanup when torching, place the cupcakes on a baking sheet or a piece of foil to catch any stray sugar granules.
Pretty Presentation Ideas
- Place each cupcake on a small, decorative plate with a tiny spoon or fork.
- Garnish the serving platter with a few whole vanilla beans for a gorgeous, fragrant touch.
- Serve with a small side of fresh berries, like raspberries or blueberries, for a pop of color and a tart contrast.
- For a holiday feel, add a tiny sprig of mint or a dusting of edible gold dust before serving.
Six Tasty Twists on This Recipe
Love this base recipe? Try these fun variations for your next batch!
- Chocolate Swirl: Swirl 1/4 cup of melted and cooled dark chocolate into the batter before baking for a marbled effect.
- Citrus Zest: Add the zest of one lemon or orange to the filling for a bright, sunny flavor.
- Espresso Shot: Dissolve 1 tablespoon of instant espresso powder into the sour cream before adding it for a mocha twist.
- Ginger Snap Crust: Use crushed ginger snap cookies instead of graham crackers for a spicy, warm crust.
- Berry Compote Bottom: Place a small spoonful of raspberry or strawberry compote on the crust before adding the cheesecake batter.
- Maple Brûlée: Use a mix of granulated sugar and a bit of maple sugar for the topping for a fall-inspired flavor.
If you’re looking for more inspired sweet creations, our collection of delicious cupcake and cake recipes is always growing with new ideas to try.
Common Mistakes to Avoid with Cheesecake Cupcakes
Mistake 1: Using Cold Cream Cheese
This is the number one reason for lumpy batter. Cold cream cheese will never blend smoothly with the sugar and eggs. Always take your cream cheese out of the fridge at least an hour before you start baking. To speed it up, you can microwave unwrapped blocks on 50% power for 15-second intervals until slightly softened but not melty.
Mistake 2: Overbaking the Mini Cheesecakes
We bake cheesecakes to *just* set, not until they’re firm all the way through. An overbaked cheesecake becomes dry and dense, and it’s more likely to crack. Pull them from the oven when the edges are set but the center still has a slight wobble, like firm Jell-O. Remember, they continue to cook from residual heat as they cool.
Mistake 3: Rushing the Chilling Process
It’s so tempting to torch them right after they cool on the counter. Don’t do it! The structure of the cheesecake needs time to firm up in the fridge. Skipping this step leads to a filling that’s too soft and can melt or slump when you torch it. The flavor also needs this time to develop fully. Two hours is the minimum; overnight is ideal.
Mistake 4: Applying Too Much Sugar for the Brûlée
A thick layer of sugar will not caramelize evenly. You’ll end up with some burnt spots and some raw, gritty sugar. A thin, even layer—about 1/2 teaspoon per cupcake—is perfect. Tilt the cupcake as you sprinkle to coat it evenly, then gently tap out any excess before torching.
Mistake 5: Holding the Torch Too Close
Getting overexcited with the torch can lead to burnt, bitter sugar instead of beautiful golden caramel. Hold the flame 3 to 4 inches away from the surface. Use a slow, steady, circular motion. Patience gives you control and that perfect, glass-like finish.
Frequently Asked Questions
Can I make these without a kitchen torch?
Yes, you can! The broiler in your oven is a good backup. Place the sugared cupcakes on a baking sheet and position them about 4-5 inches below the broiler element. Turn the broiler to high and watch them constantly. It usually takes 1 to 3 minutes for the sugar to melt and caramelize. They can go from perfect to burnt in seconds, so don’t walk away. The torch gives you more control, but the broiler works in a pinch.
Why did my cheesecake cupcakes crack on top?
Cracking usually happens from overmixing the batter (which incorporates too much air), overbaking, or a sudden temperature change. To avoid this, mix just until ingredients are combined after adding the flour. Don’t open the oven door during baking. Let them cool gradually in the turned-off oven with the door cracked open if you’re worried. And remember, even if they crack, the brûlée topping will cover it all up beautifully, so don’t stress.
Can I use vanilla extract instead of vanilla bean paste?
Absolutely. Use 2 teaspoons of good-quality pure vanilla extract. The flavor will still be wonderful. The main difference is visual—you won’t get those lovely little black vanilla specks throughout the creamy filling. The paste or real bean provides a more intense and complex vanilla aroma, but extract makes a perfectly delicious dessert.
How far in advance can I prepare these?
You can bake the cupcakes (without the sugar topping) up to 2 days in advance. Keep them tightly covered in the refrigerator. You can also freeze them for up to 2 months. Thaw in the fridge overnight. The final step of sprinkling and torching the sugar should always be done right before serving for that perfect crisp texture.
What can I use if I don’t have sour cream?
Full-fat plain Greek yogurt is the best direct substitute. It has a similar tang and fat content, so it won’t change the texture or flavor much. You could also use an equal amount of full-fat plain yogurt, just make sure it’s not too runny. The sour cream or yogurt adds necessary acidity and richness for that classic cheesecake flavor.
My sugar topping got soft. How can I keep it crisp?
The sugar topping softens when it absorbs moisture from the air and the cheesecake underneath. This is why we torch at the last minute. If you need to store torched cupcakes for a short time, keep them uncovered in a single layer in the fridge for no more than an hour. For longer storage, it’s best to store the plain cheesecakes and torch them individually as you serve them.
Is it okay to use low-fat cream cheese?
I don’t recommend it for this recipe. Full-fat cream cheese provides the rich, dense, and creamy structure that makes cheesecake so special. Low-fat versions have more water and stabilizers, which can lead to a softer, sometimes gummy texture, and they may not set as firmly. For the best results, stick with the regular, full-fat brick-style cream cheese.
Can I use a different type of crust?
Of course! Get creative. Crushed shortbread cookies, vanilla wafers, or even chocolate wafer cookies make fantastic crusts. Use the same weight or volume—1 cup of fine crumbs mixed with the same amount of sugar and melted butter. A gingersnap crust is especially lovely during the holidays.
How do I get the filling perfectly smooth?
The key is room temperature ingredients and thorough, patient mixing. Beat the softened cream cheese alone first until it’s completely lump-free. Scrape the bowl well. Add the sugar and beat again. Add eggs one at a time, fully incorporating each before adding the next. Finally, beat in the sour cream and flour just until smooth. A fine-mesh strainer can be used for an ultra-silken texture, but it’s usually not necessary if you follow these steps.
What’s the best way to serve these cupcakes?
Serve them chilled with the crisp, warm sugar topping. Let them sit at room temperature for just 5 minutes after torching so the caramel hardens but the inside stays cool and creamy. Provide small dessert plates and spoons so your guests can enjoy the iconic “crack” sound. A simple garnish, like a single raspberry on the side, adds a lovely touch.
I hope you feel inspired to make these show-stopping Vanilla Bean Crème Brûlée Cheesecake Cupcakes. They truly are a little bite of magic. The process is fun, the result is stunning, and the taste is unforgettable. Whether you’re treating your family or impressing guests, this recipe is a guaranteed winner. Happy baking—and happy cracking! Don’t forget to explore other treats like decadent Salted Caramel Truffles, cozy Apple Pie Dip, tropical Hawaiian Carrot Pineapple Cake, or light Fluffy Cottage Cheese Cloud Bread for your next baking adventure.
Equipment
- Grand bol
- Fouet
- Spatule
- Plaque à pâtisserie
- Papier sulfurisé
Ingredients
- 1 tasse miettes de graham
- 2 cuillères à soupe sucre
- 3 cuillères à soupe beurre fondu
- 450 g fromage à la crème ramolli
- 125 g sucre
- 1 gousse de vanille graines grattées
- 2 oeufs
- 60 ml crème aigre
- 1 cuillère à soupe farine tout usage
- 2 cuillères à soupe sucre granulé pour la garniture brûlée
Instructions
- Préchauffez votre four à 160°C et tapissez un moule à muffins de 12 caissettes à cupcakes.
- Dans un petit bol, mélangez les miettes de graham, 2 cuillères à soupe de sucre et le beurre fondu. Pressez environ une cuillère à soupe au fond de chaque caissette.
- Dans un grand bol, battez le fromage à la crème ramolli avec un mixeur électrique jusqu'à obtenir une consistance lisse. Ajoutez 125 g de sucre et les graines de vanille ou la pâte de vanille, puis mélangez jusqu'à ce que le tout soit combiné.
- Ajoutez les œufs un à un, en mélangeant bien après chacun. Raclez les côtés du bol.
- Battre la crème aigre et la farine jusqu'à obtenir un mélange lisse et crémeux, en faisant attention de ne pas trop mélanger.
- Versez la garniture sur les croûtes, en remplissant chaque caissette aux trois quarts. Faites cuire au four pendant 18-22 minutes jusqu'à ce que les centres soient juste pris avec un léger tremblement.
- Laissez refroidir complètement sur une grille, puis réfrigérez pendant au moins 2 heures ou toute la nuit.
- Avant de servir, saupoudrez 1/2 cuillère à café de sucre sur chaque cupcake et utilisez un chalumeau de cuisine pour caraméliser le sucre jusqu'à ce qu'il soit doré et bouillonnant.
Notes
Nutrition

Hi, I’m Olivia Parker, the founder of BakingSecret.com and a lifelong lover of all things sweet and homemade. I grew up in a small town in Oregon, where the smell of fresh cookies in my family’s kitchen sparked my passion for baking. Over the years, I turned that passion into a mission: to help home bakers feel confident, inspired, and creative.
After studying food science and working in several artisan bakeries across the U.S., I decided to create a space where everyone from beginners to seasoned bakers can find reliable recipes, expert tips, and a warm, welcoming community. BakingSecret.com is my way of sharing the magic of baking with the world. When I’m not testing new recipes, you’ll find me exploring farmers’ markets, collecting vintage cookbooks, or perfecting my sourdough technique.