
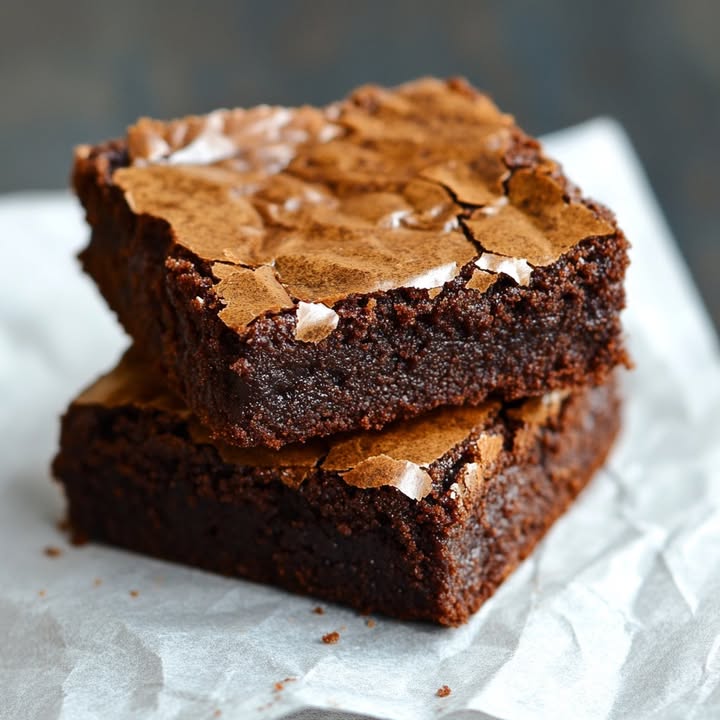
The Best Fudgy Dr. Pepper Brownies You’ll Ever Bake
Have you ever had a baking experiment turn out so right you did a little happy dance right there in the kitchen? That was me with these Dr. Pepper brownies. I was trying to use up an extra can of soda that had been sitting in the back of the fridge, and you guys, the result was pure magic. The soda doesn’t scream “Dr. Pepper” in the final bite. Instead, it whispers a secret of deep, complex sweetness and creates a brownie so fudgy it might just change your life. My kids now request these “soda pop brownies” for every bake sale!
A Sweet Sip of History
Adding soda to cake batter isn’t new. Folks in the South have been making “Cola Cake” for generations, often with chocolate cake and a sticky glaze. My version is a nod to that tradition but focuses on pure, decadent brownie bliss. This recipe is my modern, no-fuss take. We’re skipping the box mix and making everything from scratch. It’s a fun twist that connects us to a clever bit of American kitchen history, where carbonated beverages were used as a rising agent and flavor booster long before we all had fancy stand mixers.
Why You’ll Fall In Love With This Recipe
First, the texture is unbelievable. We’re talking about a rich, dense, and incredibly moist crumb. Second, it’s incredibly easy. You don’t even need a mixer for most of it—just a couple of bowls and a whisk. The Dr. Pepper works wonders. It enhances the chocolate flavor and keeps the brownies soft for days. Honestly, it’s the easiest “wow factor” dessert you can make. Everyone will ask for the secret ingredient!
Perfect Occasions for Fudgy Dr. Pepper Brownies
These are your new go-to treat. Need a showstopper for a backyard barbecue? Bring these. Game day potluck? These brownies are a total touchdown. They’re perfect for a cozy family movie night or a last-minute “I need dessert!” moment. I even cut them into small, elegant squares for book club. They are universally loved and always disappear fast.
Gathering Your Ingredients for Fudgy Goodness
- 1 cup all-purpose flour
- ¾ cup unsweetened cocoa powder (use good quality!)
- 1 teaspoon baking powder
- ½ teaspoon salt
- ¾ cup unsalted butter, melted
- 1 cup granulated sugar
- ¾ cup packed brown sugar
- 2 large eggs, at room temperature
- 1 teaspoon pure vanilla extract
- ¾ cup Dr. Pepper soda (flat or slightly flat is best)
- 1 cup semisweet chocolate chips
Handy Substitution Options
Out of something? Don’t worry! Here are some easy swaps: Use regular salted butter and just omit the extra salt. Brown the melted butter for a nutty, caramel note—it’s amazing. You can use other dark colas like root beer or Coca-Cola, but the unique spice blend in Dr. Pepper is my favorite. For the chocolate chips, peanut butter chips or chopped nuts like walnuts or pecans are a fantastic twist.
How to Make Your Fudgy Dr. Pepper Brownies
Step 1: Prep Your Pan and Oven
Start by preheating your oven to 350°F (175°C). This makes sure it’s perfectly hot when your batter is ready. Grab your 9×9-inch baking pan. Grease it thoroughly with butter or non-stick spray. For super-easy removal, you can also line it with parchment paper, leaving some overhang on the sides. This little trick makes lifting out the whole brownie slab a breeze! Pro tip: Let your eggs sit on the counter while you do this. Room temperature eggs blend into the batter much more smoothly.
Step 2: Whisk the Dry Ingredients
In a medium bowl, take your flour, cocoa powder, baking powder, and salt. Grab a whisk and stir them all together. You’ll see the dark cocoa powder swirling with the white flour, creating a beautiful, dark mixture. Whisking now prevents lumps later and makes sure the baking powder and salt are evenly spread throughout. This is the secret to a consistent, perfectly rising brownie. There’s something very satisfying about this simple act of mixing.
Step 3: Create the Sugary Butter Base
In a large bowl, pour in your melted butter. To it, add the granulated sugar and the packed brown sugar. The brown sugar adds lovely moisture. Stir them with a spatula or whisk until the mixture looks smooth, glossy, and well combined. The sugars will begin to dissolve into the butter. Your kitchen will already start to smell sweet and buttery. This rich, caramel-colored base is the foundation of our fudgy texture.
Step 4: Blend in the Eggs and Vanilla
Crack in your two eggs and add the teaspoon of vanilla extract. Now, mix vigorously! You want to beat the mixture for a good minute until it becomes slightly paler and thickens up. This step incorporates air and gives structure. You’ll see the texture transform from loose and shiny to more creamy and cohesive. The vanilla adds that warm, classic bakery aroma that makes everything smell like home.
Step 5: Combine Wet and Dry with Dr. Pepper
Here comes the fun part! Add about one-third of your flour mixture to the wet ingredients. Stir gently until just combined. Then, pour in half of the Dr. Pepper. The batter will fizz and bubble a bit—that’s normal! Stir, then repeat: add more flour, the rest of the soda, and finally the last of the flour. Mix until you no longer see streaks of white flour. The batter will be thick, shiny, and gloriously chocolatey.
Step 6: Fold in Chips and Bake to Perfection
Pour in your cup of chocolate chips. Carefully fold them into the thick batter until they’re evenly scattered. Now, pour this heavenly mixture into your prepared pan. Use your spatula to spread it into an even layer, getting into the corners. Slide the pan into your preheated oven. Bake for 28 to 30 minutes. The top will look set and have a delicate crust. Chef’s tip: The key to fudgy brownies is slightly underbaking them. A toothpick poked into the center should come out with a few moist, fudgy crumbs attached, not completely clean.
Step 7: The Crucial Cool Down
This is the hardest step—waiting! Place the hot pan on a wire rack and let the brownies cool completely. I know it’s tempting, but cutting into warm brownies will make a gooey mess. As they cool, they finish setting up from the residual heat. This patience is rewarded with perfect, clean squares. Once cool, use a sharp knife to slice them. Enjoy the sight of that dense, fudgy interior.
Your Baking Timeline
- Prep Time: 15 minutes
- Cook Time: 30 minutes
- Cooling Time: 1 hour (minimum)
- Total Time: 1 hour 45 minutes
Chef’s Secret for Intense Flavor
For an insane flavor boost, toast your cocoa powder. Spread it on a dry baking sheet and place it in the 350°F oven for 3-5 minutes before you start mixing. This simple act of roasting deepens the chocolate flavor dramatically, making it richer and more complex. Just let it cool a bit before whisking it with the flour. It’s a game-changer for any chocolate recipe!
A Little Extra Info
Why does Dr. Pepper work so well? It’s the unique blend of 23 flavors! The notes of cherry, caramel, and spice complement the deep cocoa perfectly. The carbonation also gives a tiny bit of lift, making the brownies tender. It’s not just a gimmick—it’s a genuinely smart baking ingredient.
Necessary Equipment
- 9×9-inch baking pan
- Two mixing bowls (one medium, one large)
- Whisk and spatula
- Measuring cups and spoons
- Wire cooling rack
Storing Your Fudgy Dr. Pepper Brownies
Once completely cooled, you can store these brownies right in the pan, covered tightly with foil or plastic wrap. They will stay wonderfully moist and fudgy at room temperature for up to 3 days. Just make sure your covering is airtight to keep them from drying out.
For longer storage, you can freeze them. Place the sliced brownies in a single layer on a parchment-lined baking sheet and freeze until solid. Then, transfer them to a freezer bag or airtight container. They’ll keep for up to 3 months. This is perfect for having a sweet treat ready anytime!
To enjoy a frozen brownie, just let it thaw on the counter for an hour. You can also pop it in the microwave for about 15 seconds for a warm, gooey, fresh-from-the-oven experience. The texture holds up beautifully to freezing.
My Best Tips and Advice
- Use room temperature eggs. They incorporate much better than cold ones.
- Let your Dr. Pepper go a little flat. Pour it into a cup and give it a stir before measuring to reduce excessive bubbles.
- For super clean cuts, use a plastic knife or run your sharp knife under hot water before slicing.
- Don’t overmix the batter once you add the flour. Mix until just combined to keep the texture tender.
Fun Presentation Tips
- Dust with powdered sugar just before serving for a pretty, snowy effect.
- Serve warm with a scoop of vanilla ice cream for the ultimate brownie sundae.
- Drizzle with a simple caramel or chocolate sauce and a sprinkle of sea salt.
- For a party, cut them into tiny, bite-sized squares and serve on a tiered stand.
Healthier & Fun Recipe Variations
Want to switch it up? Here are six delicious twists on the classic Fudgy Dr. Pepper Brownies recipe:
- Gluten-Free Fudgy Dr. Pepper Brownies: Swap the all-purpose flour for a 1-to-1 gluten-free baking blend. Make sure your cocoa powder is also certified gluten-free.
- Vegan Dr. Pepper Brownies: Use vegan butter, flax eggs (1 tbsp ground flax + 2.5 tbsp water per egg), and ensure your chocolate chips are dairy-free. The soda is already vegan!
- Spicy Mexican Chocolate Brownies: Add ½ teaspoon of cinnamon and a pinch of cayenne pepper to the dry ingredients for a warm, surprising kick.
- Salted Caramel Swirl Dr. Pepper Brownies: After pouring the batter into the pan, dollop with ½ cup of store-bought or homemade caramel sauce. Use a knife to swirl it gently into the top layer before baking.
- Peanut Butter Cup Dr. Pepper Brownies: Fold in 1 cup of chopped peanut butter cups instead of regular chocolate chips for a candy bar treat.
- Mint Chocolate Dr. Pepper Brownies: Use mint chocolate chips or fold in ½ teaspoon of peppermint extract with the vanilla for a refreshing twist.
If you love trying new spins on classics, you’ll find more inspiration in our full collection of dessert bar and brownie recipes.
Common Mistakes to Avoid
Mistake 1: Using Cold Ingredients
Adding cold eggs or cold Dr. Pepper to your melted butter can cause the butter to seize up into little lumps. This makes your batter grainy and can affect how everything mixes together. Your brownies might bake up unevenly. To avoid this, simply take your eggs and soda out of the fridge about 30 minutes before you start baking. If you forget, you can place the eggs in a bowl of warm water for 5-10 minutes.
Mistake 2: Overmixing the Batter
Once you add the flour, it’s time to be gentle. Overmixing develops the gluten in the flour. This can make your brownies tough, cakey, and chewy instead of tender and fudgy. You want to mix the dry ingredients in just until you no longer see any white streaks. A few small lumps in the batter are totally fine! They will bake out perfectly.
Mistake 3: Overbaking the Brownies
This is the number one reason for dry, crumbly brownies. Oven temperatures can vary, so trust the toothpick test more than the timer. Start checking at 28 minutes. You want a few sticky, moist crumbs on the toothpick, not a clean one. Remember, the brownies will continue to cook a bit from the heat in the pan as they cool. Pro tip: It’s better to slightly underbake than overbake for that perfect fudgy center.
Mistake 4: Cutting While Warm
The smell is amazing, and the temptation is real. But if you slice into your pan of Dr. Pepper brownies while they’re still warm, you’ll have a gooey mess. The structure hasn’t set yet. Wait until they are completely cool to the touch on the cooling rack. This gives the fat and sugars time to firm up, giving you those beautiful, clean-edged squares you see in bakeries.
Frequently Asked Questions
Can I use diet or zero-sugar Dr. Pepper?
I don’t recommend it. The sugar in regular Dr. Pepper is important for the texture, moisture, and browning of the brownies. Using a diet soda, which contains artificial sweeteners, can change the chemical reaction during baking. Your brownies might turn out with a different texture, be less moist, or have an odd aftertaste. Stick with the regular version for the best, fudgy results.
What if I don’t have a 9×9 inch pan?
You can use an 8×8 inch pan or a 9×13 inch pan, but you need to adjust the baking time. An 8×8 inch pan will make thicker brownies. You’ll need to bake them for 5-10 minutes longer. Start checking at 35 minutes. A 9×13 inch pan will make thinner brownies. Check them much earlier, around 20-22 minutes. They bake faster because the batter is spread more thinly.
Can I make these brownies ahead of time?
Absolutely! These brownies are actually better the next day. The flavors have more time to meld together, making them even richer. Bake them, let them cool completely, and then store them tightly covered at room temperature for 1-2 days before serving. You can also freeze them for up to 3 months. They are a perfect make-ahead dessert for parties or busy weeks.
Why is my batter so thick?
Don’t worry, a thick batter is exactly what you want for fudgy brownies! It means you have the right ratio of flour and fat. A thin, runny batter would lead to cakey brownies. The thick, almost scoopable batter you have will bake up into dense, chocolatey squares. Just make sure you’ve spread it evenly into the corners of your pan before baking.
Can I add nuts or other mix-ins?
Yes, feel free to get creative! You can replace half of the chocolate chips with 1/2 cup of chopped walnuts, pecans, or even peanuts. Other great add-ins include: white chocolate chips, butterscotch chips, or toffee bits. Just keep the total volume of add-ins to about 1 to 1 1/4 cups so the batter can still hold everything together.
How do I get a shiny, crackly top on my brownies?
That signature shiny top comes from properly dissolving the sugar into the fat and eggs. When you mix the melted butter and sugars, whisk them together very well until they look smooth and glossy. Then, when you add the eggs, whisk vigorously for a full minute. This dissolves the sugar crystals and incorporates air, which helps create that beautiful, paper-thin crust on top as they bake.
My brownies sunk in the middle. What happened?
A sunken middle usually means they were underbaked in the center, or there was too much leavening. Make sure your baking powder is fresh and you measured it correctly (1 teaspoon, not 1 tablespoon). Also, ensure your oven is fully preheated and you’re using the correct pan size. An oven thermometer can help verify the actual temperature inside your oven is accurate.
Can I double this recipe?
You sure can! Simply double all the ingredients. You will need to bake it in a 9×13 inch pan. The baking time will be longer, likely between 35-45 minutes. Again, use the toothpick test starting at 35 minutes. The center should be set, and a toothpick should come out with a few moist crumbs attached.
What does the Dr. Pepper actually do?
The Dr. Pepper does three great things. First, its carbonation provides a tiny bit of lift, making the texture tender. Second, its sugar adds sweetness and helps with browning. Third, and most importantly, its complex blend of 23 flavors (like vanilla, cherry, and spice) adds a subtle depth to the chocolate that you can’t quite place but makes the brownies taste extra special.
Are these brownies more cakey or fudgy?
This recipe is specifically designed to be fudgy. We use more fat (butter and eggs) than flour, and we don’t overmix. The addition of the brown sugar and Dr. Pepper also adds extra moisture, which leans toward a dense, moist, fudgy crumb. If you prefer a cakey texture, you would need a different recipe with more flour and a different mixing method.
Ready to Bake Up Some Joy?
So there you have it—my ultimate recipe for Fudgy Dr. Pepper Brownies. It’s a simple, fun, and incredibly delicious dessert that never fails to impress. Whether you’re a baking newbie or a seasoned pro, these brownies are a guaranteed hit. The secret ingredient adds a touch of whimsy and a whole lot of flavor. So preheat that oven, grab a can of soda, and get ready for the richest, fudgiest brownies of your life. Happy baking!
Equipment
- Grand bol
- Fouet
- Spatule
- Plaque à pâtisserie
- Papier sulfurisé
Ingredients
- 1 tasse farine tout usage
- 3/4 tasse cacao en poudre non sucré utiliser de bonne qualité !
- 1 cuillère à café poudre à lever
- 1/2 cuillère à café sel
- 3/4 tasse beurre non salé, fondu
- 1 tasse sucre granulé
- 3/4 tasse sucre brun, tassé
- 1 cuillère à café extrait de vanille pur
- 3/4 tasse soda Dr. Pepper plat ou légèrement plat est mieux
- 1 tasse pépites de chocolat semi-sucrées
Instructions
- Préchauffez votre four à 175°C et graissez un moule à pâtisserie de 23x23 cm.
- Dans un bol moyen, fouettez ensemble la farine, le cacao en poudre, la poudre à lever et le sel.
- Dans un grand bol, mélangez le beurre fondu, le sucre granulé et le sucre brun jusqu'à obtenir un mélange lisse et brillant.
- Ajoutez les œufs et l'extrait de vanille au mélange de sucre et battez jusqu'à ce qu'il soit légèrement plus clair et épaissi.
- Ajoutez progressivement un tiers du mélange de farine aux ingrédients humides, puis versez la moitié du Dr. Pepper et mélangez délicatement.
- Répétez le processus avec le reste du mélange de farine, le reste de Dr. Pepper et mélangez jusqu'à ce qu'il n'y ait plus de traces de farine.
- Incorporez les pépites de chocolat et versez la pâte dans le moule préparé en l'étalant uniformément.
- Faites cuire pendant 28 à 30 minutes jusqu'à ce que le dessus soit pris ; un cure-dent doit en ressortir avec quelques miettes humides.
- Laissez les brownies refroidir complètement sur une grille avant de les couper en carrés.
Notes
Nutrition

Hi, I’m Olivia Parker, the founder of BakingSecret.com and a lifelong lover of all things sweet and homemade. I grew up in a small town in Oregon, where the smell of fresh cookies in my family’s kitchen sparked my passion for baking. Over the years, I turned that passion into a mission: to help home bakers feel confident, inspired, and creative.
After studying food science and working in several artisan bakeries across the U.S., I decided to create a space where everyone from beginners to seasoned bakers can find reliable recipes, expert tips, and a warm, welcoming community. BakingSecret.com is my way of sharing the magic of baking with the world. When I’m not testing new recipes, you’ll find me exploring farmers’ markets, collecting vintage cookbooks, or perfecting my sourdough technique.