
A Slice of Sunshine: The Only Lemon Cake Recipe You’ll Ever Need
If there’s a scent that can immediately lift my spirits, it’s the sweet, sharp aroma of fresh lemon zest. I remember the first time I baked this cake. It was for my friend’s baby shower, and I was so nervous! Would it be moist enough? Zesty enough? The moment I saw the empty plate at the end of the day, dotted with just a few crumbs, I knew I had a winner. This isn’t just a lemon cake; it’s a Lemon Cake Bliss experience. It’s perfectly balanced—sweet, tangy, moist, and topped with a glaze that makes your taste buds sing. Let me share this little jar of sunshine with you.
Where Did This Sweet Citrus Dream Come From?
While simple loaf cakes have roots in Europe, the American-style layer or bundt lemon cake is a classic of home baking. It’s the kind of recipe passed down on stained index cards. My version is inspired by my grandma’s “Thursday cake”—she’d bake something sweet every week to enjoy with afternoon tea. The modern twist here is the double hit of lemon. We use both zest and fresh juice in the batter, and then again in the glaze. This creates a flavor that’s bright and present, not subtle. It’s a traditional concept made bolder and better, perfect for today’s love of vibrant flavors.
Why You’ll Fall in Love With This Lemon Cake Bliss
Honestly, this recipe is a keeper for so many reasons. First, the flavor is pure joy. It’s like biting into a sunny day. Second, it’s incredibly forgiving and straightforward. You don’t need any fancy tools or ingredients. The process of creaming the butter and sugar, watching the batter turn a pale yellow, and smelling that citrus aroma fill your kitchen is pure therapy. Finally, it’s versatile. Dress it up for a party or keep it simple for a Tuesday treat. It’s a crowd-pleaser every single time.
Your Go-To Cake for Every Happy Occasion
This citrus dessert is your secret weapon. It’s perfect for spring brunches, summer picnics (it travels well!), and potluck dinners. I’ve served it for Mother’s Day, as a “Welcome to the Neighborhood” gift, and even as a happy Monday surprise for my coworkers. It brings a bit of elegance to afternoon tea and a comforting sweetness to a casual coffee chat. Any event that calls for a smile is the right occasion for this moist and fluffy masterpiece.
Gathering Your Sunshine Ingredients
Here’s your shopping list for this sweet and tangy delight. Using fresh, good-quality ingredients makes all the difference!
For the Cake:
- 1.5 cups all-purpose flour
- 1.5 teaspoons baking powder
- 1/2 teaspoon salt
- 1 cup granulated sugar
- 1/2 cup unsalted butter, softened
- 2 large eggs
- 1 tablespoon lemon zest
- 1/4 cup fresh lemon juice
- 1/2 cup whole milk
- 1 teaspoon vanilla extract
For the Glaze:
- 1 cup powdered sugar
- 2 tablespoons fresh lemon juice
- 1 teaspoon lemon zest
No Problem! Handy Substitution Options
Out of something? Don’t worry! Here are some easy swaps:
- Butter: An equal amount of vegetable oil works, though the texture will be denser and more moist.
- Milk: Any milk you have—2%, skim, or even a plain, unsweetened almond or oat milk—will do the job.
- Fresh Lemons: In a pinch, you can use bottled lemon juice. The flavor won’t be as bright, and you’ll miss the zest, but it will work. For the zest, 1/2 teaspoon of lemon extract can be used, but add it carefully as it’s strong!
- Pan: This works in a 9-inch square pan, a loaf pan (bake time may be longer), or even as lovely lemon cupcakes.
Let’s Bake! Your Step-by-Step Guide to Lemon Cake Bliss
Ready to create some magic? Follow these simple steps. I’ll walk you through it like we’re baking together in my kitchen.
Step 1: Prep Your Kitchen
First, preheat your oven to 350°F (175°C). This gives it time to reach the perfect, steady temperature. Take your 9-inch round cake pan and grease it well with butter or baking spray. I like to add a parchment paper circle to the bottom for absolute insurance—no sticking allowed! The smell of warm butter in the pan already starts to feel like home.
Step 2: Mix the Dry Team
Grab a medium bowl. Whisk together your flour, baking powder, and salt. This isn’t just mixing; it’s ensuring your leavening is evenly distributed. You’ll see little puffs of flour as you whisk. This simple step is the key to that beautiful, even rise we want. Set this “dry team” aside for their grand entrance later.
Step 3: Cream the Butter and Sugar
In a larger bowl, beat your softened butter and granulated sugar together. Use a hand mixer or stand mixer for this. Beat it for a good 3-4 minutes until it becomes pale, fluffy, and almost creamy. This incorporates air, which is crucial for a light texture. Pro tip: Your butter is ready if you can press a finger into it and leave a clean dent.
Step 4: Add Eggs and Citrus Zest
Add your eggs one at a time, beating well after each addition. This helps them emulsify into the batter smoothly. Now, stir in that glorious lemon zest and the vanilla extract. The batter will suddenly smell incredible. The little flecks of yellow zest promise the flavor to come.
Step 5: Combine Wet and Dry
Now, we alternate. Add about one-third of your flour mixture to the butter bowl and mix on low until just combined. Then, pour in half of the milk. Repeat, ending with the last third of the flour. Mix until you no longer see dry streaks, but don’t overdo it! A few lumps are fine. Overmixing is the enemy of a tender crumb.
Step 6: Bake to Golden Perfection
Pour the beautiful, thick batter into your prepared pan. Smooth the top with a spatula. Place it in the center of your preheated oven. Bake for 35-40 minutes. You’ll know it’s done when the top is a gentle golden brown and a toothpick poked into the center comes out clean or with just a few moist crumbs.
Chef’s tip: For extra insurance, you can use an instant-read thermometer. The cake is done when the internal temperature reaches about 210°F.
Step 7: Cool and Create the Glaze
Let the cake cool in the pan for about 15 minutes. Then, run a knife around the edge and invert it onto a wire rack to cool completely. This is the hard part—waiting! While it cools, make the glaze. Simply whisk the powdered sugar, fresh lemon juice, and zest in a small bowl until it’s smooth and pourable.
Step 8: The Grand Finale: Glaze and Serve
Once the cake is completely cool, drizzle that glossy glaze all over the top. I like to let it drip artfully down the sides. The zest in the glaze adds little pops of color and flavor. Slice, serve, and get ready for the compliments to roll in. You did it!
Your Baking Timeline
Here’s a quick look at how your time will be spent:
- Prep Time: 20 minutes
- Cook Time: 40 minutes
- Cooling Time: 1 hour (the most important step!)
- Total Time: 2 hours
The One Secret for Ultimate Lemon Cake Bliss
My absolute non-negotiable secret? Use fresh lemons. Bottled juice simply can’t compare. The zest, especially, holds magical citrus oils that give the cake its true, vibrant flavor. Roll your lemons on the counter before juicing to get more juice. And always zest your lemons before you juice them—it’s much easier!
A Zesty Little Fact
Did you know the acid in lemon juice reacts with baking powder to give your cake an extra lift? It’s true! This reaction helps create those lovely air pockets that make the cake light and tender. So that cup of fresh lemon juice isn’t just for flavor—it’s a silent partner in creating the perfect texture. For more on how different cooking methods affect food, you can read about grilling and its impact on flavor and texture.
Tools You’ll Need for Easy Baking
- 9-inch round cake pan
- Mixing bowls (2 medium, 1 large)
- Whisk
- Hand mixer or stand mixer
- Fine grater or zester
- Juicer or fork for lemons
- Spatula
- Wire cooling rack
- Toothpick or cake tester
Keeping Your Cake Fresh and Fabulous
To store any leftover cake (if there is any!), cover it tightly. You can use a cake dome, an overturned bowl, or plastic wrap. The glaze will form a lovely crust but keep the cake moist underneath.
This cake is best enjoyed at room temperature within 3 days. The flavors really shine when it’s not cold. If you need to store it longer, you can refrigerate it for up to 5 days.
For longer storage, you can freeze the unglazed cake. Wrap the completely cooled cake tightly in plastic wrap, then in foil. Freeze for up to 3 months. Thaw overnight at room temperature, then whip up the fresh glaze right before serving.
My Best Tips for Lemon Cake Success
- Room Temperature is Key: Make sure your butter, eggs, and milk are at room temperature. They blend together much more smoothly, creating a better batter.
- Don’t Overmix: Once you add the flour, mix just until you no longer see dry patches. Overmixing develops gluten and makes the cake tough.
- Cool Completely: I know it’s tempting, but glazing a warm cake is a disaster! The glaze will just melt and absorb. Be patient for a perfect finish.
- Zest Wisely: Only zest the bright yellow part of the lemon. The white pith underneath is bitter.
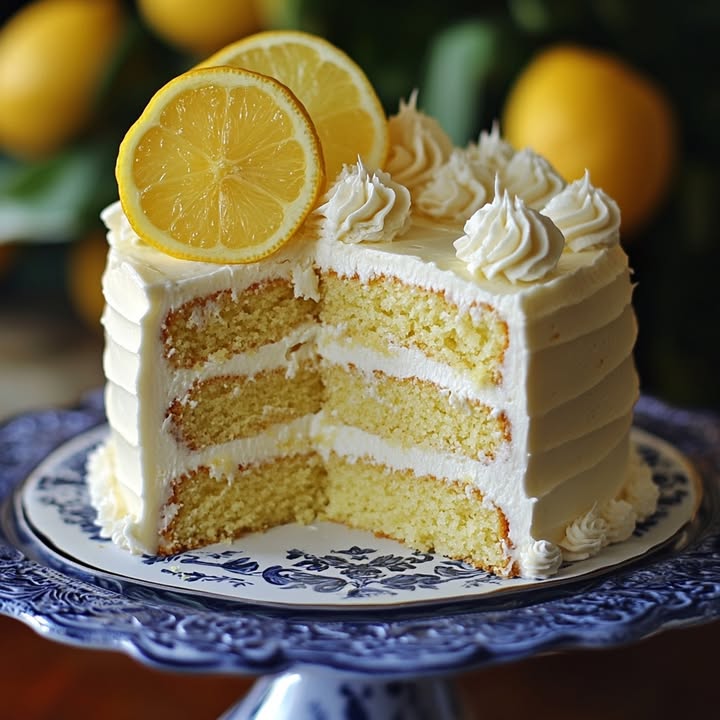
Presentation That Will Wow Your Guests
- Top the glazed cake with thin lemon slices, edible flowers, or a sprinkle of extra zest.
- Serve with a dollop of lightly sweetened whipped cream or a scoop of vanilla bean ice cream.
- For a party, add fresh berries like raspberries or blueberries on the side for a beautiful color contrast.
- Dust the serving plate with a little powdered sugar for a professional, finished look.
Love This Recipe? Try These Healthier Twists!
Want to lighten things up or try something new? Here are six delicious variations on our Lemon Cake Bliss theme.
- Greek Yogurt Lemon Cake: Swap half the butter for an equal amount of full-fat Greek yogurt. This adds protein and creates an incredibly moist, tender crumb.
- Whole Wheat Lemon Cake: Replace half the all-purpose flour with whole wheat pastry flour. It adds a nutty depth and extra fiber without sacrificing texture.
- Olive Oil Lemon Cake: Use a light, fruity olive oil instead of butter. This creates a uniquely moist cake with a sophisticated flavor profile. It’s dairy-free, too!
- Gluten-Free Lemon Cake Bliss: Use a reputable 1:1 gluten-free all-purpose flour blend. Be sure your baking powder is gluten-free as well.
- Reduced Sugar Version: You can reduce the granulated sugar in the cake by 1/4 cup. The glaze can be made with a sugar substitute designed for baking or just omitted for a less sweet treat.
- Lemon Blueberry Cake: Gently fold 1 cup of fresh or frozen blueberries (tossed in a tablespoon of flour) into the batter before baking. The burst of berry flavor is divine. This is a perfect recipe for summer gatherings.
These are just a few ways to play with this classic. Remember, the best recipes inspire creativity, and you can always find more amazing cakes and cupcake recipes for any occasion.
Common Mistakes to Avoid
Avoid these simple pitfalls to ensure your cake is perfect every single time.
Mistake 1: Using Cold Ingredients
This is the most common error. Cold butter doesn’t cream properly with sugar. Cold eggs and milk can cause the batter to separate or look curdled. This leads to a dense, heavy cake. Always plan ahead. Take your ingredients out of the fridge at least an hour before you start baking. Your batter will be smooth, creamy, and ready to rise beautifully.
Mistake 2: Overmixing the Batter
Once you add the flour, a switch should flip in your brain. Go from “mixer on high” to “mixer on low and careful.” Overmixing after adding flour develops the gluten in the flour. This makes the cake tough and chewy, not soft and tender. Mix on the lowest speed, and stop as soon as the last streaks of flour disappear. A few small lumps are perfectly fine.
Mistake 3: Glazing a Warm Cake
Your patience will be rewarded here. If you pour that lovely, thick glaze onto a warm cake, it will immediately thin out, soak into the top, and become a sticky, transparent mess. You lose the beautiful white finish and the texture contrast. Let the cake cool completely on a wire rack. This can take a full hour. Use the time to clean up and make the glaze fresh right before drizzling.
Mistake 4: Not Measuring Flour Correctly
Scooping your measuring cup directly into the flour bag packs in way too much flour. This is a sure way to get a dry, crumbly cake. The right way is to spoon the flour lightly into your measuring cup until it’s heaping. Then, level it off with the flat edge of a knife. For the most accuracy, use a kitchen scale. 1.5 cups of all-purpose flour weighs about 188 grams.
Mistake 5: Only Using Lemon Juice
Do not skip the zest! The zest contains the fragrant, potent citrus oils that carry the true essence of lemon. The juice provides the tangy punch, but the zest provides the perfume and the deep, rounded lemon flavor that makes this a Lemon Cake to Die For. If you want an even more intense experience, try our Ultimate Lemon Pound Cake Bliss recipe, where the zest really takes center stage.
Your Lemon Cake Questions, Answered
Can I make this cake ahead of time?
Absolutely! This cake is actually a great make-ahead dessert. You can bake it the day before, let it cool completely, and wrap it tightly (unglazed) in plastic wrap. Store it at room temperature. Prepare the glaze fresh the day you plan to serve it. This makes party planning so much easier. The flavors also have time to meld and develop overnight, so the lemon taste becomes even more pronounced and delicious.
Why is my cake dense and not fluffy?
A dense cake usually comes from a few key errors. The biggest culprit is overmixing the batter after adding the flour. Remember, mix just until combined. Using cold ingredients can also prevent proper air incorporation during creaming. Check your baking powder to make sure it’s not expired. Old leavening agents lose their power. Finally, make sure your oven temperature is accurate. An oven that runs too cool won’t give the cake the initial “oven spring” it needs to rise properly.
Can I use a bundt pan instead?
Yes, you can! This recipe adapts beautifully to a bundt pan, which gives it a stunning, classic shape. Make sure to grease and flour your bundt pan very, very well, getting into all the nooks. The baking time will likely be a bit longer, around 45-50 minutes. Always use the toothpick test to check for doneness. Let it cool in the pan for 20 minutes before inverting it onto a rack. For a gorgeous bundt presentation, try a simple lemon bundt cake glaze that pours beautifully over the curves.
How do I get more lemon flavor?
If you’re a true lemon lover, you have options! First, use the zest of 2 lemons instead of just one. You can also increase the lemon juice in the cake by another tablespoon. For the glaze, add an extra half teaspoon of zest. Another trick is to make a simple lemon syrup. While the cake is still warm, poke holes in the top with a skewer. Brush on a mixture of 2 tablespoons lemon juice and 2 tablespoons sugar that’s been warmed until the sugar dissolves. This soaks in and adds an incredible burst of moisture and flavor.
Can I make this recipe into cupcakes?
You sure can! This batter is perfect for cupcakes. Line a muffin tin with paper liners. Fill each liner about 2/3 full. The baking time will be much shorter, usually around 18-22 minutes. Keep a close eye on them. They are done when the tops spring back lightly when touched. Let them cool completely before glazing. You’ll get about 12-14 delightful little treats. Cupcakes are perfect for portion control and parties, offering an individual Lemon Cake Bliss experience for everyone.
My glaze is too thick/too thin. How do I fix it?
Glaze consistency is easy to adjust. If it’s too thick and won’t drizzle, add more lemon juice, just a few drops at a time, until it reaches a pourable consistency. If it’s too thin and just runs right off the cake, you have two choices. You can add more powdered sugar, a tablespoon at a time, until it thickens. Or, you can simply let it sit for 5-10 minutes. As the sugar absorbs the liquid, it will naturally thicken up a bit. The perfect glaze should coat the back of a spoon but still drip off slowly.
Can I add poppy seeds or berries?
Absolutely! Adding mix-ins is a fantastic way to customize. For poppy seed lemon cake, stir in 2-3 tablespoons of poppy seeds with the dry ingredients. For berries, toss 1 cup of fresh or frozen blueberries or raspberries in a tablespoon of flour first. This helps prevent them from sinking to the bottom. Gently fold them into the batter at the very end. The combination of sweet berries and tangy lemon is heavenly. You might also love our special Lemon Berry Bliss Cake which is designed for this perfect pairing.
Is there a dairy-free version?
Yes, you can make a delicious dairy-free lemon cake. Substitute the butter with an equal amount of dairy-free margarine or a neutral-flavored oil like vegetable or avocado oil. Replace the whole milk with your favorite unsweetened, plain non-dairy milk such as almond, soy, or oat milk. Just be sure your other ingredients, like your baking powder, are dairy-free. The result will still be moist and flavorful.
Can I double this recipe?
Doubling is a great idea if you need a larger cake or want to make a layer cake. Simply double all the ingredients exactly. You can bake it in two 9-inch round pans. Be sure to grease and line both pans. The baking time might be slightly less for two thinner layers, so start checking at around 25-30 minutes. Let the layers cool completely before stacking and glazing. A two-layer lemon cake makes a spectacular celebration dessert.
Why did my cake sink in the middle?
A sunken cake is often a sign of underbaking or too much leavening. If the cake isn’t fully set in the center when you take it out, the structure collapses as it cools. Always use the toothpick test. Another cause could be opening the oven door too early or too often during baking. The rush of cold air can cause a rising cake to fall. Try not to open the door until at least the 30-minute mark. Also, double-check your measurements for baking powder to ensure you didn’t add too much.
The Simple Joy of a Perfect Slice
And there you have it—everything you need to create pure Lemon Cake Bliss in your own kitchen. This recipe is more than just a list of ingredients and steps. It’s an invitation to slow down, to enjoy the process of creating something beautiful and delicious from scratch. The reward is in that first bite: the tender crumb, the bright, sunny flavor, and the sweet satisfaction of sharing something made with love. So, preheat that oven, zest those lemons, and bake a little happiness today. You deserve it!
Equipment
- Mélangeur
- Fouet
- Spatule
- Moule rond de 9 pouces
- Papier sulfurisé
Ingredients
- 1.5 tasses farine tout usage
- 1.5 cuillères à café poudre à lever
- 0.5 cuillères à café sel
- 1 tasse sucre granulé
- 0.5 tasses beurre non salé, ramolli
- 2 œufs
- 1 cuillère à soupe zeste de citron
- 0.25 tasses jus de citron frais
- 0.5 tasses lait entier
- 1 cuillère à café extrait de vanille
- 1 tasse sucre glace (pour le glaçage)
- 2 cuillères à soupe jus de citron frais (pour le glaçage)
- 1 cuillère à café zeste de citron (pour le glaçage)
Instructions
- Préchauffez votre four à 175°C et graissez un moule à gâteau rond de 9 pouces.
- Dans un bol moyen, mélangez la farine, la poudre à lever et le sel.
- Dans un grand bol, battez le beurre ramolli et le sucre jusqu'à ce que le mélange soit pâle et léger (environ 3-4 minutes).
- Ajoutez les œufs un à un en battant bien après chaque ajout, puis incorporez le zeste de citron et l'extrait de vanille.
- Ajoutez alternativement le mélange de farine et le lait au mélange de beurre, en mélangeant jusqu'à ce que le tout soit juste combiné.
- Versez la pâte dans le moule préparé et lissez le dessus.
- Faites cuire au four pendant 35-40 minutes ou jusqu'à ce qu'il soit doré et qu'un cure-dent inséré en ressorte propre.
- Laissez le gâteau refroidir dans le moule pendant 15 minutes, puis inversez-le sur une grille pour qu'il refroidisse complètement.
- Pour le glaçage, mélangez le sucre glace, le jus de citron et le zeste jusqu'à obtenir une consistance lisse et versable.
- Une fois le gâteau refroidi, arrosez le glaçage sur le dessus et servez.
Notes
Nutrition

Hi, I’m Olivia Parker, the founder of BakingSecret.com and a lifelong lover of all things sweet and homemade. I grew up in a small town in Oregon, where the smell of fresh cookies in my family’s kitchen sparked my passion for baking. Over the years, I turned that passion into a mission: to help home bakers feel confident, inspired, and creative.
After studying food science and working in several artisan bakeries across the U.S., I decided to create a space where everyone from beginners to seasoned bakers can find reliable recipes, expert tips, and a warm, welcoming community. BakingSecret.com is my way of sharing the magic of baking with the world. When I’m not testing new recipes, you’ll find me exploring farmers’ markets, collecting vintage cookbooks, or perfecting my sourdough technique.