
There’s a special kind of alchemy in baking. It’s the moment flour, buttermilk, and a humble spoonful of baking soda come together in a bowl and transform, promising warmth and comfort. For me, that magic happens every time I make my Irresistible Irish Soda Bread. No fancy yeast, no long waits—just a simple, rustic loaf that fills the kitchen with a toasty, incredible smell. It’s the kind of bread that makes you feel like a pro baker, even if it’s your very first time.
The Quick-Baking History of Irish Soda Bread
This bread is a beautiful piece of history. Born in rural Ireland in the 1800s, this traditional recipe was a clever solution. Bakers there didn’t always have access to yeast. They used simple, local ingredients: soft wheat flour, baking soda (or “bread soda”), soured milk (buttermilk), and salt. The reaction between the soda and the acidic buttermilk creates the rise. That’s the whole secret! It was baked in a bastible pot over an open fire. My modern version is a little more pantry-friendly, but that honest, hearty spirit is baked right in. It’s a classic comfort food that has traveled through time to land on our tables today.
Why You’ll Love This Easy Irish Bread Recipe
Honestly, what’s not to love? This recipe is the definition of easy baking. It’s a quick bread, so there’s no kneading for ages and no waiting for yeast to bubble. You mix it in one bowl, shape it, score it, and bake it. In under an hour, you have a golden-brown, crusty loaf that’s tender and slightly crumbly inside. The taste is wonderfully simple—a perfect partner for a slab of good butter or a bowl of soup. It’s forgiving, it’s fast, and it always makes you look like a kitchen hero.
Perfect Occasions for Your Homemade Bread
This bread is a crowd-pleaser for any event. Of course, it’s a star on St. Patrick’s Day, bringing a real taste of Ireland to your feast. But don’t save it just for March! It’s perfect for a cozy Sunday supper, a hearty addition to a soup or stew night, or as a welcoming gift for a new neighbor. I love bringing it to potlucks—it’s always the first thing to disappear. It turns an ordinary weeknight dinner into something special with minimal effort.
Gathering Your Ingredients for Homemade Bread
Let’s check the pantry! The beauty of this homemade bread is its short, simple ingredient list.
- 4 cups all-purpose flour
- 1 teaspoon baking soda
- 1 teaspoon salt
- 2 tablespoons granulated sugar (optional, but I love the hint of sweetness)
- 1 ¾ cups buttermilk
- 2 tablespoons unsalted butter, melted
- ¾ cup raisins or currants (optional, but highly recommended)
No Buttermilk? No Problem! Easy Substitutions
Don’t let a missing ingredient stop you. This recipe is very flexible!
- Buttermilk Substitute: Add 1 tablespoon of lemon juice or white vinegar to a measuring cup. Fill it with regular milk to reach the 1 ¾ cup line. Stir and let it sit for 5-10 minutes until it thickens slightly.
- Flour: You can use a mix of all-purpose and whole wheat flour. Try 3 cups all-purpose and 1 cup whole wheat for a nuttier flavor.
- Add-ins: Swap raisins for dried cranberries, chopped apricots, or even a handful of caraway seeds for a more traditional touch.
Step-By-Step Guide to Irresistible Irish Soda Bread
Step 1: Preheat and Prepare
First, get your oven nice and hot. Crank it to 400°F (200°C). This high heat is key for a great initial rise and that beautiful, crusty top. While it heats, line a baking sheet with a piece of parchment paper. No need to grease it. This little sheet of paper is your best friend for easy cleanup and preventing any sticking. I like to get all my ingredients measured and ready at this point too. It makes the whole process feel smooth and relaxed.
Step 2: Whisk the Dry Goods
Grab a large, roomy mixing bowl. Pour in your flour, baking soda, salt, and that optional sugar. Now, take a whisk and give it a really good, aerating stir. You’re not just mixing; you’re making sure the baking soda and salt are perfectly distributed throughout the flour. See those little bumps? That’s the baking soda getting friendly with every particle. This ensures your loaf rises evenly and tastes consistent in every single bite. Pro tip: If your flour seems packed down, fluff it with a fork before measuring.
Step 3: Create a Well and Pour
Use your spoon to push the flour mixture towards the sides of the bowl, creating a wide hole or “well” in the center. This is where the magic starts! Pour the cool buttermilk and the melted, golden butter right into that well. The butter will swirl into the buttermilk, creating little pools of deliciousness. The smell is already fantastic—tangy, rich, and promising.
Step 4: Stir and Fold
Time to bring it together. Start stirring from the center, gradually pulling in the flour from the sides. A shaggy, rough dough will form. It shouldn’t be smooth like pizza dough. It will look a bit lumpy and sticky, and that’s perfect! If you’re using raisins or currants, now is the time to sprinkle them over the dough and gently fold them in with your spoon. Don’t overmix—just until the fruit is roughly distributed and no big pockets of dry flour remain.
Step 5: Knead Gently and Shape
Lightly dust your countertop with a tablespoon of flour. Turn the dough out onto it. This is where bakers can get nervous, but don’t be! With floured hands, gently fold the dough over itself just 8-10 times. You’re not developing gluten like with yeast bread. You’re simply forming it into a cohesive ball. Press it into a round loaf, about 7 inches across. Place it proudly on your prepared baking sheet.
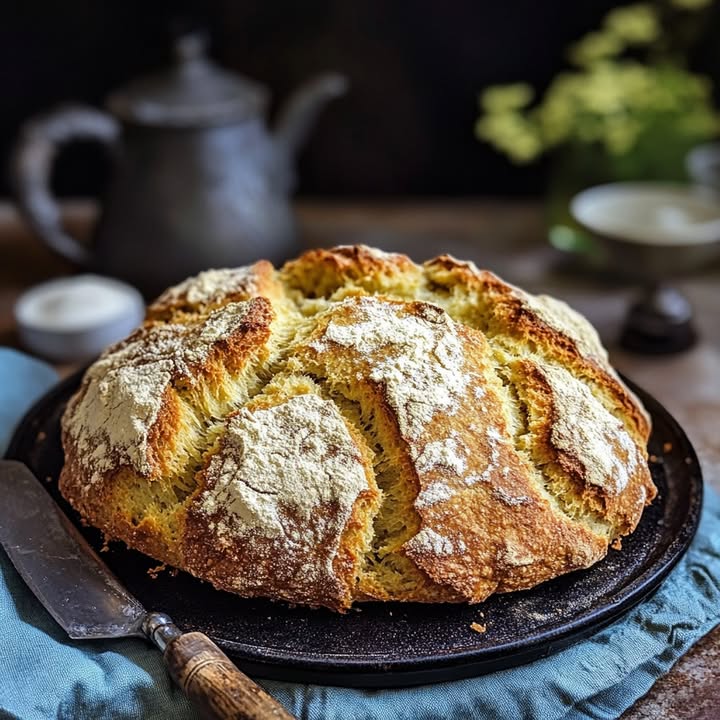
Step 6: Score the Dough and Bake
Take a sharp knife or a bench scraper. Cut a deep “X” across the entire top of the loaf, going almost an inch deep. This isn’t just for looks. It lets heat penetrate the thickest part of the dough, helping it bake evenly and giving the bread room to expand into that classic four-leaf-clover shape. Now, slide it into the hot oven. Get ready for the best kitchen smell in the world.
Step 7: Cool and Serve Warm
Bake for 35-40 minutes. You’ll know it’s done when it’s a deep, golden brown and the bottom sounds hollow when you give it a firm tap. Transfer the loaf to a wire rack and let it cool for at least 20 minutes. I know it’s hard to wait! This rest lets the interior finish setting up. Then, slice it thickly. Serve it warm, slathered with creamy, melting butter. That first bite is pure, simple joy.
Timing Your Easy Baking Session
One of the best things about this quick bread is how little time it demands from you.
- Prep Time: 10 minutes
- Cook Time: 40 minutes
- Cooling Time: 20 minutes
- Total Time: 1 hour 10 minutes
My Chef’s Secret for the Best Texture
Here’s my little trick for an extra-tender crumb: handle the dough with a light touch and use cold buttermilk. Why? The cold liquid keeps the butter in the mixture from melting before it hits the oven. This helps create a more delicate texture. Also, when you score the “X,” don’t be shy. Make it deep and confident. A shallow cut won’t allow the bread to open up beautifully as it bakes.
A Little Extra Info: The “X” Marks the Spot
That cross on top isn’t just practical. In Irish folklore, it was said to let the fairies out or to ward off evil. It also conveniently divides the loaf into four perfect “farls” or quarters for easy breaking. It’s a beautiful example of how tradition and function combine in the simplest of recipes.
Necessary Equipment for Easy Baking
You don’t need anything fancy! Here’s what you’ll use:
- Large mixing bowl
- Whisk and wooden spoon
- Measuring cups and spoons
- Baking sheet
- Parchment paper
- Wire cooling rack
- Sharp knife or bench scraper
Storing Your Hearty and Delicious Bread
This bread is best enjoyed on the day it’s made, while the crust is still crackly. But it’s still wonderful for days after! Let the loaf cool completely first. Any warmth trapped inside will create steam and make it soggy.
To store it, wrap the cooled loaf tightly in aluminum foil or place it in a paper bag (which helps keep the crust from getting soft) and then put it in a plastic bag. Keep it at room temperature for up to 3 days. The texture changes, becoming more dense and moist, which is lovely in its own way.
You can also freeze it for longer storage. Wrap the whole loaf or individual slices tightly in plastic wrap and then foil. It will keep well for up to 3 months. Thaw at room temperature and refresh in a warm oven for a few minutes to bring back that fresh-baked feel.
My Best Tips and Advice for Success
- Don’t over-knead: A minute is truly enough. Overworking makes the bread tough.
- Check for doneness: The hollow sound is your best indicator. An internal temperature of 190°F is perfect if you have a thermometer.
- Flour your hands: The dough is sticky. A little flour on your palms makes shaping a breeze.
- Use fresh baking soda: It’s the primary leavener. If it’s old, your bread won’t rise properly.
Presentation Tips for a Beautiful Loaf
Make your homemade bread the star of the table!
- Serve it whole on a wooden cutting board with a rustic butter knife stuck in the side.
- Place a small dish of high-quality salted butter next to it, maybe sprinkled with a few flakes of sea salt.
- For a party, pre-slice half the loaf and fan it out, leaving the other half whole for a dramatic look.
- Dust the top with a little extra flour before baking for a more artisanal, bakery-style finish.
Healthier & Fun Alternative Recipes
Love this base recipe? Try these tasty twists for a different take on classic comfort.
- Whole Wheat Soda Bread: Swap half the all-purpose flour for whole wheat flour. It adds a nutty flavor and extra fiber. You may need a splash more buttermilk as whole wheat flour absorbs more liquid.
- Savory Herb & Cheese: Omit the sugar and raisins. Fold in 1 cup of shredded sharp cheddar and 2 tablespoons of chopped fresh rosemary or chives before shaping. It’s incredible with soup.
- Gluten-Free Irish Soda Bread: Use a good-quality gluten-free all-purpose flour blend (like one with xanthan gum). The texture will be more crumbly but still delicious.
- Brown Soda Bread: A traditional Irish version using wholemeal flour. It’s denser, darker, and packed with wholesome flavor.
- Sweet Soda Bread Scones: Add an extra tablespoon of sugar and 1 extra tablespoon of butter. Pat the dough into a circle and cut it into 8 wedges before baking. Bake for 18-20 minutes for individual breakfast treats.
- Dairy-Free Soda Bread: Use a plant-based milk + vinegar buttermilk substitute and swap the melted butter for a neutral oil like avocado or light olive oil.
More Easy Baking Inspiration
If you loved the simplicity of this Irresistible Irish Soda Bread, you’ll adore exploring other simple bread and muffin recipes on the site. For a slightly different texture, try this Easy Irish Bread with Oats and Honey. Looking for a quicker, individual portion? These Soda Bread Muffins are a family favorite. If you want to lean into the sweet side, my Cinnamon Raisin Swirl Soda Bread is a treat. And for a truly traditional take, this Classic White Soda Bread sticks to the historic roots.
Common Mistakes to Avoid for Perfect Irish Soda Bread
Mistake 1: Over-Mixing and Over-Kneading the Dough
This is the biggest mistake! Unlike yeast bread, soda bread dough should be handled minimally. When you stir and knead it too much, you develop the gluten in the flour. This makes the bread tough, dense, and chewy, not tender and slightly crumbly. The dough should look rough and shaggy when you turn it out. A few gentle folds are all it needs to come together. If it feels sticky, just flour your hands, not the dough.
Mistake 2: Using Expired or Old Baking Soda
Baking soda is the only leavener in this quick bread. If it’s past its prime, it loses its potency. Your loaf will turn out flat, dense, and may have a faintly metallic or soapy taste. Always check the date on your box. A quick test: pour a little vinegar over a spoonful of baking soda. If it doesn’t fizz and bubble vigorously, it’s time for a new box. Fresh leavener is non-negotiable for a good rise.
Mistake 3: Not Scoring the Loaf Deeply Enough
That “X” on top is functional, not just decorative. A shallow, timid cut won’t do the job. As the bread bakes, the crust sets quickly. A deep score (about an inch deep) gives the interior dough a designated place to expand upward. This prevents cracking in odd places and ensures the center bakes through perfectly. It also creates those beautiful, rustic “ears” on each quarter of the loaf.
Mistake 4: Skipping the Cooling Time
I know it’s tempting to slice into that warm, fragrant loaf right away. But please, wait! The bread is still finishing its cooking process from residual heat as it cools. Slicing it hot will give you a gummy, doughy texture inside because the steam hasn’t had time to redistribute. Let it rest on a wire rack for at least 20 minutes. This allows the crumb to set, making it easier to slice and improving the overall texture dramatically.
Mistake 5: Baking at the Wrong Temperature
A hot, 400°F oven is crucial. It creates an immediate burst of steam and lift from the baking soda reaction, giving you a good initial rise and a crisp, golden crust. If your oven runs cold, or you bake at a lower temperature, the bread will spread out and bake more slowly. This can lead to a dense, pale loaf that’s dry inside. Use an oven thermometer to make sure your temperature is accurate for the best results.
Your Irish Soda Bread Questions, Answered
Why is it called soda bread?
It gets its name from the leavening agent used: baking soda (also called “bread soda” in Ireland). Unlike most breads that use yeast to rise, this one relies on the chemical reaction between the alkaline baking soda and the acidic buttermilk. This reaction produces carbon dioxide bubbles, which make the bread rise. It was a brilliant solution in areas where yeast wasn’t readily available. This method makes it a true “quick bread,” ready in about an hour from start to finish.
Can I make Irish soda bread without buttermilk?
Absolutely! Buttermilk is traditional, but it’s easy to make a substitute. For this recipe, pour 1 tablespoon plus 2 teaspoons of lemon juice or white vinegar into a liquid measuring cup. Then, fill the cup with regular milk (whole or 2%) until you reach the 1 ¾ cup line. Stir it and let it sit for about 5-10 minutes. It will curdle and thicken slightly, creating a perfect buttermilk stand-in. You can also use plain yogurt thinned with a little milk to the same consistency.
Why did my bread turn out dense and heavy?
A dense loaf usually points to one of three things. First, your baking soda might be old and lost its power. Second, you likely over-mixed or over-kneaded the dough, developing too much gluten. Remember, a light touch is key. Third, the oven might not have been hot enough, preventing a good initial rise. Always check your baking soda’s freshness and handle the dough just until it comes together for a lighter texture.
Is the sugar necessary in Irish soda bread?
No, the sugar is optional. Traditional Irish purists often omit it completely, especially in savory versions. However, many modern recipes, especially Americanized ones, include a small amount. I like adding it because it balances the tang of the buttermilk beautifully and promotes a golden-brown crust. Just two tablespoons won’t make it sweet, just more well-rounded in flavor. Feel free to leave it out if you prefer a purely savory bread.
What’s the purpose of the “X” on top?
The “X” has both practical and folkloric purposes. Practically, it acts as a steam vent. It allows heat to penetrate the thickest part of the dough, ensuring it bakes evenly all the way through. It also guides the loaf to expand in a controlled way as it rises, creating four distinct quarters. Traditionally, the cross was said to let the fairies escape or to bless the bread. It’s the signature look of a classic soda bread.
Can I add other ingredients like nuts or seeds?
Yes, you can! This dough is a great base for creativity. Fold in up to a cup of add-ins along with (or instead of) the raisins. Chopped walnuts or pecans add a lovely crunch. Sunflower seeds or oats sprinkled on top give great texture. For a savory twist, try grated cheese and herbs. Just be mindful that very wet add-ins (like fresh apples) might change the moisture content, so adjust slightly if the dough seems too wet.
How do I know when the bread is fully baked?
Use all your senses! Look for a deep, golden-brown crust. Gently lift the loaf and tap the bottom with your knuckles—it should sound hollow, like a drum. You can also insert a skewer into the center; it should come out clean. If you have an instant-read thermometer, the internal temperature should register between 190°F and 200°F. If the top is browning too fast, you can tent it loosely with foil for the last 10 minutes of baking.
Can I make soda bread gluten-free?
You can certainly try! Use a 1:1 gluten-free all-purpose flour blend that contains a binder like xanthan gum. The texture will be different—more crumbly and less chewy—but still delicious. Because GF flabs absorb moisture differently, you may need to adjust the amount of buttermilk slightly. Start with the recipe amount and add a little more if the dough seems dry and isn’t coming together. It’s a fun experiment for those with dietary needs.
What’s the best way to serve Irish soda bread?
Serve it slightly warm or at room temperature. It’s spectacular simply sliced and slathered with good salted butter. It’s also the perfect companion to soups and stews, soaking up the broth beautifully. For breakfast, toast a slice and top it with jam. For a real treat, try it with smoked salmon and cream cheese. It’s versatile! The key is to let its simple, hearty flavor shine alongside other comforting foods, much like the technique of sautéing enhances the natural quality of vegetables.
How long does homemade soda bread stay fresh?
At its absolute prime, eat it within 24 hours. The crust will be crispy and the interior tender. Stored properly at room temperature (wrapped in foil or in a bread bag), it stays tasty for 2-3 days. It becomes denser and the crust softens, which many people enjoy. To refresh it, wrap a slice in foil and warm it in a 300°F oven for 10 minutes, or simply toast it. For longer storage, freezing is your best bet.
And there you have it! My guide to making the most Irresistible Irish Soda Bread. This recipe is more than just a list of steps. It’s a little piece of kitchen history, a lesson in simplicity, and a guaranteed way to fill your home with warmth and wonderful smells. Whether it’s for a holiday, a weeknight dinner, or just because you feel like baking, this loaf will never let you down. So tie on your apron, grab that bowl, and get ready to bake some happiness. I promise, once you taste that warm slice with butter, you’ll be hooked. Happy baking!
Equipment
- Grand bol
- Fouet
- Cuillère en bois
- Plaque à pâtisserie
- Papier sulfurisé
Ingredients
- 4 tasses farine tout usage
- 1 cuillère à café bicarbonate de soude
- 1 cuillère à café sel
- 2 cuillères à soupe sucre granulé (facultatif)
- 1.75 tasses babeurre
- 2 cuillères à soupe beurre non salé, fondu
- 3/4 tasse raisins ou groseilles (facultatif)
Instructions
- Préchauffez le four à 200°C et tapissez une plaque à pâtisserie de papier sulfurisé.
- Dans un grand bol, fouettez ensemble la farine, le bicarbonate de soude, le sel et le sucre jusqu'à ce que ce soit bien mélangé.
- Faites un puits au centre des ingrédients secs et versez-y le babeurre et le beurre fondu.
- Mélangez à partir du centre, en ramenant la farine jusqu'à obtenir une pâte collante et ébouriffée ; incorporez les raisins ou les groseilles si vous le souhaitez.
- Retournez la pâte sur une surface farinée et pliez-la doucement sur elle-même 8 à 10 fois pour former une boule cohésive.
- Façonnez la pâte en un pain rond, d'environ 18 cm de diamètre, et placez-le sur la plaque à pâtisserie.
- Faites une croix profonde en “X” sur le dessus du pain pour permettre une cuisson uniforme.
- Faites cuire pendant 35 à 40 minutes jusqu'à ce qu'il soit doré et sonne creux lorsque vous tapez dessus ; laissez refroidir pendant au moins 20 minutes avant de trancher.
Notes
Nutrition

Hi, I’m Olivia Parker, the founder of BakingSecret.com and a lifelong lover of all things sweet and homemade. I grew up in a small town in Oregon, where the smell of fresh cookies in my family’s kitchen sparked my passion for baking. Over the years, I turned that passion into a mission: to help home bakers feel confident, inspired, and creative.
After studying food science and working in several artisan bakeries across the U.S., I decided to create a space where everyone from beginners to seasoned bakers can find reliable recipes, expert tips, and a warm, welcoming community. BakingSecret.com is my way of sharing the magic of baking with the world. When I’m not testing new recipes, you’ll find me exploring farmers’ markets, collecting vintage cookbooks, or perfecting my sourdough technique.