
Welcome to My Sweet Kitchen
I’ll never forget the first time I tasted pineapple cheesecake at a small bakery in my neighborhood. The combination seemed odd at first – tropical fruit on a rich, creamy dessert? But one bite changed everything. The bright, tangy pineapple cut through the dense cheesecake in a way that made my taste buds dance. I immediately went home and started experimenting in my own kitchen.
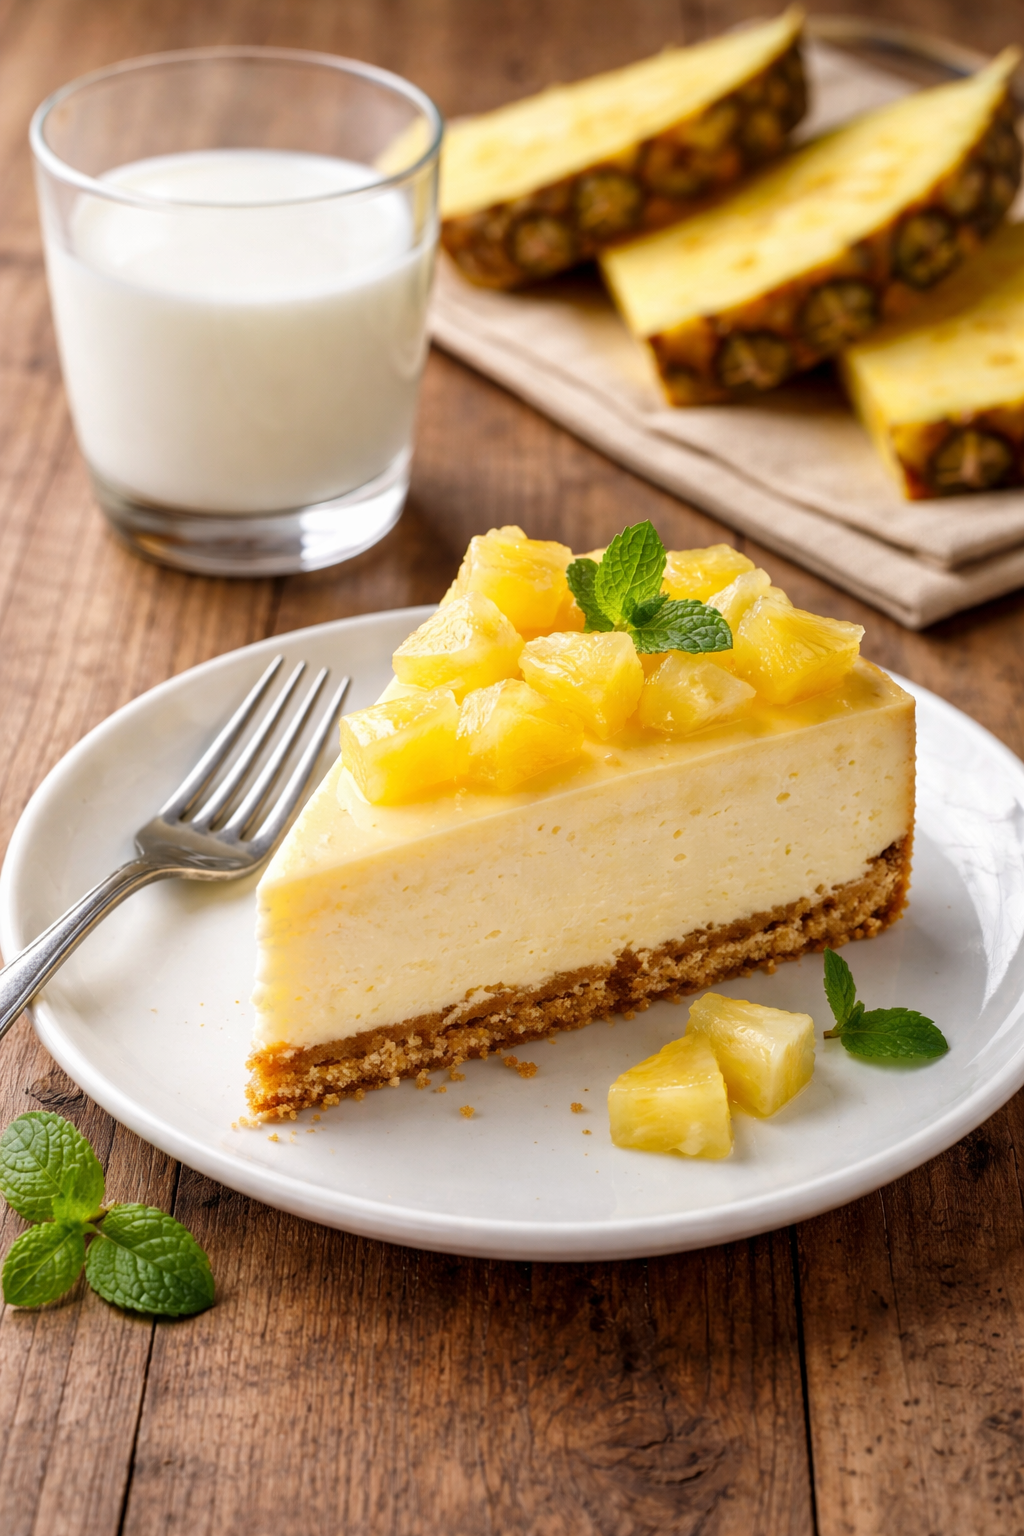
Welcome to my blog where I share my love for all things sweet and delicious! Today, I’m excited to talk about a delightful dessert that combines the tangy sweetness of pineapple with the creamy richness of cheesecake: pineapple cheesecake. This dessert isn’t as common as classic New York cheesecake, but it deserves a spot on your table.
Whether you’re a seasoned baker or just starting out, this post will guide you through making the perfect pineapple cheesecake. I’ve tested countless variations over the years, from no bake pineapple cheesecake to old fashioned versions that require hours in the oven. Each method has its charms, and I’m here to share what I’ve learned.
Let’s dive in and explore some fantastic recipes and tips!
What is Pineapple Cheesecake?
Is pineapple cheesecake a thing? Yes, and it’s been a thing for longer than you might think! While it doesn’t get the same spotlight as strawberry or chocolate cheesecake, this tropical version has loyal fans around the world.
Pineapple cheesecake is exactly what it sounds like – a creamy cheesecake that features pineapple either mixed into the filling, swirled throughout, or layered on top. Some recipes use fresh pineapple while others rely on canned. The fruit adds a bright, tangy flavor that balances the rich cream cheese base beautifully.
What makes pineapple cheesecake unique is that perfect marriage of sweet and tart. Regular cheesecake can sometimes feel heavy, but adding pineapple lightens things up. The fruit brings a refreshing quality that makes each bite feel less rich and more balanced.
The old fashioned pineapple cheesecake recipes date back several decades. Home cooks in the 1960s and 1970s often used crushed pineapple from cans to create simple desserts. The pineapple cheesecake recipe UK versions gained popularity around the same time, often featuring digestive biscuit crusts instead of graham crackers.
This dessert shines at any gathering. I’ve brought it to summer barbecues, Easter dinners, and even winter holiday parties. The tropical flavor feels especially welcome during cold months when everyone craves a taste of sunshine. It works just as well for casual family dinners as it does for special celebrations.
One reason I love this dessert is its flexibility. You can make pineapple cheesecake bars for easy serving at potlucks. You can create a no bake pineapple cheesecake with lemon jello when you don’t want to turn on the oven. And if you’re watching sugar intake, a sugar free pineapple cheesecake can still deliver amazing flavor.
Creating the Perfect Pineapple Cheesecake Topping
The pineapple cheesecake topping can make or break your dessert. I’ve seen beautiful cheesecakes ruined by watery, bland toppings. But when done right, the topping becomes the star of the show.
Let me walk you through how to make a topping that will have everyone asking for your recipe.
Choosing Your Pineapple
Fresh pineapple gives you the best flavor and texture. When shopping, look for fruit that smells sweet at the base. The leaves should pull out easily when tugged gently. Avoid pineapples with soft spots or dark patches.
To prepare fresh pineapple cheesecake topping, you’ll need to cut away the tough outer skin and remove the core. I cut the pineapple into small chunks – about half an inch works well. These pieces hold their shape during cooking without being too chunky.
Canned pineapple works too, especially when fresh fruit isn’t in season. Just make sure to drain it thoroughly. Pat the pieces dry with paper towels to remove excess moisture. This step prevents a soggy topping that slides off your cheesecake.
Making the Topping
Here’s my basic method for pineapple cheesecake topping:
- Combine pineapple chunks with a bit of sugar in a saucepan
- Add a tablespoon of cornstarch to help thicken the mixture
- Cook over medium heat until the liquid reduces and becomes syrupy
- Let it cool completely before adding to your cheesecake
The cooling step is critical. Hot topping on a cold cheesecake creates condensation and ruins the texture. I usually make my topping the day before and store it in the fridge.
Flavor Variations
Once you master the basic topping, try these variations:
Citrus boost: Add lemon or lime zest to brighten the flavor. A tablespoon of fresh lime juice makes the pineapple taste more vibrant. This works especially well for no bake pineapple cheesecake with lemon jello recipes.
Spiced version: A pinch of cinnamon or ginger adds warmth. I like adding a vanilla bean for extra depth. These spices complement the pineapple without overpowering it.
Mixed fruit: Try making a strawberry pineapple cheesecake topping by combining both fruits. The strawberries add beautiful color and their sweetness pairs well with tangy pineapple. Use equal parts of each fruit for the best balance.
Balancing Sweet and Tart
Getting the right balance in your pineapple cheesecake topping takes practice. Pineapples vary in sweetness depending on ripeness and variety. Taste your fruit before cooking.
If your pineapple is very sweet, reduce the added sugar. You want the natural fruit flavor to shine through. Too much sugar makes the topping taste artificial and can overpower the cheesecake.
On the other hand, very tart pineapple needs a bit more sugar. But don’t go overboard. The tartness actually helps cut through the rich cheesecake. A little tang is a good thing.
I usually start with two tablespoons of sugar per cup of pineapple. Then I taste and adjust. You can always add more sugar, but you can’t take it away.
Lemon juice is your secret weapon for balance. Even if you’re not making a citrus-flavored version, a small splash of lemon juice brightens the pineapple flavor. It makes everything taste fresher and more complex.
For the best texture, cook your topping until it’s thick enough to coat the back of a spoon. It will thicken more as it cools. A topping that’s too thin will run off the sides of your cheesecake and create a mess on the plate.

Fresh Pineapple Cheesecake Recipe: The Classic Version
Now that we’ve covered the perfect topping, let’s talk about the actual cheesecake underneath. Making a fresh pineapple cheesecake from scratch might sound intimidating, but I promise it’s easier than you think. I’ve taught this recipe to my sister who once burned microwave popcorn, and she nailed it on her second try.
This version uses fresh pineapple incorporated directly into the filling, which gives you intense tropical flavor in every single bite. The key difference between this and just adding topping is that the fruit becomes part of the creamy texture rather than sitting on top. Both approaches are delicious, but this method creates something truly special.
What You’ll Need
For the crust, grab two cups of graham cracker crumbs, six tablespoons of melted butter, and three tablespoons of sugar. Some folks use digestive biscuits if you’re following a pineapple cheesecake recipe UK style, which works beautifully too. I’ve even used vanilla wafers when I was out of graham crackers, and nobody complained.
The filling requires two pounds of cream cheese at room temperature – this detail matters more than you’d think. Cold cream cheese creates lumps that never quite disappear. Trust me on this one. You’ll also need one cup of sugar, three large eggs, one cup of sour cream, two teaspoons of vanilla extract, and about one cup of finely chopped fresh pineapple that’s been thoroughly drained.
Here’s the thing about the pineapple: you absolutely must remove excess moisture. I spread my chopped pineapple on paper towels and press gently. Then I wait fifteen minutes and do it again. Watery pineapple equals a soggy cheesecake, and nobody wants that at their dinner party.
Building Your Cheesecake from Bottom to Top
Preheat your oven to 325°F. Mix those graham cracker crumbs with melted butter and sugar until the mixture looks like wet sand. Press this into the bottom of a 9-inch springform pan. I use the bottom of a measuring cup to pack it down evenly. Bake this crust for ten minutes, then set it aside to cool.
While the crust cools, beat your room temperature cream cheese until it’s completely smooth and fluffy. This takes about three minutes with an electric mixer. Don’t rush this step. Scrape down the sides of the bowl at least twice. Add the sugar gradually and beat until combined.
Add eggs one at a time, beating just until incorporated after each addition. Overbeating at this stage incorporates too much air, which can cause cracks later. Funny enough, I used to think more beating meant better texture, but the opposite is true with cheesecake.
Fold in the sour cream and vanilla, then gently stir in your perfectly dried pineapple chunks. Pour this gorgeous mixture over your cooled crust. Tap the pan gently on the counter a few times to release air bubbles.
Place your springform pan inside a larger roasting pan. Fill the roasting pan with hot water until it comes halfway up the sides of the springform pan. This water bath prevents cracks and keeps the texture silky smooth. I learned about water baths after making three cracked cheesecakes in a row, and it changed everything.
Bake for about seventy to eighty minutes. The edges should be set, but the center will still jiggle slightly when you shake the pan. That jiggle is your friend. It means your cheesecake will be creamy instead of dry and crumbly.
Turn off the oven, crack the door open about an inch, and let the cheesecake cool inside for one hour. Then remove it and let it cool completely at room temperature. Finally, refrigerate for at least six hours, though overnight is better. I know waiting is torture, but patience really does pay off here.
No Bake Pineapple Cheesecake with Lemon Jello: When Speed Matters
Sometimes you need dessert fast. Maybe unexpected guests are coming, or maybe you just don’t want to heat up your kitchen during summer. That’s where this no bake pineapple cheesecake with lemon jello comes to the rescue.
I developed this recipe during a particularly hot August when running my oven felt like cruel and unusual punishment. The lemon jello adds stability and a subtle citrus note that complements the pineapple beautifully. This method is similar to what you’ll find in a jello no bake cheesecake, but with tropical flair.
The Quick Assembly Process
Start with a simple graham cracker crust like before, but skip the baking step. Just press it into your pan and chill it while you make the filling. That’s already fifteen minutes saved right there.
Dissolve one small package of lemon jello in three-quarters cup of boiling water. Stir until completely dissolved, then add half a cup of cold pineapple juice. Let this cool to room temperature but not set. You want it liquid but not hot.
Beat together sixteen ounces of softened cream cheese with half a cup of sugar until fluffy. Gradually pour in your cooled jello mixture while beating on low speed. The mixture will thin out at first, which looks alarming but is completely normal. Keep beating and it’ll come together.
Fold in one cup of whipped cream – either homemade or the frozen stuff that comes in a tub works fine. Then gently fold in three-quarters cup of well-drained crushed pineapple. Pour this over your chilled crust and refrigerate for at least four hours.
By the way, if you want extra visual appeal, save some pineapple chunks to arrange on top before chilling. The golden fruit against the pale yellow filling looks gorgeous. You could also add a drizzle on your cheesecake using white chocolate or caramel for an elegant finish.
The texture of this version differs from baked cheesecake. It’s lighter, almost mousse-like. Some people prefer this to traditional dense cheesecake. My mom actually likes this version better, though she’d never admit it to my grandmother who swears by old fashioned pineapple cheesecake methods.
Pineapple Cheesecake Bars: Perfect for Crowds
Let’s talk about practicality for a minute. Round cheesecakes look beautiful but they’re kind of a pain to serve at big gatherings. You need to slice them carefully, and the first piece always crumbles a bit. That’s why I started making pineapple cheesecake bars for potlucks and parties.
These bars give you all the flavor of regular cheesecake but in a portable, easy-to-grab format. Kids love them because they can eat them with their hands. Adults love them because they can take one without committing to a giant slice. Everyone wins.
Adapting the Recipe for Bar Form
The basic technique mirrors making Philadelphia cheesecake bars, but we’re adding our tropical twist. Use a 9×13 inch baking pan instead of a springform pan. Line it with parchment paper, leaving some overhang on the sides. This makes removal so much easier later.
Double your crust recipe to cover the larger pan bottom. Press it down firmly and bake at 350°F for twelve minutes. The slightly higher temperature works better for bars because you want a firmer base that can support cutting.
For the filling, use the same proportions as the fresh pineapple recipe but consider reducing the pineapple chunks to three-quarters cup. Smaller pieces distribute more evenly in the thinner layer of bars. I learned this after making a batch where all the pineapple sank to the bottom in weird clumps.
Skip the water bath for bars. Instead, bake at 325°F for about forty to forty-five minutes. The thinner layer cooks faster than a full cheesecake. You’re looking for the same slight jiggle in the center.
Cutting and Serving Like a Pro
Here’s where people usually mess up. They try to cut the bars too soon, and everything turns into a mushy disaster. Patience, my friend. Chill your bars completely – we’re talking at least six hours or overnight.
When you’re ready to cut, use the parchment overhang to lift the entire slab out of the pan. Place it on a cutting board. Get a long, sharp knife and run it under hot water. Dry it off, then make one cut. Wipe the knife clean, run it under hot water again, and make your next cut. Repeat this process for every single cut.
Yes, it’s tedious. Yes, it makes a difference between professional-looking bars and ragged squares. I usually cut mine into twenty-four pieces, which gives you a nice two-bite portion.
These bars actually freeze beautifully, which regular round cheesecake doesn’t always do well. Wrap individual bars in plastic wrap, then store them in a freezer bag. They’ll keep for up to three months. Just thaw them in the refrigerator overnight before serving.
If you want to get fancy, you can make them similar to how you’d approach a farmers cheese sour cream cheesecake by swapping half the cream cheese for farmer’s cheese. This creates a slightly lighter texture that some people prefer, especially for bars since they’re eating them by hand.
For serving, I like arranging the bars on a platter with fresh pineapple wedges and maybe some mint leaves for color. A dusting of powdered sugar makes them look bakery-quality without any real effort.
Sugar Free Pineapple Cheesecake: Sweetness Without the Guilt
Let me tell you about my uncle Dave. He developed diabetes a few years back and thought his cheesecake days were over. The look on his face when I brought a sugar free pineapple cheesecake to Christmas dinner was priceless. After his first bite, he actually got a little emotional. Turns out, you don’t need traditional sugar to make something absolutely delicious.
Creating a sugar free pineapple cheesecake isn’t about sacrifice. It’s about smart substitutions that let everyone enjoy dessert together. I’ve spent years testing different sweeteners, and I’ve learned what works and what tastes like chemicals pretending to be food.
Choosing the Right Sugar Substitute
Not all sugar substitutes behave the same way in cheesecake. Some create weird aftertastes, others don’t dissolve properly, and a few actually ruin the texture completely. Through plenty of trial and error, I’ve found my favorites.
Erythritol works beautifully in cheesecake because it doesn’t have that bitter aftertaste many sweeteners carry. It measures cup-for-cup like regular sugar, making recipe conversion easy. The texture stays creamy and smooth. I use it in both the filling and the crust without any problems.
Monk fruit sweetener gives you incredible sweetness without any calories. It’s much sweeter than regular sugar, so you’ll need less. Start with about half the amount of sugar the recipe calls for, then taste and adjust. The pineapple already brings natural sweetness, so you might be surprised how little added sweetener you actually need.
Stevia can work, but here’s the thing – it sometimes leaves a slightly metallic taste that clashes with the tangy pineapple. If you do use stevia, go for the liquid version rather than powdered. A few drops go a long way, and it blends more smoothly into the cream cheese mixture.
Allulose is my secret weapon. It behaves almost identically to regular sugar in baking and doesn’t cause the digestive issues some people experience with other sweeteners. It browns slightly when baked, which actually helps your crust develop that nice golden color.
Adjusting for Texture and Moisture
Sugar does more than just sweeten – it affects moisture and texture too. When you remove it, you need to compensate. I’ve found that adding an extra tablespoon of sour cream to the filling helps maintain that luxurious creaminess. The fat content makes up for what you lose when sugar isn’t there to retain moisture.
Your pineapple preparation becomes even more critical in sugar-free versions. Without sugar to balance it, any excess moisture from the fruit will make your cheesecake weep. I drain my pineapple overnight in the refrigerator, pressing it every few hours. Obsessive? Maybe. Worth it? Absolutely.
Since pineapple contains natural sugars and nutrients that contribute to overall nutrition, being mindful of portion sizes and understanding dietary reference intakes can help you balance enjoyment with health goals, especially when managing specific dietary needs.
Maximizing Natural Sweetness
The riper your pineapple, the sweeter your cheesecake tastes without any added sweeteners at all. I look for pineapples that smell fragrant and sweet at the base. The golden yellow color indicates ripeness better than green tones.
Roasting your pineapple chunks before adding them to the filling concentrates their natural sugars. Spread the pieces on a baking sheet, roast at 400°F for about fifteen minutes until they caramelize slightly. This technique adds depth and sweetness that makes people forget there’s no sugar involved.
Vanilla extract becomes your best friend in sugar-free baking. Use real vanilla, not imitation. That complex vanilla flavor makes your brain perceive more sweetness than actually exists. I usually add an extra teaspoon beyond what the regular recipe calls for.
A pinch of salt in your filling also enhances perceived sweetness. Sounds backward, but salt makes other flavors pop, including the natural fruit sugars. Just a quarter teaspoon makes everything taste brighter and more balanced.
Strawberry Pineapple Cheesecake: A Colorful Combination
One spring, I needed a dessert for my daughter’s birthday that would photograph well for her Instagram feed. Yes, that’s actually how we make decisions now. The strawberry pineapple cheesecake I created became the most-liked post she’d ever shared. Apparently, pretty food is a thing.
Combining strawberries and pineapple in one cheesecake gives you the best of both worlds. The strawberries add gorgeous pink color while the pineapple brings that tropical brightness. Together, they create something more interesting than either fruit alone could achieve.
Layering and Swirling Techniques
You have several options for incorporating both fruits. The swirl method creates beautiful marbled patterns that look professionally done even when they’re not. Make your basic cheesecake filling and divide it into three portions. Leave one plain, mix pureed strawberries into the second, and fold crushed pineapple into the third.
Pour the plain filling into your prepared crust first. Drop spoonfuls of strawberry filling randomly across the surface, then do the same with pineapple filling. Use a butter knife to swirl everything together gently. Don’t overmix or you’ll lose the distinct ribbons of color.
The layered approach creates dramatic horizontal stripes when you slice the cheesecake. Pour the pineapple layer first, freeze it for thirty minutes until firm, then add the plain layer, freeze again, and finish with the strawberry layer on top. This takes more time but delivers stunning results.
For a rustic look, make a traditional cheesecake and top it with alternating sections of strawberry and pineapple. Arrange fresh strawberry slices on half the surface and pineapple chunks on the other half. The contrast looks beautiful and lets guests choose their preferred side.
Balancing Two Distinct Flavors
Strawberries taste sweeter and more delicate than pineapple. Pineapple brings acidity and tang. Getting them to play nicely together requires some thought. I use slightly less pineapple than strawberry – maybe a three-to-two ratio. This prevents the pineapple from overwhelming the gentler berry flavor.
Macerate your strawberries with a bit of sugar and lemon juice before adding them to the filling. This draws out their juices and intensifies their flavor. Let them sit for twenty minutes, then drain thoroughly. You want the flavor without the liquid.
The pineapple should be fresh if possible. Canned pineapple works better for the pineapple portion because it’s already been processed and has a milder flavor that won’t overshadow the strawberries. Funny how sometimes the less premium ingredient actually works better.
Making It Instagram-Worthy
If presentation matters for your gathering, consider these finishing touches. Pipe whipped cream rosettes around the edge and place a strawberry slice against each one. Tuck small pineapple wedges between the rosettes for color variation.
Fresh mint leaves add a pop of green that makes the reds and yellows more vibrant. Don’t use too much – three or four small leaves strategically placed do the job. Edible flowers like pansies or violets take things to the next level if you’re feeling fancy.
A light dusting of freeze-dried strawberry powder creates a beautiful pink accent on a white whipped cream topping. You can buy this powder or make your own by grinding freeze-dried strawberries in a spice grinder. It tastes intensely fruity and looks professional.
Serve your strawberry pineapple cheesecake on a white or pale-colored plate to make the colors pop. Dark plates can be dramatic, but they sometimes make the fruit look muddy in photos. Natural lighting works better than flash if someone’s photographing your creation.
By the way, if you’re enjoying experimenting with different cheesecake variations like these tropical versions, you’ll find plenty more inspiration in our complete collection of cheesecake recipes that cover everything from classic styles to creative twists.
Final Thoughts on Your Tropical Cheesecake Journey
The most important thing I’ve learned making countless pineapple cheesecakes over the years is this: don’t be afraid to experiment and make the recipe your own. Maybe you’ll discover that you prefer lime zest instead of lemon, or that coconut in the crust adds the perfect tropical touch. Every time I make this dessert, I learn something new. Your kitchen adventures will be different from mine, and that’s exactly how it should be. Start with these recipes as your foundation, then let your creativity guide you toward your own perfect version.
Frequently Asked Questions
Is pineapple cheesecake a thing?
Yes, absolutely! Pineapple cheesecake has been around for decades, though it doesn’t get as much attention as traditional flavors. It gained popularity in the 1960s and 1970s when home cooks started experimenting with canned pineapple in desserts. Today, both fresh and canned versions appear in bakeries and home kitchens worldwide. The tropical flavor makes it especially popular for summer gatherings and beach-themed parties. It’s definitely a “thing” and deserves more recognition than it currently gets.
What cheese goes best with pineapple?
Cream cheese is the standard for pineapple cheesecake, but other options work beautifully too. Mascarpone creates an even richer, silkier texture that pairs wonderfully with pineapple’s acidity. Ricotta mixed with cream cheese gives you a lighter, less dense result that some people prefer. For savory applications, sharp cheddar and aged gouda complement pineapple surprisingly well on cheese boards. In cheesecake specifically, stick with cream cheese or mascarpone for the best results.
Can you add pineapple to a box cake mix?
You definitely can add pineapple to box cake mix, and it creates a delicious tropical cake. Drain your crushed pineapple very well and reduce other liquids in the recipe by about a quarter cup to compensate for the fruit’s moisture. Mix the pineapple into the batter just before pouring it into the pan. The fruit adds moistness and flavor that makes box mix taste more homemade. This technique works especially well with yellow or white cake mixes.
What is Christmas cheesecake?
Christmas cheesecake typically refers to festive holiday versions featuring seasonal flavors like peppermint, gingerbread, or eggnog. Some recipes include cranberries, white chocolate, and pecans for a wintery feel. In some regions, Christmas cheesecake means a pineapple version because pineapple was considered a luxury fruit historically served at special celebrations. The term varies by family tradition and location. My grandmother always made pineapple cheesecake for Christmas, calling it her “fancy holiday dessert.”
How long does pineapple cheesecake last in the refrigerator?
Properly stored pineapple cheesecake stays fresh in the refrigerator for five to seven days. Cover it tightly with plastic wrap or store it in an airtight container to prevent it from absorbing other food odors. The pineapple topping might release some liquid over time, so you may want to store it separately if making ahead. No-bake versions typically last slightly less time, about four to five days. Always check for any off smells or appearance changes before serving leftovers.
Can I freeze pineapple cheesecake?
Yes, pineapple cheesecake freezes quite well for up to two months. Wrap individual slices or the whole cheesecake tightly in plastic wrap, then again in aluminum foil. Thaw it slowly in the refrigerator overnight rather than at room temperature. The texture might be slightly different after freezing, sometimes a bit denser, but the flavor remains excellent. Add fresh toppings after thawing rather than freezing them with the cheesecake for the best presentation and texture.
Why did my pineapple cheesecake turn out watery?
Excess moisture from the pineapple is almost always the culprit. Pineapple contains lots of juice that needs to be thoroughly drained and pressed out before incorporating it into your filling. Using fresh pineapple without removing enough moisture causes this problem frequently. Skipping the water bath during baking can also create condensation that makes the top watery. Make sure to drain your fruit obsessively and follow the recommended cooling methods to avoid this issue.
Do I need to use a springform pan for pineapple cheesecake?
A springform pan makes removal much easier, but it’s not absolutely necessary. You can make cheesecake bars in a regular rectangular pan lined with parchment paper. Some people successfully make cheesecake in regular cake pans and serve it directly from the pan without removing it. If using a non-springform pan, line it with parchment paper that extends over the edges so you can lift the cheesecake out. Springform pans just make life easier for traditional round cheesecakes.
Can I make pineapple cheesecake ahead of time?
Making pineapple cheesecake ahead is actually ideal because it needs substantial chilling time anyway. Bake it up to three days before your event and keep it refrigerated. The flavors often improve after a day or two as everything melds together. Add any fresh fruit toppings the day of serving for the best appearance. No-bake versions also do well made ahead, requiring at least four hours of setting time. This is one dessert where advance preparation works in your favor.
What can I do if my cheesecake cracks on top?
First, know that cracks don’t affect taste at all, just appearance. If you’re bothered by them, cover the top with pineapple topping, whipped cream, or fresh fruit and nobody will ever know. To prevent cracks next time, avoid overbeating once you add eggs, use a water bath during baking, and let the cheesecake cool gradually in the turned-off oven. Sudden temperature changes cause most cracking. Running a knife around the edge immediately after baking also helps prevent cracks as the cheesecake contracts while cooling.
Equipment
- Mixing Bowl
- Electric Mixer
- Spatula
- Springform Pan
- Parchment Paper optional for cheesecake bars
Ingredients
- 2 cups Graham Cracker Crumbs
- 6 tablespoons Melted Butter
- 3 tablespoons Sugar
- 2 pounds Cream Cheese room temperature
- 1 cup Sugar
- 3 large Eggs
- 1 cup Sour Cream
- 2 teaspoons Vanilla Extract
- 1 cup Fresh Pineapple finely chopped and thoroughly drained
Instructions
- Preheat your oven to 325°F.
- Mix the graham cracker crumbs with melted butter and sugar until the mixture resembles wet sand.
- Press the mixture into the bottom of a 9-inch springform pan.
- Bake the crust for 10 minutes and set aside to cool.
- Beat the room temperature cream cheese until smooth and fluffy, about 3 minutes.
- Gradually add 1 cup of sugar and beat until combined.
- Add eggs, one at a time, mixing just until incorporated.
- Fold in sour cream and vanilla, then gently stir in the dried pineapple.
- Pour the mixture over the cooled crust and tap the pan to release air bubbles.
- Place the springform pan inside a larger roasting pan and fill the roasting pan with hot water until halfway up the sides of the springform pan.
- Bake for 70-80 minutes until the edges are set, and the center jiggles slightly.
- Turn off the oven and crack the door open; let the cheesecake cool for 1 hour inside.
- Remove, cool completely at room temperature, and refrigerate for at least 6 hours (overnight is better).
Notes
Nutrition

Hello! I’m Sarah Mitchell, and I’m passionate about bringing creativity and innovation to baking. My love for baking started in high school when I first tried my hand at decorating cupcakes for a class project. What began as a fun hobby quickly became a full-time passion. I’ve spent the past decade working in bakeries and dessert shops, honing my skills in everything from simple cookies to intricate wedding cakes.
After working in some of the top bakeries across the country, I realized that baking was about more than just following recipes — it was about infusing your personality into each creation. At BakingSecret.com, I love creating recipes that push boundaries while staying true to the heart of classic baking. I specialize in creating delicious and visually stunning pastries that will wow your guests.
When I’m not baking, I enjoy teaching baking classes, trying out new cake decoration techniques, and traveling to find inspiration in global dessert traditions. I’m so excited to share my tips and tricks with you to help elevate your baking game!