
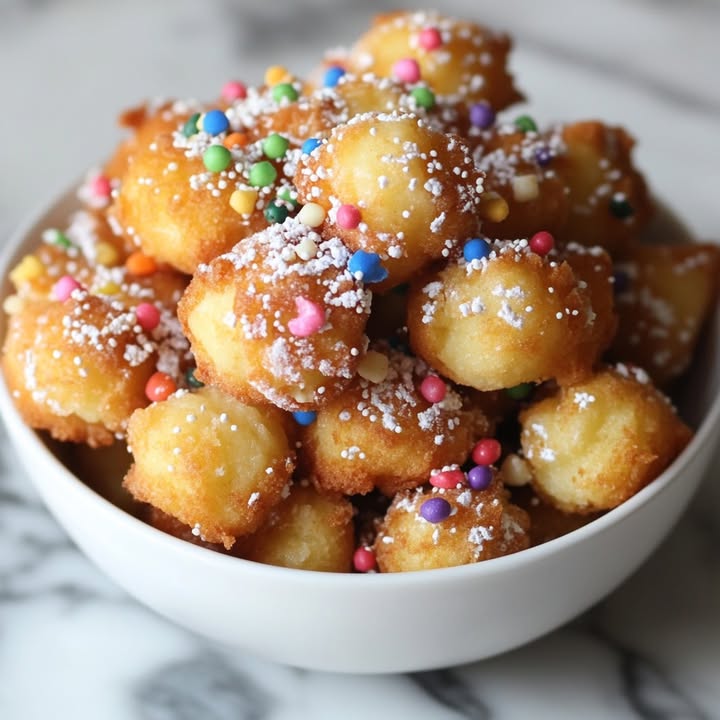
What Are Funnel Cake Bites?
Is there anything more magical than the smell of a carnival? That sweet, fried dough scent hits you the second you walk through the gate. For years, I tried to recreate that magic at home, but full-sized funnel cakes were messy. Then, I discovered the joy of Fried Funnel Cake Bites. These little puffs of golden dough are everything you love about the fair. They are easy, fun, and totally binge-worthy. My kids now beg for “Mom’s mini carnival” every weekend.
A Bite-Sized Slice of Fair History
Funnel cakes have a long, delicious history. They came to America with Pennsylvania Dutch settlers. They got their name from the funnel used to drizzle batter into hot oil. The classic treat is a large, lacy web of fried dough. But who has room for a whole one? That’s where my recipe for Funnel Cake Bites comes in. These mini versions capture all the traditional flavor. You get the crispy outside, soft inside, and cloud of powdered sugar. It’s a modern twist on a classic fair food everyone adores.
Why You’ll Love This Fried Funnel Cake Bites Recipe
You will fall head over heels for this recipe. First, it’s incredibly simple. You probably have all the ingredients in your pantry right now. Second, it’s a major crowd-pleaser. These bite-sized treats disappear faster than you can make them. The taste is pure nostalgia. Each warm, sugary bite takes you straight back to summer nights and Ferris wheel lights. Plus, they’re versatile. You can dress them up with different toppings or keep them classic. They are the perfect easy fried dessert for any sweet tooth.
Perfect Occasions for These Carnival Treats
These little bites are party superstars. They are perfect for birthday parties, especially kid’s parties. Serve them at game day gatherings for a sweet halftime snack. A platter of these makes any family movie night extra special. They are also fantastic for holiday brunches or baby showers. Think of them as your secret weapon for fun food for kids and adults alike. Anytime you need a guaranteed hit, these funnel cake bites will save the day.
What You’ll Need: The Ingredients List
Gathering your ingredients is the first step to fried heaven. Here’s your shopping list:
- 1 cup all-purpose flour
- 1 tablespoon granulated sugar
- 1 teaspoon baking powder
- 1/4 teaspoon salt
- 1 large egg
- 3/4 cup milk
- 1/2 teaspoon vanilla extract
- Oil for frying (vegetable or canola)
- Powdered sugar, for dusting
Easy Swaps: Substitution Options
Don’t stress if you’re missing an item. This recipe is very forgiving.
- Flour: For a slightly different texture, you can use a 1-to-1 gluten-free flour blend.
- Milk: Any milk works! Dairy-free options like almond or oat milk are great substitutes.
- Sugar: You can swap the granulated sugar for an equal amount of coconut sugar. For dusting, try cinnamon sugar instead of just powdered sugar.
- Vanilla: Almond extract is a delicious alternative. Use just 1/4 teaspoon as it’s stronger.
How to Make Funnel Cake Bites: Step-by-Step
Ready to fry? Let’s get started. Follow these simple steps for perfect bites every time.
Step 1: Mix Your Dry Team
Grab a medium mixing bowl. Whisk together your flour, granulated sugar, baking powder, and salt. Watch the white flour puff up as you mix. This ensures your leaveners are evenly distributed. No one wants a bite with all the baking powder in one spot! A good whisk here is the secret to a light, airy batter later on. Pro tip: Sifting your dry ingredients can make the batter even smoother, but a thorough whisk works just fine.
Step 2: Combine the Wet Crew
In a separate bowl, crack in your egg. Pour in the milk and that lovely vanilla extract. Now, whisk it all together until it’s a smooth, pale yellow liquid. You’ll see little bubbles form on the surface. That’s a good sign! This mixture is what will bring your dry ingredients to life. The vanilla scent will start to fill your kitchen. It already smells like a treat.
Step 3: Bring the Batter Together
Make a well in the center of your dry ingredients. Slowly pour your wet mixture into the well. Use a spatula or wooden spoon to gently stir. Stir just until the batter is smooth and no dry flour patches remain. The batter will be thick but pourable, like a very heavy pancake batter. Don’t overmix! A few small lumps are totally okay. Overmixing can make your bites tough.
Step 4: Heat the Oil to Perfection
Pour about 2 inches of oil into a heavy-bottomed saucepan or deep skillet. Turn the heat to medium. Attach a deep-fry or candy thermometer to the side. You want the oil to reach 350°F (175°C). This temperature is crucial. If the oil is too cool, the bites will soak up oil and be greasy. If it’s too hot, they will burn on the outside before cooking inside. The oil should shimmer slightly. Chef’s tip: If you don’t have a thermometer, test with a tiny drop of batter. It should sizzle vigorously and rise to the surface quickly.
Step 5: Fry to Golden Bliss
Once the oil is ready, it’s showtime! Use a small spoon or a cookie scoop to drop small, rounded spoonfuls of batter into the hot oil. Only add a few at a time. Do not overcrowd the pan. This keeps the oil temperature stable. The bites will sink for a second, then pop right back up. Let them fry for 2-3 minutes. They will turn a beautiful, deep golden brown. Gently flip them halfway through for even color. You’ll hear a happy, constant sizzle.
Step 6: Drain and Sugar Immediately
Use a slotted spoon to lift the golden bites from the oil. Let the excess oil drip back into the pan. Then, place them on a plate lined with paper towels. The paper towels will soak up any extra grease. Now, for the best part! While they are still very warm, pile them into a bowl. Generously dust them with powdered sugar. I mean, really go for it! The warmth helps the sugar melt slightly and cling to every nook and cranny. Serve them right away for maximum joy.
Timing Your Sweet Treat
This recipe is wonderfully fast.
- Prep Time: 10 minutes (just enough time to preheat your oil)
- Cooking Time: 15 minutes (you’ll be frying in batches)
- Total Time: About 25 minutes from bowl to table
You can have a plate of warm, homemade carnival treats ready in under half an hour. That’s faster than driving to the fair!
Chef’s Secret for the Best Bites
My secret weapon? Letting the batter rest for 5 minutes after mixing. I know, I know, you want to fry immediately! But those 5 minutes allow the flour to fully hydrate. This gives you a more consistent texture. It also helps the baking powder start to work its magic. The result is a bite that is crisp outside and tender inside, not doughy. It’s a tiny step with a big payoff.
A Fun Fact About Frying
Did you know the type of oil you use matters for flavor and health? Neutral oils like canola or vegetable are perfect for frying sweets. They have a high smoke point and don’t impart their own flavor. This lets the simple, sweet taste of the funnel cake shine through. Using fresh oil (not oil you’ve used for onions!) is also key. It keeps your homemade sweets tasting clean and delicious.
Gear You’ll Need
You don’t need fancy equipment. Here’s the short list:
- Two mixing bowls
- Whisk and spatula
- Deep, heavy saucepan or skillet (like a Dutch oven)
- Slotted spoon or spider strainer
- Thermometer (highly recommended!)
- Paper towels for draining
Storing Your Funnel Cake Bites
The Short Term: These treats are truly best eaten within an hour of frying. The sugar will start to dissolve, and they lose their perfect crispness. If you must store them, place them in a single layer on a plate at room temperature. Cover them loosely with a paper towel for up to 4 hours.
Longer Storage: I don’t recommend storing them for more than a day. They become very chewy. If you have leftovers, you can store them in an airtight container at room temperature. Re-crisp them for a few seconds in an air fryer or toaster oven. This won’t be quite the same as fresh, but it’s better than soggy bites.
Make-Ahead Tip: You can mix the dry and wet ingredients separately the night before. Keep them in the fridge. Combine them just before you’re ready to fry. This cuts your prep time to almost nothing.
My Top Tips for Success
- Oil Temperature is King: Use that thermometer! Keep an eye on it between batches and adjust the heat as needed.
- Size Matters: Keep your bites small, about a teaspoon each. This ensures they cook through quickly and evenly.
- Don’t Crowd the Pan: Frying too many at once drops the oil temperature. This leads to greasy, oily bites. Patience is a virtue here.
- Dust While Warm: The powdered sugar sticks so much better to warm bites. It creates that iconic, snowy look.
Presentation Ideas to Wow Your Guests
Make your dessert table pop with these simple ideas:
- Serve them in a paper cone or a mini fry basket for a true carnival feel.
- Create a topping bar with bowls of chocolate sauce, strawberry syrup, caramel, and sprinkles.
- Skewer 3-4 bites on a lollipop stick for a fun, walkable fair food dessert.
- For a party, pile them high on a cake stand for a stunning centerpiece.
Healthier & Fun Recipe Variations
Want to mix things up? Here are six delicious twists on the classic Fried Funnel Cake Bites recipe.
- Baked Funnel Cake Bites: Skip the frying! Drop spoonfuls of batter onto a parchment-lined baking sheet. Spray lightly with oil and bake at 375°F for 12-15 minutes until puffed and golden. They are lighter but still yummy.
- Chocolate-Dipped Delights: Let your fried bites cool completely. Dip half of each bite into melted dark or milk chocolate. Let them set on parchment paper for a decadent treat.
- Apple Cider Bites: Replace the milk with an equal amount of apple cider. Add 1/2 teaspoon of cinnamon to the dry ingredients. These taste like a fall fair in a bite.
- Lemon Zest Bites: Add the zest of one lemon to the dry ingredients. The bright lemon flavor cuts through the sweetness beautifully.
- Whole Wheat Option: Substitute half the all-purpose flour with whole wheat pastry flour. It adds a nutty flavor and a bit more fiber.
- Funfetti Party Bites: Stir 2 tablespoons of colorful sprinkles into the batter right before frying. It’s a festive, confetti-filled surprise inside.
Looking for more inspiration? I have a whole collection of easy fried desserts and homemade sweets on my site. For example, you might love my take on classic beignets or these amazing mini churro bites. If you’re planning a party, check out my recipe for crowd-pleasing carnival popcorn. And for a truly over-the-top treat, my s’mores stuffed funnel cake is a dream come true.
Common Mistakes to Avoid
Avoid these pitfalls for perfect bites every single time.
Mistake 1: Ignoring the Oil Thermometer
This is the biggest mistake. Guessing the oil temperature almost always leads to failure. Too cold, and your bites become oil sponges. Too hot, and they burn on contact. A simple, inexpensive candy thermometer is your best friend here. Clip it to the side of your pot and watch it closely. Adjust your stove’s heat to maintain that steady 350°F. Your bites will fry up crisp and golden, not greasy or charred.
Mistake 2: Making the Bites Too Big
It’s tempting to use a big spoon for faster frying. Don’t do it! Large blobs of batter won’t cook in the center. You’ll get a raw, doughy middle under a crispy shell. Aim for bites about the size of a small cherry tomato or a heaping teaspoon. This size ensures the hot oil penetrates quickly and cooks the batter all the way through for a perfect, tender interior.
Mistake 3: Overcrowding the Frying Pot
It’s so easy to want to cook them all at once. But adding too many bites at once is a recipe for disaster. It causes the oil temperature to plummet. The bites will sink and stick together. They’ll absorb oil instead of frying. Fry in small batches, giving each bite plenty of room to float and bob. This keeps the oil hot and ensures every piece cooks evenly and independently.
Mistake 4: Skipping the Drain on Paper Towels
You might think a quick shake with the slotted spoon is enough. It’s not. That brief moment on paper towels is crucial. It wicks away the thin layer of excess oil that clings to the hot, fried surface. If you skip this, the bites will feel greasy in your hand and in your mouth. A 30-second drain makes a world of difference in texture and overall enjoyment.
Remember, cooking at home allows you to control ingredient quality. Using fresh, simple ingredients is a great way to enjoy treats while being mindful of what you eat. For more on how food choices impact your well-being, you can read about the connection between diet and gut health.
If you loved this recipe, you’ll find dozens more sweet and savory ideas in my collection of international pastries from around the world. It’s a fun way to travel with your taste buds!
Frequently Asked Questions
Can I make funnel cake bites ahead of time?
You can prepare the batter components ahead, but I don’t recommend frying them in advance. The magic is in serving them warm and fresh. For easy prep, whisk your dry ingredients in one bowl the night before. Mix your egg, milk, and vanilla in a separate container and refrigerate it. When you’re ready to cook, just combine the wet and dry. This gets you to frying in under 2 minutes. The bites themselves are best eaten within an hour of cooking for peak crispness and texture.
What is the best oil for frying these?
You want a neutral oil with a high smoke point. This means it can get hot without burning or smoking. Vegetable oil and canola oil are my top choices. They are affordable, easy to find, and don’t add any flavor. Peanut oil is another excellent option if you don’t have allergies. It has a high smoke point and fries very cleanly. Avoid oils like olive oil or butter. They have lower smoke points and strong flavors that will overwhelm the simple, sweet taste of the bites.
Can I bake these instead of frying them?
Yes, you can bake them for a lighter version. Preheat your oven to 375°F. Line a baking sheet with parchment paper. Use a small cookie scoop to drop mounds of batter onto the sheet, spacing them apart. Lightly spray the tops with cooking spray. Bake for 12-15 minutes until they are puffed and golden brown. They won’t be as crispy as the fried version, but they will be soft, cakey, and delicious. It’s a great way to satisfy the craving with less mess and oil.
My batter seems too thick. Is that right?
Yes, that’s perfect! The batter should be quite thick, similar to a very heavy pancake or muffin batter. It should slowly drop off a spoon rather than pour. If it’s so thick it won’t drop at all, you can add a tiny splash more milk, one tablespoon at a time. But be careful. You want it thick so it holds its shape in the hot oil. A runny batter will spread out and make flat, lacy chips instead of plump, bite-sized puffs.
How do I know when the oil is hot enough without a thermometer?
If you don’t have a thermometer
Equipment
- Deux bols à mélanger
- Fouet
- Spatule
- Casserole profonde
- Louche à trous
Ingredients
- 1 tasse farine tout usage
- 1 c. à soupe sucre cristallisé
- 1 c. à café poudre à lever
- 1/4 c. à café sel
- 1 oeuf oeuf
- 3/4 tasse lait
- 1/2 c. à café extrait de vanille
- q.s. huile pour la friture végétale ou de colza
- q.s. sucre glace pour saupoudrer
Instructions
- Dans un grand bol, fouetter ensemble la farine, le sucre, la poudre à lever et le sel.
- Dans un autre bol, fouetter l'œuf, le lait et l'extrait de vanille jusqu'à obtenir un mélange lisse.
- Faire un puits dans les ingrédients secs, puis verser les ingrédients humides et mélanger jusqu'à ce qu'ils soient juste combinés.
- Chauffer environ 5 cm d'huile dans une casserole ou une poêle épaisse à 175°C.
- Déposer de petites cuillerées de pâte dans l'huile chaude, en les faisant frémir par petites quantités pendant 2-3 minutes jusqu'à ce qu'elles soient dorées.
- Utiliser une cuillère à trous pour transférer les bouchées frites sur une assiette tapissée de papier absorbant, et saupoudrer de sucre glace pendant qu'elles sont chaudes.
Notes
Nutrition

Hi, I’m Olivia Parker, the founder of BakingSecret.com and a lifelong lover of all things sweet and homemade. I grew up in a small town in Oregon, where the smell of fresh cookies in my family’s kitchen sparked my passion for baking. Over the years, I turned that passion into a mission: to help home bakers feel confident, inspired, and creative.
After studying food science and working in several artisan bakeries across the U.S., I decided to create a space where everyone from beginners to seasoned bakers can find reliable recipes, expert tips, and a warm, welcoming community. BakingSecret.com is my way of sharing the magic of baking with the world. When I’m not testing new recipes, you’ll find me exploring farmers’ markets, collecting vintage cookbooks, or perfecting my sourdough technique.